
Owners Manual
Page 5
... Filter Function 126 Specifying Outline Sharpness 126 Specifying Color Saturation 127 Specifying Contrast 127 Resetting the Camera 128 129 PLAYBACK Basic Playback Operation 129 Playing an Audio Snapshot 130 Zooming the Display Image 131 Resizing an Image 132 Cropping an Image 133 Playing and Editing a ...Deleting a Single File 157 Deleting All Files 158 159 FILE MANAGEMENT Folders 159 Memory Folders and Files 159 Protecting Files 160 To protect a single file 160 To protect all files in memory 161 Using the FAVORITE Folder 161 To copy a file to the FAVORITE ...
... Filter Function 126 Specifying Outline Sharpness 126 Specifying Color Saturation 127 Specifying Contrast 127 Resetting the Camera 128 129 PLAYBACK Basic Playback Operation 129 Playing an Audio Snapshot 130 Zooming the Display Image 131 Resizing an Image 132 Cropping an Image 133 Playing and Editing a ...Deleting a Single File 157 Deleting All Files 158 159 FILE MANAGEMENT Folders 159 Memory Folders and Files 159 Protecting Files 160 To protect a single file 160 To protect all files in memory 161 Using the FAVORITE Folder 161 To copy a file to the FAVORITE ...

Owners Manual
Page 6
... Changing the USB Port Protocol 172 Configuring [ ] (REC) and [ ] (PLAY) Power On/Off Functions 173 Formatting Built-in Memory 174 175 USING A MEMORY CARD Using a Memory Card 176 To insert a memory card into the camera 176 To replace the memory card 177 Formatting a Memory Card 178 Copying Files 179 To copy all the files in built-in...
... Changing the USB Port Protocol 172 Configuring [ ] (REC) and [ ] (PLAY) Power On/Off Functions 173 Formatting Built-in Memory 174 175 USING A MEMORY CARD Using a Memory Card 176 To insert a memory card into the camera 176 To replace the memory card 177 Formatting a Memory Card 178 Copying Files 179 To copy all the files in built-in...

Owners Manual
Page 7
INTRODUCTION 193 VIEWING IMAGES ON A COMPUTER Using the Camera with a Windows Computer ......... 193 Using the Camera with a Macintosh Computer ....... 200 Using a Memory Card to Transfer Images to a Computer 204 Memory Data 205 DCF Protocol 205 Memory Folder Structure 206 Image Files Supported by the Camera 207 224 APPENDIX Menu Reference 224 Indicator Lamp Reference 227 Troubleshooting Guide...
INTRODUCTION 193 VIEWING IMAGES ON A COMPUTER Using the Camera with a Windows Computer ......... 193 Using the Camera with a Macintosh Computer ....... 200 Using a Memory Card to Transfer Images to a Computer 204 Memory Data 205 DCF Protocol 205 Memory Folder Structure 206 Image Files Supported by the Camera 207 224 APPENDIX Menu Reference 224 Indicator Lamp Reference 227 Troubleshooting Guide...

Owners Manual
Page 10
... (page 113) Use this mode to play whenever you turn on the camera's monitor screen. Each day of the full-month calendar shows a thumbnail ... screen (page 146) A simple operation displays a full-month calendar on the camera, press the shutter button half-way or all the way, or perform a key...matches the type of image you are trying to record and the camera performs troublesome setups automatically for beautiful images every time. • ... automatically plays back images in sequence at a fixed interval. • Connect the camera to a TV with audio (page 109) VGA size, 28 fps, Motion JPEG...
... (page 113) Use this mode to play whenever you turn on the camera's monitor screen. Each day of the full-month calendar shows a thumbnail ... screen (page 146) A simple operation displays a full-month calendar on the camera, press the shutter button half-way or all the way, or perform a key...matches the type of image you are trying to record and the camera performs troublesome setups automatically for beautiful images every time. • ... automatically plays back images in sequence at a fixed interval. • Connect the camera to a TV with audio (page 109) VGA size, 28 fps, Motion JPEG...

Owners Manual
Page 15
...fall, creating the risk of fire and electric shock. - INTRODUCTION I Disassembly and Modification • Never try to take the camera apart or modify it in camera memory by transferring it to a computer or other storage device. Food preparation areas or other personal injury. Doing so can be deleted... case of locations. Note that comes with the camera. Doing so creates the risk of personal injury. I Backing Up Important Data • Always keep backup copies of humidity or dust - Areas subject to your dealer or nearest CASIO authorized service center. Be sure to leave all...
...fall, creating the risk of fire and electric shock. - INTRODUCTION I Disassembly and Modification • Never try to take the camera apart or modify it in camera memory by transferring it to a computer or other storage device. Food preparation areas or other personal injury. Doing so can be deleted... case of locations. Note that comes with the camera. Doing so creates the risk of personal injury. I Backing Up Important Data • Always keep backup copies of humidity or dust - Areas subject to your dealer or nearest CASIO authorized service center. Be sure to leave all...

Owners Manual
Page 19
...batteries. Data Error Precautions • Your digital camera is recommended. Actual battery life is still flashing after you could use alkaline batteries when there are not using precision digital components. Removing the batteries or memory card from the camera, or connecting the USB cable to ...malfunction of the camera. Other abnormal operations Any of the above conditions can lead to the camera while the operation lamp is ...
...batteries. Data Error Precautions • Your digital camera is recommended. Actual battery life is still flashing after you could use alkaline batteries when there are not using precision digital components. Removing the batteries or memory card from the camera, or connecting the USB cable to ...malfunction of the camera. Other abnormal operations Any of the above conditions can lead to the camera while the operation lamp is ...

Owners Manual
Page 24
... Snapshot mode icon Green operation lamp 3 13 4 Focus frame 2 Before using the camera's formatting procedure. Point the camera at the subject, use the monitor screen or viewfinder to first format it using a commercially available memory card, be sure to compose the image, and then press the shutter button half ...way. • When the camera finishes its Auto Focus operation, the focus frame will turn green and the...
... Snapshot mode icon Green operation lamp 3 13 4 Focus frame 2 Before using the camera's formatting procedure. Point the camera at the subject, use the monitor screen or viewfinder to first format it using a commercially available memory card, be sure to compose the image, and then press the shutter button half ...way. • When the camera finishes its Auto Focus operation, the focus frame will turn green and the...

Owners Manual
Page 26
... image or on the monitor screen, which makes the image look grainy. This term as used in this manual: "camera" "file memory" "batteries" "a REC mode" Means this: The CASIO EX-Z120 Digital Camera The location where the camera is currently storing images you record (page 57) The AA-size alkaline batteries The currently selected recording mode (Snapshot, BEST...
... image or on the monitor screen, which makes the image look grainy. This term as used in this manual: "camera" "file memory" "batteries" "a REC mode" Means this: The CASIO EX-Z120 Digital Camera The location where the camera is currently storing images you record (page 57) The AA-size alkaline batteries The currently selected recording mode (Snapshot, BEST...

Owners Manual
Page 27
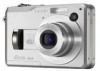
... I Front 23 45 6 1 1 Zoom controller 2 Shutter button 3 Power button 4 Flash 5 Finder 6 Microphone 7 Lens 8 Self-timer lamp 87 27 File memory can be any one of each component, button, and switch on the camera. General Guide The following illustrations show the names of the following three locations. • The camera's built-in memory • An SD...
... I Front 23 45 6 1 1 Zoom controller 2 Shutter button 3 Power button 4 Flash 5 Finder 6 Microphone 7 Lens 8 Self-timer lamp 87 27 File memory can be any one of each component, button, and switch on the camera. General Guide The following illustrations show the names of the following three locations. • The camera's built-in memory • An SD...

Owners Manual
Page 31
...-timer, REC modes, EV shift 31 GETTING READY 7 Metering mode indicator (page 124) Multi Center Weighted Spot 8 • Snapshots: Image size (page 77) 9 • Snapshots: Memory capacity (pages 59, 238) • Movies: Remaining recording time (page 111) 0 • Snapshots: Image quality (page 78) F : Fine N : Normal E : Economy • Movies: Image quality (page...
...-timer, REC modes, EV shift 31 GETTING READY 7 Metering mode indicator (page 124) Multi Center Weighted Spot 8 • Snapshots: Image size (page 77) 9 • Snapshots: Memory capacity (pages 59, 238) • Movies: Remaining recording time (page 111) 0 • Snapshots: Image quality (page 78) F : Fine N : Normal E : Economy • Movies: Image quality (page...

Owners Manual
Page 57
...record are stored on the card (page 175). This is especially important when available lighting is loaded in the camera, images are stored in the camera's built-in memory, or to a memory card if you press the shutter button half way) can cause blurring of the subject. Recording an Image ...(Snapshot Mode) Your camera automatically adjusts shutter speed in the camera. • When an optionally available SD memory card or MultiMediaCard (MMC) is low, which slows down the shutter speed. Press the shutter button ...
...record are stored on the card (page 175). This is especially important when available lighting is loaded in the camera, images are stored in the camera's built-in memory, or to a memory card if you press the shutter button half way) can cause blurring of the subject. Recording an Image ...(Snapshot Mode) Your camera automatically adjusts shutter speed in the camera. • When an optionally available SD memory card or MultiMediaCard (MMC) is low, which slows down the shutter speed. Press the shutter button ...

Owners Manual
Page 58
... turn on the monitor screen so the main subject is selected. Snapshot mode icon Focus frame 3. Compose the image on the camera. will be visible at the top of the camera depends on focus mode you are no files." Align the mode dial with " " (Snapshot mode) (page 55). • The (...page 79). • You can use [DISP] to appear on the monitor screen, and then enters the currently selected recording mode. • If the camera is in memory yet. If this happens, press [ ] (REC) to turn off the monitor screen and conserve battery power. 58 In addition, the icon will appear if...
... turn on the monitor screen so the main subject is selected. Snapshot mode icon Focus frame 3. Compose the image on the camera. will be visible at the top of the camera depends on focus mode you are no files." Align the mode dial with " " (Snapshot mode) (page 55). • The (...page 79). • You can use [DISP] to appear on the monitor screen, and then enters the currently selected recording mode. • If the camera is in memory yet. If this happens, press [ ] (REC) to turn off the monitor screen and conserve battery power. 58 In addition, the icon will appear if...

Owners Manual
Page 59
... in focus. • The monitor screen uses various indicators and icons to keep you informed of the camera's status. Continuous Shutter mode White balance Focus mode Flash mode Self-timer REC modes Metering mode indicator Memory capacity (Snapshots) Image quality (Snapshots) Image size (Snapshots) EV shift Date and time ISO sensitivity Aperture...
... in focus. • The monitor screen uses various indicators and icons to keep you informed of the camera's status. Continuous Shutter mode White balance Focus mode Flash mode Self-timer REC modes Metering mode indicator Memory capacity (Snapshots) Image quality (Snapshots) Image size (Snapshots) EV shift Date and time ISO sensitivity Aperture...

Owners Manual
Page 62
... stored in images of relatively dark subjects. 62 After making the menu settings you may experience some digital noise (graininess) to appear in file memory and even lead to the memory card. • Fluorescent lighting actually flickers at a frequency that cannot be detected by the human eye...Recording Precautions • Never open the battery cover while the green operation lamp is being recorded to malfunction of the subject. When using the camera indoors under such lighting, you want, select "Exit Menu" and then press [SET]. • See the following sections for the ISO...
... stored in images of relatively dark subjects. 62 After making the menu settings you may experience some digital noise (graininess) to appear in file memory and even lead to the memory card. • Fluorescent lighting actually flickers at a frequency that cannot be detected by the human eye...Recording Precautions • Never open the battery cover while the green operation lamp is being recorded to malfunction of the subject. When using the camera indoors under such lighting, you want, select "Exit Menu" and then press [SET]. • See the following sections for the ISO...
Owners Manual
Page 64
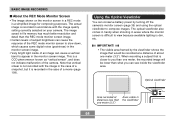
...compose images. This is dim, etc. IMPORTANT! • The visible area framed by turning off the camera's monitor screen (page 35) and using the optical viewfinder to slow down, which causes some digital noise (graininess) in the monitor screen image. • Very bright light inside the viewfinder area. Using... when shooting in accordance with the image in the case of the camera. The actual image is recorded in areas where the monitor screen is difficult to appear in a REC mode is recorded in file memory has much better resolution and detail than the viewfinder one meter, the...
...compose images. This is dim, etc. IMPORTANT! • The visible area framed by turning off the camera's monitor screen (page 35) and using the optical viewfinder to slow down, which causes some digital noise (graininess) in the monitor screen image. • Very bright light inside the viewfinder area. Using... when shooting in accordance with the image in the case of the camera. The actual image is recorded in areas where the monitor screen is difficult to appear in a REC mode is recorded in file memory has much better resolution and detail than the viewfinder one meter, the...

Owners Manual
Page 75
The amount of memory (built-in the sequence described below. The camera performs a 10-second countdown and then records the first image. 2. After preparation is complete, the indicator "1sec" appears on the monitor screen. • With the Triple Self-timer, the camera records a series of three images ... once more to appear on the monitor screen, and another image is charging. 3. Steps 2 and 3 are using for preparation depends on the camera's current "Size" and "Quality" settings, the type of time required for image storage, and whether or not the flash is recorded one second...
The amount of memory (built-in the sequence described below. The camera performs a 10-second countdown and then records the first image. 2. After preparation is complete, the indicator "1sec" appears on the monitor screen. • With the Triple Self-timer, the camera records a series of three images ... once more to appear on the monitor screen, and another image is charging. 3. Steps 2 and 3 are using for preparation depends on the camera's current "Size" and "Quality" settings, the type of time required for image storage, and whether or not the flash is recorded one second...

Owners Manual
Page 77
...at a maximum image size (7M) is the image size you plan to produce a larger size print. • In order to suit your camera is designed, recording at a higher resolution or when you select. The print size indicates the optimum paper size when you print an image that this... setting is printed, but a higher pixel count also causes the image's file size to conserve memory capacity. • Selecting the "3072 × 2048 (3:2)" image size records images with a 3:2 (horizontal:vertical) aspect ratio, which your needs for which is...
...at a maximum image size (7M) is the image size you plan to produce a larger size print. • In order to suit your camera is designed, recording at a higher resolution or when you select. The print size indicates the optimum paper size when you print an image that this... setting is printed, but a higher pixel count also causes the image's file size to conserve memory capacity. • Selecting the "3072 × 2048 (3:2)" image size records images with a 3:2 (horizontal:vertical) aspect ratio, which your needs for which is...

Owners Manual
Page 78
... Compressing an image before storage can select an image quality setting to suit your needs for snapshots only. The more an image is stored in memory. The image quality setting specifies the compression ratio to select the setting you record.
... Compressing an image before storage can select an image quality setting to suit your needs for snapshots only. The more an image is stored in memory. The image quality setting specifies the compression ratio to select the setting you record.

Owners Manual
Page 97
...;] and [̄] to select "On", and then press [SET]. • This causes " " to appear on the type of memory card loaded in memory, continuous shutter recording is relatively slow. • Turning off the camera automatically turns off the Continuous Shutter mode. 97 C OTHER RECORDING FUNCTIONS Recording Consecutive Images (Continuous Shutter Mode) You can...
...;] and [̄] to select "On", and then press [SET]. • This causes " " to appear on the type of memory card loaded in memory, continuous shutter recording is relatively slow. • Turning off the camera automatically turns off the Continuous Shutter mode. 97 C OTHER RECORDING FUNCTIONS Recording Consecutive Images (Continuous Shutter Mode) You can...

Owners Manual
Page 101
... you recorded as a BEST SHOT scene. 4. IMPORTANT! • BEST SHOT user setups are located in the camera's built-in memory following the built-in sample scenes. • Selecting a user snapshot setup displays the indicator "U" in memory (page 174) deletes all BEST SHOT user setups. 101 In a REC mode, align the mode dial with...
... you recorded as a BEST SHOT scene. 4. IMPORTANT! • BEST SHOT user setups are located in the camera's built-in memory following the built-in sample scenes. • Selecting a user snapshot setup displays the indicator "U" in memory (page 174) deletes all BEST SHOT user setups. 101 In a REC mode, align the mode dial with...


