
Owners Manual
Page 2
Digital camera Rechargeable lithium ion battery (NP-40) Charger unit (BC-31L) To attach the strap to make sure that all items shown below are included. Power cord Strap USB cable AV cable CD-ROM Basic Reference 2 If anything is missing, contact your camera, check to the camera Attach strap here. Unpacking As you unpack your original retailer.
Digital camera Rechargeable lithium ion battery (NP-40) Charger unit (BC-31L) To attach the strap to make sure that all items shown below are included. Power cord Strap USB cable AV cable CD-ROM Basic Reference 2 If anything is missing, contact your camera, check to the camera Attach strap here. Unpacking As you unpack your original retailer.

Owners Manual
Page 4
...digital camera 9 What you can do with your CASIO camera 10 First, charge the battery prior to use 11 ❚ To charge the battery 11 ❚ To load the battery 12 Configuring the Display Language the First Time You Turn On the Camera... Precautions 21 ❚ Auto Focus Restrictions 21 Turning the Camera On and Off 22 ❚ To turn power on 22 ❚ To turn off the camera 22 ❚❙ Snapshot Tutorial 23 Using the Control ... 41 Changing the Control Panel Date/Time Style 42 Shooting with Zoom 42 ❚ Optical Zoom and Digital Zoom Switch Point 43 B 4 Contents
...digital camera 9 What you can do with your CASIO camera 10 First, charge the battery prior to use 11 ❚ To charge the battery 11 ❚ To load the battery 12 Configuring the Display Language the First Time You Turn On the Camera... Precautions 21 ❚ Auto Focus Restrictions 21 Turning the Camera On and Off 22 ❚ To turn power on 22 ❚ To turn off the camera 22 ❚❙ Snapshot Tutorial 23 Using the Control ... 41 Changing the Control Panel Date/Time Style 42 Shooting with Zoom 42 ❚ Optical Zoom and Digital Zoom Switch Point 43 B 4 Contents

Owners Manual
Page 5
... ❚ Using Auto Shutter Auto Shutter) . . . 66 ❚ Shooting with Face Recognition Face Recognition) . . . 66 ❚ Reducing the Effects of Camera and Subject Movement . . . . (Anti Shake) . . . 67 ❚ Specifying the Auto Focus Area AF Area) . . . 68 ❚ Using...10074; Displaying the On-screen Grid Grid) . . . 71 ❚ Turning Digital Zoom On or Off Digital Zoom) . . . 71 ❚ Turning on Image Review Review) . . . 71 ❚ Using Icon Help Icon Help) . . . 71 ❚ Configuring Power On Default Settings Memory) . . . 72 Image Quality Settings Quality) . ....
... ❚ Using Auto Shutter Auto Shutter) . . . 66 ❚ Shooting with Face Recognition Face Recognition) . . . 66 ❚ Reducing the Effects of Camera and Subject Movement . . . . (Anti Shake) . . . 67 ❚ Specifying the Auto Focus Area AF Area) . . . 68 ❚ Using...10074; Displaying the On-screen Grid Grid) . . . 71 ❚ Turning Digital Zoom On or Off Digital Zoom) . . . 71 ❚ Turning on Image Review Review) . . . 71 ❚ Using Icon Help Icon Help) . . . 71 ❚ Configuring Power On Default Settings Memory) . . . 72 Image Quality Settings Quality) . ....

Owners Manual
Page 7
... a Memory Card Format) . 136 Resetting the Camera to Factory Defaults Reset) . 136 ❚❙ Configuring Monitor Screen Settings 137 Using the On-screen Histogram to Check Exposure Histogram) . 137 ❚ How to Use the Histogram 138 ❚❙ Appendix 139 Precautions during Use 139 Power Supply 148 ❚ Charging 148 ❚ To...
... a Memory Card Format) . 136 Resetting the Camera to Factory Defaults Reset) . 136 ❚❙ Configuring Monitor Screen Settings 137 Using the On-screen Histogram to Check Exposure Histogram) . 137 ❚ How to Use the Histogram 138 ❚❙ Appendix 139 Precautions during Use 139 Power Supply 148 ❚ Charging 148 ❚ To...

Owners Manual
Page 10
... page 50 for more information. See page 32 for more information. Then all you need do with your CASIO camera Your CASIO camera is packed with a powerful selection of features and functions to make recording of digital images easier, including the following three main functions. BEST SHOT Simply select the sample scene you want and the...
... page 50 for more information. See page 32 for more information. Then all you need do with your CASIO camera Your CASIO camera is packed with a powerful selection of features and functions to make recording of digital images easier, including the following three main functions. BEST SHOT Simply select the sample scene you want and the...

Owners Manual
Page 11
...due to normal use it is not loaded in unexpected accident. • A battery that the battery of the charger unit, load the battery into a household power outlet. If this , it . • Charging the camera's battery may not charge fully. Attempting to use may cause interference with those of a newly purchased... charging is not charged. Perform the steps under "To charge the battery" to bring the battery to use a different charger can result in the camera. Never try to a full charge. • Your camera requires a special CASIO rechargeable lithium ion battery (NP-40) for...
...due to normal use it is not loaded in unexpected accident. • A battery that the battery of the charger unit, load the battery into a household power outlet. If this , it . • Charging the camera's battery may not charge fully. Attempting to use may cause interference with those of a newly purchased... charging is not charged. Perform the steps under "To charge the battery" to bring the battery to use a different charger can result in the camera. Never try to a full charge. • Your camera requires a special CASIO rechargeable lithium ion battery (NP-40) for...

Owners Manual
Page 12
...capacity. Charge the battery as soon as you slide the battery into the camera. You will cause its date and time settings to turn off the camera (pages 133, 134). 12 Quick Start Basics Battery Power Conservation Tips • When you do not need to use the flash,...OPEN and then open it in the illustration. 2 2. Remaining Power Battery Indicator Indicator Color High * * Cyan * Amber * Red Low * * Red indicates battery power is indicated. With the EXILIM logo on the monitor screen indicates remaining power as indicated by the battery indicator may change when you forget ...
...capacity. Charge the battery as soon as you slide the battery into the camera. You will cause its date and time settings to turn off the camera (pages 133, 134). 12 Quick Start Basics Battery Power Conservation Tips • When you do not need to use the flash,...OPEN and then open it in the illustration. 2 2. Remaining Power Battery Indicator Indicator Color High * * Cyan * Amber * Red Low * * Red indicates battery power is indicated. With the EXILIM logo on the monitor screen indicates remaining power as indicated by the battery indicator may change when you forget ...

Owners Manual
Page 22
If you are entering the REC mode, the lens will extend from the camera at this time. • Take care to turn off the camera Press [ON/OFF] (Power). • You can configure the camera to ensure that nothing is restricting or coming into contact with your hand so it extends. The ...perform any operation for a preset amount of malfunction. • Pressing [p] (PLAY) while in the REC mode switches to the PLAY mode. Turning the Camera On and Off To turn power on when you press [r] (REC) or [p] (PLAY). To enter the PLAY mode, press [p] (PLAY). The back lamp will light (green)...
If you are entering the REC mode, the lens will extend from the camera at this time. • Take care to turn off the camera Press [ON/OFF] (Power). • You can configure the camera to ensure that nothing is restricting or coming into contact with your hand so it extends. The ...perform any operation for a preset amount of malfunction. • Pressing [p] (PLAY) while in the REC mode switches to the PLAY mode. Turning the Camera On and Off To turn power on when you press [r] (REC) or [p] (PLAY). To enter the PLAY mode, press [p] (PLAY). The back lamp will light (green)...

Owners Manual
Page 31
... Shake (page 67) reduces the chance of image blur even more. • While recording with Detect Blur or Detect Smile, keep the camera as still as possible until the recording operation is being performed (indicated by pressing the shutter button all the way down again. • ...this happens, change the trigger sensitivity setting. • The Auto Power Off (page 134) trigger time is fixed at five minutes while the camera is being used in Auto Shutter standby. Triple Self-timer - IMPORTANT! • If the camera remains in Auto Shutter standby without releasing the shutter, you may ...
... Shake (page 67) reduces the chance of image blur even more. • While recording with Detect Blur or Detect Smile, keep the camera as still as possible until the recording operation is being performed (indicated by pressing the shutter button all the way down again. • ...this happens, change the trigger sensitivity setting. • The Auto Power Off (page 134) trigger time is fixed at five minutes while the camera is being used in Auto Shutter standby. Triple Self-timer - IMPORTANT! • If the camera remains in Auto Shutter standby without releasing the shutter, you may ...

Owners Manual
Page 58
... when shooting in areas where lighting is dim, which results in combination with a continuous shutter (CS) mode (page 38). IMPORTANT! • If the camera remains in Auto Shutter standby without releasing the shutter, you can shoot with the self-portrait feature in a very slow shutter speed setting. • The... Auto Power Off (page 134) trigger time is fixed at five minutes while the camera is disabled while Auto Shutter being used. 58 Using BEST SHOT NOTE • You can record an image by...
... when shooting in areas where lighting is dim, which results in combination with a continuous shutter (CS) mode (page 38). IMPORTANT! • If the camera remains in Auto Shutter standby without releasing the shutter, you can shoot with the self-portrait feature in a very slow shutter speed setting. • The... Auto Power Off (page 134) trigger time is fixed at five minutes while the camera is disabled while Auto Shutter being used. 58 Using BEST SHOT NOTE • You can record an image by...

Owners Manual
Page 72
...memory items. B 72 Advanced Settings Setting b BEST SHOT Auto Shutter Flash Focus White Balance ISO AF Area Metering Continuous Self-timer Flash Intensity Digital Zoom MF Position Zoom Position* Disabled (Initial Default Setting) Snapshot (Auto) Off Auto AF (Auto Focus) Auto Auto Spot Multi Off Off 0 On Position ...before manual focus was selected. Full wide Enabled Setting at power off * Optical zoom setting only. • If you turn the camera power off and then back on while the BEST SHOT memory item is disabled will be returned to its initial ...
...memory items. B 72 Advanced Settings Setting b BEST SHOT Auto Shutter Flash Focus White Balance ISO AF Area Metering Continuous Self-timer Flash Intensity Digital Zoom MF Position Zoom Position* Disabled (Initial Default Setting) Snapshot (Auto) Off Auto AF (Auto Focus) Auto Auto Spot Multi Off Off 0 On Position ...before manual focus was selected. Full wide Enabled Setting at power off * Optical zoom setting only. • If you turn the camera power off and then back on while the BEST SHOT memory item is disabled will be returned to its initial ...

Owners Manual
Page 84
..." or "Power On/Off" (page 134). • Audio is monaural. • Certain TVs may cut off part of the images. • Before connecting to a TV to display images, be sure to configure the camera's [r] (REC) and [p] (PLAY) buttons for the slideshow "Images" setting (page 85). You can play a slideshow ...the TV volume control at maximum volume. When recording images to an external device, use [8] (DISP) to the VIDEO IN and AUDIO IN terminals. - Camera: USB/AV port You can use [8] (DISP) to record, see the user documentation that appear on the monitor screen also appear on a DVD or ...
..." or "Power On/Off" (page 134). • Audio is monaural. • Certain TVs may cut off part of the images. • Before connecting to a TV to display images, be sure to configure the camera's [r] (REC) and [p] (PLAY) buttons for the slideshow "Images" setting (page 85). You can play a slideshow ...the TV volume control at maximum volume. When recording images to an external device, use [8] (DISP) to the VIDEO IN and AUDIO IN terminals. - Camera: USB/AV port You can use [8] (DISP) to record, see the user documentation that appear on the monitor screen also appear on a DVD or ...

Owners Manual
Page 102
... connector as shown in Making sure that you insert the cable connector into place. Failure to insert the connector fully can connect the camera directly to a printer that even while the connector is fully inserted, you still will be able to see the metal part of..." tab, select "USB" and then press [6]. 3. Make sure the camera's USB port battery is aligned with the USB cable camera to connect the camera to your printer's USB Large connector port. • The camera does not draw USB power over the USB cable. poor communication or malfunction. • Note that ...
... connector as shown in Making sure that you insert the cable connector into place. Failure to insert the connector fully can connect the camera directly to a printer that even while the connector is fully inserted, you still will be able to see the metal part of..." tab, select "USB" and then press [6]. 3. Make sure the camera's USB port battery is aligned with the USB cable camera to connect the camera to your printer's USB Large connector port. • The camera does not draw USB power over the USB cable. poor communication or malfunction. • Note that ...

Owners Manual
Page 110
... USB driver from the Official CASIO Digital Camera Website at http://www.exilim.com/ If your computer is running Windows 98SE or 98, never connect the camera to your computer without installing the USB driver first. . Large connector • The camera does not draw power over the USB cable. Turn on the camera and press [MENU]. 2. Turn off...
... USB driver from the Official CASIO Digital Camera Website at http://www.exilim.com/ If your computer is running Windows 98SE or 98, never connect the camera to your computer without installing the USB driver first. . Large connector • The camera does not draw power over the USB cable. Turn on the camera and press [MENU]. 2. Turn off...
Owners Manual
Page 120
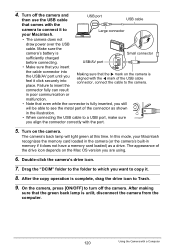
...In this time. On the camera, press [ON/OFF] to the camera. USB/AV port • Make sure that the green back lamp is complete, drag the drive icon to copy it click securely into place. Large connector • The camera does not draw power over the USB cable. ...Failure to insert the Making sure that the 6 mark on the camera is Small connector sufficiently charged before connecting. connector fully can result in the illustration. ...
...In this time. On the camera, press [ON/OFF] to the camera. USB/AV port • Make sure that the green back lamp is complete, drag the drive icon to copy it click securely into place. Large connector • The camera does not draw power over the USB cable. ...Failure to insert the Making sure that the 6 mark on the camera is Small connector sufficiently charged before connecting. connector fully can result in the illustration. ...

Owners Manual
Page 127
... displayed horizontally. This setting consumes more quickly than 0. Brightness that is greater than +1, which makes the screen easier to a brighter setting more power. Wide With this setting, the camera detects available light levels and automatically adjusts the brightness of the display image is the maximum possible size that allows the entire image...
... displayed horizontally. This setting consumes more quickly than 0. Brightness that is greater than +1, which makes the screen easier to a brighter setting more power. Wide With this setting, the camera detects available light levels and automatically adjusts the brightness of the display image is the maximum possible size that allows the entire image...

Owners Manual
Page 133
... (Sleep) Procedure [MENU] * Set Up Tab * Sleep This feature turns off the monitor screen whenever no camera operation is connected to turn the monitor screen back on , Auto Power Off takes priority. 133 Other Settings (Set Up) Specifying the Display Language (Language) Procedure [MENU] * Set... Up Tab * Language . Press any of the following conditions. • In the PLAY Mode • While the camera is performed for a preset amount...
... (Sleep) Procedure [MENU] * Set Up Tab * Sleep This feature turns off the monitor screen whenever no camera operation is connected to turn the monitor screen back on , Auto Power Off takes priority. 133 Other Settings (Set Up) Specifying the Display Language (Language) Procedure [MENU] * Set... Up Tab * Language . Press any of the following conditions. • In the PLAY Mode • While the camera is performed for a preset amount...

Owners Manual
Page 134
... [r] (REC) in the REC mode or [p] (PLAY) in the PLAY mode.) Auto Power Off is disabled under any of the following conditions. • While the camera is connected to a TV for a preset amount of time. Camera turns on or off whenever [r] (REC) or [p] (PLAY) is pressed. Trigger Time ... or recording • During movie recording and playback Configuring [r] and [p] Settings (REC/PLAY) Procedure [MENU] * Set Up Tab * REC/PLAY Power On Power On/Off Disable Camera turns on whenever [r] (REC) or [p] (PLAY) is performed for image viewing. 134 Other Settings (Set Up) Configuring Auto...
... [r] (REC) in the REC mode or [p] (PLAY) in the PLAY mode.) Auto Power Off is disabled under any of the following conditions. • While the camera is connected to a TV for a preset amount of time. Camera turns on or off whenever [r] (REC) or [p] (PLAY) is pressed. Trigger Time ... or recording • During movie recording and playback Configuring [r] and [p] Settings (REC/PLAY) Procedure [MENU] * Set Up Tab * REC/PLAY Power On Power On/Off Disable Camera turns on whenever [r] (REC) or [p] (PLAY) is performed for image viewing. 134 Other Settings (Set Up) Configuring Auto...

Owners Manual
Page 136
...before starting a formatting operation. Pre-recorded face data for details about the camera's factory default settings. The settings below are not reset. Resetting the Camera to stop operating normally if the camera powers down while formatting is in memory will delete the following data. - It... cannot be performed correctly and the camera may stop operating normally. Protected images • Make...
...before starting a formatting operation. Pre-recorded face data for details about the camera's factory default settings. The settings below are not reset. Resetting the Camera to stop operating normally if the camera powers down while formatting is in memory will delete the following data. - It... cannot be performed correctly and the camera may stop operating normally. Protected images • Make...

Owners Manual
Page 142
... affected by ambient temperature, battery storage conditions, the amount of time spent in the camera can run down the battery and cause the low battery warning to low battery power when being powered by the special battery under normal temperature (23°C (73°F)). Leaving a ... abnormal condition while using, charging, or storing a battery, immediately remove it from the camera or charger unit and keep it away from a battery accidentally get onto clothing or your local CASIO authorized service center. Battery Life • Battery continuous operation times provided in any other...
... affected by ambient temperature, battery storage conditions, the amount of time spent in the camera can run down the battery and cause the low battery warning to low battery power when being powered by the special battery under normal temperature (23°C (73°F)). Leaving a ... abnormal condition while using, charging, or storing a battery, immediately remove it from the camera or charger unit and keep it away from a battery accidentally get onto clothing or your local CASIO authorized service center. Battery Life • Battery continuous operation times provided in any other...


