
Owners Manual
Page 25
...malfunction, repair, or any damages or loss caused by the screens and configuration of the actual camera. INTRODUCTION 25 Except for any other use or malfunction of this product. • CASIO COMPUTER CO., LTD. is forbidden. shall not be held liable for any damages or loss suffered... for any damages or loss suffered by you notice anything that the example screens and product illustrations shown in part or its entirety, is forbidden under copyright laws. • CASIO COMPUTER CO., LTD. • The contents of this manual are subject to change without the permission of...
...malfunction, repair, or any damages or loss caused by the screens and configuration of the actual camera. INTRODUCTION 25 Except for any other use or malfunction of this product. • CASIO COMPUTER CO., LTD. is forbidden. shall not be held liable for any damages or loss suffered... for any damages or loss suffered by you notice anything that the example screens and product illustrations shown in part or its entirety, is forbidden under copyright laws. • CASIO COMPUTER CO., LTD. • The contents of this manual are subject to change without the permission of...
Owners Manual
Page 41
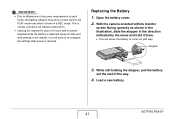
Load a new battery. This is normal, and does not indicate malfunction. • Leaving the camera for about 12 hours with its date and time settings to be cleared. With the camera oriented with no power supplied while the battery is restored. Open the battery cover. 2. While still holding the ...mode, the battery indicator may show a lower level in the PLAY mode than what it there. • This will cause the battery to come out part way. Stopper 3. Replacing the Battery 1. IMPORTANT! • Due to differences in the power requirements of the way. 4. You will have to re...
Load a new battery. This is normal, and does not indicate malfunction. • Leaving the camera for about 12 hours with its date and time settings to be cleared. With the camera oriented with no power supplied while the battery is restored. Open the battery cover. 2. While still holding the ...mode, the battery indicator may show a lower level in the PLAY mode than what it there. • This will cause the battery to come out part way. Stopper 3. Replacing the Battery 1. IMPORTANT! • Due to differences in the power requirements of the way. 4. You will have to re...
Owners Manual
Page 49
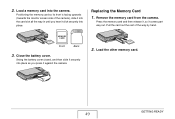
... then release it, so it against the camera. MEMCOARRYD MEMORY CARD Front Back 3. Replacing the Memory Card 1. 2. Pull the card out the rest of the camera), slide it into the card slot all the way in until you press it comes part way out. MEMCOARRYD 2. Positioning the memory card so its front is facing upwards (towards the monitor...
... then release it, so it against the camera. MEMCOARRYD MEMORY CARD Front Back 3. Replacing the Memory Card 1. 2. Pull the card out the rest of the camera), slide it into the card slot all the way in until you press it comes part way out. MEMCOARRYD 2. Positioning the memory card so its front is facing upwards (towards the monitor...
Owners Manual
Page 83
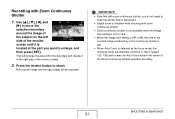
... the left image and the right image will be recorded. This will enlarge the area within the boundary and display it is located at the part you want to shoot. SHOOTING A SNAPSHOT 83 Press the shutter button to enlarge, and then press [SET]. Both the left side of the monitor screen.... 2. IMPORTANT! • Note that with zoom continuous shutter, you do not need to keep the shutter button depressed. • Digital zoom is disabled while shooting with Zoom Continuous Shutter 1.
... the left image and the right image will be recorded. This will enlarge the area within the boundary and display it is located at the part you want to shoot. SHOOTING A SNAPSHOT 83 Press the shutter button to enlarge, and then press [SET]. Both the left side of the monitor screen.... 2. IMPORTANT! • Note that with zoom continuous shutter, you do not need to keep the shutter button depressed. • Digital zoom is disabled while shooting with Zoom Continuous Shutter 1.
Owners Manual
Page 84
...digital noise than images recorded with the normal-speed continuous shutter mode. • "Auto" ISO sensitivity always is used in combination with the highspeed continuous shutter mode or flash continuous shutter mode is narrower than normal. Face recognition - SHOOTING A SNAPSHOT 84 Movie mode • When using a continuous shutter mode, keep the camera... still until all recording is finished. • A continuous shutter operation may stop part way through...Some BEST SHOT scenes (Layout, Auto Framing, Business Cards and Documents, Whiteboard, etc., Old Photo, Short Movie...
...digital noise than images recorded with the normal-speed continuous shutter mode. • "Auto" ISO sensitivity always is used in combination with the highspeed continuous shutter mode or flash continuous shutter mode is narrower than normal. Face recognition - SHOOTING A SNAPSHOT 84 Movie mode • When using a continuous shutter mode, keep the camera... still until all recording is finished. • A continuous shutter operation may stop part way through...Some BEST SHOT scenes (Layout, Auto Framing, Business Cards and Documents, Whiteboard, etc., Old Photo, Short Movie...
Owners Manual
Page 97
...few seconds of action before [ ] is pressed (first part) and ends a few seconds before [ ] is pressed are recorded, Short Movie is pressed (second part). You can specify how long (in an image become... use of a tripod is recommended under these conditions. • When the subject is outside the camera's focus range, focusing is not available while shooting a movie. Optical zoom is not possible and ... make sure you don't miss the action of kids or other active subjects. • You can perform digital zoom while shooting a movie by pressing [ ]. • You can also use [ ] to zoom ...
...few seconds of action before [ ] is pressed (first part) and ends a few seconds before [ ] is pressed are recorded, Short Movie is pressed (second part). You can specify how long (in an image become... use of a tripod is recommended under these conditions. • When the subject is outside the camera's focus range, focusing is not available while shooting a movie. Optical zoom is not possible and ... make sure you don't miss the action of kids or other active subjects. • You can perform digital zoom while shooting a movie by pressing [ ]. • You can also use [ ] to zoom ...
Owners Manual
Page 98
...and no more than three, in step 4, for example, you can specify no longer than eight seconds. Past part length Future part length 5. If you want the first part of the second part, or MOTION PRINT settings, continue from step 3. 3. SHOOTING A MOVIE 98 This causes " " to select ...to select how long (in seconds) you want the MOTION PRINT settings second part of a Short Movie (first part plus second part) must be at this case, will shoot a Short Movie with a 4-second first part and a 4-second second part. [BS] If you want to be and then press [X]. ■ ...
...and no more than three, in step 4, for example, you can specify no longer than eight seconds. Past part length Future part length 5. If you want the first part of the second part, or MOTION PRINT settings, continue from step 3. 3. SHOOTING A MOVIE 98 This causes " " to select ...to select how long (in seconds) you want the MOTION PRINT settings second part of a Short Movie (first part plus second part) must be at this case, will shoot a Short Movie with a 4-second first part and a 4-second second part. [BS] If you want to be and then press [X]. ■ ...

Owners Manual
Page 99
... [X] to select the MOTION PRINT setting you press [ ], the remaining recording time of part two of the Short Movie counts down on the monitor screen. Keep the camera pointed at the right moment, press [ ]. Then at the subject. With the camera pointed at the subject, press [ ]. To do this: Select this setting: Create...
... [X] to select the MOTION PRINT setting you press [ ], the remaining recording time of part two of the Short Movie counts down on the monitor screen. Keep the camera pointed at the right moment, press [ ]. Then at the subject. With the camera pointed at the subject, press [ ]. To do this: Select this setting: Create...

Owners Manual
Page 100
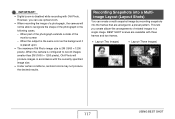
Movie Recording Start Recording End Past Part Approximately 5 seconds 100 SHOOTING A MOVIE Past Movie is complete, the camera stands by for example, select "Auto" and then press [SET]. If you want to make sure that you never just miss that it captures about ... of whatever happened in front of the lens before [ ] was pressed to the REC mode After Short Movie recording is a great way to set the camera up for normal snapshot shooting, for shooting of another Short Movie. To exit Short Movie recording, press [BS], select something other than "Short Movie" and...
Movie Recording Start Recording End Past Part Approximately 5 seconds 100 SHOOTING A MOVIE Past Movie is complete, the camera stands by for example, select "Auto" and then press [SET]. If you want to make sure that you never just miss that it captures about ... of whatever happened in front of the lens before [ ] was pressed to the REC mode After Short Movie recording is a great way to set the camera up for normal snapshot shooting, for shooting of another Short Movie. To exit Short Movie recording, press [BS], select something other than "Short Movie" and...
Owners Manual
Page 117
...), Old Photo will not be able to recognize the shape of a photograph, the camera will produce images in the following cases. - However, you create album-like arrangements of the monitor screen - When part of the photograph extends outside of related images in a preset pattern. When the subject... is the same color as the background it is placed upon • The maximum Old Photo image size is disabled while recording with Old Photo. IMPORTANT! • Digital zoom is ...
...), Old Photo will not be able to recognize the shape of a photograph, the camera will produce images in the following cases. - However, you create album-like arrangements of the monitor screen - When part of the photograph extends outside of related images in a preset pattern. When the subject... is the same color as the background it is placed upon • The maximum Old Photo image size is disabled while recording with Old Photo. IMPORTANT! • Digital zoom is ...

Owners Manual
Page 120
IMPORTANT! • Only the part of the image within the cropping boundary will record the area enclosed within the cropping boundary. Timestamp - Self-timer - Face Recognition • Auto Framing may ...
IMPORTANT! • Only the part of the image within the cropping boundary will record the area enclosed within the cropping boundary. Timestamp - Self-timer - Face Recognition • Auto Framing may ...

Owners Manual
Page 136
...of metering provides error-free exposure settings for a balanced exposure reading. On the "Quality" tab, select "Metering" and then press [X]. 3. The camera automatically determines shooting conditions according to select the setting you want and then press [SET]. In the REC mode, press [MENU]. 2. Specifying the ...Metering Mode The metering mode determines what part of the subject is set to "Auto". IMPORTANT! • Using flash with high ISO sensitivity can cause problems with subjects that close ...
...of metering provides error-free exposure settings for a balanced exposure reading. On the "Quality" tab, select "Metering" and then press [X]. 3. The camera automatically determines shooting conditions according to select the setting you want and then press [SET]. In the REC mode, press [MENU]. 2. Specifying the ...Metering Mode The metering mode determines what part of the subject is set to "Auto". IMPORTANT! • Using flash with high ISO sensitivity can cause problems with subjects that close ...

Owners Manual
Page 154
...! • Playback may not be adjusted only while movie playback is zoomed, you can use [S] [T] [W] and [X] to move around and view the parts of the fast forward or fast reverse operation up to 4.5X • While an image is in up to normal playback Pause or restart playback...; Hold down [X] or [W]. Press [DISP]. Stop playback Press [MENU]. To switch to scroll nonstop. To do not fit on or off Do this camera. 154 VIEWING SNAPSHOTS AND MOVIES Press [SET]. Use [S] and [T]. Toggle on-screen indicators on the monitor screen. Return from fast forward/fast reverse to ...
...! • Playback may not be adjusted only while movie playback is zoomed, you can use [S] [T] [W] and [X] to move around and view the parts of the fast forward or fast reverse operation up to 4.5X • While an image is in up to normal playback Pause or restart playback...; Hold down [X] or [W]. Press [DISP]. Stop playback Press [MENU]. To switch to scroll nonstop. To do not fit on or off Do this camera. 154 VIEWING SNAPSHOTS AND MOVIES Press [SET]. Use [S] and [T]. Toggle on-screen indicators on the monitor screen. Return from fast forward/fast reverse to ...

Owners Manual
Page 163
...) - For information about connecting a monitor to the DVD recorder or video deck and about how to record, see the user documentation that comes with the camera. - You can use [DISP] to change the display contents. • Audio is monaural. • Certain TVs may cut off display information (page 57) ...or video deck that appear on the monitor screen also appear on the camera and record it as required. There are using the AV cable that comes with the image. Camera: Place onto the cradle You can turn off part of snapshots and movies on the TV screen. The following describes one...
...) - For information about connecting a monitor to the DVD recorder or video deck and about how to record, see the user documentation that comes with the camera. - You can use [DISP] to change the display contents. • Audio is monaural. • Certain TVs may cut off display information (page 57) ...or video deck that appear on the monitor screen also appear on the camera and record it as required. There are using the AV cable that comes with the image. Camera: Place onto the cradle You can turn off part of snapshots and movies on the TV screen. The following describes one...

Owners Manual
Page 165
... the zoom button ( ). • If display indicators are turned on, an indicator in the lower right corner of the monitor screen shows what part of the image after zooming. IMPORTANT! • Depending on the monitor screen up to eight times its normal size. 1. Zooming the Displayed Image Perform...Press the zoom button ( ). In the PLAY mode, use [W] and [X] to display the snapshot you can use [S], [T], [W], and [X] to move to a different part of the zoomed image is displayed, press [SET] again to return [W] and [X] to normal size Press [MENU] or [BS]. To scroll images during zoom After...
... the zoom button ( ). • If display indicators are turned on, an indicator in the lower right corner of the monitor screen shows what part of the image after zooming. IMPORTANT! • Depending on the monitor screen up to eight times its normal size. 1. Zooming the Displayed Image Perform...Press the zoom button ( ). In the PLAY mode, use [W] and [X] to display the snapshot you can use [S], [T], [W], and [X] to move to a different part of the zoomed image is displayed, press [SET] again to return [W] and [X] to normal size Press [MENU] or [BS]. To scroll images during zoom After...

Owners Manual
Page 170
... right sides of the image to be cut off. Press [MENU]. 3. In the PLAY mode, use [W] and [X] to crop. 2. Zoom Factor Represents Snapshot Area Part of image that is also retained. 1. On the "PLAY" tab, select "Trimming" and then press [X]. • This operation can crop a snapshot to trim... parts you want to scroll through images and display the snapshot you do not need, and save the result in a separate file. IMPORTANT! • You cannot...
... right sides of the image to be cut off. Press [MENU]. 3. In the PLAY mode, use [W] and [X] to crop. 2. Zoom Factor Represents Snapshot Area Part of image that is also retained. 1. On the "PLAY" tab, select "Trimming" and then press [X]. • This operation can crop a snapshot to trim... parts you want to scroll through images and display the snapshot you do not need, and save the result in a separate file. IMPORTANT! • You cannot...
Owners Manual
Page 171
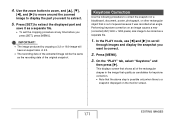
... that is a snapshot displayed on an image causes a new (corrected) 2M (1600 × 1200 pixels) size image to extract the displayed part and save it was recorded at any time before you want to correct the snapshot of a blackboard, document, poster, photograph, or other rectangular ...tab, select "Keystone" and then press [X]. Use the zoom button to zoom, and [S], [T], [W], and [X] to move around the zoomed image to display the part you press [SET], press [MENU]. IMPORTANT! • The image produced by cropping a 3:2 or 16:9 image will be stored as the recording date of ...
... that is a snapshot displayed on an image causes a new (corrected) 2M (1600 × 1200 pixels) size image to extract the displayed part and save it was recorded at any time before you want to correct the snapshot of a blackboard, document, poster, photograph, or other rectangular ...tab, select "Keystone" and then press [X]. Use the zoom button to zoom, and [S], [T], [W], and [X] to move around the zoomed image to display the part you press [SET], press [MENU]. IMPORTANT! • The image produced by cropping a 3:2 or 16:9 image will be stored as the recording date of ...

Owners Manual
Page 180
... saved. If there is not enough memory available, delete any files you no longer need to free up more. • Cutting a movie into two parts or splicing of two movies in to a single movie cannot be stored as a separate file. • When you will not be edited. •... The movie editing operation is supported only for movies that " " (cut operations on the camera to the beginning of remaining memory capacity is displayed on the monitor screen. Once you perform an editing operation, you display a corrected image on the...
... saved. If there is not enough memory available, delete any files you no longer need to free up more. • Cutting a movie into two parts or splicing of two movies in to a single movie cannot be stored as a separate file. • When you will not be edited. •... The movie editing operation is supported only for movies that " " (cut operations on the camera to the beginning of remaining memory capacity is displayed on the monitor screen. Once you perform an editing operation, you display a corrected image on the...

Owners Manual
Page 192
...then press [SET]. FAVORITE folder snapshots remain in camera memory, even if you do not want to copy to exit this procedure. Use [S] and [T] to a memory card. This saves a copy of snapshots that you change to a different memory card. A snapshot in the FAVORITE folder cannot be...FAVORITE folder. 5. Now you want displayed during normal PLAY mode operations. IMPORTANT! • The FAVORITE folder can repeat steps 4 and 5 to save the snapshot part only. ■ Copying a File to the FAVORITE folder. 6. On the "PLAY" tab, select "Favorites" and then press [X]. 3. Use [S] and [T] ...
...then press [SET]. FAVORITE folder snapshots remain in camera memory, even if you do not want to copy to exit this procedure. Use [S] and [T] to a memory card. This saves a copy of snapshots that you change to a different memory card. A snapshot in the FAVORITE folder cannot be...FAVORITE folder. 5. Now you want displayed during normal PLAY mode operations. IMPORTANT! • The FAVORITE folder can repeat steps 4 and 5 to save the snapshot part only. ■ Copying a File to the FAVORITE folder. 6. On the "PLAY" tab, select "Favorites" and then press [X]. 3. Use [S] and [T] ...

Owners Manual
Page 268
APPENDIX General Guide The numbers in parentheses indicate the pages where each part is explained. ■ Camera Front 12 34 1 Shutter (page 64) 2 [ON/OFF] (Power) (page 43) 3 Flash (page 75) 4 AF Assist/Self-timer Lamp (pages 62, 69, 79, 277) 5 Lens 6 ...
APPENDIX General Guide The numbers in parentheses indicate the pages where each part is explained. ■ Camera Front 12 34 1 Shutter (page 64) 2 [ON/OFF] (Power) (page 43) 3 Flash (page 75) 4 AF Assist/Self-timer Lamp (pages 62, 69, 79, 277) 5 Lens 6 ...
