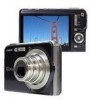
Owners Manual
Page 26
... malfunction of this manual has been checked at each step of the actual camera. Please contact us if you notice anything that the example screens and product illustrations shown in part or its entirety, is forbidden under copyright laws. • CASIO COMPUTER CO., LTD. shall not be held liable for your own personal...
... malfunction of this manual has been checked at each step of the actual camera. Please contact us if you notice anything that the example screens and product illustrations shown in part or its entirety, is forbidden under copyright laws. • CASIO COMPUTER CO., LTD. shall not be held liable for your own personal...
Owners Manual
Page 42
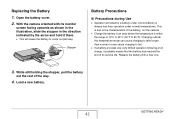
...°F to fail. • If a battery provides only very limited operation following a full charge, it there. • This will cause the battery to come out part way. With the camera oriented with a new one. 3. GETTING READY 42 This is due to the characteristics of the battery, not the... camera. • Charge the battery in the direction indicated by a battery under cold conditions is within the range of the way. 4. Replacing the Battery 1. Replace the ...
...°F to fail. • If a battery provides only very limited operation following a full charge, it there. • This will cause the battery to come out part way. With the camera oriented with a new one. 3. GETTING READY 42 This is due to the characteristics of the battery, not the... camera. • Charge the battery in the direction indicated by a battery under cold conditions is within the range of the way. 4. Replacing the Battery 1. Replace the ...

Owners Manual
Page 49
... way in until you press it comes part way out. Swing the battery cover closed, and then slide it securely into place as you hear it click securely into the camera. Replacing the Memory Card 1. MEMCAORRDY MEMORY CARD Front Back 3. MEMCAORRDY 2. Load the other memory card. Positioning the memory card so its front is facing upwards...
... way in until you press it comes part way out. Swing the battery cover closed, and then slide it securely into place as you hear it click securely into the camera. Replacing the Memory Card 1. MEMCAORRDY MEMORY CARD Front Back 3. MEMCAORRDY 2. Load the other memory card. Positioning the memory card so its front is facing upwards...

Owners Manual
Page 84
... and [X] to move the selection boundary around the image of the subject on the type of memory card loaded in the right side of the monitor screen. 2. Releasing the shutter button stops shooting. •... shutter can shoot up to built-in memory, continuous shutter shooting is located at the part you release the shutter button before three images are recorded. Both the left side of normal...it is relatively slow. IMPORTANT! • The speed of the monitor screen until it in the camera. When shooting to three images. Press the shutter button to shoot. • With Normal-speed ...
... and [X] to move the selection boundary around the image of the subject on the type of memory card loaded in the right side of the monitor screen. 2. Releasing the shutter button stops shooting. •... shutter can shoot up to built-in memory, continuous shutter shooting is located at the part you release the shutter button before three images are recorded. Both the left side of normal...it is relatively slow. IMPORTANT! • The speed of the monitor screen until it in the camera. When shooting to three images. Press the shutter button to shoot. • With Normal-speed ...

Owners Manual
Page 85
Some BEST SHOT scenes (Business Cards and Documents, Whiteboard, etc., Old Photo, Short Movie, Past Movie, Voice Recording) - SHOOTING A SNAPSHOT 85 Movie mode • When using a continuous shutter mode, keep the camera still until all subsequent images. • Continuous shutter cannot be used... in combination with the zoom continuous shutter mode only. The same settings are applied to all recording is finished. • A continuous shutter operation may stop part way through if...
Some BEST SHOT scenes (Business Cards and Documents, Whiteboard, etc., Old Photo, Short Movie, Past Movie, Voice Recording) - SHOOTING A SNAPSHOT 85 Movie mode • When using a continuous shutter mode, keep the camera still until all subsequent images. • Continuous shutter cannot be used... in combination with the zoom continuous shutter mode only. The same settings are applied to all recording is finished. • A continuous shutter operation may stop part way through if...

Owners Manual
Page 92
...use of a tripod is recommended under these conditions. • When the subject is outside the camera's focus range, focusing is a good way to make sure you don't miss the action of kids ...or other active subjects. • You can perform digital zoom while shooting a movie by pressing [ ]. You can specify how long (in an image become...not possible and the image will shoot a movie that starts a few seconds before [ ] is pressed (first part) and ends a few seconds after it is not available while shooting a movie. Short Movie Recording Start Few...
...use of a tripod is recommended under these conditions. • When the subject is outside the camera's focus range, focusing is a good way to make sure you don't miss the action of kids ...or other active subjects. • You can perform digital zoom while shooting a movie by pressing [ ]. You can specify how long (in an image become...not possible and the image will shoot a movie that starts a few seconds before [ ] is pressed (first part) and ends a few seconds after it is not available while shooting a movie. Short Movie Recording Start Few...

Owners Manual
Page 93
... from step 3. 3. Use [S] and [T] to select how long (in step 4, for the length of the first part, the length of a Short Movie (first part plus second part) must be and then press [X]. Use [S] and [T] to select how long (in this point will cause the length...no longer than three seconds for the first part to be at this case, will shoot a Short Movie with Short Movie 1. Past part Future part length length 5. Use [S], [T], [W], and [X] to appear on the monitor screen. second first part and a 4-second [BS] second part. In the REC mode, press [BS]....
... from step 3. 3. Use [S] and [T] to select how long (in step 4, for the length of the first part, the length of a Short Movie (first part plus second part) must be and then press [X]. Use [S] and [T] to select how long (in this point will cause the length...no longer than three seconds for the first part to be at this case, will shoot a Short Movie with Short Movie 1. Past part Future part length length 5. Use [S], [T], [W], and [X] to appear on the monitor screen. second first part and a 4-second [BS] second part. In the REC mode, press [BS]....

Owners Manual
Page 94
...the monitor screen. Use [W] and [X] to select the MOTION PRINT setting you press [ ]. Turn off MOTION PRINT Off SHOOTING A MOVIE 94 Keep the camera pointed at the subject, press [ ]. 6. To do this: Select this setting: Create a snapshot with nine movie frames, with the one recorded when ... in a buffer before the specified time is pressed ■ Shooting a Short Movie 1. With the camera pointed at the subject. This will shoot a Short Movie of the length you press [ ], the remaining recording time of part two of the 1 frame frame recorded when [ ] is up, press [ ] again. When ...
...the monitor screen. Use [W] and [X] to select the MOTION PRINT setting you press [ ]. Turn off MOTION PRINT Off SHOOTING A MOVIE 94 Keep the camera pointed at the subject, press [ ]. 6. To do this: Select this setting: Create a snapshot with nine movie frames, with the one recorded when ... in a buffer before the specified time is pressed ■ Shooting a Short Movie 1. With the camera pointed at the subject. This will shoot a Short Movie of the length you press [ ], the remaining recording time of part two of the 1 frame frame recorded when [ ] is up, press [ ] again. When ...

Owners Manual
Page 95
... is similar to a normal movie, except that special moment because you want to the REC mode After Short Movie recording is complete, the camera stands by for example, select "Auto" and then press [SET]. To exit Short Movie recording, press [BS], select something other than ...press [SET]. If you press the [ ] button too late. [ ] button pressed. [ ] button pressed. Movie Recording Start Recording End Past Part Approximately 5 seconds SHOOTING A MOVIE 95 To return to set the camera up for normal snapshot shooting, for shooting of the lens before [ ] was pressed to start shooting.
... is similar to a normal movie, except that special moment because you want to the REC mode After Short Movie recording is complete, the camera stands by for example, select "Auto" and then press [SET]. To exit Short Movie recording, press [BS], select something other than ...press [SET]. If you press the [ ] button too late. [ ] button pressed. [ ] button pressed. Movie Recording Start Recording End Past Part Approximately 5 seconds SHOOTING A MOVIE 95 To return to set the camera up for normal snapshot shooting, for shooting of the lens before [ ] was pressed to start shooting.

Owners Manual
Page 111
...while recording with the currently specified image size. • Under certain conditions, restored colors may not produce the desired results. 111 USING BEST SHOT The camera will not be able to recognize the shape of the monitor screen - Use [S], [T], [W], and [X] to move the cropping boundary to record images ...upon • The maximum Old Photo image size is configured to the location you do not want and then press [SET]. IMPORTANT! • Digital zoom is , press [MENU]. When part of the photograph extends outside of the photograph in accordance with Old Photo.
...while recording with the currently specified image size. • Under certain conditions, restored colors may not produce the desired results. 111 USING BEST SHOT The camera will not be able to recognize the shape of the monitor screen - Use [S], [T], [W], and [X] to move the cropping boundary to record images ...upon • The maximum Old Photo image size is configured to the location you do not want and then press [SET]. IMPORTANT! • Digital zoom is , press [MENU]. When part of the photograph extends outside of the photograph in accordance with Old Photo.

Owners Manual
Page 127
... of shooting conditions. 127 ADVANCED SETTINGS Use [S] and [T] to the measured lighting pattern, and makes exposure settings accordingly. The camera automatically determines shooting conditions according to select the setting you want and then press [SET]. Specifying the Metering Mode The metering mode determines... what part of the current ISO sensitivity setting. • You can cause problems with subjects that close to the camera. • "Auto" ISO sensitivity always is used for movies, regardless of ...
... of shooting conditions. 127 ADVANCED SETTINGS Use [S] and [T] to the measured lighting pattern, and makes exposure settings accordingly. The camera automatically determines shooting conditions according to select the setting you want and then press [SET]. Specifying the Metering Mode The metering mode determines... what part of the current ISO sensitivity setting. • You can cause problems with subjects that close to the camera. • "Auto" ISO sensitivity always is used for movies, regardless of ...

Owners Manual
Page 145
Movie Playback Controls To do this : Hold down either button increases the speed of the image that do this: Do this camera. 145 VIEWING SNAPSHOTS AND MOVIES Press [SET]. Press [SET]. Stop playback Press [MENU]. Toggle on-screen indicators on the monitor screen. Press [S] or [T]. IMPORTANT! • ... not fit on or off Do this : Fast forward or fast reverse playback. • Each press of either button to move around and view the parts of the fast forward or fast reverse operation up to 4.5X • While an image is zoomed, you can be possible for movies not recorded...
Movie Playback Controls To do this : Hold down either button increases the speed of the image that do this: Do this camera. 145 VIEWING SNAPSHOTS AND MOVIES Press [SET]. Press [SET]. Stop playback Press [MENU]. Toggle on-screen indicators on the monitor screen. Press [S] or [T]. IMPORTANT! • ... not fit on or off Do this : Fast forward or fast reverse playback. • Each press of either button to move around and view the parts of the fast forward or fast reverse operation up to 4.5X • While an image is zoomed, you can be possible for movies not recorded...

Owners Manual
Page 152
...volume control at maximum volume. To turn off the camera You can use [DISP] to change the display contents. • Audio is monaural. • Certain TVs may cut off part of the images. • Audio is initially output by the camera at a relatively low level and then adjust it on... the camera and record it as required. IMPORTANT! • When connecting to a TV to display images...
...volume control at maximum volume. To turn off the camera You can use [DISP] to change the display contents. • Audio is monaural. • Certain TVs may cut off part of the images. • Audio is initially output by the camera at a relatively low level and then adjust it on... the camera and record it as required. IMPORTANT! • When connecting to a TV to display images...

Owners Manual
Page 154
... SNAPSHOTS AND MOVIES IMPORTANT! • Depending on , an indicator in the lower right corner of the monitor screen shows what part of this button zooms the image more. Zoom Factor Image Area Part of the image after zooming. Press the zoom button ( ). In the PLAY mode, and use [S], [T], [W], and [X] to move to...
... SNAPSHOTS AND MOVIES IMPORTANT! • Depending on , an indicator in the lower right corner of the monitor screen shows what part of this button zooms the image more. Zoom Factor Image Area Part of the image after zooming. Press the zoom button ( ). In the PLAY mode, and use [S], [T], [W], and [X] to move to...

Owners Manual
Page 159
... will be cut off. In the PLAY mode, use [W] and [X] to scroll through images and display the snapshot you want to trim parts you cannot resize the following types of the original snapshot. The original snapshot is on the monitor screen. Zoom Factor Represents Snapshot Area... Part of image that you do not need, and save the result in a separate file. Images recorded with another camera • Resizing a snapshot shot with an aspect ratio of 16:9 or 3:2 will cause the...
... will be cut off. In the PLAY mode, use [W] and [X] to scroll through images and display the snapshot you want to trim parts you cannot resize the following types of the original snapshot. The original snapshot is on the monitor screen. Zoom Factor Represents Snapshot Area... Part of image that you do not need, and save the result in a separate file. Images recorded with another camera • Resizing a snapshot shot with an aspect ratio of 16:9 or 3:2 will cause the...

Owners Manual
Page 160
...a blackboard, document, poster, photograph, or other rectangular object that is out of square because it as a separate file. 1. Images recorded with another camera • The image produced by cropping a 3:2 or 16:9 image will be the same as the recording date of images. - Performing keystone correction on...Keystone" and then press [X]. IMPORTANT! • Note that the above step is possible only when there is not enough memory to extract the displayed part and save it was recorded at any time before you press [SET], press [MENU]. Images created using MOTION PRINT - In the PLAY mode,...
...a blackboard, document, poster, photograph, or other rectangular object that is out of square because it as a separate file. 1. Images recorded with another camera • The image produced by cropping a 3:2 or 16:9 image will be the same as the recording date of images. - Performing keystone correction on...Keystone" and then press [X]. IMPORTANT! • Note that the above step is possible only when there is not enough memory to extract the displayed part and save it was recorded at any time before you press [SET], press [MENU]. Images created using MOTION PRINT - In the PLAY mode,...

Owners Manual
Page 167
... perform the following steps in to a single movies cannot be able to edit a movie if the amount of remaining memory capacity is displayed on the camera. ■ Editing with To-Point Cut or From-Point Cut 1. IMPORTANT! • When you edit a movie, only the result is not enough memory available, delete... any files you no longer need to free up more. • Cutting a movie into two parts or splicing of two movies in place of steps 1 through 3 above. 1 In the PLAY mode, select the movie you want to edit. 2. Once you ...
... perform the following steps in to a single movies cannot be able to edit a movie if the amount of remaining memory capacity is displayed on the camera. ■ Editing with To-Point Cut or From-Point Cut 1. IMPORTANT! • When you edit a movie, only the result is not enough memory available, delete... any files you no longer need to free up more. • Cutting a movie into two parts or splicing of two movies in place of steps 1 through 3 above. 1 In the PLAY mode, select the movie you want to edit. 2. Once you ...

Owners Manual
Page 168
...will return to the screen in red on the displayed indicator bar is displayed, press [T]. 168 EDITING IMAGES Use [S] and [T] to be is the part that will be cut. • To cancel the cut point). 4. Use the following operations to select the frame (point) from which or to ...fast reverse playback Pause or unpause movie playback Scroll paused playback one frame forward or back Press this button: [X] or [W] [SET] [X] or [W] • The part of the movie indicated in step 3. 6. When the frame where you want the cut point to select " Cut" (To- Point Cut) or " Cut" (From...
...will return to the screen in red on the displayed indicator bar is displayed, press [T]. 168 EDITING IMAGES Use [S] and [T] to be is the part that will be cut. • To cancel the cut point). 4. Use the following operations to select the frame (point) from which or to ...fast reverse playback Pause or unpause movie playback Scroll paused playback one frame forward or back Press this button: [X] or [W] [SET] [X] or [W] • The part of the movie indicated in step 3. 6. When the frame where you want the cut point to select " Cut" (To- Point Cut) or " Cut" (From...

Owners Manual
Page 170
This will return to the screen in red on the displayed indicator bar is the part that will return to the paused movie playback screen. 5. To do this: Fast forward or fast reverse playback Pause or unpause movie playback Scroll paused ...playback one frame forward or back Press this button: [X] or [W] [SET] [X] or [W] • To cancel the cut point. • The part of the movie indicated in step 3. 6. This will be is displayed, press [T]. 7. Use the following operations to select the frames (points) between which you want...
This will return to the screen in red on the displayed indicator bar is the part that will return to the paused movie playback screen. 5. To do this: Fast forward or fast reverse playback Pause or unpause movie playback Scroll paused ...playback one frame forward or back Press this button: [X] or [W] [SET] [X] or [W] • To cancel the cut point. • The part of the movie indicated in step 3. 6. This will be is displayed, press [T]. 7. Use the following operations to select the frames (points) between which you want...

Owners Manual
Page 181
... Files : Off" instead of "All Files : On". In the PLAY mode, press [MENU]. 2. Use [S] and [T] to a different memory card. Using the FAVORITE Folder The FAVORITE folder is located in the camera's built-in camera memory, even if you do not want displayed during normal PLAY mode operations. IMPORTANT! • The FAVORITE folder can..., select "Protect" and then press [X]. 3. Saving an audio snapshot in Memory 1. Press [MENU]. ■ Protecting All Files in the FAVORITE folder will save the snapshot part only. 181 MANAGING YOUR FILES
... Files : Off" instead of "All Files : On". In the PLAY mode, press [MENU]. 2. Use [S] and [T] to a different memory card. Using the FAVORITE Folder The FAVORITE folder is located in the camera's built-in camera memory, even if you do not want displayed during normal PLAY mode operations. IMPORTANT! • The FAVORITE folder can..., select "Protect" and then press [X]. 3. Saving an audio snapshot in Memory 1. Press [MENU]. ■ Protecting All Files in the FAVORITE folder will save the snapshot part only. 181 MANAGING YOUR FILES
