

Owners Manual
Page 7
... Movie 207 Editing a Movie 210 Viewing User Documentation (PDF Files) 212 User Registration 212 Exiting the Menu Application 212 Using the Camera with a Macintosh Computer ....... 213 About the bundled CD-ROM 213 Computer System Requirements 214 Managing Images on a Macintosh 215 Viewing ...User Documentation (PDF Files) 216 To register as a camera user 216 217 APPENDIX Menu Reference 217 Indicator Lamp Reference 220 Troubleshooting Guide 223 If you have problems installing the USB driver... 227 Display Messages 228...
... Movie 207 Editing a Movie 210 Viewing User Documentation (PDF Files) 212 User Registration 212 Exiting the Menu Application 212 Using the Camera with a Macintosh Computer ....... 213 About the bundled CD-ROM 213 Computer System Requirements 214 Managing Images on a Macintosh 215 Viewing ...User Documentation (PDF Files) 216 To register as a camera user 216 217 APPENDIX Menu Reference 217 Indicator Lamp Reference 220 Troubleshooting Guide 223 If you have problems installing the USB driver... 227 Display Messages 228...
Owners Manual
Page 15
... 104°F). • Do not use or keep the camera in file memory. - I Data Error Precautions • Your digital camera is being performed - In areas subject to temperature extremes - Disconnecting the USB cable, removing the camera from the USB cradle, or disconnecting the AC adaptor from... from the USB cradle while a data communication operation is manufactured using precision digital components. Removing the battery, removing the memory card, or placing the camera onto the USB cradle while the operation lamp is performing a record or memory access operation - In areas subject to ...
... 104°F). • Do not use or keep the camera in file memory. - I Data Error Precautions • Your digital camera is being performed - In areas subject to temperature extremes - Disconnecting the USB cable, removing the camera from the USB cradle, or disconnecting the AC adaptor from... from the USB cradle while a data communication operation is manufactured using precision digital components. Removing the battery, removing the memory card, or placing the camera onto the USB cradle while the operation lamp is performing a record or memory access operation - In areas subject to ...

Owners Manual
Page 18
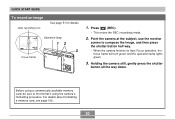
QUICK START GUIDE QUICK START GUIDE First, charge the battery! 1. Place the camera onto the USB cradle to charge the battery (page 33). • Note that the shape of the AC adaptor depends on the area where you purchased the camera. • It takes about 120 minutes to achieve a full charge. 1 Inlet Type 2 2 Stopper 1 Plug-in Type [CHARGE] lamp Charging: Lights red Charging Complete: Lights green 3 18 Load the battery into the camera (page 32). 1 2.
QUICK START GUIDE QUICK START GUIDE First, charge the battery! 1. Place the camera onto the USB cradle to charge the battery (page 33). • Note that the shape of the AC adaptor depends on the area where you purchased the camera. • It takes about 120 minutes to achieve a full charge. 1 Inlet Type 2 2 Stopper 1 Plug-in Type [CHARGE] lamp Charging: Lights red Charging Complete: Lights green 3 18 Load the battery into the camera (page 32). 1 2.
Owners Manual
Page 20
..., gently press the shutter button all the way down. For details about formatting a memory card, see page 166. 20 Point the camera at the subject, use the monitor screen to first format it using a commercially available memory card, be sure to compose the image, and then press ...the shutter button half way. • When the camera finishes its Auto Focus operation, the focus frame will turn green and the operation lamp lights green. 3. QUICK START GUIDE To record an image Auto recording icon See page 51 for details. 10...
..., gently press the shutter button all the way down. For details about formatting a memory card, see page 166. 20 Point the camera at the subject, use the monitor screen to first format it using a commercially available memory card, be sure to compose the image, and then press ...the shutter button half way. • When the camera finishes its Auto Focus operation, the focus frame will turn green and the operation lamp lights green. 3. QUICK START GUIDE To record an image Auto recording icon See page 51 for details. 10...
Owners Manual
Page 23
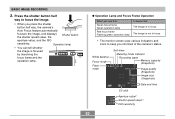
... 1 Shutter button 2 Power button 3 Flash 4 AF assist light/ self-timer lamp 5 Lens 6 Microphone 65 23 B General Guide The following three locations. • The camera's built-in memory • An SD memory card loaded in the camera • A MultiMediaCard loaded in this manual is a general term that refers to... the location where your camera is currently storing the images you record. Camera I File Memory The term "file memory" in the camera For more information about how the camera stores images, see page 195. File memory can be any one...
... 1 Shutter button 2 Power button 3 Flash 4 AF assist light/ self-timer lamp 5 Lens 6 Microphone 65 23 B General Guide The following three locations. • The camera's built-in memory • An SD memory card loaded in the camera • A MultiMediaCard loaded in this manual is a general term that refers to... the location where your camera is currently storing the images you record. Camera I File Memory The term "file memory" in the camera For more information about how the camera stores images, see page 195. File memory can be any one...

Owners Manual
Page 24
GETTING READY I Back 7 890 A B C D H G FE 7 Operation lamp 8 [ ] (PLAY mode) button 9 [ ] (REC mode) button 0 [ ] (MOVIE) button A Zoom button B Strap ring C Speaker D E [SET] button F [BS] (BEST SHOT) button G [MENU] button H Monitor Screen [̈] [SET] I Bottom I NM L KJ 24 I Stopper J Memory card slot K Battery compartment L Battery cover M Connector N Tripod screw hole * Use this hole when attaching to a tripod.
GETTING READY I Back 7 890 A B C D H G FE 7 Operation lamp 8 [ ] (PLAY mode) button 9 [ ] (REC mode) button 0 [ ] (MOVIE) button A Zoom button B Strap ring C Speaker D E [SET] button F [BS] (BEST SHOT) button G [MENU] button H Monitor Screen [̈] [SET] I Bottom I NM L KJ 24 I Stopper J Memory card slot K Battery compartment L Battery cover M Connector N Tripod screw hole * Use this hole when attaching to a tripod.

Owners Manual
Page 25
Other USB cradles are not supported. I Front 1 5 432 I Back 67 8 1 Camera connector 2 [USB] lamp 3 [USB] button 4 [PHOTO] button 5 [CHARGE] lamp 6 [DC IN 5.3V] (AC adaptor connector) 7 [ ] (USB port) 8 [AV OUT] (AV output port) 25 GETTING READY USB Cradle Simply placing your CASIO digital camera onto the USB cradle lets you perform the following tasks. • Battery charging... printing (page 175) • Automatic transfer of images to a computer (page 180) IMPORTANT! • Use only the USB cradle (CA-28) that comes with the camera.
Other USB cradles are not supported. I Front 1 5 432 I Back 67 8 1 Camera connector 2 [USB] lamp 3 [USB] button 4 [PHOTO] button 5 [CHARGE] lamp 6 [DC IN 5.3V] (AC adaptor connector) 7 [ ] (USB port) 8 [AV OUT] (AV output port) 25 GETTING READY USB Cradle Simply placing your CASIO digital camera onto the USB cradle lets you perform the following tasks. • Battery charging... printing (page 175) • Automatic transfer of images to a computer (page 180) IMPORTANT! • Use only the USB cradle (CA-28) that comes with the camera.

Owners Manual
Page 34
... or geographic area. Actual charging time depends on the USB cradle should turn green. [CHARGE] lamp • It takes about 120 minutes to achieve a full charge. Set the camera onto the USB cradle. • Do not place the camera onto the USB cradle while it is turned on. • The [CHARGE...] lamp on current battery capacity and charging conditions. 34 AC Adaptor USB Cradle [DC IN 5.3V] NOTE &#...
... or geographic area. Actual charging time depends on the USB cradle should turn green. [CHARGE] lamp • It takes about 120 minutes to achieve a full charge. Set the camera onto the USB cradle. • Do not place the camera onto the USB cradle while it is turned on. • The [CHARGE...] lamp on current battery capacity and charging conditions. 34 AC Adaptor USB Cradle [DC IN 5.3V] NOTE &#...

Owners Manual
Page 35
... normal temperature. An error can be caused by any of the following: a problem with the USB cradle, a problem with the camera, or a problem with the camera or the optionally available charger (BC-10L) to charge the special NP-20 rechargeable lithium ion battery. GETTING READY 4. IMPORTANT! •... After charging is on the USB cradle are performing the charge operation. Remove the camera from the USB cradle. The [CHARGE] lamp will turn red and charging will go. • The [CHARGE] lamp may remain amber colored and the charge operation may not start when the battery temperature...
... normal temperature. An error can be caused by any of the following: a problem with the USB cradle, a problem with the camera, or a problem with the camera or the optionally available charger (BC-10L) to charge the special NP-20 rechargeable lithium ion battery. GETTING READY 4. IMPORTANT! •... After charging is on the USB cradle are performing the charge operation. Remove the camera from the USB cradle. The [CHARGE] lamp will turn red and charging will go. • The [CHARGE] lamp may remain amber colored and the charge operation may not start when the battery temperature...

Owners Manual
Page 42
.... Water creates the risk of fire and electric shock. • Do not place a vase or any other container filled with water. Turning the Camera On and Off I To turn on the AC adaptor. The operation lamp will light green momentarily, and then power will not be splashed with liquid on the... camera Press the power button, [ ] (REC) or [ ] (PLAY). This is normal and does not indicate malfunction. • Unplug the AC power cord from the ...
.... Water creates the risk of fire and electric shock. • Do not place a vase or any other container filled with water. Turning the Camera On and Off I To turn on the AC adaptor. The operation lamp will light green momentarily, and then power will not be splashed with liquid on the... camera Press the power button, [ ] (REC) or [ ] (PLAY). This is normal and does not indicate malfunction. • Unplug the AC power cord from the ...

Owners Manual
Page 51
...against your fingers and the strap do not block the flash, microphone, AF assist light/self-timer lamp or lens. IMPORTANT! • Make sure your sides. • Vertical When holding the camera vertically, make sure that the flash is above the lens. Flash AF assist light/ self-timer... lamp Lens Microphone NOTE • Moving the camera as you press the shutter button half way) can blur your images. •...
...against your fingers and the strap do not block the flash, microphone, AF assist light/self-timer lamp or lens. IMPORTANT! • Make sure your sides. • Vertical When holding the camera vertically, make sure that the flash is above the lens. Flash AF assist light/ self-timer... lamp Lens Microphone NOTE • Moving the camera as you press the shutter button half way) can blur your images. •...
Owners Manual
Page 53
... this: Green focus frame Green operation lamp Red focus frame Flashing green operation lamp It means this: The image is not in focus. Press the shutter button half way to keep you press the shutter button half way, the camera's Auto Focus feature automatically focuses the image...image is in focus. • The monitor screen uses various indicators and icons to focus the image. • When you informed of the camera's status. White balance Focus mode Flash mode Self-timer Metering mode indicator Recording types Memory capacity (Snapshots) Image quality (Snapshots) Image size ...
... this: Green focus frame Green operation lamp Red focus frame Flashing green operation lamp It means this: The image is not in focus. Press the shutter button half way to keep you press the shutter button half way, the camera's Auto Focus feature automatically focuses the image...image is in focus. • The monitor screen uses various indicators and icons to focus the image. • When you informed of the camera's status. White balance Focus mode Flash mode Self-timer Metering mode indicator Recording types Memory capacity (Snapshots) Image quality (Snapshots) Image size ...

Owners Manual
Page 54
... without pausing. After making sure that allows light passing through . AF assist light/ self-timer lamp 54 I About AF Assist Light The AF assist light/self-timer lamp operates automatically to be performed when you press the shutter release all the way down to capture ...for light to reach the CCD. A larger aperture value indicates a smaller opening (aperture) that the image is dim. The camera adjusts this setting automatically. 4. The camera adjusts this setting automatically. *2 The amount of time the shutter remains open longer, which means more light reaches the CCD. ...
... without pausing. After making sure that allows light passing through . AF assist light/ self-timer lamp 54 I About AF Assist Light The AF assist light/self-timer lamp operates automatically to be performed when you press the shutter release all the way down to capture ...for light to reach the CCD. A larger aperture value indicates a smaller opening (aperture) that the image is dim. The camera adjusts this setting automatically. 4. The camera adjusts this setting automatically. *2 The amount of time the shutter remains open longer, which means more light reaches the CCD. ...
Owners Manual
Page 55
... memory card while an image is recommended that cannot be detected by the human eye. When using the camera indoors under such lighting, you may experience some digital noise (graininess) to the memory card. • Fluorescent lighting actually flickers at the subject's eyes. Use...3. I Recording Precautions • Never open the battery cover or place the camera onto the USB cradle while the operation lamp is selected for the ISO sensitivity setting (page 114), the camera automatically adjusts its sensitivity in images of relatively dark subjects. 55 BASIC IMAGE RECORDING...
... memory card while an image is recommended that cannot be detected by the human eye. When using the camera indoors under such lighting, you may experience some digital noise (graininess) to the memory card. • Fluorescent lighting actually flickers at the subject's eyes. Use...3. I Recording Precautions • Never open the battery cover or place the camera onto the USB cradle while the operation lamp is selected for the ISO sensitivity setting (page 114), the camera automatically adjusts its sensitivity in images of relatively dark subjects. 55 BASIC IMAGE RECORDING...

Owners Manual
Page 56
...your free hand to guard against this , you need to shade the lens from the camera - To protect against camera movement if you want for the ISO sensitivity setting (page 114), the camera increases sensitivity and uses a faster shutter speed. Very shiny objects - Subjects outside the shooting.... - Multiple subjects that the resulting image will be difficult or even impossible when shooting the following types of the camera • Note that a green operation lamp and focus frame do not necessarily guarantee that are varying distances from the light. I About Auto Focus •...
...your free hand to guard against this , you need to shade the lens from the camera - To protect against camera movement if you want for the ISO sensitivity setting (page 114), the camera increases sensitivity and uses a faster shutter speed. Very shiny objects - Subjects outside the shooting.... - Multiple subjects that the resulting image will be difficult or even impossible when shooting the following types of the camera • Note that a green operation lamp and focus frame do not necessarily guarantee that are varying distances from the light. I About Auto Focus •...

Owners Manual
Page 63
... very well if the subjects are located far away from the camera. Flash Unit Status You can find out the current flash unit status by pressing the shutter button half way and checking the monitor screen and operation lamp. Note the following important points when using redeye reduction. •...; Red-eye reduction does not work unless the people in the image are looking directly at the camera while the pre-flash operation is ready to the ...
... very well if the subjects are located far away from the camera. Flash Unit Status You can find out the current flash unit status by pressing the shutter button half way and checking the monitor screen and operation lamp. Note the following important points when using redeye reduction. •...; Red-eye reduction does not work unless the people in the image are looking directly at the camera while the pre-flash operation is ready to the ...

Owners Manual
Page 68
...or two seconds). • You can interrupt an ongoing self-timer countdown by pressing the shutter button while the AF assist light/self-timer lamp is best when shooting with a slow shutter speed, because it helps to record the image. BASIC IMAGE RECORDING 5. AF assist light/ Self-timer... lamp • When you press the shutter button, the AF assist light/self-timer lamp flashes and the shutter releases after the self-timer reaches the end of images due to hand movement. •...
...or two seconds). • You can interrupt an ongoing self-timer countdown by pressing the shutter button while the AF assist light/self-timer lamp is best when shooting with a slow shutter speed, because it helps to record the image. BASIC IMAGE RECORDING 5. AF assist light/ Self-timer... lamp • When you press the shutter button, the AF assist light/self-timer lamp flashes and the shutter releases after the self-timer reaches the end of images due to hand movement. •...

Owners Manual
Page 72
... 4. Select the "REC" tab, select "Focus", and then press [̈]. 3. The image is focused by observing the focus frame and the operation lamp. Use [̆] and [̄] to change. 1. OTHER RECORDING FUNCTIONS Using Auto Focus As its name suggests, Auto Focus focuses the image automatically. Operation... lamp F2.7 1 / 1000 ISO100 Focus frame When you press the shutter button down half way. Press the shutter button the rest of the...
... 4. Select the "REC" tab, select "Focus", and then press [̈]. 3. The image is focused by observing the focus frame and the operation lamp. Use [̆] and [̄] to change. 1. OTHER RECORDING FUNCTIONS Using Auto Focus As its name suggests, Auto Focus focuses the image automatically. Operation... lamp F2.7 1 / 1000 ISO100 Focus frame When you press the shutter button down half way. Press the shutter button the rest of the...

Owners Manual
Page 103
Press the shutter button to record the image. • After the image is recorded, the camera enters audio recording standby, with the image you just recorded on while you are adding audio to a snapshot. 6. In the REC mode, press [MENU]. 2. ... • Audio snapshot recording is in progress. • If you press the shutter button. Use [̆] and [̄] to start audio recording. • The operation lamp will flash green while recording is not supported (audio cannot be recorded) for the following types of recording: "X3" self-timer recording (Triple Selftimer), snapshot...
Press the shutter button to record the image. • After the image is recorded, the camera enters audio recording standby, with the image you just recorded on while you are adding audio to a snapshot. 6. In the REC mode, press [MENU]. 2. ... • Audio snapshot recording is in progress. • If you press the shutter button. Use [̆] and [̄] to start audio recording. • The operation lamp will flash green while recording is not supported (audio cannot be recorded) for the following types of recording: "X3" self-timer recording (Triple Selftimer), snapshot...

Owners Manual
Page 104
... monitor screen. Press the shutter button to start voice recording. • The remaining recording time value counts down on the monitor screen and the operation lamp flashes green as recording is performed. • Pressing [̆] (DISP) during playback. 104 Recording time Remaining recording time 3. OTHER RECORDING FUNCTIONS Recording Your Voice Voice...
... monitor screen. Press the shutter button to start voice recording. • The remaining recording time value counts down on the monitor screen and the operation lamp flashes green as recording is performed. • Pressing [̆] (DISP) during playback. 104 Recording time Remaining recording time 3. OTHER RECORDING FUNCTIONS Recording Your Voice Voice...
