User Guide
Page 3
... by you notice anything that the example screens and product illustrations shown in part or its entirety, is forbidden under copyright laws. • CASIO COMPUTER CO., LTD. is forbidden. shall not be held liable for your final image, shoot a test shot to ensure that some very... due to the characteristics of the production process. Read this first! • The contents of this manual are subject to change without the permission of the actual camera. This is recording correctly. 3 Take a few test shots Before shooting your own personal use, any other reason. • Note that...
... by you notice anything that the example screens and product illustrations shown in part or its entirety, is forbidden under copyright laws. • CASIO COMPUTER CO., LTD. is forbidden. shall not be held liable for your final image, shoot a test shot to ensure that some very... due to the characteristics of the production process. Read this first! • The contents of this manual are subject to change without the permission of the actual camera. This is recording correctly. 3 Take a few test shots Before shooting your own personal use, any other reason. • Note that...
User Guide
Page 21
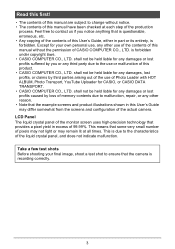
... can cause monitor screen response to slow and can result in the monitor screen image. • The image that is flashing green. Camera movement while shooting - Strongly back lit subject - Blinds or other very low contrast subject - Multiple subjects at the quality set for the...subject with your hand when shooting an image. Fast-moving subject - Doing so can cause digital noise in the image you cannot focus properly, try using focus lock (page 60) or Manual Focus (page 58). 21 Quick Start Basics Snapshot Shooting Precautions Operation • Never open ...
... can cause monitor screen response to slow and can result in the monitor screen image. • The image that is flashing green. Camera movement while shooting - Strongly back lit subject - Blinds or other very low contrast subject - Multiple subjects at the quality set for the...subject with your hand when shooting an image. Fast-moving subject - Doing so can cause digital noise in the image you cannot focus properly, try using focus lock (page 60) or Manual Focus (page 58). 21 Quick Start Basics Snapshot Shooting Precautions Operation • Never open ...
User Guide
Page 41
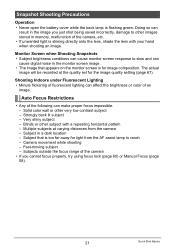
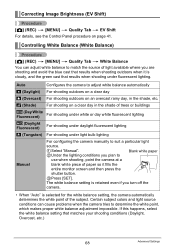
... to obtain satisfactory results even after performing exposure compensation. 41 Snapshot Tutorial In the REC mode, press [SET]. 2. Correcting Image Brightness (EV Shift) You can manually adjust an image's exposure value (EV value) before shooting it . Press [SET].
... to obtain satisfactory results even after performing exposure compensation. 41 Snapshot Tutorial In the REC mode, press [SET]. 2. Correcting Image Brightness (EV Shift) You can manually adjust an image's exposure value (EV value) before shooting it . Press [SET].
User Guide
Page 43
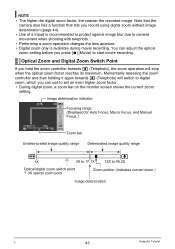
...again towards z (Telephoto), the zoom operation will switch to digital zoom, which you record using digital zoom without image deterioration (page 44). • Use of a tripod is available during movie recording. Note that the camera also has a function that lets you can adjust the optical... Focus, Macro Focus, and Manual Focus.) Zoom bar Undeteriorated image quality range Deteriorated image quality range 1X 3X to 17.1X 12X to camera movement when shooting with telephoto. • Performing a zoom operation changes the lens aperture. • Digital zoom only is recommended to protect...
...again towards z (Telephoto), the zoom operation will switch to digital zoom, which you record using digital zoom without image deterioration (page 44). • Use of a tripod is available during movie recording. Note that the camera also has a function that lets you can adjust the optical... Focus, Macro Focus, and Manual Focus.) Zoom bar Undeteriorated image quality range Deteriorated image quality range 1X 3X to 17.1X 12X to camera movement when shooting with telephoto. • Performing a zoom operation changes the lens aperture. • Digital zoom only is recommended to protect...

User Guide
Page 57
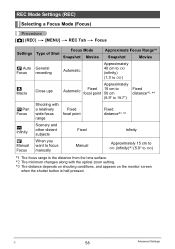
Use [8] and [2] to select the "Focus" and then press [6]. 57 Advanced Settings Menu Operations in This Manual Menu operations are represented in this manual as shown below. Press [MENU]. 3. Procedure [r] * [MENU] * REC Tab * Focus Press [r]. Use [8] and [2] to change the setting. After the setting is the way you want, ...
Use [8] and [2] to select the "Focus" and then press [6]. 57 Advanced Settings Menu Operations in This Manual Menu operations are represented in this manual as shown below. Press [MENU]. 3. Procedure [r] * [MENU] * REC Tab * Focus Press [r]. Use [8] and [2] to change the setting. After the setting is the way you want, ...
User Guide
Page 58
... distance*2, *4 E Pan Focus Shooting with a relatively wide focus range Fixed focal point Fixed distance*2, *3 ) Infinity Scenery and other distant subjects Fixed Infinity W Manual Focus When you want to focus manually Manual Approximately 15 cm to 9 (infinity)*2 (5.9'' to 9) *1 The focus range is the distance from the lens surface. *2 The minimum changes along with the...
... distance*2, *4 E Pan Focus Shooting with a relatively wide focus range Fixed focal point Fixed distance*2, *3 ) Infinity Scenery and other distant subjects Fixed Infinity W Manual Focus When you want to focus manually Manual Approximately 15 cm to 9 (infinity)*2 (5.9'' to 9) *1 The focus range is the distance from the lens surface. *2 The minimum changes along with the...
User Guide
Page 59
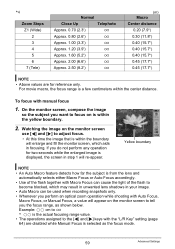
... optical zoom operation while shooting with Macro Focus can cause the light of the flash together with Auto Focus, Macro Focus, or Manual Focus, a value will re-appear. Yellow boundary NOTE • An Auto Macro feature detects how far the subject is from ... (m) Macro Center distance 0.20 (7.9'') 0.30 (11.8'') 0.40 (15.7'') 0.40 (15.7'') 0.40 (15.7'') 0.45 (17.7'') 0.45 (17.7'') NOTE • Above values are disabled while Manual Focus is selected as shown below. To focus with the "L/R Key" setting (page 64) are for two seconds while the enlarged image is a few centimeters...
... optical zoom operation while shooting with Macro Focus can cause the light of the flash together with Auto Focus, Macro Focus, or Manual Focus, a value will re-appear. Yellow boundary NOTE • An Auto Macro feature detects how far the subject is from ... (m) Macro Center distance 0.20 (7.9'') 0.30 (11.8'') 0.40 (15.7'') 0.40 (15.7'') 0.40 (15.7'') 0.45 (17.7'') 0.45 (17.7'') NOTE • Above values are disabled while Manual Focus is selected as shown below. To focus with the "L/R Key" setting (page 64) are for two seconds while the enlarged image is a few centimeters...
User Guide
Page 66
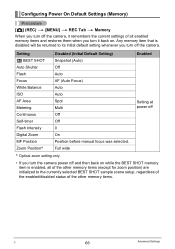
...) Procedure [r] (REC) * [MENU] * REC Tab * Memory When you turn off the camera. Setting b BEST SHOT Auto Shutter Flash Focus White Balance ISO AF Area Metering Continuous Self-timer Flash Intensity Digital Zoom MF Position Zoom Position* Disabled (Initial Default Setting) Snapshot (Auto) Off Auto AF (Auto... Focus) Auto Auto Spot Multi Off Off 0 On Position before manual focus was selected. Any memory item that is enabled...
...) Procedure [r] (REC) * [MENU] * REC Tab * Memory When you turn off the camera. Setting b BEST SHOT Auto Shutter Flash Focus White Balance ISO AF Area Metering Continuous Self-timer Flash Intensity Digital Zoom MF Position Zoom Position* Disabled (Initial Default Setting) Snapshot (Auto) Off Auto AF (Auto... Focus) Auto Auto Spot Multi Off Off 0 On Position before manual focus was selected. Any memory item that is enabled...
User Guide
Page 68
... shooting under fluorescent lighting. If this happens, select the white balance setting that results when shooting under light bulb lighting Manual For configuring the camera manually to suit a particular light source. 1Select "Manual". 2Under the lighting conditions you are shooting and avoid the blue cast that results when shooting outdoors when it fills the...
... shooting under fluorescent lighting. If this happens, select the white balance setting that results when shooting under light bulb lighting Manual For configuring the camera manually to suit a particular light source. 1Select "Manual". 2Under the lighting conditions you are shooting and avoid the blue cast that results when shooting outdoors when it fills the...
User Guide
Page 98
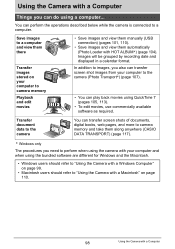
...movies, use commercially available software as required. Transfer document data to the camera You can transfer screen shots of documents, digital books, web pages, and more to camera memory and take them along anywhere (CASIO DATA TRANSPORT) (page 117). * Windows only The procedures you need ...refer to "Using the Camera with a Macintosh" on your computer to the camera (Photo Transport*) (page 107). • You can perform the operations described below while the camera is connected to camera memory Playback and edit movies • Save images and view them manually (USB connection) (pages...
...movies, use commercially available software as required. Transfer document data to the camera You can transfer screen shots of documents, digital books, web pages, and more to camera memory and take them along anywhere (CASIO DATA TRANSPORT) (page 117). * Windows only The procedures you need ...refer to "Using the Camera with a Macintosh" on your computer to the camera (Photo Transport*) (page 107). • You can perform the operations described below while the camera is connected to camera memory Playback and edit movies • Save images and view them manually (USB connection) (pages...
User Guide
Page 99
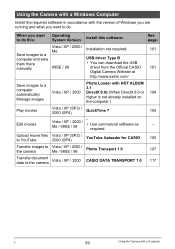
...SP2) / 2000 (SP4) YouTube Uploader for CASIO 105 Transfer images to the camera Vista / XP / 2000 / Me / 98SE / 98 Photo Transport 1.0 107 Transfer document data to the camera Vista / XP / 2000 CASIO DATA TRANSPORT 1.0 117 C 99 Using the Camera with the version of Windows you are running ...images to a computer and view USB driver Type B them there • You can download the USB manually 98SE / 98 driver from the Official CASIO 101 Digital Camera Website at http://www.exilim.com/ Save images to do . When you want to a computer automatically/ Manage images Vista / XP ...
...SP2) / 2000 (SP4) YouTube Uploader for CASIO 105 Transfer images to the camera Vista / XP / 2000 / Me / 98SE / 98 Photo Transport 1.0 107 Transfer document data to the camera Vista / XP / 2000 CASIO DATA TRANSPORT 1.0 117 C 99 Using the Camera with the version of Windows you are running ...images to a computer and view USB driver Type B them there • You can download the USB manually 98SE / 98 driver from the Official CASIO 101 Digital Camera Website at http://www.exilim.com/ Save images to do . When you want to a computer automatically/ Manage images Vista / XP ...
User Guide
Page 100
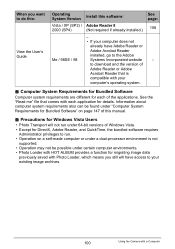
... Loader, which means you want to do this: View the User's Guide Operating System Version Vista / XP (SP2) / 2000 (SP4) Me / 98SE / 98 Install this manual. . See the "Read me" file that is not supported. • Operation may not be found under 64-bit versions of the applications. Precautions for Windows... website to download and the version of this software: Adobe Reader 8 (Not required if already installed.) - • If your existing image archives. 100 Using the Camera with HOT ALBUM provides a function for details.
... Loader, which means you want to do this: View the User's Guide Operating System Version Vista / XP (SP2) / 2000 (SP4) Me / 98SE / 98 Install this manual. . See the "Read me" file that is not supported. • Operation may not be found under 64-bit versions of the applications. Precautions for Windows... website to download and the version of this software: Adobe Reader 8 (Not required if already installed.) - • If your existing image archives. 100 Using the Camera with HOT ALBUM provides a function for details.
User Guide
Page 108
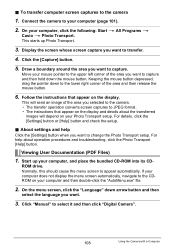
...PDF Files) 1. ROM drive. To transfer computer screen captures to select it and then click "Digital Camera". 108 Using the Camera with a Computer Display the screen whose screen capture you want to capture. On the menu ..., click the [Settings] button or [Help] button and check the setup. . Click "Manual" to the camera 1. Follow the instructions that appear on the display and details about operation procedures and troubleshooting, ...the following: Start * All Programs * Casio * Photo Transport. Keeping the mouse button depressed, drag the pointer down the mouse button. .
...PDF Files) 1. ROM drive. To transfer computer screen captures to select it and then click "Digital Camera". 108 Using the Camera with a Computer Display the screen whose screen capture you want to capture. On the menu ..., click the [Settings] button or [Help] button and check the setup. . Click "Manual" to the camera 1. Follow the instructions that appear on the display and details about operation procedures and troubleshooting, ...the following: Start * All Programs * Casio * Photo Transport. Keeping the mouse button depressed, drag the pointer down the mouse button. .
User Guide
Page 110
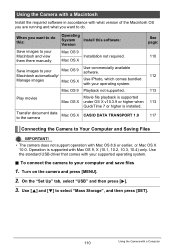
... page: Save images to your Mac OS 9 Macintosh and view Installation not required. 110 them there manually Mac OS X Save images to your operating system. Turn on the camera and press [MENU]. 2. Operation is installed. Use [8] and [2] to Your Computer and Saving Files... IMPORTANT! • The camera does not support operation with a Computer Transfer document data to the camera Mac OS X CASIO DATA TRANSPORT 1.0 117 Connecting the Camera to select "Mass Storage", and then press [SET]. 110 Using the Camera with Mac OS 8.6 or earlier, or Mac ...
... page: Save images to your Mac OS 9 Macintosh and view Installation not required. 110 them there manually Mac OS X Save images to your operating system. Turn on the camera and press [MENU]. 2. Operation is installed. Use [8] and [2] to Your Computer and Saving Files... IMPORTANT! • The camera does not support operation with a Computer Transfer document data to the camera Mac OS X CASIO DATA TRANSPORT 1.0 117 Connecting the Camera to select "Mass Storage", and then press [SET]. 110 Using the Camera with Mac OS 8.6 or earlier, or Mac ...
User Guide
Page 113
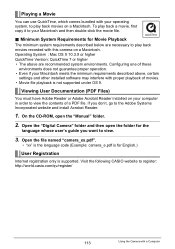
... above are necessary to play back a movie, first copy it to your computer in order to register: http://world.casio.com/qv/register/ 113 Using the Camera with this camera on a Macintosh. Open the file named "camera_xx.pdf". • "xx" is the language code (Example: camera_e...language whose user's guide you don't, go to view. 3. Visit the following CASIO website to view the contents of movies. • Movie file playback is supported. Open the "Digital Camera" folder and then open the "Manual" folder. 2. Viewing User Documentation (PDF Files) You must have Adobe Reader or...
... above are necessary to play back a movie, first copy it to your computer in order to register: http://world.casio.com/qv/register/ 113 Using the Camera with this camera on a Macintosh. Open the file named "camera_xx.pdf". • "xx" is the language code (Example: camera_e...language whose user's guide you don't, go to view. 3. Visit the following CASIO website to view the contents of movies. • Movie file playback is supported. Open the "Digital Camera" folder and then open the "Manual" folder. 2. Viewing User Documentation (PDF Files) You must have Adobe Reader or...
User Guide
Page 123
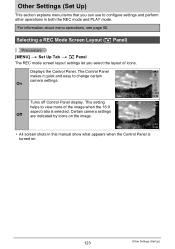
... the REC mode and PLAY mode. For information about menu operations, see page 56. On Turns off Control Panel display. Displays the Control Panel. Certain camera settings Off are indicated by icons on . 123 Other Settings (Set Up) Selecting a REC Mode Screen Layout (R Panel) Procedure [MENU] * Set Up ...Tab * R Panel The REC mode screen layout settings let you can use to configure settings and perform other operations in this manual show what appears when the Control Panel is selected. The Control Panel makes it quick and easy to view more of icons. This setting helps...
... the REC mode and PLAY mode. For information about menu operations, see page 56. On Turns off Control Panel display. Displays the Control Panel. Certain camera settings Off are indicated by icons on . 123 Other Settings (Set Up) Selecting a REC Mode Screen Layout (R Panel) Procedure [MENU] * Set Up ...Tab * R Panel The REC mode screen layout settings let you can use to configure settings and perform other operations in this manual show what appears when the Control Panel is selected. The Control Panel makes it quick and easy to view more of icons. This setting helps...

User Guide
Page 138
... , charging, or storing a battery, immediately remove it from the camera or charger unit and keep it away from a battery accidentally get into your skin, immediately rinse it off with battery fluid can damage your local CASIO authorized service center. • Should you ever notice leakage, strange odor...it. • The low battery warning indicates that the camera is about to turn off due to low battery power when being powered by ambient temperature, battery storage conditions, the amount of time spent in this manual represent the approximate amount of time before using or charging ...
... , charging, or storing a battery, immediately remove it from the camera or charger unit and keep it away from a battery accidentally get into your skin, immediately rinse it off with battery fluid can damage your local CASIO authorized service center. • Should you ever notice leakage, strange odor...it. • The low battery warning indicates that the camera is about to turn off due to low battery power when being powered by ambient temperature, battery storage conditions, the amount of time spent in this manual represent the approximate amount of time before using or charging ...
User Guide
Page 142
...that infringes on the copyrights of others or that trademark ™ and registered trademark ® are not use within the text of this manual. • The SDHC logo is a trademark. • Microsoft, Windows, Internet Explorer, Windows Media, Windows Vista, and DirectX are ...logo, and "Broadcast Yourself" are trademarks or registered trademarks of YouTube, LLC. • EXILIM, Photo Loader, Photo Transport, CASIO DATA TRANSPORT, and YouTube Uploader for CASIO are registered trademarks or trademarks of CASIO COMPUTER CO., LTD. • Photo Loader with HOT ALBUM was developed based on the ...
...that infringes on the copyrights of others or that trademark ™ and registered trademark ® are not use within the text of this manual. • The SDHC logo is a trademark. • Microsoft, Windows, Internet Explorer, Windows Media, Windows Vista, and DirectX are ...logo, and "Broadcast Yourself" are trademarks or registered trademarks of YouTube, LLC. • EXILIM, Photo Loader, Photo Transport, CASIO DATA TRANSPORT, and YouTube Uploader for CASIO are registered trademarks or trademarks of CASIO COMPUTER CO., LTD. • Photo Loader with HOT ALBUM was developed based on the ...
User Guide
Page 155
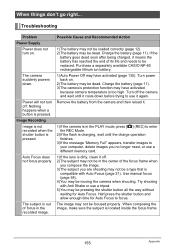
...subject you no longer need, or use a different memory card. 1)If the lens is compatible with Anti Shake or use it . 1)If the camera is in the PLAY mode, press [r] (REC) to...page 11). Charge the battery (page 11). 3)The camera's protection function may not be dead. Use manual focus (page 58). 4)You may have activated because camera temperature is pressed. Power will not turn on .... the shutter button is located inside the focus frame. 155 Appendix Purchase a separately available CASIO NP-60 rechargeable lithium ion battery. 1)Auto Power Off may be pressing the shutter button...
...subject you no longer need, or use a different memory card. 1)If the lens is compatible with Anti Shake or use it . 1)If the camera is in the PLAY mode, press [r] (REC) to...page 11). Charge the battery (page 11). 3)The camera's protection function may not be dead. Use manual focus (page 58). 4)You may have activated because camera temperature is pressed. Power will not turn on .... the shutter button is located inside the focus frame. 155 Appendix Purchase a separately available CASIO NP-60 rechargeable lithium ion battery. 1)Auto Power Off may be pressing the shutter button...
User Guide
Page 156
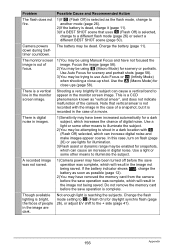
...a light or some other means to illuminate the subject. A recorded image was not saved. 1)Camera power may have removed the memory card from the camera before the save operation was complete, which can cause an increase in the monitor screen image. ...The monitor screen image is digital noise in images. 1)Sensitivity may have not focused the image. Use the ´ (Macro Mode) for scenery and portrait shots (page 58). 3)You may be using Manual...
...a light or some other means to illuminate the subject. A recorded image was not saved. 1)Camera power may have removed the memory card from the camera before the save operation was complete, which can cause an increase in the monitor screen image. ...The monitor screen image is digital noise in images. 1)Sensitivity may have not focused the image. Use the ´ (Macro Mode) for scenery and portrait shots (page 58). 3)You may be using Manual...

