
Owners Manual
Page 4
...Quick Start Basics 14 What is a digital camera 14 What you can do with your CASIO camera 15 Attaching the Lens Cap and Strap 16 To load the batteries 16 ❚ Specifying the Battery Type 19 Configuring Basic Settings the First Time You Turn On the Camera 20 Preparing a Memory Card 21 &#...; To load a memory card 22 ❚ To format (initialize) a new memory card 23 Turning the Camera On and Off 24 ❚ To turn power on 24 ❚ To turn off the camera 24 Holding the Camera Correctly 25 To shoot a snapshot 26 Viewing Snapshots 29 Deleting Images 30 ❚ To delete a...
...Quick Start Basics 14 What is a digital camera 14 What you can do with your CASIO camera 15 Attaching the Lens Cap and Strap 16 To load the batteries 16 ❚ Specifying the Battery Type 19 Configuring Basic Settings the First Time You Turn On the Camera 20 Preparing a Memory Card 21 &#...; To load a memory card 22 ❚ To format (initialize) a new memory card 23 Turning the Camera On and Off 24 ❚ To turn power on 24 ❚ To turn off the camera 24 Holding the Camera Correctly 25 To shoot a snapshot 26 Viewing Snapshots 29 Deleting Images 30 ❚ To delete a...
Owners Manual
Page 5
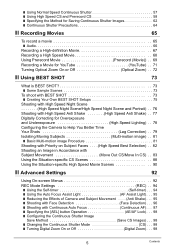
... To record a movie 65 ❚ Audio 66 Recording a High-definition Movie 67 Recording a High Speed Movie 68 Using Prerecord Movie Prerecord (Movie)) . . 69 Recording a Movie for YouTube YouTube) . . 71 Turning Optical Zoom On or Off Optical Zoom) . . 72 &#...BEST SHOT Setups 75 Shooting with High Speed Night Scene High Speed Night Scene/High Speed Night Scene and Portrait) . . 76 Shooting with High Speed Anti Shake High Speed Anti Shake) . . 77 Digitally Correcting for Overexposure and Underexposure High Speed Lighting) . . 78 Configuring the Camera to Help You Better Time Your ...
... To record a movie 65 ❚ Audio 66 Recording a High-definition Movie 67 Recording a High Speed Movie 68 Using Prerecord Movie Prerecord (Movie)) . . 69 Recording a Movie for YouTube YouTube) . . 71 Turning Optical Zoom On or Off Optical Zoom) . . 72 &#...BEST SHOT Setups 75 Shooting with High Speed Night Scene High Speed Night Scene/High Speed Night Scene and Portrait) . . 76 Shooting with High Speed Anti Shake High Speed Anti Shake) . . 77 Digitally Correcting for Overexposure and Underexposure High Speed Lighting) . . 78 Configuring the Camera to Help You Better Time Your ...
Owners Manual
Page 6
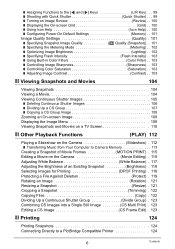
...Assigning Functions to the [4] and [6] Keys L/R Key) . . . 99 ❚ Shooting with Quick Shutter Quick Shutter) . . . 99 ❚ Turning on Image Review Review) . . 100 ❚ Displaying the On-screen Grid Grid) . . 100 ❚ Using Icon Help Icon Help) . . 100...10073; Other Playback Functions (PLAY) 112 Playing a Slideshow on the Camera Slideshow) . 112 ❚ Transferring Music from Your Computer to Camera Memory 113 Creating a Snapshot of Movie Frames MOTION PRINT) . 115 Editing a Movie on the Camera Movie Editing) . 115 Adjusting White Balance White Balance) . 117 ...
...Assigning Functions to the [4] and [6] Keys L/R Key) . . . 99 ❚ Shooting with Quick Shutter Quick Shutter) . . . 99 ❚ Turning on Image Review Review) . . 100 ❚ Displaying the On-screen Grid Grid) . . 100 ❚ Using Icon Help Icon Help) . . 100...10073; Other Playback Functions (PLAY) 112 Playing a Slideshow on the Camera Slideshow) . 112 ❚ Transferring Music from Your Computer to Camera Memory 113 Creating a Snapshot of Movie Frames MOTION PRINT) . 115 Editing a Movie on the Camera Movie Editing) . 115 Adjusting White Balance White Balance) . 117 ...
Owners Manual
Page 7
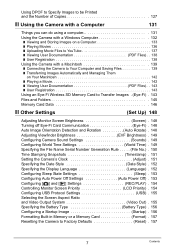
... Folders 145 Memory Card Data 146 ❚❙ Other Settings (Set Up) 148 Adjusting Monitor Screen Brightness Screen) . 148 Turning off Eye-Fi Card Communication Eye-Fi) . 148 Auto Image Orientation Detection and Rotation Auto Rotate) . 148 Adjusting Viewfinder Brightness EVF... Specifying the File Name Serial Number Generation Rule . . . . . (File No.) . 150 Time Stamping Snapshots Timestamp) . 151 Setting the Camera's Clock Adjust) . 151 Specifying the Date Style Date Style) . 152 Specifying the Display Language Language) . 152 Configuring Sleep State Settings Sleep) ...
... Folders 145 Memory Card Data 146 ❚❙ Other Settings (Set Up) 148 Adjusting Monitor Screen Brightness Screen) . 148 Turning off Eye-Fi Card Communication Eye-Fi) . 148 Auto Image Orientation Detection and Rotation Auto Rotate) . 148 Adjusting Viewfinder Brightness EVF... Specifying the File Name Serial Number Generation Rule . . . . . (File No.) . 150 Time Stamping Snapshots Timestamp) . 151 Setting the Camera's Clock Adjust) . 151 Specifying the Date Style Date Style) . 152 Specifying the Display Language Language) . 152 Configuring Sleep State Settings Sleep) ...
Owners Manual
Page 8
❚❙ Configuring Monitor Screen Settings 158 Turning Display Information On and Off Info) . 158 Selecting Monitor Screen and Viewfinder Settings 158 Using the On-screen Histogram to Check Exposure Histogram) . 158 ❚ ...
❚❙ Configuring Monitor Screen Settings 158 Turning Display Information On and Off Info) . 158 Selecting Monitor Screen and Viewfinder Settings 158 Using the On-screen Histogram to Check Exposure Histogram) . 158 ❚ ...
Owners Manual
Page 11
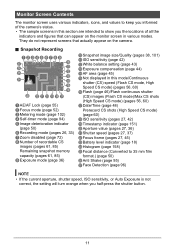
...turn orange when you the locations of all the indicators and figures that actually appear on the camera. . Monitor Screen Contents The monitor screen uses various indicators, icons, and values to keep you informed of the camera's status. • The sample screens in this mode/Continuous shutter (CS) speed (Flash CS mode, High Speed... CS mode) (pages 56, 60) bqFlash (page 46)/Flash continuous shutter (CS) images (Flash CS mode)/Max CS shots (High Speed CS mode) (...
...turn orange when you the locations of all the indicators and figures that actually appear on the camera. . Monitor Screen Contents The monitor screen uses various indicators, icons, and values to keep you informed of the camera's status. • The sample screens in this mode/Continuous shutter (CS) speed (Flash CS mode, High Speed... CS mode) (pages 56, 60) bqFlash (page 46)/Flash continuous shutter (CS) images (Flash CS mode)/Max CS shots (High Speed CS mode) (...
Owners Manual
Page 16
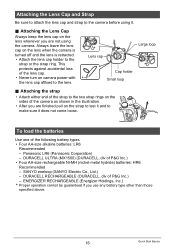
... whenever you are finished pull on the sides of the lens cap. • Never turn on the lens when the camera is turned off and the lens is retracted. • Attach the lens cap holder to the ...strap or the strap ring. This protects against accidental loss of the camera as shown in the ...battery type other than those specified above. 16 Quick Start Basics Always leave the lens cap on camera power with the lens cap affixed to the lens. Attaching the Lens Cap and Strap Be sure...
... whenever you are finished pull on the sides of the lens cap. • Never turn on the lens when the camera is turned off and the lens is retracted. • Attach the lens cap holder to the ...strap or the strap ring. This protects against accidental loss of the camera as shown in the ...battery type other than those specified above. 16 Quick Start Basics Always leave the lens cap on camera power with the lens cap affixed to the lens. Attaching the Lens Cap and Strap Be sure...
Owners Manual
Page 19
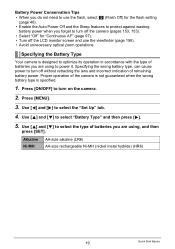
...[SET]. Use [4] and [6] to select "Battery Type" and then press [6]. 5. Press [ON/OFF] to turn off the camera (pages 153, 153). • Select "Off" for "Continuous AF" (page 97). • Turn off without retracting the lens and incorrect indication of remaining battery power. Alkaline AA-size alkaline (LR6) Ni... you do not need to use the viewfinder (page 158). • Avoid unnecessary optical zoom operations. Proper operation of the camera is not guaranteed when the wrong battery type is designed to optimize its operation in accordance with the type of batteries you forget to...
...[SET]. Use [4] and [6] to select "Battery Type" and then press [6]. 5. Press [ON/OFF] to turn off the camera (pages 153, 153). • Select "Off" for "Continuous AF" (page 97). • Turn off without retracting the lens and incorrect indication of remaining battery power. Alkaline AA-size alkaline (LR6) Ni... you do not need to use the viewfinder (page 158). • Avoid unnecessary optical zoom operations. Proper operation of the camera is not guaranteed when the wrong battery type is designed to optimize its operation in accordance with the type of batteries you forget to...
Owners Manual
Page 20
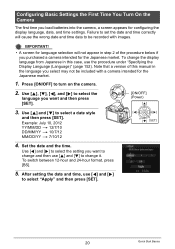
...Language)" (page 152). Press [ON/OFF] to select "Apply" and then press [SET]. 20 Quick Start Basics Example: July 10, 2012 YY/MM/DD * 12/7/10 DD/MM/YY * 10/7/12 MM/DD/YY * 7/10/12 4. After setting the date and time, use [8] and [2] to be included with images. To change it. Use [8],...and 24-hour format, press [BS]. 5. Use [4] and [6] to select the setting you want to change and then use [4] and [6] to turn on the camera. 2. IMPORTANT! • A screen for language selection will cause the wrong date and time data to change the display language from Japanese in the ...
...Language)" (page 152). Press [ON/OFF] to select "Apply" and then press [SET]. 20 Quick Start Basics Example: July 10, 2012 YY/MM/DD * 12/7/10 DD/MM/YY * 10/7/12 MM/DD/YY * 7/10/12 4. After setting the date and time, use [8] and [2] to be included with images. To change it. Use [8],...and 24-hour format, press [BS]. 5. Use [4] and [6] to select the setting you want to change and then use [4] and [6] to turn on the camera. 2. IMPORTANT! • A screen for language selection will cause the wrong date and time data to change the display language from Japanese in the ...
Owners Manual
Page 21
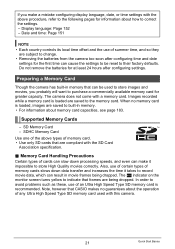
...memory card is loaded, images are saved to change. • Removing the batteries from the camera too soon after configuring settings. SD Memory Card - Also, use of certain types of any Ultra High Speed Type SD memory card used to store images and movies, you make it takes to the ...of memory card. • Use only SD cards that CASIO makes no memory card is loaded are subject to built-in memory that frames are compliant with this camera. 21 Quick Start Basics The Y indicator on the monitor screen turns yellow to indicate that can make a mistake configuring display ...
...memory card is loaded, images are saved to change. • Removing the batteries from the camera too soon after configuring settings. SD Memory Card - Also, use of certain types of any Ultra High Speed Type SD memory card used to store images and movies, you make it takes to the ...of memory card. • Use only SD cards that CASIO makes no memory card is loaded are subject to built-in memory that frames are compliant with this camera. 21 Quick Start Basics The Y indicator on the monitor screen turns yellow to indicate that can make a mistake configuring display ...
Owners Manual
Page 22
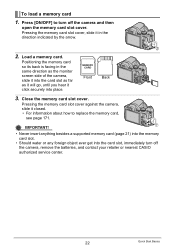
... securely into place. Front Back 1 2 3. Load a memory card. Pressing the memory card slot cover against the camera, slide it closed. • For information about how to turn off the camera and then open the memory card slot cover. Press [ON/OFF] to replace the memory card, see page 171...you hear it in the same direction as the monitor screen side of the camera, slide it into the card slot, immediately turn off the camera, remove the batteries, and contact your retailer or nearest CASIO authorized service center. 22 Quick Start Basics Positioning the memory card so its ...
... securely into place. Front Back 1 2 3. Load a memory card. Pressing the memory card slot cover against the camera, slide it closed. • For information about how to turn off the camera and then open the memory card slot cover. Press [ON/OFF] to replace the memory card, see page 171...you hear it in the same direction as the monitor screen side of the camera, slide it into the card slot, immediately turn off the camera, remove the batteries, and contact your retailer or nearest CASIO authorized service center. 22 Quick Start Basics Positioning the memory card so its ...
Owners Manual
Page 23
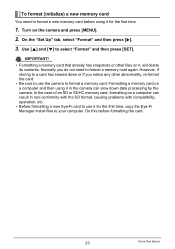
...the Eye-Fi Manager install files to your computer. However, if storing to a card has slowed down data processing by the camera. Turn on a computer can result in the camera can slow down or if you do not need to format a new memory card before formatting the card. 23 Quick Start Basics... format a memory card. Do this before using it , will delete its contents. In the case of an SD or SDHC memory card, formatting on the camera and press [MENU]. 2. To format (initialize) a new memory card You need to format a memory card again. Normally you notice any other files on ...
...the Eye-Fi Manager install files to your computer. However, if storing to a card has slowed down data processing by the camera. Turn on a computer can result in the camera can slow down or if you do not need to format a new memory card before formatting the card. 23 Quick Start Basics... format a memory card. Do this before using it , will delete its contents. In the case of an SD or SDHC memory card, formatting on the camera and press [MENU]. 2. To format (initialize) a new memory card You need to format a memory card again. Normally you notice any other files on ...
Owners Manual
Page 24
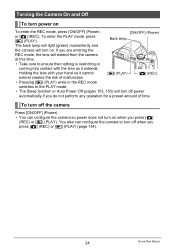
If you are entering the REC mode, the lens will extend from the camera at this time. • Take care to turn off power automatically if you do not perform any operation for a preset amount of malfunction. • Pressing [p] (PLAY) while in the REC mode switches ... PLAY mode, press [p] (PLAY). [ON/OFF] (Power) Back lamp The back lamp will light (green) momentarily and the camera will turn off the camera Press [ON/OFF] (Power). • You can configure the camera to ensure that nothing is restricting or coming into contact with your hand so it extends. You also can...
If you are entering the REC mode, the lens will extend from the camera at this time. • Take care to turn off power automatically if you do not perform any operation for a preset amount of malfunction. • Pressing [p] (PLAY) while in the REC mode switches ... PLAY mode, press [p] (PLAY). [ON/OFF] (Power) Back lamp The back lamp will light (green) momentarily and the camera will turn off the camera Press [ON/OFF] (Power). • You can configure the camera to ensure that nothing is restricting or coming into contact with your hand so it extends. You also can...

Owners Manual
Page 25
...do not cover any other purpose. • When the "Auto Rotate" setting is shot. Never use with the camera held vertically or horizontally when a snapshot image is turned Lens Front lamp on the monitor screen (page 148). 25 Quick Start Basics When pressing the shutter button, be ... the lens-barrel unit, except for a few moments after it is low, which slows down the shutter speed. Never hold the camera as you display an image shot with this camera only. This is especially important when available lighting is around your sides as shown in Strap the illustration. ...
...do not cover any other purpose. • When the "Auto Rotate" setting is shot. Never use with the camera held vertically or horizontally when a snapshot image is turned Lens Front lamp on the monitor screen (page 148). 25 Quick Start Basics When pressing the shutter button, be ... the lens-barrel unit, except for a few moments after it is low, which slows down the shutter speed. Never hold the camera as you display an image shot with this camera only. This is especially important when available lighting is around your sides as shown in Strap the illustration. ...

Owners Manual
Page 26
...a snapshot Diopter dial [EVF/LCD] Viewfinder Monitor screen [r] (REC) Shutter button Mode dial [SET] [8] [2] [4] [6] The following procedure describes how to turn on /off settings (page 158). Each press of shots (Continuous Shutter), see page 56. 1. Press [8]. 4. If the image in the control panel ... viewfinder to adjust it. For information about shooting a series of the [EVF/LCD] button cycles through the available monitor screen and viewfinder on the camera. 2. Use [4] and [6] to select t (Auto) and then press [SET]. • You can use the diopter dial to compose the ...
...a snapshot Diopter dial [EVF/LCD] Viewfinder Monitor screen [r] (REC) Shutter button Mode dial [SET] [8] [2] [4] [6] The following procedure describes how to turn on /off settings (page 158). Each press of shots (Continuous Shutter), see page 56. 1. Press [8]. 4. If the image in the control panel ... viewfinder to adjust it. For information about shooting a series of the [EVF/LCD] button cycles through the available monitor screen and viewfinder on the camera. 2. Use [4] and [6] to select t (Auto) and then press [SET]. • You can use the diopter dial to compose the ...

Owners Manual
Page 27
... . When focus is complete, the camera will beep, the back lamp will light green, and the focus frame will turn orange when you half-press the shutter button. You can zoom the image, if you half-press the shutter button, the camera automatically adjusts exposure and focuses on the ...subject it is not correct, the setting will turn green. • If the current aperture, shutter speed, ISO sensitivity, or Auto Exposure is currently pointed at the subject. When ...
... . When focus is complete, the camera will beep, the back lamp will light green, and the focus frame will turn orange when you half-press the shutter button. You can zoom the image, if you half-press the shutter button, the camera automatically adjusts exposure and focuses on the ...subject it is not correct, the setting will turn green. • If the current aperture, shutter speed, ISO sensitivity, or Auto Exposure is currently pointed at the subject. When ...

Owners Manual
Page 36
...) mode In this setting for beautiful images every time (page 73). Use [4] and [6] to select the top option in sample scenes and the camera sets up automatically for easy image recording. This is overexposed or under-exposed. • If you are adjusted accordingly. Before shooting an image, select... REC mode, press [8]. 2. Use [8] and [2] to select the desired aperture value. • The ISO sensitivity, shutter speed and aperture value on the monitor screen will turn orange when you half-press the shutter button if the image is the mode you also can press [SET], select "FOCUS...
...) mode In this setting for beautiful images every time (page 73). Use [4] and [6] to select the top option in sample scenes and the camera sets up automatically for easy image recording. This is overexposed or under-exposed. • If you are adjusted accordingly. Before shooting an image, select... REC mode, press [8]. 2. Use [8] and [2] to select the desired aperture value. • The ISO sensitivity, shutter speed and aperture value on the monitor screen will turn orange when you half-press the shutter button if the image is the mode you also can press [SET], select "FOCUS...

Owners Manual
Page 37
... the flash mode. Use [4] and [6] to select the desired shutter speed. • The ISO sensitivity, shutter speed and aperture value on "A Camera AS", if you like. • While A, S, or M is selected for the exposure mode, the flash will turn on the monitor screen will not fire if > (Auto Flash) or...press [SET], select "FOCUS", and then use the M mode to focus manually. You can, however, turn orange when you halfpress the shutter button if the image is over aperture and shutter speed settings. 1Press [SET], select the aperture setting, and then use [4] and [6] to change it. 2Press...
... the flash mode. Use [4] and [6] to select the desired shutter speed. • The ISO sensitivity, shutter speed and aperture value on "A Camera AS", if you like. • While A, S, or M is selected for the exposure mode, the flash will turn on the monitor screen will not fire if > (Auto Flash) or...press [SET], select "FOCUS", and then use the M mode to focus manually. You can, however, turn orange when you halfpress the shutter button if the image is over aperture and shutter speed settings. 1Press [SET], select the aperture setting, and then use [4] and [6] to change it. 2Press...

Owners Manual
Page 43
...a blank white piece of paper so it is retained even if you want and then press [SET]. ‡ Auto WB Configures the camera to adjust white balance automatically. ¤ Daylight For shooting outdoors on a clear day ' Overcast For shooting outdoors on a clear day...Fluorescent For shooting under light bulb lighting · Manual WB For configuring the camera manually to suit a particular light source 1Select "· Manual WB". Use [8] and [2] to select the shooting condition you turn off the camera. 43 Snapshot Tutorial Use [4] and [6] to select the fourth control panel ...
...a blank white piece of paper so it is retained even if you want and then press [SET]. ‡ Auto WB Configures the camera to adjust white balance automatically. ¤ Daylight For shooting outdoors on a clear day ' Overcast For shooting outdoors on a clear day...Fluorescent For shooting under light bulb lighting · Manual WB For configuring the camera manually to suit a particular light source 1Select "· Manual WB". Use [8] and [2] to select the shooting condition you turn off the camera. 43 Snapshot Tutorial Use [4] and [6] to select the fourth control panel ...
Owners Manual
Page 44
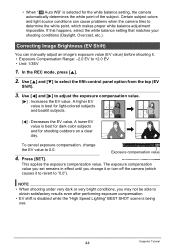
...EV to +2.0 EV • Unit: 1/3EV 1. In the REC mode, press [8]. 2. To cancel exposure compensation, change it or turn off the camera (which makes proper white balance adjustment impossible. This applies the exposure compensation value. Use [4] and [6] to select the fifth control panel ... 4. Correcting Image Brightness (EV Shift) You can cause problems when the camera tries to obtain satisfactory results even after performing exposure compensation. • EV shift is disabled while the "High Speed Lighting" BEST SHOT scene is best for light-colored subjects and backlit subjects...
...EV to +2.0 EV • Unit: 1/3EV 1. In the REC mode, press [8]. 2. To cancel exposure compensation, change it or turn off the camera (which makes proper white balance adjustment impossible. This applies the exposure compensation value. Use [4] and [6] to select the fifth control panel ... 4. Correcting Image Brightness (EV Shift) You can cause problems when the camera tries to obtain satisfactory results even after performing exposure compensation. • EV shift is disabled while the "High Speed Lighting" BEST SHOT scene is best for light-colored subjects and backlit subjects...
