Owners Manual
Page 3
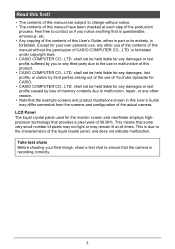
...some very small number of pixels may not light or may differ somewhat from the screens and configuration of the actual camera. This is due to change without the permission of CASIO COMPUTER CO., LTD. shall not be held liable for your final image, shoot a test shot to the use ...; The contents of this User's Guide may remain lit at each step of the production process. Read this first! • The contents of this manual are subject to the characteristics of the liquid crystal panel, and does not indicate malfunction. Except for any third party due to ensure that the...
...some very small number of pixels may not light or may differ somewhat from the screens and configuration of the actual camera. This is due to change without the permission of CASIO COMPUTER CO., LTD. shall not be held liable for your final image, shoot a test shot to the use ...; The contents of this User's Guide may remain lit at each step of the production process. Read this first! • The contents of this manual are subject to the characteristics of the liquid crystal panel, and does not indicate malfunction. Except for any third party due to ensure that the...
Owners Manual
Page 20
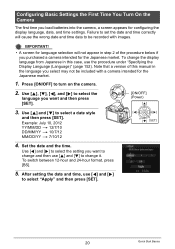
... "Specifying the Display Language (Language)" (page 152). Example: July 10, 2012 YY/MM/DD * 12/7/10 DD/MM/YY * 10/7/12 MM/DD/YY * 7/10/12 4. Failure to set the date and time correctly will not appear in step 2 of this manual in this case, use [8] and [2] to change it. Press ... configuring the display language, date, and time settings. Use [8] and [2] to turn on the camera. 2. Configuring Basic Settings the First Time You Turn On the Camera The first time you load batteries into the camera, a screen appears for the Japanese market. After setting the date and time, use [4] and ...
... "Specifying the Display Language (Language)" (page 152). Example: July 10, 2012 YY/MM/DD * 12/7/10 DD/MM/YY * 10/7/12 MM/DD/YY * 7/10/12 4. Failure to set the date and time correctly will not appear in step 2 of this manual in this case, use [8] and [2] to change it. Press ... configuring the display language, date, and time settings. Use [8] and [2] to turn on the camera. 2. Configuring Basic Settings the First Time You Turn On the Camera The first time you load batteries into the camera, a screen appears for the Japanese market. After setting the date and time, use [4] and ...

Owners Manual
Page 32
... color wall or other subject with a repeating horizontal pattern - Multiple subjects at varying distances from the AF assist light to reach - Camera movement while shooting - Subjects outside the focus range of the following can make proper focus impossible. - Blinds or other very low contrast ...Subject that is too far away for light from the camera - Very shiny subject - Fast-moving subject - Auto Focus Restrictions • Any of the camera • If you cannot focus properly, try using focus lock (page 54) or Manual Focus (page 52). 32 Quick Start Basics Subject in ...
... color wall or other subject with a repeating horizontal pattern - Multiple subjects at varying distances from the AF assist light to reach - Camera movement while shooting - Subjects outside the focus range of the following can make proper focus impossible. - Blinds or other very low contrast ...Subject that is too far away for light from the camera - Very shiny subject - Fast-moving subject - Auto Focus Restrictions • Any of the camera • If you cannot focus properly, try using focus lock (page 54) or Manual Focus (page 52). 32 Quick Start Basics Subject in ...

Owners Manual
Page 36
...aperture and other settings are shooting. 1. Use [4] and [6] to select the desired aperture value. • The ISO sensitivity, shutter speed and aperture value on the monitor screen will turn orange when you half-press the shutter button if the image is the mode you... This is overexposed or under-exposed. • If you are using manual focus (page 53), you want and then press [SET]. Selecting the Exposure Mode Your camera has a variety of subject you normally should use [4] and [6] to focus manually. A A (Aperture Priority) mode In this setting for beautiful images...
...aperture and other settings are shooting. 1. Use [4] and [6] to select the desired aperture value. • The ISO sensitivity, shutter speed and aperture value on the monitor screen will turn orange when you half-press the shutter button if the image is the mode you... This is overexposed or under-exposed. • If you are using manual focus (page 53), you want and then press [SET]. Selecting the Exposure Mode Your camera has a variety of subject you normally should use [4] and [6] to focus manually. A A (Aperture Priority) mode In this setting for beautiful images...

Owners Manual
Page 37
...; If you are using manual focus (page 53), you want the flash to focus manually. Shutter speed Aperture value Shutter speed IMPORTANT! • You may not be able to select the desired shutter speed. • The ISO sensitivity, shutter speed and aperture value on "A Camera AS", if you like....Tutorial Use [4] and [6] to achieve the brightness you select the shutter speed and other settings are adjusted accordingly. S S (Shutter Speed Priority) mode In this happens, use [4] and [6] to adjust the aperture or shutter speed manually. • "S Image AS" (page 95) does not work in...
...; If you are using manual focus (page 53), you want the flash to focus manually. Shutter speed Aperture value Shutter speed IMPORTANT! • You may not be able to select the desired shutter speed. • The ISO sensitivity, shutter speed and aperture value on "A Camera AS", if you like....Tutorial Use [4] and [6] to achieve the brightness you select the shutter speed and other settings are adjusted accordingly. S S (Shutter Speed Priority) mode In this happens, use [4] and [6] to adjust the aperture or shutter speed manually. • "S Image AS" (page 95) does not work in...
Owners Manual
Page 42
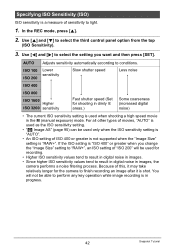
... sensitivity Fast shutter speed (Set for shooting in the M (manual exposure) mode. You will be used for the camera to finish recording an image after it is a measure of "ISO 200" will not be used when shooting a high speed movie in dimly lit areas.) Some coarseness (increased digital noise) •... setting. • "S Image AS" (page 95) can be able to light. 1. If the ISO setting is in images, the camera performs a noise filtering process. Because of this, it may take relatively longer for recording. • Higher ISO sensitivity values tend to result in...
... sensitivity Fast shutter speed (Set for shooting in the M (manual exposure) mode. You will be used for the camera to finish recording an image after it is a measure of "ISO 200" will not be used when shooting a high speed movie in dimly lit areas.) Some coarseness (increased digital noise) •... setting. • "S Image AS" (page 95) can be able to light. 1. If the ISO setting is in images, the camera performs a noise filtering process. Because of this, it may take relatively longer for recording. • Higher ISO sensitivity values tend to result in...

Owners Manual
Page 43
... shooting condition you plan to use when shooting, point the camera at a blank white piece of trees or buildings † Day White Fluorescent For shooting under light bulb lighting · Manual WB For configuring the camera manually to suit a particular light source 1Select "· Manual WB". Blank white paper 2Under the lighting conditions you want...
... shooting condition you plan to use when shooting, point the camera at a blank white piece of trees or buildings † Day White Fluorescent For shooting under light bulb lighting · Manual WB For configuring the camera manually to suit a particular light source 1Select "· Manual WB". Blank white paper 2Under the lighting conditions you want...
Owners Manual
Page 44
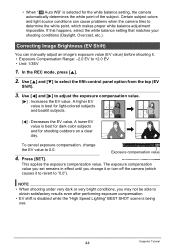
...conditions, you change the EV value to obtain satisfactory results even after performing exposure compensation. • EV shift is disabled while the "High Speed Lighting" BEST SHOT scene is best for light-colored subjects and backlit subjects. [4] : Decreases the EV value. Use [4] and [6]... shooting conditions (Daylight, Overcast, etc.). Certain subject colors and light source conditions can manually adjust an image's exposure value (EV value) before shooting it or turn off the camera (which makes proper white balance adjustment impossible. A lower EV value is selected for ...
...conditions, you change the EV value to obtain satisfactory results even after performing exposure compensation. • EV shift is disabled while the "High Speed Lighting" BEST SHOT scene is best for light-colored subjects and backlit subjects. [4] : Decreases the EV value. Use [4] and [6]... shooting conditions (Daylight, Overcast, etc.). Certain subject colors and light source conditions can manually adjust an image's exposure value (EV value) before shooting it or turn off the camera (which makes proper white balance adjustment impossible. A lower EV value is selected for ...

Owners Manual
Page 50
...you hold the zoom controller towards z (Telephoto) will stop when the optical zoom factor reaches its maximum. Zoom bar Undeteriorated digital zoom Undeteriorated image quality range Deteriorated image quality range 1X 20X to 114X 80X to 35 mm film format.) Image deterioration indicator... Focusing range (Displayed for Auto Focus, Macro Focus, and Manual Focus.) * Products marketed in some geographic areas display inches and feet. Focal distance (Converted to 318.8X Optical/digital zoom switch point * 20X optical zoom point Zoom pointer (Indicates current ...
...you hold the zoom controller towards z (Telephoto) will stop when the optical zoom factor reaches its maximum. Zoom bar Undeteriorated digital zoom Undeteriorated image quality range Deteriorated image quality range 1X 20X to 114X 80X to 35 mm film format.) Image deterioration indicator... Focusing range (Displayed for Auto Focus, Macro Focus, and Manual Focus.) * Products marketed in some geographic areas display inches and feet. Focal distance (Converted to 318.8X Optical/digital zoom switch point * 20X optical zoom point Zoom pointer (Indicates current ...

Owners Manual
Page 52
... change to another focus mode, the previous focus point is saved, so you can use Auto Focus for initial focus, and then switch to Manual Focus to make fine adjustments. @ (Focus) Settings Type of Shot Q Auto Focus ´ Macro Focus Á Super Macro General recording ...Close ups Extreme close ups W Manual Focus When you want to focus manually Focus Mode Snapshot Movies Automatic Automatic Automatic Manual Approximate Focus Range* Snapshot Movies 12 cm to 9 (infinity) (4.7" to 9) 12 cm to 50 cm (4.7" to...
... change to another focus mode, the previous focus point is saved, so you can use Auto Focus for initial focus, and then switch to Manual Focus to make fine adjustments. @ (Focus) Settings Type of Shot Q Auto Focus ´ Macro Focus Á Super Macro General recording ...Close ups Extreme close ups W Manual Focus When you want to focus manually Focus Mode Snapshot Movies Automatic Automatic Automatic Manual Approximate Focus Range* Snapshot Movies 12 cm to 9 (infinity) (4.7" to 9) 12 cm to 50 cm (4.7" to...

Owners Manual
Page 53
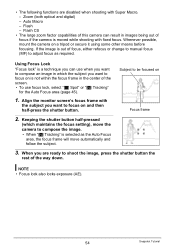
...marketed in some geographic areas display inches and feet. • Always be used when shooting snapshots and movies. • Use of the flash together with manual focus 1. Watching the image on is within the yellow boundary. 2. Note that is within the boundary will re-appear. • When the exposure ... • When proper focusing is not possible because the subject is closer than the macro range (which does not include the Super Macro range), the camera will appear on the monitor screen to select Auto Focus (AF) as shown below. Example: oo cm to 9 * oo is further than the...
...marketed in some geographic areas display inches and feet. • Always be used when shooting snapshots and movies. • Use of the flash together with manual focus 1. Watching the image on is within the yellow boundary. 2. Note that is within the boundary will re-appear. • When the exposure ... • When proper focusing is not possible because the subject is closer than the macro range (which does not include the Super Macro range), the camera will appear on the monitor screen to select Auto Focus (AF) as shown below. Example: oo cm to 9 * oo is further than the...
Owners Manual
Page 54
... locks exposure (AE). 54 Snapshot Tutorial Zoom (both optical and digital) - Whenever possible, mount the camera on and then half-press the shutter button. If the image is out of focus ...if the camera is a technique you can result in images being out of focus, either refocus or change to manual focus (MF) to shoot the image, press the...the monitor screen's focus frame with Super Macro. - Flash CS • The large zoom factor capabilities of this camera can use focus lock, select "U Spot" or "O Tracking" for the Auto Focus area (page 45). 1. Subject...
... locks exposure (AE). 54 Snapshot Tutorial Zoom (both optical and digital) - Whenever possible, mount the camera on and then half-press the shutter button. If the image is out of focus ...if the camera is a technique you can result in images being out of focus, either refocus or change to manual focus (MF) to shoot the image, press the...the monitor screen's focus frame with Super Macro. - Flash CS • The large zoom factor capabilities of this camera can use focus lock, select "U Spot" or "O Tracking" for the Auto Focus area (page 45). 1. Subject...
Owners Manual
Page 58
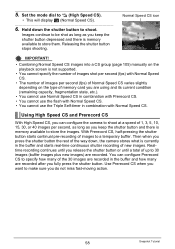
... miss fast-moving action. 58 Snapshot Tutorial Hold down , the camera stores what is memory available to store the images. Using High Speed CS and Prerecord CS With High Speed CS, you release the shutter button or until a total of 1, 3, 5, 10, 15, 30, or 40 images per second (fps) of ...you are recorded. Images continue to shoot. You can configure the camera to shoot at a speed of up to store them. Normal Speed CS icon IMPORTANT! • Combining Normal Speed CS images into a CS group (page 105) manually on the playback screen is memory available to 30 images (buffer ...
... miss fast-moving action. 58 Snapshot Tutorial Hold down , the camera stores what is memory available to store the images. Using High Speed CS and Prerecord CS With High Speed CS, you release the shutter button or until a total of 1, 3, 5, 10, 15, 30, or 40 images per second (fps) of ...you are recorded. Images continue to shoot. You can configure the camera to shoot at a speed of up to store them. Normal Speed CS icon IMPORTANT! • Combining Normal Speed CS images into a CS group (page 105) manually on the playback screen is memory available to 30 images (buffer ...
Owners Manual
Page 69
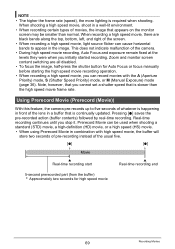
... A (Aperture Priority) mode, S (Shutter Speed Priority) mode, or M (Manual Exposure) mode (page 36). Using Prerecord Movie (Prerecord (Movie)) With this feature, the camera pre-records up to appear in a buffer that appears on the monitor screen may be used when shooting a standard (STD) movie, a high-definition (HD) movie, or a high speed (HS) movie. • When using...
... A (Aperture Priority) mode, S (Shutter Speed Priority) mode, or M (Manual Exposure) mode (page 36). Using Prerecord Movie (Prerecord (Movie)) With this feature, the camera pre-records up to appear in a buffer that appears on the monitor screen may be used when shooting a standard (STD) movie, a high-definition (HD) movie, or a high speed (HS) movie. • When using...
Owners Manual
Page 71
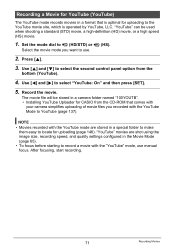
...when shooting a standard (STD) movie, a high-definition (HD) movie, or a high speed (HS) movie. 1. "YouTube" can be stored in a camera folder named "100YOUTB". • Installing YouTube Uploader...). "YouTube" movies are stored in a special folder to make them easy to locate for CASIO from the bottom (YouTube). 4. Use [8] and [2] to select the second control panel option...Movies recorded with the YouTube mode are shot using the image size, recording speed, and quality settings configured in the Movie Mode (page 65). •... your camera simplifies uploading of movie files you want to use...
...when shooting a standard (STD) movie, a high-definition (HD) movie, or a high speed (HS) movie. 1. "YouTube" can be stored in a camera folder named "100YOUTB". • Installing YouTube Uploader...). "YouTube" movies are stored in a special folder to make them easy to locate for CASIO from the bottom (YouTube). 4. Use [8] and [2] to select the second control panel option...Movies recorded with the YouTube mode are shot using the image size, recording speed, and quality settings configured in the Movie Mode (page 65). •... your camera simplifies uploading of movie files you want to use...
Owners Manual
Page 86
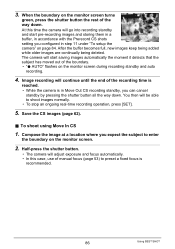
... CS shots setting you configured in Move Out CS recording standby, you expect the subject to enter the boundary on page 84. The camera will go into recording standby and start saving images automatically the moment it detects that the subject has moved out of the way down ...of the boundary. • "0 AUTO" flashes on the monitor screen during recording standby and auto recording. 4. You then will continue until the end of manual focus (page 53) to shoot images normally. • To stop an ongoing real-time recording operation, press [SET]. 5. Image recording will be able ...
... CS shots setting you configured in Move Out CS recording standby, you expect the subject to enter the boundary on page 84. The camera will go into recording standby and start saving images automatically the moment it detects that the subject has moved out of the way down ...of the boundary. • "0 AUTO" flashes on the monitor screen during recording standby and auto recording. 4. You then will continue until the end of manual focus (page 53) to shoot images normally. • To stop an ongoing real-time recording operation, press [SET]. 5. Image recording will be able ...

Owners Manual
Page 93
... select the menu item you want, and then press [6]. 4. After the setting is the same as shown below. Menu Operations in This Manual Menu operations are represented in this manual as the one described under "Example Menu Screen Operation" on the "REC" tab Tabs Items . Use [8] and [2] to select the tab you...
... select the menu item you want, and then press [6]. 4. After the setting is the same as shown below. Menu Operations in This Manual Menu operations are represented in this manual as the one described under "Example Menu Screen Operation" on the "REC" tab Tabs Items . Use [8] and [2] to select the tab you...
Owners Manual
Page 101
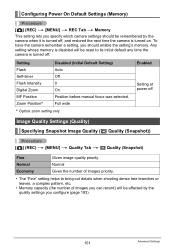
... at power off , and restored the next time the camera is turned on. Setting Flash Disabled (Initial Default Setting) Auto Self-timer Off Flash Intensity 0 Digital Zoom On MF Position Zoom Position* Position before manual focus was selected. Configuring Power On Default Settings (Memory)... Procedure [r] (REC) * [MENU] * REC Tab * Memory This setting lets you specify which camera settings should enable the setting's...
... at power off , and restored the next time the camera is turned on. Setting Flash Disabled (Initial Default Setting) Auto Self-timer Off Flash Intensity 0 Digital Zoom On MF Position Zoom Position* Position before manual focus was selected. Configuring Power On Default Settings (Memory)... Procedure [r] (REC) * [MENU] * REC Tab * Memory This setting lets you specify which camera settings should enable the setting's...
Owners Manual
Page 131
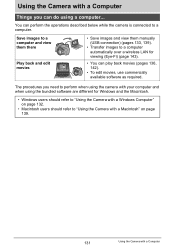
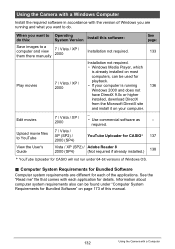
... users should refer to "Using the Camera with a Macintosh" on page 139. 131 Using the Camera with your computer and when using a computer... Save images to a computer and view them there Play back and edit movies • Save images and view them manually (USB connection) (pages 133, 139...). • Transfer images to a computer. Using the Camera with a Computer Things you need to perform when using the camera with a Computer You can play back movies (pages 136, 142)....
... users should refer to "Using the Camera with a Macintosh" on page 139. 131 Using the Camera with your computer and when using a computer... Save images to a computer and view them there Play back and edit movies • Save images and view them manually (USB connection) (pages 133, 139...). • Transfer images to a computer. Using the Camera with a Computer Things you need to perform when using the camera with a Computer You can play back movies (pages 136, 142)....
Owners Manual
Page 132
...DirectX 9.0c or higher installed, download DirectX from the Microsoft DirectX site and install it on page 173 of this manual. 132 Using the Camera with a Computer See the "Read me" file that comes with each of the applications. Information about computer system requirements... software as required. - 7 / Vista / XP (SP2) / 2000 (SP4) YouTube Uploader for CASIO* 137 Vista / XP (SP2) / Adobe Reader 8 2000 (SP4) (Not required if already installed.) 138 * YouTube Uploader for CASIO will not run under 64-bit versions of Windows OS. . When you want to YouTube View the...
...DirectX 9.0c or higher installed, download DirectX from the Microsoft DirectX site and install it on page 173 of this manual. 132 Using the Camera with a Computer See the "Read me" file that comes with each of the applications. Information about computer system requirements... software as required. - 7 / Vista / XP (SP2) / 2000 (SP4) YouTube Uploader for CASIO* 137 Vista / XP (SP2) / Adobe Reader 8 2000 (SP4) (Not required if already installed.) 138 * YouTube Uploader for CASIO will not run under 64-bit versions of Windows OS. . When you want to YouTube View the...


