
Owners Manual
Page 3
shall not be held liable for CASIO. • CASIO COMPUTER CO., LTD. LCD Panel The liquid crystal panel of the monitor screen uses high-precision technology that the camera is due to the characteristics of the liquid crystal panel, and does not indicate malfunction. Except for your final image, shoot a... from the screens and configuration of the actual camera. This is recording correctly. 3 shall not be held liable for any third party due to the use of the contents of this manual without notice. • The contents of this manual have been checked at all times. This means...
shall not be held liable for CASIO. • CASIO COMPUTER CO., LTD. LCD Panel The liquid crystal panel of the monitor screen uses high-precision technology that the camera is due to the characteristics of the liquid crystal panel, and does not indicate malfunction. Except for your final image, shoot a... from the screens and configuration of the actual camera. This is recording correctly. 3 shall not be held liable for any third party due to the use of the contents of this manual without notice. • The contents of this manual have been checked at all times. This means...

Owners Manual
Page 20
... case, use [4] and [6] to select the language you want to change the display language from Japanese in this manual in step 2 of the procedure below if you purchased a camera intended for configuring the display language, date, and time settings. After setting the date and time, use the procedure... "Specifying the Display Language (Language)" (page 154). Press [ON/OFF] to be recorded with a camera intended for language selection will cause the wrong date and time data to turn on the camera. [ON/OFF] 2. Set the date and the time. B 20 Quick Start Basics To switch between...
... case, use [4] and [6] to select the language you want to change the display language from Japanese in this manual in step 2 of the procedure below if you purchased a camera intended for configuring the display language, date, and time settings. After setting the date and time, use the procedure... "Specifying the Display Language (Language)" (page 154). Press [ON/OFF] to be recorded with a camera intended for language selection will cause the wrong date and time data to turn on the camera. [ON/OFF] 2. Set the date and the time. B 20 Quick Start Basics To switch between...

Owners Manual
Page 33
... distorted. Subject in memory, malfunction of the time required for the image quality setting (page 96). Storage of the camera's semiconductor, slow shutter speeds can result in images. Auto Focus Restrictions • Any of an image. Blinds or other subject with your hand....Manual Focus (page 82). 33 Quick Start Basics Shooting Indoors under Fluorescent Lighting • Minute flickering of fluorescent lighting can affect the brightness or color of the following can cause digital noise in the monitor screen image. • The image that is for light from the camera...
... distorted. Subject in memory, malfunction of the time required for the image quality setting (page 96). Storage of the camera's semiconductor, slow shutter speeds can result in images. Auto Focus Restrictions • Any of an image. Blinds or other subject with your hand....Manual Focus (page 82). 33 Quick Start Basics Shooting Indoors under Fluorescent Lighting • Minute flickering of fluorescent lighting can affect the brightness or color of the following can cause digital noise in the monitor screen image. • The image that is for light from the camera...

Owners Manual
Page 39
... day white fluorescent lighting For shooting under daylight fluorescent lighting For shooting under light bulb lighting For configuring the camera manually to suit a particular light source. 1Select "· Manual WB". 2Under the lighting conditions you plan to select the shooting condition you turn off the... the white balance setting that matches your shooting conditions (Daylight, Overcast, etc.) 39 Snapshot Tutorial Daylight Fluorescent « Tungsten · Manual WB Configures the camera to determine the white point, which makes proper white balance adjustment impossible. 3.
... day white fluorescent lighting For shooting under daylight fluorescent lighting For shooting under light bulb lighting For configuring the camera manually to suit a particular light source. 1Select "· Manual WB". 2Under the lighting conditions you plan to select the shooting condition you turn off the... the white balance setting that matches your shooting conditions (Daylight, Overcast, etc.) 39 Snapshot Tutorial Daylight Fluorescent « Tungsten · Manual WB Configures the camera to determine the white point, which makes proper white balance adjustment impossible. 3.

Owners Manual
Page 40
... dark-color subjects and for light-colored subjects and backlit subjects. [4]: Decreases the EV value. Exposure compensation value 4. Correcting Image Brightness (EV Shift) You can manually adjust an image's exposure value (EV value) before shooting it . A lower EV value is best for shooting outdoors on a clear day. NOTE • When shooting...
... dark-color subjects and for light-colored subjects and backlit subjects. [4]: Decreases the EV value. Exposure compensation value 4. Correcting Image Brightness (EV Shift) You can manually adjust an image's exposure value (EV value) before shooting it . A lower EV value is best for shooting outdoors on a clear day. NOTE • When shooting...
Owners Manual
Page 48
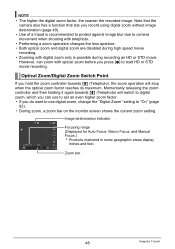
... want to use digital zoom, change the "Digital Zoom" setting to camera movement when shooting with telephoto. • Performing a zoom operation changes the lens aperture. • Both optical zoom and digital zoom are disabled during high speed movie recording. &#...digital zoom without image deterioration (page 49). • Use of a tripod is recommended to protect against image blur due to "On" (page 92). • During zoom, a zoom bar on the monitor screen shows the current zoom setting. Image deterioration indicator Focusing range (Displayed for Auto Focus, Macro Focus, and Manual...
... want to use digital zoom, change the "Digital Zoom" setting to camera movement when shooting with telephoto. • Performing a zoom operation changes the lens aperture. • Both optical zoom and digital zoom are disabled during high speed movie recording. &#...digital zoom without image deterioration (page 49). • Use of a tripod is recommended to protect against image blur due to "On" (page 92). • During zoom, a zoom bar on the monitor screen shows the current zoom setting. Image deterioration indicator Focusing range (Displayed for Auto Focus, Macro Focus, and Manual...

Owners Manual
Page 50
... to select "Normal Speed CS", and then press [SET]. 5. Yellow frame IMPORTANT! • Combining Normal Speed CS images into a CS group (page 100) manually on the playback screen is not supported. • You cannot specify the number of images shot per second (fps) with Normal Speed CS. • ...The number of images per second (fps) of Normal Speed CS varies slightly depending...
... to select "Normal Speed CS", and then press [SET]. 5. Yellow frame IMPORTANT! • Combining Normal Speed CS images into a CS group (page 100) manually on the playback screen is not supported. • You cannot specify the number of images shot per second (fps) with Normal Speed CS. • ...The number of images per second (fps) of Normal Speed CS varies slightly depending...

Owners Manual
Page 62
... Real-time recording start 5-second prerecorded part (from the buffer) * Approximately two seconds for Auto Focus or focus manually before starting the high speed movie recording operation. When shooting a high speed movie, shoot in a well-lit environment. • When recording certain types of movies, the image that is ... shooting. Zoom and monitor screen content switching are black bands along the top, bottom, left, and right of the camera. • During high speed movie recording, Auto Focus and exposure remain fixed at the levels they were when you stop it. Pressing [0] saves the...
... Real-time recording start 5-second prerecorded part (from the buffer) * Approximately two seconds for Auto Focus or focus manually before starting the high speed movie recording operation. When shooting a high speed movie, shoot in a well-lit environment. • When recording certain types of movies, the image that is ... shooting. Zoom and monitor screen content switching are black bands along the top, bottom, left, and right of the camera. • During high speed movie recording, Auto Focus and exposure remain fixed at the levels they were when you stop it. Pressing [0] saves the...

Owners Manual
Page 78
...go into the area within the boundary. • "0 AUTO" flashes on the monitor screen turns green, press the shutter button the rest of manual focus (page 82) to shoot images normally. • To stop an ongoing real-time recording operation, press [SET]. 5. You then will... adjust exposure and focus automatically. • In this time the camera will start saving images to memory automatically the moment it detects the subject has moved into recording standby and start pre-recording images and storing...
...go into the area within the boundary. • "0 AUTO" flashes on the monitor screen turns green, press the shutter button the rest of manual focus (page 82) to shoot images normally. • To stop an ongoing real-time recording operation, press [SET]. 5. You then will... adjust exposure and focus automatically. • In this time the camera will start saving images to memory automatically the moment it detects the subject has moved into recording standby and start pre-recording images and storing...

Owners Manual
Page 81
... [4] and [6] to change the setting. 5. After the setting is selected on the "REC" tab Tabs Items . Press [MENU]. Menu Operations in This Manual Menu operations are represented in this manual as the one described under "Example Menu Screen Operation" on another tab after pressing [4] to return to the menu, use [8] to move...
... [4] and [6] to change the setting. 5. After the setting is selected on the "REC" tab Tabs Items . Press [MENU]. Menu Operations in This Manual Menu operations are represented in this manual as the one described under "Example Menu Screen Operation" on another tab after pressing [4] to return to the menu, use [8] to move...

Owners Manual
Page 82
... distance *2, *3 E Pan Focus Shooting with a relatively wide focus range Fixed focal point Fixed distance*2 ) Infinity Scenery and other distant subjects Fixed Infinity W Manual Focus When you want to focus manually Manual Approximately 3 cm to 9 (infinity)*2 (1.2" to 9) *1 The focus range is the distance from the lens surface. *2 The minimum changes along with the optical...
... distance *2, *3 E Pan Focus Shooting with a relatively wide focus range Fixed focal point Fixed distance*2 ) Infinity Scenery and other distant subjects Fixed Infinity W Manual Focus When you want to focus manually Manual Approximately 3 cm to 9 (infinity)*2 (1.2" to 9) *1 The focus range is the distance from the lens surface. *2 The minimum changes along with the optical...

Owners Manual
Page 84
... to 9 * oo is the actual focusing range value. • The operations assigned to the [4] and [6] keys with the "L/R Key" setting (page 92) are disabled while Manual Focus is selected as shown below. On the monitor screen, compose the image so the subject you do not perform any operation for two seconds... of the flash together with Macro Focus can be used when recording snapshots only. • Whenever you perform an optical zoom operation while shooting with manual focus 1. If you want to focus on is within the yellow boundary. 2. To focus with Auto Focus, Macro Focus, or...
... to 9 * oo is the actual focusing range value. • The operations assigned to the [4] and [6] keys with the "L/R Key" setting (page 92) are disabled while Manual Focus is selected as shown below. On the monitor screen, compose the image so the subject you do not perform any operation for two seconds... of the flash together with Macro Focus can be used when recording snapshots only. • Whenever you perform an optical zoom operation while shooting with manual focus 1. If you want to focus on is within the yellow boundary. 2. To focus with Auto Focus, Macro Focus, or...
Owners Manual
Page 95
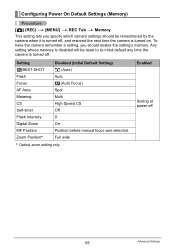
Any setting whose memory is disabled will be remembered by the camera when it is turned off, and restored the next time the camera is turned off 95 Advanced Settings Enabled Setting at power off . Zoom Position* Full wide * ...camera is turned on. To have the camera remember a setting, you specify which camera settings should enable the setting's memory. Setting b BEST SHOT Disabled (Initial Default Setting) R (Auto) Flash Focus AF Area Auto Q (Auto Focus) Spot Metering CS Self-timer Multi High Speed CS Off Flash Intensity Digital Zoom MF Position 0 On Position before manual...
Any setting whose memory is disabled will be remembered by the camera when it is turned off, and restored the next time the camera is turned off 95 Advanced Settings Enabled Setting at power off . Zoom Position* Full wide * ...camera is turned on. To have the camera remember a setting, you specify which camera settings should enable the setting's memory. Setting b BEST SHOT Disabled (Initial Default Setting) R (Auto) Flash Focus AF Area Auto Q (Auto Focus) Spot Metering CS Self-timer Multi High Speed CS Off Flash Intensity Digital Zoom MF Position 0 On Position before manual...

Owners Manual
Page 100
...pause playback. The first playback is at high speed, while the second and subsequent playbacks are at slower speed. • Note that you cannot scroll forward or back through the images manually, and you perform a continuous shutter (CS) operation, the camera creates a CS group that includes all... of the images for that particular CS session. Viewing Continuous Shutter Images Each time you cannot change the playback speed while playback is in progress....
...pause playback. The first playback is at high speed, while the second and subsequent playbacks are at slower speed. • Note that you cannot scroll forward or back through the images manually, and you perform a continuous shutter (CS) operation, the camera creates a CS group that includes all... of the images for that particular CS session. Viewing Continuous Shutter Images Each time you cannot change the playback speed while playback is in progress....

Owners Manual
Page 130
Save images to a computer and view them manually (USB connection) (pages 132, 141). • Transfer images to "Using the Camera with a Macintosh" on page 141. 130 Using the Camera with a Computer Things you need to perform when using the camera with your computer and when using a computer... ...the Macintosh. • Windows users should refer to "Using the Camera with a Windows Computer" on your computer to the camera (Photo Transport*) (page 139). • You can perform the operations described below while the camera is connected to a computer. In addition to images, you ...
Save images to a computer and view them manually (USB connection) (pages 132, 141). • Transfer images to "Using the Camera with a Macintosh" on page 141. 130 Using the Camera with a Computer Things you need to perform when using the camera with your computer and when using a computer... ...the Macintosh. • Windows users should refer to "Using the Camera with a Windows Computer" on your computer to the camera (Photo Transport*) (page 139). • You can perform the operations described below while the camera is connected to a computer. In addition to images, you ...

Owners Manual
Page 131
...view Vista / XP / 2000 Installation not required. 132 them there manually Play movies Vista / XP / 2000 Installation not required. • Windows Media Player, which is already installed on most computers, can be used for CASIO and Photo Transport will not run under 64-bit versions of Windows ...you are running and what you want to the camera Vista / XP / 2000 Photo Transport 1.0* 139 View the User's Guide Vista / ...
...view Vista / XP / 2000 Installation not required. 132 them there manually Play movies Vista / XP / 2000 Installation not required. • Windows Media Player, which is already installed on most computers, can be used for CASIO and Photo Transport will not run under 64-bit versions of Windows ...you are running and what you want to the camera Vista / XP / 2000 Photo Transport 1.0* 139 View the User's Guide Vista / ...

Owners Manual
Page 132
...application for Bundled Software" on page 173 of the applications. To connect the camera to your computer in order to your computer and save files 1. . Viewing and Storing Images on the camera and press [MENU]. 2. Computer System Requirements for Bundled Software Computer system ...different for Adobe Reader, the bundled software requires Administrator privileges to select "Mass Storage", and then press [SET]. 132 Using the Camera with each of this manual. . Use [8] and [2] to run. • Operation under a dual-processor environment is not supported. • Operation may...
...application for Bundled Software" on page 173 of the applications. To connect the camera to your computer in order to your computer and save files 1. . Viewing and Storing Images on the camera and press [MENU]. 2. Computer System Requirements for Bundled Software Computer system ...different for Adobe Reader, the bundled software requires Administrator privileges to select "Mass Storage", and then press [SET]. 132 Using the Camera with each of this manual. . Use [8] and [2] to run. • Operation under a dual-processor environment is not supported. • Operation may...

Owners Manual
Page 138
... Click "Manual" to upload. 7. The left side of a PDF file. Enter the required information. 6. This will have Adobe Reader or Adobe Acrobat Reader installed, install Adobe Reader from the bundled CD-ROM. 138 Using the Camera with ... IMPORTANT! • You must have Adobe Reader or Adobe Acrobat Reader installed on your computer in camera memory. The right side of the display shows a list of movie files in order to view the...Documentation (PDF Files) 1. If you want to select it and then click "Digital Camera". If your computer, and place the bundled CD-ROM into its CD-
... Click "Manual" to upload. 7. The left side of a PDF file. Enter the required information. 6. This will have Adobe Reader or Adobe Acrobat Reader installed, install Adobe Reader from the bundled CD-ROM. 138 Using the Camera with ... IMPORTANT! • You must have Adobe Reader or Adobe Acrobat Reader installed on your computer in camera memory. The right side of the display shows a list of movie files in order to view the...Documentation (PDF Files) 1. If you want to select it and then click "Digital Camera". If your computer, and place the bundled CD-ROM into its CD-

Owners Manual
Page 141
... [8] and [2] to your operating system. On the "Set Up" tab, select "USB" and then press [6]. 3. Connecting the Camera to Your Computer and Saving Files IMPORTANT! • The camera does not support operation with what version of the Macintosh OS you are running and what you want to do this...: Save images to your Macintosh and view them there manually Operating System Version OS 9 OS X Save images to do . Using the Camera with a Macintosh Install the required software in accordance with Mac OS 8.6 or earlier, or Mac OS X 10...
... [8] and [2] to your operating system. On the "Set Up" tab, select "USB" and then press [6]. 3. Connecting the Camera to Your Computer and Saving Files IMPORTANT! • The camera does not support operation with what version of the Macintosh OS you are running and what you want to do this...: Save images to your Macintosh and view them there manually Operating System Version OS 9 OS X Save images to do . Using the Camera with a Macintosh Install the required software in accordance with Mac OS 8.6 or earlier, or Mac OS X 10...

Owners Manual
Page 145
... code (Example: camera_e.pdf is supported. Images you don't, go to view. 3. Open the "Digital Camera" folder and then open the "Manual" folder. 2. Visit the following CASIO website to register: http://world.casio.com/qv/register/ Using an Eye-Fi Wireless SD Memory Card to a computer via wireless LAN. ...1. After configuring settings, load the Eye-Fi card into the camera and record. Configure LAN...
... code (Example: camera_e.pdf is supported. Images you don't, go to view. 3. Open the "Digital Camera" folder and then open the "Manual" folder. 2. Visit the following CASIO website to register: http://world.casio.com/qv/register/ Using an Eye-Fi Wireless SD Memory Card to a computer via wireless LAN. ...1. After configuring settings, load the Eye-Fi card into the camera and record. Configure LAN...

