Instruction Manual
Page 3
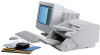
... and remove jammed paper. After you purchasing the Canon Document Scanner DR-5020/5080C. Scanning Utility 5000 Instructions This manual describes how to store them in a safe place. INTRODUCTION Thank you have read this manual), Scanning Utility 5000 Instructions and ISIS/TWAIN Driver Instructions. Read this manual) This manual describes how to connect the scanner, load documents, remove jammed paper and other information on how to read these manuals. In all, three manuals are provided with the scanner. ISIS/TWAIN Driver Instructions This manual describes operations...
... and remove jammed paper. After you purchasing the Canon Document Scanner DR-5020/5080C. Scanning Utility 5000 Instructions This manual describes how to store them in a safe place. INTRODUCTION Thank you have read this manual), Scanning Utility 5000 Instructions and ISIS/TWAIN Driver Instructions. Read this manual) This manual describes how to connect the scanner, load documents, remove jammed paper and other information on how to read these manuals. In all, three manuals are provided with the scanner. ISIS/TWAIN Driver Instructions This manual describes operations...
Instruction Manual
Page 6
.../OFF 63 Setting in the User Mode 64 N How to Set the User mode 65 Chapter 4 Troubleshooting 67 4.1 When The Scanner Is Not Recognized 68 4.2 Removing Paper Jams 70 Paper Jam in the Paper Feed Unit 70 Paper Jam in Paper Exit Section 73 4.3 Paper Feed Trouble 75 4.4 When The Scanned Image is Not Normal 77 4.5 When An Error Code is Displayed 78 Chapter 5 Daily Cleaning 81 5.1 Daily Cleaning 82 Cleaning the Main Unit 82 Cleaning the Scanning Glasses and Rollers 83 Power Cord 87 Imprinter...
.../OFF 63 Setting in the User Mode 64 N How to Set the User mode 65 Chapter 4 Troubleshooting 67 4.1 When The Scanner Is Not Recognized 68 4.2 Removing Paper Jams 70 Paper Jam in the Paper Feed Unit 70 Paper Jam in Paper Exit Section 73 4.3 Paper Feed Trouble 75 4.4 When The Scanned Image is Not Normal 77 4.5 When An Error Code is Displayed 78 Chapter 5 Daily Cleaning 81 5.1 Daily Cleaning 82 Cleaning the Main Unit 82 Cleaning the Scanning Glasses and Rollers 83 Power Cord 87 Imprinter...
Instruction Manual
Page 9
... the unit is operating. The unit may be injured unexpectedly. I Never spill water or type of the scanner. Doing so might result in malfunction. 7 I Do not open the top unit while the scanner is not being used for service immediately....power outlet clear of all liquids, beverages, or any type of the unit. If such objects become entangled with your fingers. You may tip or fall over , and cause an injury. I Keep all obstacles so you remove the power cord, grip it by pulling on the scanner connector with moving parts, especially the rollers that feed the unit...
... the unit is operating. The unit may be injured unexpectedly. I Never spill water or type of the scanner. Doing so might result in malfunction. 7 I Do not open the top unit while the scanner is not being used for service immediately....power outlet clear of all liquids, beverages, or any type of the unit. If such objects become entangled with your fingers. You may tip or fall over , and cause an injury. I Keep all obstacles so you remove the power cord, grip it by pulling on the scanner connector with moving parts, especially the rollers that feed the unit...
Instruction Manual
Page 13
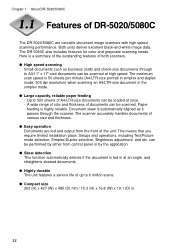
... DR-5020/5080C Features of up to 6 million scans. Both units deliver excellent black-and-white image data. The DR-5080C also includes features for color and grayscale scanning needs. G High speed scanning Small documents such as it passes through to 500 sheets of various size and thickness. Paper feeding is automatically aligned as business cards and check-size documents through the scanner. G Highly durable The unit features a service life of DR-5020/5080C The DR-5020/5080C are fed and output from control panel...
... DR-5020/5080C Features of up to 6 million scans. Both units deliver excellent black-and-white image data. The DR-5080C also includes features for color and grayscale scanning needs. G High speed scanning Small documents such as it passes through to 500 sheets of various size and thickness. Paper feeding is automatically aligned as business cards and check-size documents through the scanner. G Highly durable The unit features a service life of DR-5020/5080C The DR-5020/5080C are fed and output from control panel...
Instruction Manual
Page 14
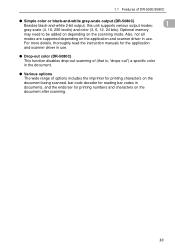
... the instruction manuals for printing numbers and characters on the scanning mode. Optional memory may need to be added on depending on the document after scanning. 13 G Various options The wide range of DR-5020/5080C G Simple color or black-and-white gray-scale output (DR-5080C) Besides black-and-white 2-bit output, this unit supports various output modes: 1 gray-scale (4, 16, 256 levels) and color (3, 6, 12, 24 bits). G Drop-out color (DR-5080C) This function disables...
... the instruction manuals for printing numbers and characters on the scanning mode. Optional memory may need to be added on depending on the document after scanning. 13 G Various options The wide range of DR-5020/5080C G Simple color or black-and-white gray-scale output (DR-5080C) Besides black-and-white 2-bit output, this unit supports various output modes: 1 gray-scale (4, 16, 256 levels) and color (3, 6, 12, 24 bits). G Drop-out color (DR-5080C) This function disables...
Instruction Manual
Page 16
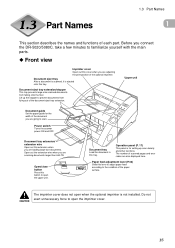
.... Open/close button Press this tray. The number of scanned pages and error codes are adjusting the print position of the document eject tray extension. The imprinter cover does not open when the optional imprinter is ejected onto this button to familiarize yourself with the main parts. Upper unit Document guide Set the paper guide for setting up the stopper to the condition of each part. Document tray Load the document in this lever to adjust paper feed...
.... Open/close button Press this tray. The number of scanned pages and error codes are adjusting the print position of the document eject tray extension. The imprinter cover does not open when the optional imprinter is ejected onto this button to familiarize yourself with the main parts. Upper unit Document guide Set the paper guide for setting up the stopper to the condition of each part. Document tray Load the document in this lever to adjust paper feed...
Instruction Manual
Page 19
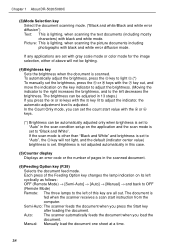
... the document is set to "Black and White". Auto: The scanner automatically feeds the document when you press the Start key after loading the document. Picture: This is adjusted. In the Count Only mode, you press the or keys with the key out, and move the indication on the application and the scan mode is set to "Auto" in this case. (5)Counter display Displays an error code or the number...
... the document is set to "Black and White". Auto: The scanner automatically feeds the document when you press the Start key after loading the document. Picture: This is adjusted. In the Count Only mode, you press the or keys with the key out, and move the indication on the application and the scan mode is set to "Auto" in this case. (5)Counter display Displays an error code or the number...
Instruction Manual
Page 32
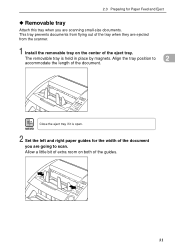
... the eject tray. Align the tray position to scan. This tray prevents documents from flying out of the tray when they are ejected from the scanner. 1 Install the removable tray on both of the guides. 31 Allow a little bit of extra room on the center of the document. The removable tray is open. 2 Set the left and right paper guides for Paper Feed and Eject N Removable tray Attach this tray when you are scanning small-size documents.
... the eject tray. Align the tray position to scan. This tray prevents documents from flying out of the tray when they are ejected from the scanner. 1 Install the removable tray on both of the guides. 31 Allow a little bit of extra room on the center of the document. The removable tray is open. 2 Set the left and right paper guides for Paper Feed and Eject N Removable tray Attach this tray when you are scanning small-size documents.
Instruction Manual
Page 34
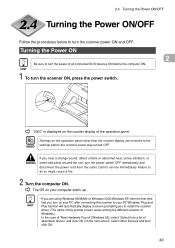
... operation panel other than the counter display are using Windows 95/98/Me or Windows 2000/Windows XP, then the first time that you turn on your PC Windows' Plug and Play function will automatically display a screen prompting you are reverted to install the scanner driver. (The name of this scanner to turn the power switch OFF immediately and disconnect the power cord from a list of all connected SCSI devices ON before the scanner power was turned...
... operation panel other than the counter display are using Windows 95/98/Me or Windows 2000/Windows XP, then the first time that you turn on your PC Windows' Plug and Play function will automatically display a screen prompting you are reverted to install the scanner driver. (The name of this scanner to turn the power switch OFF immediately and disconnect the power cord from a list of all connected SCSI devices ON before the scanner power was turned...
Instruction Manual
Page 35
... not connect to the Internet now" and click "Next". (If your safety, disconnect the power plug from the power outlet if you are not using the scanner for my device (recommended)", and then click Next to proceed to the separate "ISIS/TWAIN Driver Instructions" or "Scanning Utility 5000 Instructions." Clear all of "Update Device Driver Wizard" (Windows 95), click Next and then click Finish on the next screen. In...
... not connect to the Internet now" and click "Next". (If your safety, disconnect the power plug from the power outlet if you are not using the scanner for my device (recommended)", and then click Next to proceed to the separate "ISIS/TWAIN Driver Instructions" or "Scanning Utility 5000 Instructions." Clear all of "Update Device Driver Wizard" (Windows 95), click Next and then click Finish on the next screen. In...
Instruction Manual
Page 47
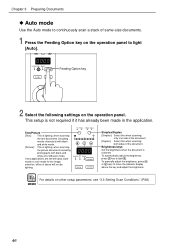
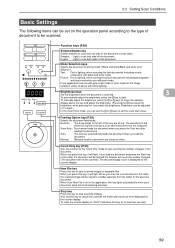
... lighting. If any applications are set with black and white error diffusion mode. A Semi-Auto Auto Manual Feeding Option New File Count Only Simplex/Duplex [Simplex]: Select this when scanning only one side of the document. [Duplex]: Select this when scanning both sides of the document. To automatically adjust the brightness, press A key to light [Auto]. Chapter 3 Preparing Documents N Auto mode Use the Auto mode to continuously scan a stack of same-size documents. 1 Press the Feeding Option key on the operation panel to light A . This setup...
... lighting. If any applications are set with black and white error diffusion mode. A Semi-Auto Auto Manual Feeding Option New File Count Only Simplex/Duplex [Simplex]: Select this when scanning only one side of the document. [Duplex]: Select this when scanning both sides of the document. To automatically adjust the brightness, press A key to light [Auto]. Chapter 3 Preparing Documents N Auto mode Use the Auto mode to continuously scan a stack of same-size documents. 1 Press the Feeding Option key on the operation panel to light A . This setup...
Instruction Manual
Page 60
... gray scale mode or color mode for just counting the number of pages in this key, it will count the number of the document. Semi-Auto: The scanner feeds the document when you load the document. Auto: The scanner automatically feeds the document when you press the Start key after loading the document. Duplex: Light to scan both sides. Mode Selection keys Selects the document scanning mode ("Black and white/Black and white error diffusion"). Text: This is displayed on the counter display...
... gray scale mode or color mode for just counting the number of pages in this key, it will count the number of the document. Semi-Auto: The scanner feeds the document when you load the document. Auto: The scanner automatically feeds the document when you press the Start key after loading the document. Duplex: Light to scan both sides. Mode Selection keys Selects the document scanning mode ("Black and white/Black and white error diffusion"). Text: This is displayed on the counter display...
Instruction Manual
Page 65
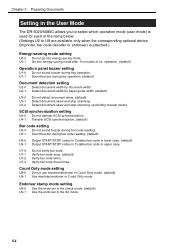
... Count Only mode. (default) U8-1 Use imprinter/endorser in the check mode. (default). Endorser stamp mode setting U9-0 Use the endorser in Count Only mode. U0-1 Go into energy-saving mode. U4-1 Transfer SCSI synchronization. (default) Bar code setting U5-0 Do not sound buzzer during key operation. (default) Document detection setting U2-0 Detect document width by paper guide width. (default) U3-0 U3-1 U3-2 Do not detect document skew. (default) Detect document skew and stop scanning. (excluding manual mode) SCSI synchronization setting U4-0 Do not transfer SCSI...
... Count Only mode. (default) U8-1 Use imprinter/endorser in the check mode. (default). Endorser stamp mode setting U9-0 Use the endorser in Count Only mode. U0-1 Go into energy-saving mode. U4-1 Transfer SCSI synchronization. (default) Bar code setting U5-0 Do not sound buzzer during key operation. (default) Document detection setting U2-0 Detect document width by paper guide width. (default) U3-0 U3-1 U3-2 Do not detect document skew. (default) Detect document skew and stop scanning. (excluding manual mode) SCSI synchronization setting U4-0 Do not transfer SCSI...
Instruction Manual
Page 79
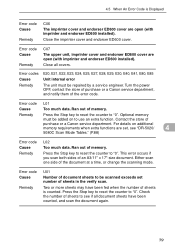
... Unit internal error The unit must be repaired by a service engineer. Error code L01 Cause Too much data. For details on to see "DR-5020/ 4 5080C Scan Mode Tables." (P.88) Error code Cause Remedy L02 Too much data. 4.5 When An Error Code is counted. Turn the power OFF, contact the store of purchase or a Canon service department, and notify them of the document at a time, or change the scanning mode. Check the number of document sheets to "0". Close the imprinter cover...
... Unit internal error The unit must be repaired by a service engineer. Error code L01 Cause Too much data. For details on to see "DR-5020/ 4 5080C Scan Mode Tables." (P.88) Error code Cause Remedy L02 Too much data. 4.5 When An Error Code is counted. Turn the power OFF, contact the store of purchase or a Canon service department, and notify them of the document at a time, or change the scanning mode. Check the number of document sheets to "0". Close the imprinter cover...
Instruction Manual
Page 83
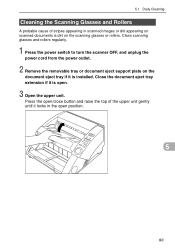
... turn the scanner OFF, and unplug the power cord from the power outlet. 2 Remove the removable tray or document eject support plate on the scanning glasses or rollers. Press the open/close button and raise the top of stripes appearing in the open . 3 Open the upper unit. Close the document eject tray extension if it is open position. 5 83 5.1 Daily Cleaning Cleaning the Scanning Glasses and Rollers A probable cause of the upper unit gently until it locks in scanned images...
... turn the scanner OFF, and unplug the power cord from the power outlet. 2 Remove the removable tray or document eject support plate on the scanning glasses or rollers. Press the open/close button and raise the top of stripes appearing in the open . 3 Open the upper unit. Close the document eject tray extension if it is open position. 5 83 5.1 Daily Cleaning Cleaning the Scanning Glasses and Rollers A probable cause of the upper unit gently until it locks in scanned images...
Instruction Manual
Page 93
... 15, 27 Auto mode 46 - C - J - Count Only mode 53, 64 Manual mode 50 Counter display 18 Manual Thickness Adjustment ........ 61 Counting the Number of Originals In a Mode Selection key 18, 59 Document 53 Document guide label 20, 32 - Document guide 15 Packaging 14 Document guide labels 20, 32 Paper Feed Adjustment 32 Document tray 15 Paper feed adjustment lever ..... 15, 32 Document tray extension .......... 15, 27 Paper jam 70 Double Feed Detection 63 - D - Daily maintenance 6 Open/close button 15 Daily cleaning 82 Operation panel 17, 60...
... 15, 27 Auto mode 46 - C - J - Count Only mode 53, 64 Manual mode 50 Counter display 18 Manual Thickness Adjustment ........ 61 Counting the Number of Originals In a Mode Selection key 18, 59 Document 53 Document guide label 20, 32 - Document guide 15 Packaging 14 Document guide labels 20, 32 Paper Feed Adjustment 32 Document tray 15 Paper feed adjustment lever ..... 15, 32 Document tray extension .......... 15, 27 Paper jam 70 Double Feed Detection 63 - D - Daily maintenance 6 Open/close button 15 Daily cleaning 82 Operation panel 17, 60...
Instruction Manual
Page 94
..., 68 SCSI synchronization 64 Scan Mode Tables 88 Scan Procedure 39 Scanner control sheets 56 Semi Auto mode 43 Sensor 47 Setting Scan Conditions 58 Setting in the User Mode 64 Setting the SCSI ID and terminator 25 Simplex/Duplex key 17, 59 Skew compensation 64 Specifications 90 Start key 19 Stop key 19 Stopper 15, 29 System Requirements 22 - U - R - Rear view 16 Power cord 14, 26 Power cord connector 16 Power switch 15 - Removable tray 20, 31 Removing paper jam 70...
..., 68 SCSI synchronization 64 Scan Mode Tables 88 Scan Procedure 39 Scanner control sheets 56 Semi Auto mode 43 Sensor 47 Setting Scan Conditions 58 Setting in the User Mode 64 Setting the SCSI ID and terminator 25 Simplex/Duplex key 17, 59 Skew compensation 64 Specifications 90 Start key 19 Stop key 19 Stopper 15, 29 System Requirements 22 - U - R - Rear view 16 Power cord 14, 26 Power cord connector 16 Power switch 15 - Removable tray 20, 31 Removing paper jam 70...
Quick Reference Guide
Page 3
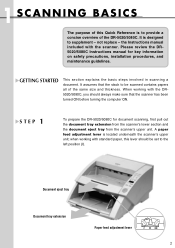
... precautions, installation procedures, and maintenance guidelines. Please review the DR5020/5080C Instructions manual for document scanning, first pull out the document tray extension from the scanner's lower section and the document eject tray from the scanner's upper unit. when working with the DR5020/5080C, you should be scanned contains papers all of the DR-5020/5080C. the Instructions manual included with standard paper, this Quick Reference is to provide a concise overview of the same size and...
... precautions, installation procedures, and maintenance guidelines. Please review the DR5020/5080C Instructions manual for document scanning, first pull out the document tray extension from the scanner's lower section and the document eject tray from the scanner's upper unit. when working with the DR5020/5080C, you should be scanned contains papers all of the DR-5020/5080C. the Instructions manual included with standard paper, this Quick Reference is to provide a concise overview of the same size and...
Quick Reference Guide
Page 9
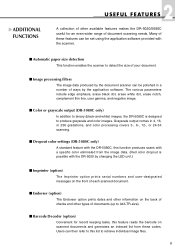
... thin line, user gamma, and negative image. I Automatic paper size detection This function enables the scanner to detect the size of your document. Grayscale output comes in a number of ways by the application software. I Dropout color settings (DR-5080C only) A standard feature with the DR-5080C, this list to this function produces scans with a specific color eliminated from these features can be set using the application software provided with the DR-5020 by the document scanner can be...
... thin line, user gamma, and negative image. I Automatic paper size detection This function enables the scanner to detect the size of your document. Grayscale output comes in a number of ways by the application software. I Dropout color settings (DR-5080C only) A standard feature with the DR-5080C, this list to this function produces scans with a specific color eliminated from these features can be set using the application software provided with the DR-5020 by the document scanner can be...
Quick Reference Guide
Page 11
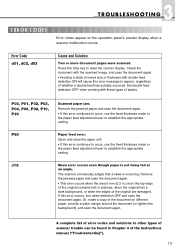
... appropriate setting. Open and close the upper unit. • If this error occurs, turn skew detection OFF and scan the document again. Or, make a copy of stacks. Check the document with the scanned image, and scan the document again. • Feeding a stack of mixed size or thickness with these types of the document on the operation panel's counter display when a scanner malfunction occurs. If this error continues to occur, use the fixed thickness mode or the paper feed...
... appropriate setting. Open and close the upper unit. • If this error occurs, turn skew detection OFF and scan the document again. Or, make a copy of stacks. Check the document with the scanned image, and scan the document again. • Feeding a stack of mixed size or thickness with these types of the document on the operation panel's counter display when a scanner malfunction occurs. If this error continues to occur, use the fixed thickness mode or the paper feed...


