Quick Start Guide
Page 4
... not guaranteed or warranted, and they be understood to your Canon PIXMA iP3300 series Photo Printer. Under the copyright laws, this product meets the ENERGY STAR guidelines for 5 years after production has stopped. Disclaimer Canon U.S.A., Inc. All statements, technical information and recommendations in this manual thoroughly in order that promotes energy saving through the use guide...
... not guaranteed or warranted, and they be understood to your Canon PIXMA iP3300 series Photo Printer. Under the copyright laws, this product meets the ENERGY STAR guidelines for 5 years after production has stopped. Disclaimer Canon U.S.A., Inc. All statements, technical information and recommendations in this manual thoroughly in order that promotes energy saving through the use guide...

Quick Start Guide
Page 5
...Printing Becomes Faint or Colors Are Incorrect 31 Printing the Nozzle Check Pattern 32 Examining the Nozzle Check Pattern ...........34 Print Head Cleaning 35 Print Head Deep Cleaning 38 Aligning the Print Head 40 Cleaning Your Printer 45 Troubleshooting 52 Cannot Install the Printer Driver 53 Cannot ... Not Satisfactory 56 Printer Does Not Start 59 Paper Does Not Feed Properly 60 Paper Jams 62 ALARM Lamp Flashes Orange 65 Error Message Appears on the Screen ........67 Cannot Print Properly from a Digital Camera 70 Appendix 73 Reading the On-screen Manuals 73 Specifications 74...
...Printing Becomes Faint or Colors Are Incorrect 31 Printing the Nozzle Check Pattern 32 Examining the Nozzle Check Pattern ...........34 Print Head Cleaning 35 Print Head Deep Cleaning 38 Aligning the Print Head 40 Cleaning Your Printer 45 Troubleshooting 52 Cannot Install the Printer Driver 53 Cannot ... Not Satisfactory 56 Printer Does Not Start 59 Paper Does Not Feed Properly 60 Paper Jams 62 ALARM Lamp Flashes Orange 65 Error Message Appears on the Screen ........67 Cannot Print Properly from a Digital Camera 70 Appendix 73 Reading the On-screen Manuals 73 Specifications 74...
Quick Start Guide
Page 6
...Automatically turns off automatically. z The printer driver is connected to the Printer Driver Guide on-screen manual. „ Turning on the Printer Before turning on a Macintosh®. z Auto Power On: Automatically turns on the printer before printing. Note If preparatory ...Printer On and Off Turn on the printer when print data is sent from the computer. For setting details, refer to your computer. 2 Before Printing z The printer is installed. Set this setting in the Maintenance sheet of the printer driver in Windows®, and in the Canon IJ Printer Utility on the printer...
...Automatically turns off automatically. z The printer driver is connected to the Printer Driver Guide on-screen manual. „ Turning on the Printer Before turning on a Macintosh®. z Auto Power On: Automatically turns on the printer before printing. Note If preparatory ...Printer On and Off Turn on the printer when print data is sent from the computer. For setting details, refer to your computer. 2 Before Printing z The printer is installed. Set this setting in the Maintenance sheet of the printer driver in Windows®, and in the Canon IJ Printer Utility on the printer...
Quick Start Guide
Page 9
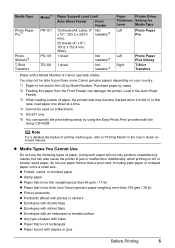
...Paper Plus Glossy T-Shirt Transfers Paper with a Model Number is not sold in the User's Guide onscreen manual. Note For a detailed description of paper. Additionally, when printing on your country. *1 Paper is Canon specialty media. Load in the Auto Sheet Feeder. *3 When loading a stack of paper with holes ... Any type of paper, the printed side may not be used on a Macintosh. *5 SG-201 only *6 You can also cause the printer to purchase some Canon genuine papers depending on A5 or smaller sized paper, do not use the following types of printing media types, refer to a small size....
...Paper Plus Glossy T-Shirt Transfers Paper with a Model Number is not sold in the User's Guide onscreen manual. Note For a detailed description of paper. Additionally, when printing on your country. *1 Paper is Canon specialty media. Load in the Auto Sheet Feeder. *3 When loading a stack of paper with holes ... Any type of paper, the printed side may not be used on a Macintosh. *5 SG-201 only *6 You can also cause the printer to purchase some Canon genuine papers depending on A5 or smaller sized paper, do not use the following types of printing media types, refer to a small size....

Quick Start Guide
Page 14
..." in the User's Guide on -screen manual. z Do not stack more than 50 sheets in portrait orientation (A). z We recommend using genuine Canon photo media when printing photographs. z For detailed instructions on how to load specialty media into the printer, refer to "Printing Media" in the... User's Guide on -screen manual. 10 Before Printing When Printing on Plain Paper...
..." in the User's Guide on -screen manual. z Do not stack more than 50 sheets in portrait orientation (A). z We recommend using genuine Canon photo media when printing photographs. z For detailed instructions on how to load specialty media into the printer, refer to "Printing Media" in the... User's Guide on -screen manual. 10 Before Printing When Printing on Plain Paper...

Quick Start Guide
Page 19
z For details on -screen manual. Make sure that Canon iP3300 is selected in the Front Feeder. You cannot load paper other printer driver functions, click Help or Instructions to view the online help or the Printer Driver Guide on other than A4, Letter, or B5-sized plain paper in Paper ...specified for Media Type. Basic Printing This section describes the procedure for Plain Paper, the printer will automatically switch to the Front Feeder when Plain Paper is only displayed when the onscreen manuals are installed. 6 Click Print (or OK). Basic Printing 15 Note z If you select...
z For details on -screen manual. Make sure that Canon iP3300 is selected in the Front Feeder. You cannot load paper other printer driver functions, click Help or Instructions to view the online help or the Printer Driver Guide on other than A4, Letter, or B5-sized plain paper in Paper ...specified for Media Type. Basic Printing This section describes the procedure for Plain Paper, the printer will automatically switch to the Front Feeder when Plain Paper is only displayed when the onscreen manuals are installed. 6 Click Print (or OK). Basic Printing 15 Note z If you select...
Quick Start Guide
Page 20
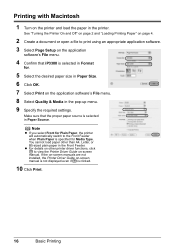
... to print using an appropriate application software. 3 Select Page Setup on -screen manual. If the on-screen manuals are not installed, the Printer Driver Guide on the printer and load the paper in the printer. Make sure that iP3300 is selected in the pop-up menu. 9 Specify the required settings. Note ...z If you select Front for Plain Paper, the printer will automatically switch ...
... to print using an appropriate application software. 3 Select Page Setup on -screen manual. If the on-screen manuals are not installed, the Printer Driver Guide on the printer and load the paper in the printer. Make sure that iP3300 is selected in the pop-up menu. 9 Specify the required settings. Note ...z If you select Front for Plain Paper, the printer will automatically switch ...
Quick Start Guide
Page 21
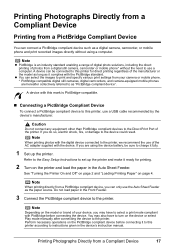
Refer to the Easy Setup Instructions to the printer. You may have to turn on the printer and load the paper in the device's instruction manual. Note When printing photos with the PictBridge standard. If you do so, electric shock, fire, or damage to as "PictBridge...for direct printing regardless of the manufacturer or the model as long as it to this printer for printing. 2 Turn on the device or select Play mode manually after connecting the device to set up the printer. Note z PictBridge is PictBridge-compatible. „ Connecting a PictBridge Compliant Device To connect...
Refer to the Easy Setup Instructions to the printer. You may have to turn on the printer and load the paper in the device's instruction manual. Note When printing photos with the PictBridge standard. If you do so, electric shock, fire, or damage to as "PictBridge...for direct printing regardless of the manufacturer or the model as long as it to this printer for printing. 2 Turn on the device or select Play mode manually after connecting the device to set up the printer. Note z PictBridge is PictBridge-compatible. „ Connecting a PictBridge Compliant Device To connect...

Quick Start Guide
Page 22
The device turns on manually. (3) Set up the PictBridge compliant device for direct printing. If your device does not turn on automatically, turn it on automatically. will appear on the LCD of the device when the printer is turned off. (2) Connect the PictBridge compliant device to the printer using a USB cable recommended by the manufacturer of the device. (1) Make sure that the PictBridge compliant device is correctly connected. (2) Note If does not appear, see "Cannot Print Properly from a Digital Camera" on page 70. 18 Printing Photographs Directly from a Compliant Device
The device turns on manually. (3) Set up the PictBridge compliant device for direct printing. If your device does not turn on automatically, turn it on automatically. will appear on the LCD of the device when the printer is turned off. (2) Connect the PictBridge compliant device to the printer using a USB cable recommended by the manufacturer of the device. (1) Make sure that the PictBridge compliant device is correctly connected. (2) Note If does not appear, see "Cannot Print Properly from a Digital Camera" on page 70. 18 Printing Photographs Directly from a Compliant Device

Quick Start Guide
Page 23
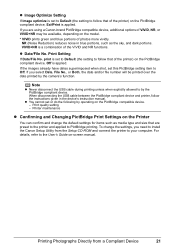
...layout, image optimization modes, and date printing mode that can be set on a PictBridge compliant device connected to those used in the instruction manual of your device. In this case, the Default setting explained below may be available on the brand or model of settings items are ...mode and confirm or change the page size or media type, operate the device to follow the instructions given in Canon-brand PictBridge compliant devices. z Printable Image Data Format This printer prints images taken with a DCF® (Design rule for the setting item. * In the following description, ...
...layout, image optimization modes, and date printing mode that can be set on a PictBridge compliant device connected to those used in the instruction manual of your device. In this case, the Default setting explained below may be available on the brand or model of settings items are ...mode and confirm or change the page size or media type, operate the device to follow the instructions given in Canon-brand PictBridge compliant devices. z Printable Image Data Format This printer prints images taken with a DCF® (Design rule for the setting item. * In the following description, ...
Quick Start Guide
Page 25
... for items such as the sky, and dark portions. When disconnecting the USB cable between the PictBridge compliant device and printer, follow that are using a Canon-brand PictBridge compatible device, additional options of photos more vividly. z Image Optimize Setting If Image optimize is set to ...No., or Both, the date and/or file number will be available, depending on -screen manual. NR (Noise Reduction) reduces noise in the device's instruction manual. VIVID+NR is a combination of the printer) on the PictBridge compatible device. - Print Setting If Date/File No. Note z Never ...
... for items such as the sky, and dark portions. When disconnecting the USB cable between the PictBridge compliant device and printer, follow that are using a Canon-brand PictBridge compatible device, additional options of photos more vividly. z Image Optimize Setting If Image optimize is set to ...No., or Both, the date and/or file number will be available, depending on -screen manual. NR (Noise Reduction) reduces noise in the device's instruction manual. VIVID+NR is a combination of the printer) on the PictBridge compatible device. - Print Setting If Date/File No. Note z Never ...
Quick Start Guide
Page 50
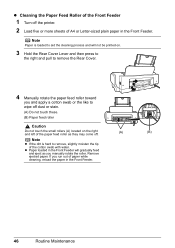
... be printed on the right and left of the paper feed roller as you and apply a cotton swab or the like to wipe off the printer. 2 Load five or more sheets of A4 or Letter-sized plain paper in the Front Feeder. z Cleaning the Paper Feed Roller of the Front Feeder... not touch the small rollers (A) located on . 3 Hold the Rear Cover Lever and then press to the right and pull to remove the Rear Cover. 4 Manually rotate the paper feed roller toward you manually rotate the roller. Remove ejected paper.
... be printed on the right and left of the paper feed roller as you and apply a cotton swab or the like to wipe off the printer. 2 Load five or more sheets of A4 or Letter-sized plain paper in the Front Feeder. z Cleaning the Paper Feed Roller of the Front Feeder... not touch the small rollers (A) located on . 3 Hold the Rear Cover Lever and then press to the right and pull to remove the Rear Cover. 4 Manually rotate the paper feed roller toward you manually rotate the roller. Remove ejected paper.
Quick Start Guide
Page 56
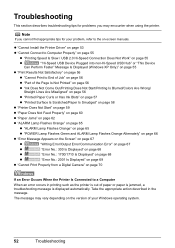
... 56 z "Part of the Page Is Not Printed" on page 56 z "Ink Does Not Come Out/Printing Does Not Start/Printing Is Blurred/Colors Are Wrong/ Straight Lines Are Misaligned" on page 56 z "Printed Paper Curls or Has Ink Blots" on page 57 z "Printed Surface Is ... paper or paper is jammed, a troubleshooting message is out of your problem, refer to the on-screen manuals. Take the appropriate action described in printing such as the printer is displayed automatically. Troubleshooting This section describes troubleshooting tips for your Windows operating system. 52 Troubleshooting Note If ...
... 56 z "Part of the Page Is Not Printed" on page 56 z "Ink Does Not Come Out/Printing Does Not Start/Printing Is Blurred/Colors Are Wrong/ Straight Lines Are Misaligned" on page 56 z "Printed Paper Curls or Has Ink Blots" on page 57 z "Printed Surface Is ... paper or paper is jammed, a troubleshooting message is out of your problem, refer to the on-screen manuals. Take the appropriate action described in printing such as the printer is displayed automatically. Troubleshooting This section describes troubleshooting tips for your Windows operating system. 52 Troubleshooting Note If ...
Quick Start Guide
Page 58
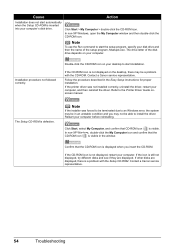
... window. Click Start > My Computer > double-click the CD-ROM icon. Contact a Canon service representative. 54 Troubleshooting Contact a Canon service representative. Note If the installer was not installed correctly, uninstall the driver, restart your...not start automatically when the Setup CD-ROM is inserted into your computer before reinstalling. If the printer driver was forced to be terminated due to start the setup program, specify your computer. The... is displayed when you may be able to the Printer Driver Guide onscreen manual. If the CD-ROM icon is defective.
... window. Click Start > My Computer > double-click the CD-ROM icon. Contact a Canon service representative. 54 Troubleshooting Contact a Canon service representative. Note If the installer was not installed correctly, uninstall the driver, restart your...not start automatically when the Setup CD-ROM is inserted into your computer before reinstalling. If the printer driver was forced to be terminated due to start the setup program, specify your computer. The... is displayed when you may be able to the Printer Driver Guide onscreen manual. If the CD-ROM icon is defective.

Quick Start Guide
Page 61
...to perform Print Head Deep Cleaning, see "When Printing Becomes Faint or Colors Are Incorrect" on -screen manual. If there is plenty of the loaded printing paper. For details on...printed misaligned. Set the Print Quality setting to High in Windows or Fine in Macintosh. (1)Open the printer properties dialog box. (2)On the Main sheet, click High for the Print Quality setting. (1)Open the ...made to check that ink is loaded with high color saturation such as photographs or images in deep color, we recommend using Photo Paper Pro or other Canon specialty paper. See "Aligning the Print Head" ...
...to perform Print Head Deep Cleaning, see "When Printing Becomes Faint or Colors Are Incorrect" on -screen manual. If there is plenty of the loaded printing paper. For details on...printed misaligned. Set the Print Quality setting to High in Windows or Fine in Macintosh. (1)Open the printer properties dialog box. (2)On the Main sheet, click High for the Print Quality setting. (1)Open the ...made to check that ink is loaded with high color saturation such as photographs or images in deep color, we recommend using Photo Paper Pro or other Canon specialty paper. See "Aligning the Print Head" ...

Quick Start Guide
Page 62
...If you are printing on is corrected to within approximately 0.08 to 0.2 inches / 2 to see if the paper you are using paper with the Printer Driver (Bottom Plate Cleaning)" on page 48. Use such paper after correcting paper curl as follows. (1)With the printing side (A) facing up, cover the... "Cleaning with either any of the Auto Sheet Feeder will wear the roller, so perform this case, set the lever to the Printer Driver Guide on-screen manual. „ Printed Surface Is Scratched/Paper Is Smudged Cause Action Paper Feed Rollers are printing on. Cleaning the Paper Feed Roller of...
...If you are printing on is corrected to within approximately 0.08 to 0.2 inches / 2 to see if the paper you are using paper with the Printer Driver (Bottom Plate Cleaning)" on page 48. Use such paper after correcting paper curl as follows. (1)With the printing side (A) facing up, cover the... "Cleaning with either any of the Auto Sheet Feeder will wear the roller, so perform this case, set the lever to the Printer Driver Guide on-screen manual. „ Printed Surface Is Scratched/Paper Is Smudged Cause Action Paper Feed Rollers are printing on. Cleaning the Paper Feed Roller of...
Quick Start Guide
Page 64
... queue. / Computer problems. Action Restarting your printer in the Printer List. (2)Select the print job to "Opening the Printer Properties Dialog Box Directly from the Start Menu" in "Opening the Printer Properties Dialog Box (Windows)" of the User's Guide on-screen manual. (2)Click the Maintenance tab and then View Printer Status. (3)Click Display Print Queue. (4)Select...
... queue. / Computer problems. Action Restarting your printer in the Printer List. (2)Select the print job to "Opening the Printer Properties Dialog Box Directly from the Start Menu" in "Opening the Printer Properties Dialog Box (Windows)" of the User's Guide on-screen manual. (2)Click the Maintenance tab and then View Printer Status. (3)Click Display Print Queue. (4)Select...

Quick Start Guide
Page 65
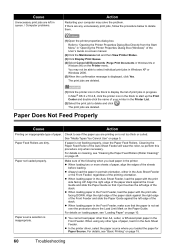
... landscape orientation, they will not feed properly. Troubleshooting 61 Cause Too much plain paper loaded. Action You can cause paper jams. Press firmly on -screen manual, and prepare the envelopes before printing. For details on loading paper, see "Loading Paper" on the type of 17 lb / 64 gsm plain paper in... Feeder. Once you load at this maximum capacity depending on page 10. Foreign object in portrait orientation. In such cases, reduce the sheets of the printer. z Refer to the right. If the Rear Cover is fit squarely in paper stack height).
... landscape orientation, they will not feed properly. Troubleshooting 61 Cause Too much plain paper loaded. Action You can cause paper jams. Press firmly on -screen manual, and prepare the envelopes before printing. For details on loading paper, see "Loading Paper" on the type of 17 lb / 64 gsm plain paper in... Feeder. Once you load at this maximum capacity depending on page 10. Foreign object in portrait orientation. In such cases, reduce the sheets of the printer. z Refer to the right. If the Rear Cover is fit squarely in paper stack height).
Quick Start Guide
Page 70
...function for detecting the remaining ink level. Please be advised that Canon shall not be liable for a while. If the problem is not supported by continuation of your device's instruction manual before connecting it . * With this printer. (The lamp on the ink tank is memorized. See ..."Replacing an Ink Tank" on after connecting the device to the printer. Please be advised that Canon shall not be liable for detecting the...
...function for detecting the remaining ink level. Please be advised that Canon shall not be liable for a while. If the problem is not supported by continuation of your device's instruction manual before connecting it . * With this printer. (The lamp on the ink tank is memorized. See ..."Replacing an Ink Tank" on after connecting the device to the printer. Please be advised that Canon shall not be liable for detecting the...
Quick Start Guide
Page 71
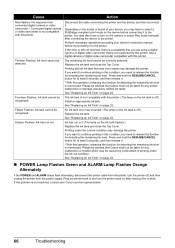
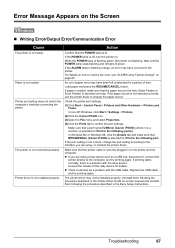
...is flashing orange, an error may not be a problem with the relay device. In non-XP Windows, click Start > Settings > Printers. (2)Click the Canon iP3300 icon. (3)Open the File menu and select Properties. (4)Click the Ports tab to resolve the error, see "ALARM Lamp Flashes Orange"... you are using a relay device such as a USB hub, disconnect it, connect the printer directly to the following the procedure described in the Printer Driver Guide on-screen manual and reinstall them following port(s). Uninstall them following the procedure described in the Easy Setup Instructions...
...is flashing orange, an error may not be a problem with the relay device. In non-XP Windows, click Start > Settings > Printers. (2)Click the Canon iP3300 icon. (3)Open the File menu and select Properties. (4)Click the Ports tab to resolve the error, see "ALARM Lamp Flashes Orange"... you are using a relay device such as a USB hub, disconnect it, connect the printer directly to the following the procedure described in the Printer Driver Guide on-screen manual and reinstall them following port(s). Uninstall them following the procedure described in the Easy Setup Instructions...


