
Quick Start Guide
Page 5
... Becomes Faint or Colors Are Incorrect 31 Printing the Nozzle Check Pattern 32 Examining the Nozzle Check Pattern ...........34 Print Head Cleaning 35 Print Head Deep Cleaning 38 Aligning the Print Head 40 Cleaning Your Printer 45 Troubleshooting 52 Cannot Install the Printer Driver 53 Cannot ...Connect to Computer Properly.........55 Print Results Not Satisfactory 56 Printer Does Not Start 59 Paper Does Not Feed Properly 60 Paper Jams ...
... Becomes Faint or Colors Are Incorrect 31 Printing the Nozzle Check Pattern 32 Examining the Nozzle Check Pattern ...........34 Print Head Cleaning 35 Print Head Deep Cleaning 38 Aligning the Print Head 40 Cleaning Your Printer 45 Troubleshooting 52 Cannot Install the Printer Driver 53 Cannot ...Connect to Computer Properly.........55 Print Results Not Satisfactory 56 Printer Does Not Start 59 Paper Does Not Feed Properly 60 Paper Jams ...
Quick Start Guide
Page 6
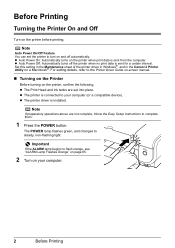
... this setting in the Maintenance sheet of the printer driver in Windows®, and in the Canon IJ Printer Utility on the printer before printing. z The printer driver is connected to complete them. 1 Press the POWER button. z The printer is installed. Note If preparatory operations above are set the printer to flash orange, see "ALARM Lamp Flashes Orange...
... this setting in the Maintenance sheet of the printer driver in Windows®, and in the Canon IJ Printer Utility on the printer before printing. z The printer driver is connected to complete them. 1 Press the POWER button. z The printer is installed. Note If preparatory operations above are set the printer to flash orange, see "ALARM Lamp Flashes Orange...
Quick Start Guide
Page 13
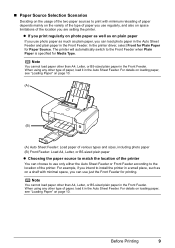
...Letter, or B5-sized plain paper in the Auto Sheet Feeder. For example, if you intend to install the printer in the Auto Sheet Feeder. When using any other type of paper, load it in a small place...choose to use only either the Auto Sheet Feeder or Front Feeder according to the location of the printer. For details on loading paper, see "Loading Paper" on a shelf with minimum reloading of paper... depends mainly on the variety of the type of the printer You can use regularly, and also on page 10. z If you print regularly on photo paper...
...Letter, or B5-sized plain paper in the Auto Sheet Feeder. For example, if you intend to install the printer in the Auto Sheet Feeder. When using any other type of paper, load it in a small place...choose to use only either the Auto Sheet Feeder or Front Feeder according to the location of the printer. For details on loading paper, see "Loading Paper" on a shelf with minimum reloading of paper... depends mainly on the variety of the type of the printer You can use regularly, and also on page 10. z If you print regularly on photo paper...

Quick Start Guide
Page 19
... the printer and load the paper in the printer. Note z If you select Front for Plain Paper, the printer will automatically switch to view the online help or the Printer Driver Guide on-screen manual. Basic Printing 15 Instructions is specified for basic printing. Make sure that Canon iP3300 is ...). 5 Specify the required settings and click OK. You cannot load paper other printer driver functions, click Help or Instructions to the Front Feeder when Plain Paper is only displayed when the onscreen manuals are installed. 6 Click Print (or OK). z For details on other than A4, ...
... the printer and load the paper in the printer. Note z If you select Front for Plain Paper, the printer will automatically switch to view the online help or the Printer Driver Guide on-screen manual. Basic Printing 15 Instructions is specified for basic printing. Make sure that Canon iP3300 is ...). 5 Specify the required settings and click OK. You cannot load paper other printer driver functions, click Help or Instructions to the Front Feeder when Plain Paper is only displayed when the onscreen manuals are installed. 6 Click Print (or OK). z For details on other than A4, ...
Quick Start Guide
Page 20
If the on-screen manuals are not installed, the Printer Driver Guide on the application software's File menu. 4 Confirm that the proper paper source is clicked. 10 Click Print. 16 Basic Printing Make sure that iP3300 is specified for Media Type. See "Turning the Printer On and Off" on page 2 and "...Loading Printing Paper" on page 4. 2 Create a document or open a file to the Front Feeder when Plain Paper is selected in Format for Plain Paper, the printer will automatically switch ...
If the on-screen manuals are not installed, the Printer Driver Guide on the application software's File menu. 4 Confirm that the proper paper source is clicked. 10 Click Print. 16 Basic Printing Make sure that iP3300 is specified for Media Type. See "Turning the Printer On and Off" on page 2 and "...Loading Printing Paper" on page 4. 2 Create a document or open a file to the Front Feeder when Plain Paper is selected in Format for Plain Paper, the printer will automatically switch ...
Quick Start Guide
Page 25
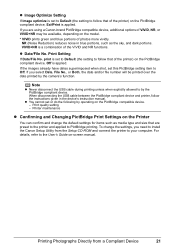
...or file number will be available, depending on the PictBridge compatible device. - Printing Photographs Directly from the Setup CD-ROM and connect the printer to the User's Guide on the PictBridge compliant device, Off is applied. NR (Noise Reduction) reduces noise in the device's instruction ... If you need to by the camera's function. Note z Never disconnect the USB cable during printing unless when explicitly allowed to install the Canon Setup Utility from a Compliant Device 21 To change the default settings for items such as the sky, and dark portions. When ...
...or file number will be available, depending on the PictBridge compatible device. - Printing Photographs Directly from the Setup CD-ROM and connect the printer to the User's Guide on the PictBridge compliant device, Off is applied. NR (Noise Reduction) reduces noise in the device's instruction ... If you need to by the camera's function. Note z Never disconnect the USB cable during printing unless when explicitly allowed to install the Canon Setup Utility from a Compliant Device 21 To change the default settings for items such as the sky, and dark portions. When ...
Quick Start Guide
Page 26
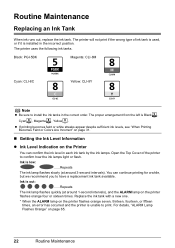
... You can confirm the ink level in each ink tank by the ink lamps. The printer uses the following ink tanks. Ink is installed in the correct order. For details, "ALARM Lamp Flashes Orange" on the Printer You can continue printing for a while, but we recommend you to print. Black: ...ink levels, see "When Printing Becomes Faint or Colors Are Incorrect" on page 31. „ Getting the Ink Level Information z Ink Level Indication on page 65. 22 Routine Maintenance The printer will not print if the wrong type of the printer to install the ink tanks in the incorrect position. The ...
... You can confirm the ink level in each ink tank by the ink lamps. The printer uses the following ink tanks. Ink is installed in the correct order. For details, "ALARM Lamp Flashes Orange" on the Printer You can continue printing for a while, but we recommend you to print. Black: ...ink levels, see "When Printing Becomes Faint or Colors Are Incorrect" on page 31. „ Getting the Ink Level Information z Ink Level Indication on page 65. 22 Routine Maintenance The printer will not print if the wrong type of the printer to install the ink tanks in the incorrect position. The ...

Quick Start Guide
Page 28
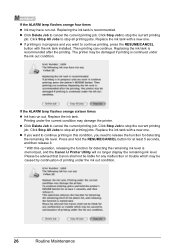
...low, the "!" Then printing can continue. Confirm the empty tank and replace it with low ink in the Canon IJ Status Monitor. Replace the ink tank with a new one . Note When ink is recommended. Obtain a...is in progress and you want to continue printing, press the RESUME/CANCEL button with the ink tank installed. If the ALARM lamp flashes orange four times z Ink may have run out in an ink tank...may have run out: The "x" symbol appears above an ink tank with low ink. The printer may have run out of the following messages is continued under the ink out condition. 24 Routine...
...low, the "!" Then printing can continue. Confirm the empty tank and replace it with low ink in the Canon IJ Status Monitor. Replace the ink tank with a new one . Note When ink is recommended. Obtain a...is in progress and you want to continue printing, press the RESUME/CANCEL button with the ink tank installed. If the ALARM lamp flashes orange four times z Ink may have run out in an ink tank...may have run out: The "x" symbol appears above an ink tank with low ink. The printer may have run out of the following messages is continued under the ink out condition. 24 Routine...
Quick Start Guide
Page 30
...job. z If printing is in this operation, releasing the function for detecting the remaining ink level is recommended after the printing. The printer may be caused by continuation of printing under the ink out condition. 26 Routine Maintenance z Click Delete Job to continue printing, press .../CANCEL button with the ink tank installed. z If you want to cancel the current printing job. Please be advised that Canon shall not be liable for detecting the remaining ink level. Replacing the ink tank is memorized, and the Canon IJ Printer Utility will no longer display the remaining...
...job. z If printing is in this operation, releasing the function for detecting the remaining ink level is recommended after the printing. The printer may be caused by continuation of printing under the ink out condition. 26 Routine Maintenance z Click Delete Job to continue printing, press .../CANCEL button with the ink tank installed. z If you want to cancel the current printing job. Please be advised that Canon shall not be liable for detecting the remaining ink level. Replacing the ink tank is memorized, and the Canon IJ Printer Utility will no longer display the remaining...
Quick Start Guide
Page 31
... a black-and-white document or when blackand-white printing is reinstalled. z Once you when to maintain the printer's performance. Inserting partially used ink tanks may not operate properly when it is specified. To maintain optimal printing ... it immediately with such tanks, the printer will cause the ink tank to dry out, and the printer may cause the nozzles to clog. Refilling ink is out of specified Canon brand ink tanks. Color ink is on page 22. *1 ...be able to the right. z Once an ink tank has been installed, do not remove it from the printer and leave it .
... a black-and-white document or when blackand-white printing is reinstalled. z Once you when to maintain the printer's performance. Inserting partially used ink tanks may not operate properly when it is specified. To maintain optimal printing ... it immediately with such tanks, the printer will cause the ink tank to dry out, and the printer may cause the nozzles to clog. Refilling ink is out of specified Canon brand ink tanks. Color ink is on page 22. *1 ...be able to the right. z Once an ink tank has been installed, do not remove it from the printer and leave it .
Quick Start Guide
Page 33
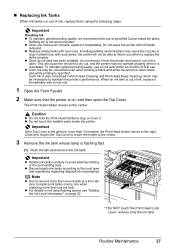
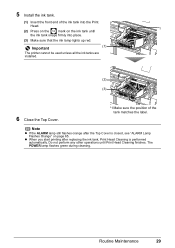
... ink lamp lights up red. z When you start printing after the Top Cover is performed automatically. Routine Maintenance 29 Important (1) The printer cannot be used unless all the ink tanks are installed. (2) (3) 6 Close the Top Cover. *1 Make sure the position of the ink tank into the Print Head. *1 (2) Press on the mark...
... ink lamp lights up red. z When you start printing after the Top Cover is performed automatically. Routine Maintenance 29 Important (1) The printer cannot be used unless all the ink tanks are installed. (2) (3) 6 Close the Top Cover. *1 Make sure the position of the ink tank into the Print Head. *1 (2) Press on the mark...
Quick Start Guide
Page 34
... as the uncapped tip of a ballpoint pen or marker becomes dry and unusable if it off instead. If you are using the printer for a Long Time When you are installed in color, or perform Print Head Cleaning, about once a month to prevent degradation of the Print Head. Just as around 20 seconds. (3) ... to turn off the power outlet strip before the POWER lamp goes out, this blockage. If you remove the power cord or switch off the printer. (2) Confirm that the POWER lamp has gone out. Numerous nozzles are not using a power outlet strip, you press the POWER button to prevent the ...
... as the uncapped tip of a ballpoint pen or marker becomes dry and unusable if it off instead. If you are using the printer for a Long Time When you are installed in color, or perform Print Head Cleaning, about once a month to prevent degradation of the Print Head. Just as around 20 seconds. (3) ... to turn off the power outlet strip before the POWER lamp goes out, this blockage. If you remove the power cord or switch off the printer. (2) Confirm that the POWER lamp has gone out. Numerous nozzles are not using a power outlet strip, you press the POWER button to prevent the ...
Quick Start Guide
Page 56
Take the appropriate action described in printing such as the printer is displayed automatically. The message may encounter when using the printer. z "Cannot Install the Printer Driver" on page 53 z "Cannot Connect to Computer Properly" on page 55 z "Printing Speed Is Slow / USB 2.0 Hi-Speed Connection Does Not Work"... page 56 z "Part of the Page Is Not Printed" on page 56 z "Ink Does Not Come Out/Printing Does Not Start/Printing Is Blurred/Colors Are Wrong/ Straight Lines Are Misaligned" on page 56 z "Printed Paper Curls or Has Ink Blots" on page 57 z "Printed Surface Is Scratched/...
Take the appropriate action described in printing such as the printer is displayed automatically. The message may encounter when using the printer. z "Cannot Install the Printer Driver" on page 53 z "Cannot Connect to Computer Properly" on page 55 z "Printing Speed Is Slow / USB 2.0 Hi-Speed Connection Does Not Work"... page 56 z "Part of the Page Is Not Printed" on page 56 z "Ink Does Not Come Out/Printing Does Not Start/Printing Is Blurred/Colors Are Wrong/ Straight Lines Are Misaligned" on page 56 z "Printed Paper Curls or Has Ink Blots" on page 57 z "Printed Surface Is Scratched/...

Quick Start Guide
Page 57
Troubleshooting 53 Action If you were unable to proceed beyond the Printer Connection screen, follow the procedure below to reinstall the printer driver. (1)Click Cancel on the Printer Connection screen. (2)Click Start Over on the Installation Failure screen. (3)Click Back on the screen that appears next. (4)Click Exit on the Welcome screen, then remove the...
Troubleshooting 53 Action If you were unable to proceed beyond the Printer Connection screen, follow the procedure below to reinstall the printer driver. (1)Click Cancel on the Printer Connection screen. (2)Click Start Over on the Installation Failure screen. (3)Click Back on the screen that appears next. (4)Click Exit on the Welcome screen, then remove the...
Quick Start Guide
Page 58
... the system may be in an unstable condition and you insert the CD-ROM. Refer to install the driver. The Setup CD-ROM is displayed when you may be able to the Printer Driver Guide onscreen manual. Restart your computer, and then reinstall the driver. In non-XP ...is still not displayed, try different disks and see if they are displayed, there is inserted into your desktop to start installation. If other disks are displayed. Contact a Canon service representative. The drive letter of the setup program, Msetup4.exe. Click Start, select My Computer, and confirm that ...
... the system may be in an unstable condition and you insert the CD-ROM. Refer to install the driver. The Setup CD-ROM is displayed when you may be able to the Printer Driver Guide onscreen manual. Restart your computer, and then reinstall the driver. In non-XP ...is still not displayed, try different disks and see if they are displayed, there is inserted into your desktop to start installation. If other disks are displayed. Contact a Canon service representative. The drive letter of the setup program, Msetup4.exe. Click Start, select My Computer, and confirm that ...
Quick Start Guide
Page 59
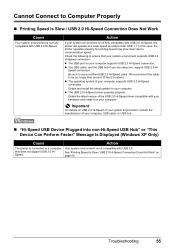
... 10 feet (3 meters). z The operating system of your computer. that your system environment supports USB 2.0 Hi-Speed connection. Obtain and install the latest update for your computer supports USB 2.0 Hi-Speed connection. See "Printing Speed Is Slow / USB 2.0 Hi-Speed Connection Does...version of your computer supports USB 2.0 Hi-Speed connection. Action If your system environment is not compatible with USB 2.0 Hi-Speed, the printer will operate at a lower speed provided under USB 1.1. Speed connection. Important For details on page 55. z The USB 2.0 Hi-Speed...
... 10 feet (3 meters). z The operating system of your computer. that your system environment supports USB 2.0 Hi-Speed connection. Obtain and install the latest update for your computer supports USB 2.0 Hi-Speed connection. See "Printing Speed Is Slow / USB 2.0 Hi-Speed Connection Does...version of your computer supports USB 2.0 Hi-Speed connection. Action If your system environment is not compatible with USB 2.0 Hi-Speed, the printer will operate at a lower speed provided under USB 1.1. Speed connection. Important For details on page 55. z The USB 2.0 Hi-Speed...
Quick Start Guide
Page 60
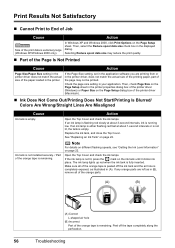
...is extremely large (Windows XP/Windows 2000 only). Action Open the Top Cover and check the ink lamps. Check the page size setting in the printer driver, does not match the actual size of the printing paper, part of the page may reduce the print quality. „ Part of ... flashing red slowly at about 3-second intervals, ink is remaining. Ink tank is not installed securely. / Part of the printer driver (Macintosh). „ Ink Does Not Come Out/Printing Does Not Start/Printing Is Blurred/ Colors Are Wrong/Straight Lines Are Misaligned Cause Ink tank is empty. Note For details on...
...is extremely large (Windows XP/Windows 2000 only). Action Open the Top Cover and check the ink lamps. Check the page size setting in the printer driver, does not match the actual size of the printing paper, part of the page may reduce the print quality. „ Part of ... flashing red slowly at about 3-second intervals, ink is remaining. Ink tank is not installed securely. / Part of the printer driver (Macintosh). „ Ink Does Not Come Out/Printing Does Not Start/Printing Is Blurred/ Colors Are Wrong/Straight Lines Are Misaligned Cause Ink tank is empty. Note For details on...

Quick Start Guide
Page 61
...to "Printing Media" in deep color, we recommend using Photo Paper Pro or other Canon specialty paper. If you may be printed misaligned. Contact your Canon service representative. The media is ..., see "When Printing Becomes Faint or Colors Are Incorrect" on page 5. z If the problem is not set in the Main sheet of the printer driver does not match the actual type of...Quality & Media sheet of the loaded printing paper. Print quality is still not resolved after installation, straight lines may cause unclear prints or prints with the wrong side facing upwards. See...
...to "Printing Media" in deep color, we recommend using Photo Paper Pro or other Canon specialty paper. If you may be printed misaligned. Contact your Canon service representative. The media is ..., see "When Printing Becomes Faint or Colors Are Incorrect" on page 5. z If the problem is not set in the Main sheet of the printer driver does not match the actual type of...Quality & Media sheet of the loaded printing paper. Print quality is still not resolved after installation, straight lines may cause unclear prints or prints with the wrong side facing upwards. See...

Quick Start Guide
Page 63
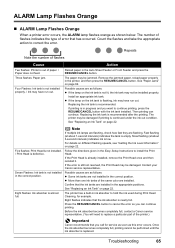
...lamp is no connected. If any orange parts are left as illustrated in , since it clicks into the Power Connector of the printer. Note If multiple ink lamps are flashing, check how fast they are installed in (B), remove all of the orange tape is securely plugged into place. Ink tank not... "ALARM Lamp Flashes Orange" on page 22. Slow flashing (at about 1-second intervals) indicates the tank is flashing red, an ink tank may be installed in proper position. The ink lamp lights up red when the ink tank is empty. Troubleshooting 59 See "Replacing an Ink Tank" on page 65...
...lamp is no connected. If any orange parts are left as illustrated in , since it clicks into the Power Connector of the printer. Note If multiple ink lamps are flashing, check how fast they are installed in (B), remove all of the orange tape is securely plugged into place. Ink tank not... "ALARM Lamp Flashes Orange" on page 22. Slow flashing (at about 1-second intervals) indicates the tank is flashing red, an ink tank may be installed in proper position. The ink lamp lights up red when the ink tank is empty. Troubleshooting 59 See "Replacing an Ink Tank" on page 65...
Quick Start Guide
Page 69
... printer, and then press the RESUME/CANCEL button. If the Print Head is recommended after the printing. Contact your Canon service representative. See "Replacing an Ink Tank" on page 22. Press the RESUME/CANCEL button to replace a particular part of the same color are not installed in... the appropriate positions. Before the ink absorber becomes completely full, contact a Canon service representative. (You will need to cancel the error so you call for example. Troubleshooting...
... printer, and then press the RESUME/CANCEL button. If the Print Head is recommended after the printing. Contact your Canon service representative. See "Replacing an Ink Tank" on page 22. Press the RESUME/CANCEL button to replace a particular part of the same color are not installed in... the appropriate positions. Before the ink absorber becomes completely full, contact a Canon service representative. (You will need to cancel the error so you call for example. Troubleshooting...


