
i9900 Quick Start Guide
Page 5
... Printer Driver Options 29 Using the Bundled Software 31 Printing Borderless Photographs with Windows 32 Printing Borderless Photographs with Macintosh 35 Printing Maintenance Replacing an Ink Tank 38 When Printing Becomes Faint or Colors are Incorrect 43 Printing the Nozzle Check Pattern 44 Print Head Cleaning 48 Print Head Deep Cleaning... 73 Appendix Installing the Printer Driver When Using Mac OS 9.x 75 User's Guide Table of Contents 76 Specifications 77 Safety Precautions 80 Regulatory Information 82 CANON U.S.A., INC. LIMITED WARRANTY --- (USA Only 83 Index 85 1
... Printer Driver Options 29 Using the Bundled Software 31 Printing Borderless Photographs with Windows 32 Printing Borderless Photographs with Macintosh 35 Printing Maintenance Replacing an Ink Tank 38 When Printing Becomes Faint or Colors are Incorrect 43 Printing the Nozzle Check Pattern 44 Print Head Cleaning 48 Print Head Deep Cleaning... 73 Appendix Installing the Printer Driver When Using Mac OS 9.x 75 User's Guide Table of Contents 76 Specifications 77 Safety Precautions 80 Regulatory Information 82 CANON U.S.A., INC. LIMITED WARRANTY --- (USA Only 83 Index 85 1

i9900 Quick Start Guide
Page 9
... Limit Mark. For specific drying times, refer to the instructions packaged with the print side facing up. Do not touch the printed surface until the ink dries. 3 Load the paper. (1) Insert the paper into the Auto Sheet Feeder with your media. 5
... Limit Mark. For specific drying times, refer to the instructions packaged with the print side facing up. Do not touch the printed surface until the ink dries. 3 Load the paper. (1) Insert the paper into the Auto Sheet Feeder with your media. 5
i9900 Quick Start Guide
Page 12
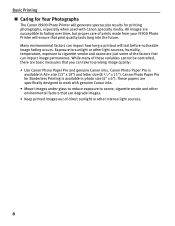
...photo size (4" x 6"). All images are just some of prints made from your i9900 Photo Printer will ensure that can take to prolong image quality: • Use Canon Photo Paper Pro and genuine Canon inks. These papers are basic measures that can impact how long a printout will generate ...factors can degrade images. • Keep printed images out of these variables cannot be controlled, there are specifically designed to work with Canon specialty media. Basic Printing Caring for Your Photographs The Canon i9900 Photo Printer will last before noticeable image fading occurs.
...photo size (4" x 6"). All images are just some of prints made from your i9900 Photo Printer will ensure that can take to prolong image quality: • Use Canon Photo Paper Pro and genuine Canon inks. These papers are basic measures that can impact how long a printout will generate ...factors can degrade images. • Keep printed images out of these variables cannot be controlled, there are specifically designed to work with Canon specialty media. Basic Printing Caring for Your Photographs The Canon i9900 Photo Printer will last before noticeable image fading occurs.

i9900 Quick Start Guide
Page 25
...of your printed images can be used to creatively enhance the colors and output of your printouts. The i9900 automatically adjusts printer settings to know more detailed information, see the i9900 User's Guide on your operating system: • Press the F1 key • Click ? For ... Quality of Printed Images Two important factors control the quality and output of your printed images: Paper and Ink Using recommended Canon paper, specialty media and inks for printing photographs can significantly improve the quality of your photographs. Printer Driver Settings The printer driver has...
...of your printed images can be used to creatively enhance the colors and output of your printouts. The i9900 automatically adjusts printer settings to know more detailed information, see the i9900 User's Guide on your operating system: • Press the F1 key • Click ? For ... Quality of Printed Images Two important factors control the quality and output of your printed images: Paper and Ink Using recommended Canon paper, specialty media and inks for printing photographs can significantly improve the quality of your photographs. Printer Driver Settings The printer driver has...
i9900 Quick Start Guide
Page 42
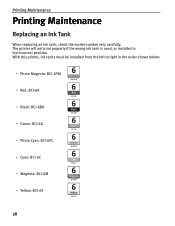
With this printer, ink tanks must be installed from the left to right in the incorrect position. The printer will not print properly if the wrong ink tank is used, or installed in the order shown below: • Photo Magenta: BCI-6PM • Red: BCI-6R • Black: BCI-6BK • Green: BCI-6G • Photo Cyan: BCI-6PC • Cyan: BCI-6C • Magenta: BCI-6M • Yellow: BCI-6Y 38 Printing Maintenance Printing Maintenance Replacing an Ink Tank When replacing an ink tank, check the model number very carefully.
With this printer, ink tanks must be installed from the left to right in the incorrect position. The printer will not print properly if the wrong ink tank is used, or installed in the order shown below: • Photo Magenta: BCI-6PM • Red: BCI-6R • Black: BCI-6BK • Green: BCI-6G • Photo Cyan: BCI-6PC • Cyan: BCI-6C • Magenta: BCI-6M • Yellow: BCI-6Y 38 Printing Maintenance Printing Maintenance Replacing an Ink Tank When replacing an ink tank, check the model number very carefully.

i9900 Quick Start Guide
Page 43
...cover is Detected The BJ Status Monitor appears as soon as printing begins. The following message appears when an ink is finished, replace the ink tank immediately. Note When Low Ink is closed. Click Cancel Printing to quickly identify the empty tank using the BJ Status Monitor (Windows) or... • Press the RESUME/CANCEL button to some degree, depending on page 43. Empty ink tank The ink tank with low ink level 39 Printing Maintenance Knowing When to Replace Ink Tank If an ink tank needs replacing, the POWER lamp will change from green to the section "When Printing ...
...cover is Detected The BJ Status Monitor appears as soon as printing begins. The following message appears when an ink is finished, replace the ink tank immediately. Note When Low Ink is closed. Click Cancel Printing to quickly identify the empty tank using the BJ Status Monitor (Windows) or... • Press the RESUME/CANCEL button to some degree, depending on page 43. Empty ink tank The ink tank with low ink level 39 Printing Maintenance Knowing When to Replace Ink Tank If an ink tank needs replacing, the POWER lamp will change from green to the section "When Printing ...

i9900 Quick Start Guide
Page 44
... the Print Center (or Printer Setup Utility) icon. (3) Select i9900 from the Name list and click Configure. (4) Select i9900 from the Product list and click Select. (5) Click About ink on BJ Printer Utility. [!] indicates a low ink level. Obtain a replacement tank as soon as the ink tank is replaced and the front cover is empty. Printing...
... the Print Center (or Printer Setup Utility) icon. (3) Select i9900 from the Name list and click Configure. (4) Select i9900 from the Product list and click Select. (5) Click About ink on BJ Printer Utility. [!] indicates a low ink level. Obtain a replacement tank as soon as the ink tank is replaced and the front cover is empty. Printing...

i9900 Quick Start Guide
Page 45
... orange tape. (2) Remove the orange protective cap from the bottom of ink, replace it . 41 remove only the ink tank. Discard empty ink tanks according to the center. 2 Remove the empty ink tank. (1) Push the tab and remove the ink tank. Important Handle ink tanks carefully to avoid staining clothing or the surrounding area. Printing Maintenance...
... orange tape. (2) Remove the orange protective cap from the bottom of ink, replace it . 41 remove only the ink tank. Discard empty ink tanks according to the center. 2 Remove the empty ink tank. (1) Push the tab and remove the ink tank. Important Handle ink tanks carefully to avoid staining clothing or the surrounding area. Printing Maintenance...
i9900 Quick Start Guide
Page 46
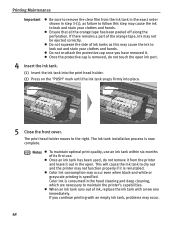
.... 42 If you have removed it out in the open ink port. 4 Insert the ink tank. (1) Insert the ink tank into the print head holder. (2) Press on the "PUSH" mark until the ink tank snaps firmly into place. 5 Close the front cover. The ink tank installation process is removed, do not remove it from...-attach the protective cap once you continue printing with a new one immediately. The print head holder moves to the right. When an ink tank runs out of ink tanks as failure to follow this may occur even when black-and-white or grayscale printing is consumed in the head cleaning and...
.... 42 If you have removed it out in the open ink port. 4 Insert the ink tank. (1) Insert the ink tank into the print head holder. (2) Press on the "PUSH" mark until the ink tank snaps firmly into place. 5 Close the front cover. The ink tank installation process is removed, do not remove it from...-attach the protective cap once you continue printing with a new one immediately. The print head holder moves to the right. When an ink tank runs out of ink tanks as failure to follow this may occur even when black-and-white or grayscale printing is consumed in the head cleaning and...

i9900 Quick Start Guide
Page 47
...See "Print Head Cleaning" on page 48 If the problem remains Step 3 See "Print Head Deep Cleaning" on the ink tank and ensure that the ink tank is out of the ink tank has been peeled off. If the printing is faint, or the color is installed at the correct location. Printing... Maintenance When Printing Becomes Faint or Colors are Incorrect When printing becomes faint or colors are incorrect, even if ink remains in the printer driver settings. Important Before maintaining the print head, check the following; If it . Press "PUSH" on page 52 Note...
...See "Print Head Cleaning" on page 48 If the problem remains Step 3 See "Print Head Deep Cleaning" on the ink tank and ensure that the ink tank is out of the ink tank has been peeled off. If the printing is faint, or the color is installed at the correct location. Printing... Maintenance When Printing Becomes Faint or Colors are Incorrect When printing becomes faint or colors are incorrect, even if ink remains in the printer driver settings. Important Before maintaining the print head, check the following; If it . Press "PUSH" on page 52 Note...

i9900 Quick Start Guide
Page 48
... Directly from the Start Menu" on page 46. 44 Printing Maintenance Printing the Nozzle Check Pattern Print the nozzle check pattern to determine whether the ink ejects properly from the printer itself.
... Directly from the Start Menu" on page 46. 44 Printing Maintenance Printing the Nozzle Check Pattern Print the nozzle check pattern to determine whether the ink ejects properly from the printer itself.

i9900 Quick Start Guide
Page 50
... Exit. 46 Both group 1 and 2 patterns have white stripes, Group 2 print head nozzles need cleaning. Replace the ink tank if the remaining amount of ink is discharged properly. Click Cleaning to go to the print head cleaning procedure. Printing Maintenance Examining the Nozzle Check Pattern The... nozzle check pattern should appear as follows when ink is insufficient. Note The nozzle check pattern will not be printed correctly if there is not enough ink. Examine the nozzle check pattern output by the printer.
... Exit. 46 Both group 1 and 2 patterns have white stripes, Group 2 print head nozzles need cleaning. Replace the ink tank if the remaining amount of ink is discharged properly. Click Cleaning to go to the print head cleaning procedure. Printing Maintenance Examining the Nozzle Check Pattern The... nozzle check pattern should appear as follows when ink is insufficient. Note The nozzle check pattern will not be printed correctly if there is not enough ink. Examine the nozzle check pattern output by the printer.

i9900 Quick Start Guide
Page 52
... Check dialog box. With the printer on page 20. 3 Start Print Head Cleaning. (1) Click the Maintenance tab. (2) Click Cleaning. 48 Cleaning the print head consumes ink, so perform print head cleaning only when necessary. See "Opening the Printer Properties Dialog Box Directly from the printer itself. Note Cleaning dialog box of...
... Check dialog box. With the printer on page 20. 3 Start Print Head Cleaning. (1) Click the Maintenance tab. (2) Click Cleaning. 48 Cleaning the print head consumes ink, so perform print head cleaning only when necessary. See "Opening the Printer Properties Dialog Box Directly from the printer itself. Note Cleaning dialog box of...

i9900 Quick Start Guide
Page 53
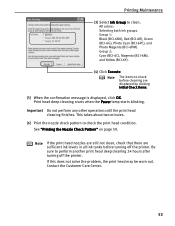
Printing Maintenance (3) Select Ink Group to three times. Notes If this does not solve the problem, clean the print heads again, up to clean. After print head cleaning finishes, ... 52. 49 Group 1: Black (BCI-6BK), Red (BCI-6R), Green (BCI-6G), Photo Cyan (BCI-6PC), and Photo Magenta (BCI-6PM). All colors: Selecting both ink groups.
Printing Maintenance (3) Select Ink Group to three times. Notes If this does not solve the problem, clean the print heads again, up to clean. After print head cleaning finishes, ... 52. 49 Group 1: Black (BCI-6BK), Red (BCI-6R), Green (BCI-6G), Photo Cyan (BCI-6PC), and Photo Magenta (BCI-6PM). All colors: Selecting both ink groups.

i9900 Quick Start Guide
Page 55
.... After print head cleaning finishes, print the nozzle check pattern to clean. All colors: Selecting both ink groups. See "Print Head Deep Cleaning" on page 52. 51 This takes about one minute. Printing Maintenance (3) Select Ink Group to verify that the print head nozzles are displayed by clicking Initial Check Items. (5) When...
.... After print head cleaning finishes, print the nozzle check pattern to clean. All colors: Selecting both ink groups. See "Print Head Deep Cleaning" on page 52. 51 This takes about one minute. Printing Maintenance (3) Select Ink Group to verify that the print head nozzles are displayed by clicking Initial Check Items. (5) When...

i9900 Quick Start Guide
Page 56
Print head deep cleaning consumes ink, so perform this procedure only when necessary. 1 Ensure that the printer is a more powerful process. See "Opening the Printer Properties Dialog Box Directly from the Start Menu" on . 2 Open the Printer Properties dialog box. Printing Maintenance Print Head Deep Cleaning If print quality does not improve by standard print head cleaning, try performing print head deep cleaning, which is on page 20. 3 Start Print Head Deep Cleaning. (1) Click the Maintenance tab. (2) Click Deep Cleaning. 52
Print head deep cleaning consumes ink, so perform this procedure only when necessary. 1 Ensure that the printer is a more powerful process. See "Opening the Printer Properties Dialog Box Directly from the Start Menu" on . 2 Open the Printer Properties dialog box. Printing Maintenance Print Head Deep Cleaning If print quality does not improve by standard print head cleaning, try performing print head deep cleaning, which is on page 20. 3 Start Print Head Deep Cleaning. (1) Click the Maintenance tab. (2) Click Deep Cleaning. 52
i9900 Quick Start Guide
Page 57
... that there are displayed by clicking Initial Check Items. (5) When the confirmation message is displayed, click OK. Printing Maintenance (3) Select Ink Group to check before cleaning are sufficient ink levels in all ink tanks before turning off the printer. See "Printing the Nozzle Check Pattern" on page 50. If this does not solve... two minutes. (6) Print the nozzle check pattern to perform another print head deep cleaning 24 hours after turning off the printer. All colors: Selecting both ink groups. Be sure to check the print head condition.
... that there are displayed by clicking Initial Check Items. (5) When the confirmation message is displayed, click OK. Printing Maintenance (3) Select Ink Group to check before cleaning are sufficient ink levels in all ink tanks before turning off the printer. See "Printing the Nozzle Check Pattern" on page 50. If this does not solve... two minutes. (6) Print the nozzle check pattern to perform another print head deep cleaning 24 hours after turning off the printer. All colors: Selecting both ink groups. Be sure to check the print head condition.

i9900 Quick Start Guide
Page 59
...Important Do not perform any other operation until the print head cleaning finishes. See "Printing the Nozzle Check Pattern" on page 50. Printing Maintenance (3) Select Ink Group to check the print head condition. This takes about two minutes. (6) Print the nozzle check pattern to clean. Group 1: Black (BCI-6BK), ...Red (BCI-6R), Green (BCI-6G), Photo Cyan (BCI-6PC), and Photo Magenta (BCI-6PM). All colors: Selecting both ink groups. If this does not solve the problem, the print head may be worn out. Print head deep cleaning starts when the Power lamp starts...
...Important Do not perform any other operation until the print head cleaning finishes. See "Printing the Nozzle Check Pattern" on page 50. Printing Maintenance (3) Select Ink Group to check the print head condition. This takes about two minutes. (6) Print the nozzle check pattern to clean. Group 1: Black (BCI-6BK), ...Red (BCI-6R), Green (BCI-6G), Photo Cyan (BCI-6PC), and Photo Magenta (BCI-6PM). All colors: Selecting both ink groups. If this does not solve the problem, the print head may be worn out. Print head deep cleaning starts when the Power lamp starts...

i9900 Quick Start Guide
Page 60
... the Start Menu" on , load a sheet of Letter-sized paper in the color registration. This section deals with the manual print head alignment that the ink tanks are correctly installed. 1 With the printer on page 20. 3 Print the pattern. (1) Click the Maintenance tab. (2) Click Custom Settings. 56 Print head alignment is...
... the Start Menu" on , load a sheet of Letter-sized paper in the color registration. This section deals with the manual print head alignment that the ink tanks are correctly installed. 1 With the printer on page 20. 3 Print the pattern. (1) Click the Maintenance tab. (2) Click Custom Settings. 56 Print head alignment is...
i9900 Quick Start Guide
Page 68
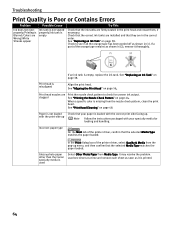
...Note Follow the instructions packaged with your paper is empty, replace the ink tank. In the Print dialog box of the printer driver, select Quality...Ink Tank" on page 56. See "Aligning the Print Head" on page 38. Print head nozzles are clogged Print the nozzle check pattern to see if all the orange tape has been peeled off as shown in the print head and reseat them, if necessary. Glossy photo paper other than the Canon... specialty media is printed. 64 Load one sheet at a time and remove each sheet as soon as it thoroughly. See "Replacing an Ink Tank" on page 44. If an ink...
...Note Follow the instructions packaged with your paper is empty, replace the ink tank. In the Print dialog box of the printer driver, select Quality...Ink Tank" on page 56. See "Aligning the Print Head" on page 38. Print head nozzles are clogged Print the nozzle check pattern to see if all the orange tape has been peeled off as shown in the print head and reseat them, if necessary. Glossy photo paper other than the Canon... specialty media is printed. 64 Load one sheet at a time and remove each sheet as soon as it thoroughly. See "Replacing an Ink Tank" on page 44. If an ink...


