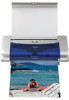
i70 Quick Start Guide
Page 2
... guidelines for energy efficiency. Trademarks • Canon is a registered trademark of Canon Inc. • PhotoRecord is a trademark of Canon Information System Research Australia. • Macintosh, Mac and the Mac logo are registered trademarks of Canon U.S.A., Inc. © 2003 Canon U.S.A., Inc. All information regarding the accuracy thereof...order that this manual may not be reproduced in part, without notice. Specifications are subject to your Canon i70 Color Bubble Jet Printer. Canon i70 Color Bubble Jet Printer Quick Start Guide. Copyright This manual is made regarding non...
... guidelines for energy efficiency. Trademarks • Canon is a registered trademark of Canon Inc. • PhotoRecord is a trademark of Canon Information System Research Australia. • Macintosh, Mac and the Mac logo are registered trademarks of Canon U.S.A., Inc. © 2003 Canon U.S.A., Inc. All information regarding the accuracy thereof...order that this manual may not be reproduced in part, without notice. Specifications are subject to your Canon i70 Color Bubble Jet Printer. Canon i70 Color Bubble Jet Printer Quick Start Guide. Copyright This manual is made regarding non...
i70 Quick Start Guide
Page 3
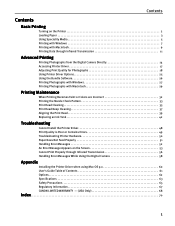
...Advanced Printing Printing Photographs from the Digital Camera Directly 14 Accessing Printer Driver 17 Adjusting Print Quality for Photographs 18 Using Printer Driver Options 25 Using the Bundle Software 26 Printing Photographs ... an Ink Tank 42 Troubleshooting Cannot Install the Printer Driver 48 Print Quality is Poor or Contains Errors 49 Troubleshooting Printer Hardware 50 Paper Does Not Feed Properly 51 ...Handling Error Messages While Using the Digital Camera 58 Appendix Installing the Printer Driver when using Mac OS 9.x 60 User's Guide Table of Contents 61 Options ...
...Advanced Printing Printing Photographs from the Digital Camera Directly 14 Accessing Printer Driver 17 Adjusting Print Quality for Photographs 18 Using Printer Driver Options 25 Using the Bundle Software 26 Printing Photographs ... an Ink Tank 42 Troubleshooting Cannot Install the Printer Driver 48 Print Quality is Poor or Contains Errors 49 Troubleshooting Printer Hardware 50 Paper Does Not Feed Properly 51 ...Handling Error Messages While Using the Digital Camera 58 Appendix Installing the Printer Driver when using Mac OS 9.x 60 User's Guide Table of Contents 61 Options ...
i70 Quick Start Guide
Page 4
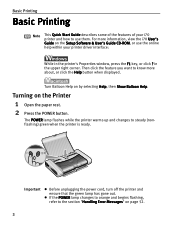
...key, or click ? z If the POWER lamp changes to orange and begins flashing, refer to steady (nonflashing) green when the printer is ready. The POWER lamp flashes while the printer warms up and changes to the section "Handling Error Messages" on the Setup Software & User's Guide CD-ROM, or use ... Important z Before unplugging the power cord, turn off the printer and ensure that the green lamp has gone out. For more about, or click the Help button when displayed. Then click the feature you want to use the online help within your i70 printer and how to know more information, view the...
...key, or click ? z If the POWER lamp changes to orange and begins flashing, refer to steady (nonflashing) green when the printer is ready. The POWER lamp flashes while the printer warms up and changes to the section "Handling Error Messages" on the Setup Software & User's Guide CD-ROM, or use ... Important z Before unplugging the power cord, turn off the printer and ensure that the green lamp has gone out. For more about, or click the Help button when displayed. Then click the feature you want to use the online help within your i70 printer and how to know more information, view the...
i70 Quick Start Guide
Page 5
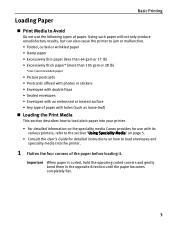
..." on page 5. • Consult the User's Guide for detailed instructions on how to load plain paper into your printer. • For detailed information on the speciality media Canon provides for use the following types of the paper before loading it. Important When paper is curled, hold the opposing ...results, but can also cause the printer to jam or malfunction. • Folded, curled or wrinkled paper • Damp paper • Excessively thin paper (less than 64 gsm or 17 lb) • Excessively thick paper* (more than 105 gsm or 28 lb) *non-Canon branded paper • Picture postcards ...
..." on page 5. • Consult the User's Guide for detailed instructions on how to load plain paper into your printer. • For detailed information on the speciality media Canon provides for use the following types of the paper before loading it. Important When paper is curled, hold the opposing ...results, but can also cause the printer to jam or malfunction. • Folded, curled or wrinkled paper • Damp paper • Excessively thin paper (less than 64 gsm or 17 lb) • Excessively thick paper* (more than 105 gsm or 28 lb) *non-Canon branded paper • Picture postcards ...
i70 Quick Start Guide
Page 8
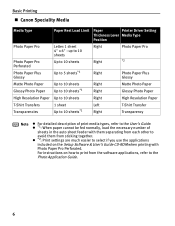
... much easier to select if you use the applications included on how to print from sticking together. Basic Printing „ Canon Speciality Media Media Type Paper Rest Load Limit Paper Printer Driver Setting Thickness Lever Media Type Position Photo Paper Pro Photo Paper Pro Perforated Photo Paper Plus Glossy Letter:1 sheet 4s...
... much easier to select if you use the applications included on how to print from sticking together. Basic Printing „ Canon Speciality Media Media Type Paper Rest Load Limit Paper Printer Driver Setting Thickness Lever Media Type Position Photo Paper Pro Photo Paper Pro Perforated Photo Paper Plus Glossy Letter:1 sheet 4s...
i70 Quick Start Guide
Page 9
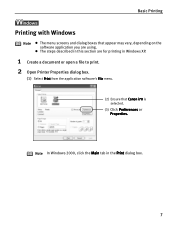
Basic Printing Printing with Windows Note z The menu screens and dialog boxes that Canon i70 is selected. (3) Click Preferences or Properties. z The steps described in this section are using. Note In Windows 2000, click the Main tab in Windows XP. 1 Create a document or open a file to print. 2 Open Printer Properties dialog box. (1) Select Print from the application software's File menu. (2) Ensure that appear may vary, depending on the software application you are for printing in the Print dialog box. 7
Basic Printing Printing with Windows Note z The menu screens and dialog boxes that Canon i70 is selected. (3) Click Preferences or Properties. z The steps described in this section are using. Note In Windows 2000, click the Main tab in Windows XP. 1 Create a document or open a file to print. 2 Open Printer Properties dialog box. (1) Select Print from the application software's File menu. (2) Ensure that appear may vary, depending on the software application you are for printing in the Print dialog box. 7

i70 Quick Start Guide
Page 10
.... Basic Printing 3 Specify the required settings. (1) Click Media Type to the User's Guide or Help. z For details about other printer driver functions, refer to select the type of media loaded in the printer. (2) Click OK. z Select Preview before printing by simply pressing the RESUME/ CANCEL button on the Main tab. Note You... can control quality in progress by clicking the check box. z To adjust Print Quality settings, select Custom and click Set on the printer. 8 Note z From the Page Setup tab select the correct document size to be printed.
.... Basic Printing 3 Specify the required settings. (1) Click Media Type to the User's Guide or Help. z For details about other printer driver functions, refer to select the type of media loaded in the printer. (2) Click OK. z Select Preview before printing by simply pressing the RESUME/ CANCEL button on the Main tab. Note You... can control quality in progress by clicking the check box. z To adjust Print Quality settings, select Custom and click Set on the printer. 8 Note z From the Page Setup tab select the correct document size to be printed.

i70 Quick Start Guide
Page 12
... Detailed Setting dialog box where you select Manual, the Details button will be printed in progress by simply pressing the RESUME/CANCEL button on the printer. 10 z For details about other printer driver functions, refer to the User's Guide. Basic Printing Note z When you have selected.
... Detailed Setting dialog box where you select Manual, the Details button will be printed in progress by simply pressing the RESUME/CANCEL button on the printer. 10 z For details about other printer driver functions, refer to the User's Guide. Basic Printing Note z When you have selected.
i70 Quick Start Guide
Page 13
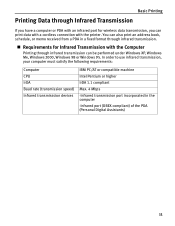
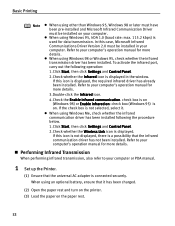
... with a cordless connection with the Computer Printing through Infrared Transmission If you have a computer or PDA with an infrared port for Infrared Transmission with the printer.
... with a cordless connection with the Computer Printing through Infrared Transmission If you have a computer or PDA with an infrared port for Infrared Transmission with the printer.
i70 Quick Start Guide
Page 14
... operation manual for more details. „ Performing Infrared Transmission When performing infrared transmission, also refer to your computer or PDA manual. 1 Set up the Printer. (1) Ensure that it . check box is on (Windows 98) or Enable infrared on: check box (Windows 95) is used for more details. z... battery, ensure that the universal AC adapter is not selected, select it has been charged. (2) Open the paper rest and turn on the printer. (3) Load the paper on the paper rest. 12 Refer to your computer's operation manual for data transmission. When using Windows Me, check ...
... operation manual for more details. „ Performing Infrared Transmission When performing infrared transmission, also refer to your computer or PDA manual. 1 Set up the Printer. (1) Ensure that it . check box is on (Windows 98) or Enable infrared on: check box (Windows 95) is used for more details. z... battery, ensure that the universal AC adapter is not selected, select it has been charged. (2) Open the paper rest and turn on the printer. (3) Load the paper on the paper rest. 12 Refer to your computer's operation manual for data transmission. When using Windows Me, check ...
i70 Quick Start Guide
Page 15
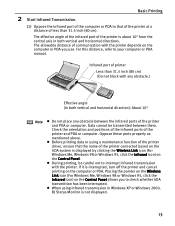
...10° from the central axis in both vertical and horizontal directions. Check the orientation and positions of the infrared ports of the printer and PDA or computer. The effective angle of the infrared port of the computer or PDA to check whether IrDA transmittion has been ... not place any obstacle between them. Oppose these ports properly as mentioned above. z During printing, be transmitted between the infrared ports of the printer and PDA or computer. 2 Start Infrared Transmission. Data cannot be careful not to your computer or PDA manual. z When using a maintenance function ...
...10° from the central axis in both vertical and horizontal directions. Check the orientation and positions of the infrared ports of the printer and PDA or computer. The effective angle of the infrared port of the computer or PDA to check whether IrDA transmittion has been ... not place any obstacle between them. Oppose these ports properly as mentioned above. z During printing, be transmitted between the infrared ports of the printer and PDA or computer. 2 Start Infrared Transmission. Data cannot be careful not to your computer or PDA manual. z When using a maintenance function ...
i70 Quick Start Guide
Page 16
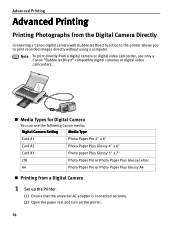
... Jet Direct" compatible digital cameras or digital video camcorders. „ Media Types for Digital Camera You can use the following Canon media: Digital Camera Setting Media Type Card #1 Photo Paper Pro 4s x 6s Card #2 Photo Paper Plus Glossy 4s x 6s Card #3 ... A4 Photo Paper Pro or Photo Paper Plus Glossy A4 „ Printing from the Digital Camera Directly Connecting a Canon digital camera with Bubble Jet Direct function to the printer allows you to print recorded images directly without using a computer. Advanced Printing Advanced Printing Printing Photographs from a Digital...
... Jet Direct" compatible digital cameras or digital video camcorders. „ Media Types for Digital Camera You can use the following Canon media: Digital Camera Setting Media Type Card #1 Photo Paper Pro 4s x 6s Card #2 Photo Paper Plus Glossy 4s x 6s Card #3 ... A4 Photo Paper Pro or Photo Paper Plus Glossy A4 „ Printing from the Digital Camera Directly Connecting a Canon digital camera with Bubble Jet Direct function to the printer allows you to print recorded images directly without using a computer. Advanced Printing Advanced Printing Printing Photographs from a Digital...
i70 Quick Start Guide
Page 17
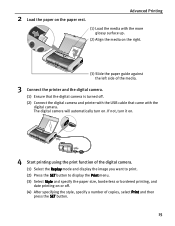
... the media on or off. (4) After specifying the style, specify a number of the media. 3 Connect the printer and the digital camera. (1) Ensure that the digital camera is turned off. (2) Connect the digital camera and printer with the USB cable that came with the digital camera. The digital camera will automatically turn it...
... the media on or off. (4) After specifying the style, specify a number of the media. 3 Connect the printer and the digital camera. (1) Ensure that the digital camera is turned off. (2) Connect the digital camera and printer with the USB cable that came with the digital camera. The digital camera will automatically turn it...
i70 Quick Start Guide
Page 18
... make an index print using the DPOF function. z By operating the digital camera, you can print specified numbers of the media set on the printer. Connect the printer to the image size set on the digital camera and the size of images, or make the following functions: · Print quality setting ·...
... make an index print using the DPOF function. z By operating the digital camera, you can print specified numbers of the media set on the printer. Connect the printer to the image size set on the digital camera and the size of images, or make the following functions: · Print quality setting ·...
i70 Quick Start Guide
Page 19
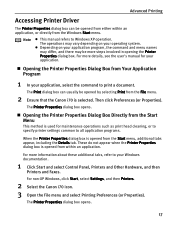
...Properties). For non-XP Windows, click Start, select Settings, and then Printers. 2 Select the Canon i70 icon. 3 Open the File menu and select Printing Preferences (or Properties). For more steps involved in opening the Printer Properties dialog box. For more details, see the user's manual for ... there may vary depending on your operating system. Advanced Printing Accessing Printer Driver The Printer Properties dialog box can usually be opened by selecting Print from the File menu. 2 Ensure that the Canon i70 is opened from within an application, or directly from the Windows...
...Properties). For non-XP Windows, click Start, select Settings, and then Printers. 2 Select the Canon i70 icon. 3 Open the File menu and select Printing Preferences (or Properties). For more steps involved in opening the Printer Properties dialog box. For more details, see the user's manual for ... there may vary depending on your operating system. Advanced Printing Accessing Printer Driver The Printer Properties dialog box can usually be opened by selecting Print from the File menu. 2 Ensure that the Canon i70 is opened from within an application, or directly from the Windows...
i70 Quick Start Guide
Page 20
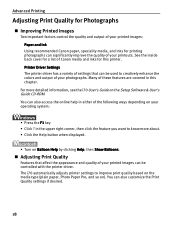
...on Balloon Help by clicking Help, then Show Balloons. „ Adjusting Print Quality Features that can be controlled with the printer driver. The i70 automatically adjusts printer settings to improve print quality based on the media type (plain paper, Photo Paper Pro, and so on the Setup ...i70 User's Guide on ). Many of these features are covered in the upper right corner, then click the feature you want to creatively enhance the colors and output of your operating system: • Press the F1 key • Click ? in this printer. See the inside back cover for a list of Canon...
...on Balloon Help by clicking Help, then Show Balloons. „ Adjusting Print Quality Features that can be controlled with the printer driver. The i70 automatically adjusts printer settings to improve print quality based on the media type (plain paper, Photo Paper Pro, and so on the Setup ...i70 User's Guide on ). Many of these features are covered in the upper right corner, then click the feature you want to creatively enhance the colors and output of your operating system: • Press the F1 key • Click ? in this printer. See the inside back cover for a list of Canon...

i70 Quick Start Guide
Page 21
...Printing with Macintosh" on page 17. 2 Select Custom in Print Quality, then click Set... To manually adjust Print Quality settings: Advanced Printing 1 Open the Printer Properties dialog box. to open the Detailed Setting dialog box. 3 Move the slide bar to adjust the Print Quality. 4 When the process is complete, ... Move the slide bar to adjust the Print Quality. 4 When the process is complete, click OK. 1 Open the Print dialog box. See"Opening the Printer Properties Dialog Box from Your Application Program" on page 9. 2 Click Print Mode and select Manual, then click Details...
...Printing with Macintosh" on page 17. 2 Select Custom in Print Quality, then click Set... To manually adjust Print Quality settings: Advanced Printing 1 Open the Printer Properties dialog box. to open the Detailed Setting dialog box. 3 Move the slide bar to adjust the Print Quality. 4 When the process is complete, ... Move the slide bar to adjust the Print Quality. 4 When the process is complete, click OK. 1 Open the Print dialog box. See"Opening the Printer Properties Dialog Box from Your Application Program" on page 9. 2 Click Print Mode and select Manual, then click Details...
i70 Quick Start Guide
Page 22
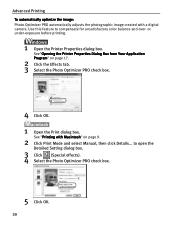
... Macintosh" on page 17. 2 Click the Effects tab. 3 Select the Photo Optimizer PRO check box. 4 Click OK. 1 Open the Print dialog box. See"Opening the Printer Properties Dialog Box from Your Application Program" on page 9. 2 Click Print Mode and select Manual, then click Details... to compensate for unsatisfactory color balance and... the Detailed Setting dialog box. 3 Click (Special effects). 4 Select the Photo Optimizer PRO check box. 5 Click OK. 20 or under-exposure before printing. 1 Open the Printer Properties dialog box. See "Printing with a digital camera.
... Macintosh" on page 17. 2 Click the Effects tab. 3 Select the Photo Optimizer PRO check box. 4 Click OK. 1 Open the Print dialog box. See"Opening the Printer Properties Dialog Box from Your Application Program" on page 9. 2 Click Print Mode and select Manual, then click Details... to compensate for unsatisfactory color balance and... the Detailed Setting dialog box. 3 Click (Special effects). 4 Select the Photo Optimizer PRO check box. 5 Click OK. 20 or under-exposure before printing. 1 Open the Printer Properties dialog box. See "Printing with a digital camera.
i70 Quick Start Guide
Page 25
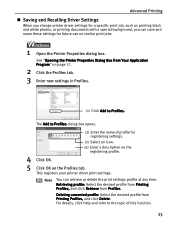
... Profiles. Deleting unwanted profile: Select the desired profile from Profiles. Advanced Printing „ Saving and Recalling Driver Settings When you change printer driver settings for a specific print job, such as printing black and white photos, or printing documents with a special background, you ...can retrieve or delete the print settings profile at any time. This registers your printer driver print settings. The Add to the topic of profile for registering settings. (3) Select an icon. (4) Enter a description on the ...
... Profiles. Deleting unwanted profile: Select the desired profile from Profiles. Advanced Printing „ Saving and Recalling Driver Settings When you change printer driver settings for a specific print job, such as printing black and white photos, or printing documents with a special background, you ...can retrieve or delete the print settings profile at any time. This registers your printer driver print settings. The Add to the topic of profile for registering settings. (3) Select an icon. (4) Enter a description on the ...

i70 Quick Start Guide
Page 26
Advanced Printing 1 Open the Print dialog box. The Register Settings dialog box opens. 3 Enter the print settings to register your printer driver print settings. The dialog box to enter the new settings name opens. (2) Enter a name under which to register. (1) Click Apply.... Retrieving print settings: Select ...
Advanced Printing 1 Open the Print dialog box. The Register Settings dialog box opens. 3 Enter the print settings to register your printer driver print settings. The dialog box to enter the new settings name opens. (2) Enter a name under which to register. (1) Click Apply.... Retrieving print settings: Select ...


