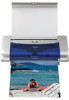
i70 Quick Start Guide
Page 3
...Bundle Software 26 Printing Photographs with Windows 27 Printing Photographs with Macintosh 29 Printing Maintenance When Printing Becomes Faint or Colors are Incorrect 32 Printing the Nozzle Check Pattern 33 Print Head Cleaning 35 Print Head Deep Cleaning 37 Aligning the Print Head 39 Replacing an...Print Properly through Infrared Transmission 56 Handling Error Messages While Using the Digital Camera 58 Appendix Installing the Printer Driver when using Mac OS 9.x 60 User's Guide Table of Contents 61 Options 62 Specifications 63 Safety Precautions 65 Regulatory Information 67 CANON...
...Bundle Software 26 Printing Photographs with Windows 27 Printing Photographs with Macintosh 29 Printing Maintenance When Printing Becomes Faint or Colors are Incorrect 32 Printing the Nozzle Check Pattern 33 Print Head Cleaning 35 Print Head Deep Cleaning 37 Aligning the Print Head 39 Replacing an...Print Properly through Infrared Transmission 56 Handling Error Messages While Using the Digital Camera 58 Appendix Installing the Printer Driver when using Mac OS 9.x 60 User's Guide Table of Contents 61 Options 62 Specifications 63 Safety Precautions 65 Regulatory Information 67 CANON...
i70 Quick Start Guide
Page 19
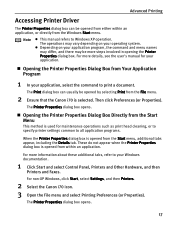
...from either within an application. For non-XP Windows, click Start, select Settings, and then Printers. 2 Select the Canon i70 icon. 3 Open the File menu and select Printing Preferences (or Properties). Then click Preferences (or Properties). The Printer Properties dialog box opens. „ Opening the ... the command and menu names may differ, and there may be more details, see the user's manual for maintenance operations such as print head cleaning, or to specify printer settings common to your Windows documentation. 1 Click Start and select Control Panel, Printers and Other Hardware, and...
...from either within an application. For non-XP Windows, click Start, select Settings, and then Printers. 2 Select the Canon i70 icon. 3 Open the File menu and select Printing Preferences (or Properties). Then click Preferences (or Properties). The Printer Properties dialog box opens. „ Opening the ... the command and menu names may differ, and there may be more details, see the user's manual for maintenance operations such as print head cleaning, or to specify printer settings common to your Windows documentation. 1 Click Start and select Control Panel, Printers and Other Hardware, and...
i70 Quick Start Guide
Page 34
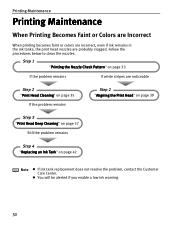
... faint or colors are incorrect, even if ink remains in the ink tanks, the print head nozzles are noticeable Step 2 "Print Head Cleaning" on page 35 If the problem remains Step 2 "Aligning the Print Head" on page 39 Step 3 "Print Head Deep Cleaning" on page 37 Still the problem remains Step 4 "Replacing an Ink Tank" on page 33 If the...
... faint or colors are incorrect, even if ink remains in the ink tanks, the print head nozzles are noticeable Step 2 "Print Head Cleaning" on page 35 If the problem remains Step 2 "Aligning the Print Head" on page 39 Step 3 "Print Head Deep Cleaning" on page 37 Still the problem remains Step 4 "Replacing an Ink Tank" on page 33 If the...
i70 Quick Start Guide
Page 36
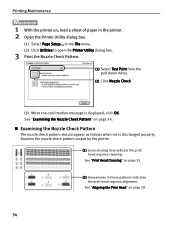
... Nozzle Check. (3) When the confirmation message is discharged properly. Examine the nozzle check pattern output by the printer. (1) Lines missing here indicate the print head requires cleaning. See "Aligning the Print Head" on page 34. „ Examining the Nozzle Check Pattern The nozzle check pattern should appear as follows when ink is displayed, click OK...
... Nozzle Check. (3) When the confirmation message is discharged properly. Examine the nozzle check pattern output by the printer. (1) Lines missing here indicate the print head requires cleaning. See "Aligning the Print Head" on page 34. „ Examining the Nozzle Check Pattern The nozzle check pattern should appear as follows when ink is displayed, click OK...

i70 Quick Start Guide
Page 37
Print Head Cleaning Printing Maintenance Clean the print head if you suspect that the nozzles might be clogged. Cleaning the print head consumes ink, so perform print head cleaning only when necessary. 1 Ensure the printer is on page 17. 3 Start Print Head Cleaning. (1) Click the Maintenance tab. (2) Click Cleaning. (3) Select the ink tank for cleaning. (4) When a confirmation message is displayed, click OK. 35 See "Opening the Printer Properties Dialog Box Directly from the Start Menu" on . 2 Open the Printer Properties dialog box.
Print Head Cleaning Printing Maintenance Clean the print head if you suspect that the nozzles might be clogged. Cleaning the print head consumes ink, so perform print head cleaning only when necessary. 1 Ensure the printer is on page 17. 3 Start Print Head Cleaning. (1) Click the Maintenance tab. (2) Click Cleaning. (3) Select the ink tank for cleaning. (4) When a confirmation message is displayed, click OK. 35 See "Opening the Printer Properties Dialog Box Directly from the Start Menu" on . 2 Open the Printer Properties dialog box.

i70 Quick Start Guide
Page 38
... on . 2 Open the Printer Utility dialog box. (1) Select Page Setup... Hold down the RESUME/CANCEL button until the print head cleaning finishes. Printing Maintenance 1 Ensure the printer is not still clean after print head cleaning, perform print head cleaning three times. If the head is on . Ensure the printer is displayed, click OK. Important Do not perform any other operations until the...
... on . 2 Open the Printer Utility dialog box. (1) Select Page Setup... Hold down the RESUME/CANCEL button until the print head cleaning finishes. Printing Maintenance 1 Ensure the printer is not still clean after print head cleaning, perform print head cleaning three times. If the head is on . Ensure the printer is displayed, click OK. Important Do not perform any other operations until the...
i70 Quick Start Guide
Page 39
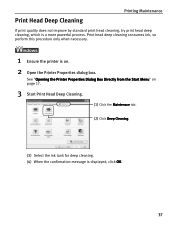
... Printer Properties Dialog Box Directly from the Start Menu" on . 2 Open the Printer Properties dialog box. Print Head Deep Cleaning Printing Maintenance If print quality does not improve by standard print head cleaning, try print head deep cleaning, which is displayed, click OK. 37 Print head deep cleaning consumes ink, so perform this procedure only when necessary. 1 Ensure the printer is on page 17...
... Printer Properties Dialog Box Directly from the Start Menu" on . 2 Open the Printer Properties dialog box. Print Head Deep Cleaning Printing Maintenance If print quality does not improve by standard print head cleaning, try print head deep cleaning, which is displayed, click OK. 37 Print head deep cleaning consumes ink, so perform this procedure only when necessary. 1 Ensure the printer is on page 17...

i70 Quick Start Guide
Page 40
...ink tank replacement does not resolve the problem, the print head may be worn out. See "Replacing an Ink Tank" on page 33. Important The process takes one or two minutes to verify that the print head nozzles are clean. Contact the Customer Care Center. 38 in the File... menu. (2) Click Utilities to open the Printer Utility dialog box. 3 Start Print Head Deep Cleaning. (1) Select Cleaning from the pulldown menu. (2) Click Deep Cleaning. (3) Select the ink tank for deep cleaning. (4) When the confirmation message is on. 2 Open the Printer Utility dialog box. (1) Select Page...
...ink tank replacement does not resolve the problem, the print head may be worn out. See "Replacing an Ink Tank" on page 33. Important The process takes one or two minutes to verify that the print head nozzles are clean. Contact the Customer Care Center. 38 in the File... menu. (2) Click Utilities to open the Printer Utility dialog box. 3 Start Print Head Deep Cleaning. (1) Select Cleaning from the pulldown menu. (2) Click Deep Cleaning. (3) Select the ink tank for deep cleaning. (4) When the confirmation message is on. 2 Open the Printer Utility dialog box. (1) Select Page...
i70 Quick Start Guide
Page 45
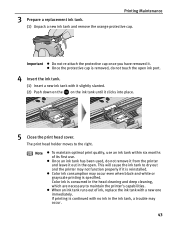
... a new ink tank and remove the orange protective cap. Color ink is consumed in the head cleaning and deep cleaning, which are necessary to the right. If printing is specified. The print head holder moves to maintain the printer's capabilities. z Once an ink tank has been used, do not touch the... open . Note z To maintain optimal print quality, use an ink tank within six months of...
... a new ink tank and remove the orange protective cap. Color ink is consumed in the head cleaning and deep cleaning, which are necessary to the right. If printing is specified. The print head holder moves to maintain the printer's capabilities. z Once an ink tank has been used, do not touch the... open . Note z To maintain optimal print quality, use an ink tank within six months of...
i70 Quick Start Guide
Page 51
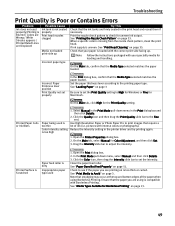
...clean the print head. Incorrect Paper thickness lever position Print Quality not set the Print Quality setting to set properly In the Print dialog box, confirm that the Media Type selected matches the paper loaded. Reduce the Intensity setting in the print head and reseat them if necessary. If ink supply is uneven: See "Print Head Cleaning..." on page 33. On the Main tab, click High for Color Adjustment, and then click Set. 3. Select Manual in the Print dialog box ...
...clean the print head. Incorrect Paper thickness lever position Print Quality not set the Print Quality setting to set properly In the Print dialog box, confirm that the Media Type selected matches the paper loaded. Reduce the Intensity setting in the print head and reseat them if necessary. If ink supply is uneven: See "Print Head Cleaning..." on page 33. On the Main tab, click High for Color Adjustment, and then click Set. 3. Select Manual in the Print dialog box ...
i70 Quick Start Guide
Page 53
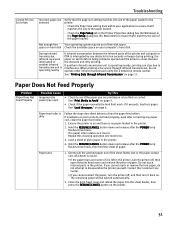
... transmission unit is no paper loaded in the printer, turn the printer off , and then turn the printer off , then open the print head cover and remove the piece of paper. Hold the RESUME/CANCEL button down and release after the POWER lamp flashes three times. Gently pull...Not Feed Properly Possible Cause Inappropriate paper type used Try This • Check to disassemble the printer yourself. See "Load the paper." Repeat this cleaning operation one more time. 3. Paper Jams 1. Do not touch internal parts in the printer. 4. If you cannot reach or remove the torn paper...
... transmission unit is no paper loaded in the printer, turn the printer off , and then turn the printer off , then open the print head cover and remove the piece of paper. Hold the RESUME/CANCEL button down and release after the POWER lamp flashes three times. Gently pull...Not Feed Properly Possible Cause Inappropriate paper type used Try This • Check to disassemble the printer yourself. See "Load the paper." Repeat this cleaning operation one more time. 3. Paper Jams 1. Do not touch internal parts in the printer. 4. If you cannot reach or remove the torn paper...
i70 Quick Start Guide
Page 54
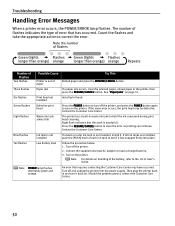
...Troubleshooting Handling Error Messages When a printer error occurs, the POWER/ERROR lamp flashes. Seven flashes Defective print head Press the POWER button to turn off the printer, and press the POWER button again to the ...AC adapter or load a charged battery. 3. Note For details on page 51. Six flashes Print head not installed Install print head. Nine flashes Ink tank is not installed If a black or color ink tank is nearly full...ink tank to hold the ink consumed during print head cleaning. Ten flashes Low battery level Follow the procedure below. 1. Turn off the printer. 2.
...Troubleshooting Handling Error Messages When a printer error occurs, the POWER/ERROR lamp flashes. Seven flashes Defective print head Press the POWER button to turn off the printer, and press the POWER button again to the ...AC adapter or load a charged battery. 3. Note For details on page 51. Six flashes Print head not installed Install print head. Nine flashes Ink tank is not installed If a black or color ink tank is nearly full...ink tank to hold the ink consumed during print head cleaning. Ten flashes Low battery level Follow the procedure below. 1. Turn off the printer. 2.

i70 Quick Start Guide
Page 21
...the low ink warning, reset the ink counter of Ink Replace the empty ink tank with a new one. Refer to "Aligning the Print Head - Click Cleaning. „ When the Printer Runs out of the ink tank installed. Do not touch the lock lever. Specify the following ink ... the printer is turned on page 11. • Macintosh Open the Page Setup dialog box and click Utilities. Close the print head cover when finished. black color 2 Install the new ink tank. Print Head Maintenance „ If Blurring Occurs or If a Specific Color Does Not Print Perform print head cleaning to improve the...
...the low ink warning, reset the ink counter of Ink Replace the empty ink tank with a new one. Refer to "Aligning the Print Head - Click Cleaning. „ When the Printer Runs out of the ink tank installed. Do not touch the lock lever. Specify the following ink ... the printer is turned on page 11. • Macintosh Open the Page Setup dialog box and click Utilities. Close the print head cover when finished. black color 2 Install the new ink tank. Print Head Maintenance „ If Blurring Occurs or If a Specific Color Does Not Print Perform print head cleaning to improve the...


