i70 Quick Start Guide
Page 2
... reserved. has reviewed this manual and in part, without notice. Specifications are not intended to be, nor should they are subject to your Canon i70 Color Bubble Jet Printer. All statements, technical information and recommendations in this manual thoroughly in order that this manual may not be an easy-to-use guide to...
... reserved. has reviewed this manual and in part, without notice. Specifications are not intended to be, nor should they are subject to your Canon i70 Color Bubble Jet Printer. All statements, technical information and recommendations in this manual thoroughly in order that this manual may not be an easy-to-use guide to...
i70 Quick Start Guide
Page 3
...Advanced Printing Printing Photographs from the Digital Camera Directly 14 Accessing Printer Driver 17 Adjusting Print Quality for Photographs 18 Using Printer Driver Options 25 Using the Bundle Software 26 Printing Photographs ... an Ink Tank 42 Troubleshooting Cannot Install the Printer Driver 48 Print Quality is Poor or Contains Errors 49 Troubleshooting Printer Hardware 50 Paper Does Not Feed Properly 51 ...Handling Error Messages While Using the Digital Camera 58 Appendix Installing the Printer Driver when using Mac OS 9.x 60 User's Guide Table of Contents 61 Options ...
...Advanced Printing Printing Photographs from the Digital Camera Directly 14 Accessing Printer Driver 17 Adjusting Print Quality for Photographs 18 Using Printer Driver Options 25 Using the Bundle Software 26 Printing Photographs ... an Ink Tank 42 Troubleshooting Cannot Install the Printer Driver 48 Print Quality is Poor or Contains Errors 49 Troubleshooting Printer Hardware 50 Paper Does Not Feed Properly 51 ...Handling Error Messages While Using the Digital Camera 58 Appendix Installing the Printer Driver when using Mac OS 9.x 60 User's Guide Table of Contents 61 Options ...
i70 Quick Start Guide
Page 4
...Balloon Help. Then click the feature you want to know more information, view the i70 User's Guide on page 52. 2 z If the POWER lamp changes to orange and begins flashing, refer to steady (nonflashing) green when the printer is ready. For more about, or click the Help button when displayed. in... the F1 key, or click ? The POWER lamp flashes while the printer warms up and changes to the section "Handling Error Messages" on the Setup Software & User's Guide CD-ROM, or use the online help within your i70 printer and how to use them. Basic Printing Basic Printing Note This Quick ...
...Balloon Help. Then click the feature you want to know more information, view the i70 User's Guide on page 52. 2 z If the POWER lamp changes to orange and begins flashing, refer to steady (nonflashing) green when the printer is ready. For more about, or click the Help button when displayed. in... the F1 key, or click ? The POWER lamp flashes while the printer warms up and changes to the section "Handling Error Messages" on the Setup Software & User's Guide CD-ROM, or use the online help within your i70 printer and how to use them. Basic Printing Basic Printing Note This Quick ...
i70 Quick Start Guide
Page 5
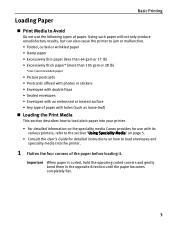
...-leaf) „ Loading the Print Media This section describes how to load envelopes and speciality media into your printer. • For detailed information on the speciality media Canon provides for use the following types of the paper before loading it. Loading Paper Basic Printing „ Print ...Media to Avoid Do not use with its various printers, refer to the section "Using Speciality Media" on page 5. • ...
...-leaf) „ Loading the Print Media This section describes how to load envelopes and speciality media into your printer. • For detailed information on the speciality media Canon provides for use the following types of the paper before loading it. Loading Paper Basic Printing „ Print ...Media to Avoid Do not use with its various printers, refer to the section "Using Speciality Media" on page 5. • ...
i70 Quick Start Guide
Page 8
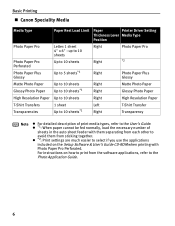
... separating from each other to avoid them from the software applications, refer to print from sticking together. Basic Printing „ Canon Speciality Media Media Type Paper Rest Load Limit Paper Printer Driver Setting Thickness Lever Media Type Position Photo Paper Pro Photo Paper Pro Perforated Photo Paper Plus Glossy Letter:1 sheet 4s...
... separating from each other to avoid them from the software applications, refer to print from sticking together. Basic Printing „ Canon Speciality Media Media Type Paper Rest Load Limit Paper Printer Driver Setting Thickness Lever Media Type Position Photo Paper Pro Photo Paper Pro Perforated Photo Paper Plus Glossy Letter:1 sheet 4s...
i70 Quick Start Guide
Page 9
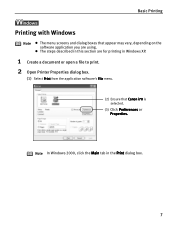
z The steps described in this section are for printing in the Print dialog box. 7 Note In Windows 2000, click the Main tab in Windows XP. 1 Create a document or open a file to print. 2 Open Printer Properties dialog box. (1) Select Print from the application software's File menu. (2) Ensure that appear may vary, depending on the software application you are using. Basic Printing Printing with Windows Note z The menu screens and dialog boxes that Canon i70 is selected. (3) Click Preferences or Properties.
z The steps described in this section are for printing in the Print dialog box. 7 Note In Windows 2000, click the Main tab in Windows XP. 1 Create a document or open a file to print. 2 Open Printer Properties dialog box. (1) Select Print from the application software's File menu. (2) Ensure that appear may vary, depending on the software application you are using. Basic Printing Printing with Windows Note z The menu screens and dialog boxes that Canon i70 is selected. (3) Click Preferences or Properties.

i70 Quick Start Guide
Page 10
... printed. Note You can control quality in the Set Print Quality dialog box. z To adjust Print Quality settings, select Custom and click Set on the printer. 8 This displays a preview screen that allows you to the User's Guide or Help. Basic Printing 3 Specify the required settings. (1) Click Media Type to display the... clicking the check box. Note z From the Page Setup tab select the correct document size to be printed. You can cancel a print job in the printer. (2) Click OK. z Select Preview before printing by simply pressing the RESUME/ CANCEL button on the Main tab.
... printed. Note You can control quality in the Set Print Quality dialog box. z To adjust Print Quality settings, select Custom and click Set on the printer. 8 This displays a preview screen that allows you to the User's Guide or Help. Basic Printing 3 Specify the required settings. (1) Click Media Type to display the... clicking the check box. Note z From the Page Setup tab select the correct document size to be printed. You can cancel a print job in the printer. (2) Click OK. z Select Preview before printing by simply pressing the RESUME/ CANCEL button on the Main tab.

i70 Quick Start Guide
Page 12
...box where you can cancel a print job in color and print quality suited to the User's Guide or Help. z For details about other printer driver functions, refer to the characteristics of Media Type you have selected. Manual: If you select Manual, the Details button will be printed ...in progress by simply pressing the RESUME/CANCEL button on the printer. 10 Basic Printing Note z When you select the type of text. Text: Select when printing documents consisting mainly of document from the ...
...box where you can cancel a print job in color and print quality suited to the User's Guide or Help. z For details about other printer driver functions, refer to the characteristics of Media Type you have selected. Manual: If you select Manual, the Details button will be printed ...in progress by simply pressing the RESUME/CANCEL button on the printer. 10 Basic Printing Note z When you select the type of text. Text: Select when printing documents consisting mainly of document from the ...
i70 Quick Start Guide
Page 13
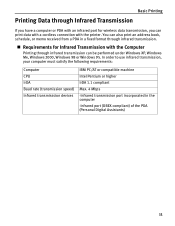
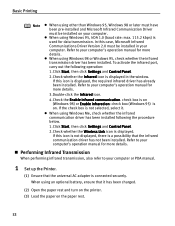
... for Infrared Transmission with the Computer Printing through infrared transmission. „ Requirements for wireless data transmission, you can print data with a cordless connection with the printer.
... for Infrared Transmission with the Computer Printing through infrared transmission. „ Requirements for wireless data transmission, you can print data with a cordless connection with the printer.
i70 Quick Start Guide
Page 14
...possibility that the universal AC adapter is connected securely. If the check box is displayed in your computer or PDA manual. 1 Set up the Printer. (1) Ensure that the infrared communication driver has not been installed. z When using Windows Me, check whether the infrared communication driver has been ... Control Panel. 2.Check whether the Infrared icon is not selected, select it has been charged. (2) Open the paper rest and turn on the printer. (3) Load the paper on . Basic Printing Note z When using other than Windows 95, Windows 98 or later must have been pre-installed...
...possibility that the universal AC adapter is connected securely. If the check box is displayed in your computer or PDA manual. 1 Set up the Printer. (1) Ensure that the infrared communication driver has not been installed. z When using Windows Me, check whether the infrared communication driver has been ... Control Panel. 2.Check whether the Infrared icon is not selected, select it has been charged. (2) Open the paper rest and turn on the printer. (3) Load the paper on . Basic Printing Note z When using other than Windows 95, Windows 98 or later must have been pre-installed...
i70 Quick Start Guide
Page 15
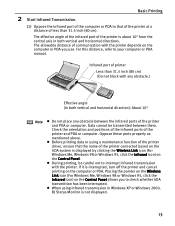
...Note z Do not place any obstacle.) Effective angle (in Windows XP or Windows 2000, BJ Status Monitor is interrupted, turn off the printer and cancel printing on the Control Panel allows you use. z Before printing data or using Infrared transmission in both vertical and horizontal directions.... 2 Start Infrared Transmission. The effective angle of the infrared port of the printer and PDA or computer. Placing the pointer on the Wireless Link icon (For Windows Me, Windows 98 or Windows 95, click the ...
...Note z Do not place any obstacle.) Effective angle (in Windows XP or Windows 2000, BJ Status Monitor is interrupted, turn off the printer and cancel printing on the Control Panel allows you use. z Before printing data or using Infrared transmission in both vertical and horizontal directions.... 2 Start Infrared Transmission. The effective angle of the infrared port of the printer and PDA or computer. Placing the pointer on the Wireless Link icon (For Windows Me, Windows 98 or Windows 95, click the ...
i70 Quick Start Guide
Page 16
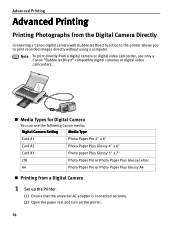
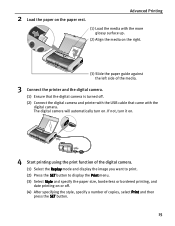
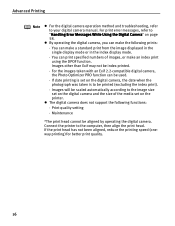
... that the universal AC adapter is connected securely. (2) Open the paper rest and turn on the printer. 14 Note To print directly from a digital camera or digital video camcorder, use only a Canon "Bubble Jet Direct" compatible digital cameras or digital video camcorders. „ Media Types for Digital Camera You ... Paper Plus Glossy Letter A4 Photo Paper Pro or Photo Paper Plus Glossy A4 „ Printing from the Digital Camera Directly Connecting a Canon digital camera with Bubble Jet Direct function to the printer allows you to print recorded images directly without using a computer.
... that the universal AC adapter is connected securely. (2) Open the paper rest and turn on the printer. 14 Note To print directly from a digital camera or digital video camcorder, use only a Canon "Bubble Jet Direct" compatible digital cameras or digital video camcorders. „ Media Types for Digital Camera You ... Paper Plus Glossy Letter A4 Photo Paper Pro or Photo Paper Plus Glossy A4 „ Printing from the Digital Camera Directly Connecting a Canon digital camera with Bubble Jet Direct function to the printer allows you to print recorded images directly without using a computer.
i70 Quick Start Guide
Page 17
... the media with the digital camera. 2 Load the paper on the right. (3) Slide the paper guide against the left side of the media. 3 Connect the printer and the digital camera. (1) Ensure that the digital camera is turned off . (4) After specifying the style, specify a number of copies, select Print and then press... the Print menu. (3) Select Style and specify the paper size, borderless or bordered printing, and date printing on or off . (2) Connect the digital camera and printer with the USB cable that came with the more glossy surface up. (2) Align the media on the paper rest.
... the media with the digital camera. 2 Load the paper on the right. (3) Slide the paper guide against the left side of the media. 3 Connect the printer and the digital camera. (1) Ensure that the digital camera is turned off . (4) After specifying the style, specify a number of copies, select Print and then press... the Print menu. (3) Select Style and specify the paper size, borderless or bordered printing, and date printing on or off . (2) Connect the digital camera and printer with the USB cable that came with the more glossy surface up. (2) Align the media on the paper rest.
i70 Quick Start Guide
Page 18
... the media set on the digital camera, the date when the photograph was taken is set on the printer. For print error messages, refer to the computer, then align the print head. Connect the printer to "Handling Error Messages While Using the Digital Camera" on page 58. If the print head has...
... the media set on the digital camera, the date when the photograph was taken is set on the printer. For print error messages, refer to the computer, then align the print head. Connect the printer to "Handling Error Messages While Using the Digital Camera" on page 58. If the print head has...
i70 Quick Start Guide
Page 19
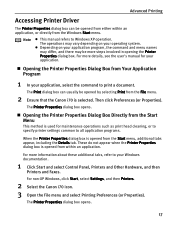
... box can be opened by selecting Print from the File menu. 2 Ensure that the Canon i70 is selected. For non-XP Windows, click Start, select Settings, and then Printers. 2 Select the Canon i70 icon. 3 Open the File menu and select Printing Preferences (or Properties). Then click ...Preferences (or Properties). These do not appear when the Printer Properties dialog box is opened from the Start menu,...
... box can be opened by selecting Print from the File menu. 2 Ensure that the Canon i70 is selected. For non-XP Windows, click Start, select Settings, and then Printers. 2 Select the Canon i70 icon. 3 Open the File menu and select Printing Preferences (or Properties). Then click ...Preferences (or Properties). These do not appear when the Printer Properties dialog box is opened from the Start menu,...
i70 Quick Start Guide
Page 20
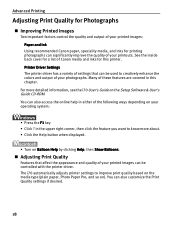
... of settings that affect the appearance and quality of your photographs. You can also access the online help in this printer. The i70 automatically adjusts printer settings to creatively enhance the colors and output of your printed images can be used to improve print quality based on...by clicking Help, then Show Balloons. „ Adjusting Print Quality Features that can be controlled with the printer driver. See the inside back cover for a list of Canon media and inks for printing photographs can significantly improve the quality of your operating system: • Press ...
... of settings that affect the appearance and quality of your photographs. You can also access the online help in this printer. The i70 automatically adjusts printer settings to creatively enhance the colors and output of your printed images can be used to improve print quality based on...by clicking Help, then Show Balloons. „ Adjusting Print Quality Features that can be controlled with the printer driver. See the inside back cover for a list of Canon media and inks for printing photographs can significantly improve the quality of your operating system: • Press ...

i70 Quick Start Guide
Page 21
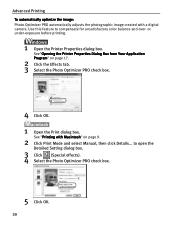
.... See "Printing with Macintosh" on page 17. 2 Select Custom in Print Quality, then click Set... To manually adjust Print Quality settings: Advanced Printing 1 Open the Printer Properties dialog box. See"Opening the Printer Properties Dialog Box from Your Application Program" on page 9. 2 Click Print Mode and select Manual, then click Details...
.... See "Printing with Macintosh" on page 17. 2 Select Custom in Print Quality, then click Set... To manually adjust Print Quality settings: Advanced Printing 1 Open the Printer Properties dialog box. See"Opening the Printer Properties Dialog Box from Your Application Program" on page 9. 2 Click Print Mode and select Manual, then click Details...
i70 Quick Start Guide
Page 22
... this feature to open the Detailed Setting dialog box. 3 Click (Special effects). 4 Select the Photo Optimizer PRO check box. 5 Click OK. 20 See"Opening the Printer Properties Dialog Box from Your Application Program" on page 9. 2 Click Print Mode and select Manual, then click Details... Advanced Printing To automatically optimize the image...
... this feature to open the Detailed Setting dialog box. 3 Click (Special effects). 4 Select the Photo Optimizer PRO check box. 5 Click OK. 20 See"Opening the Printer Properties Dialog Box from Your Application Program" on page 9. 2 Click Print Mode and select Manual, then click Details... Advanced Printing To automatically optimize the image...
i70 Quick Start Guide
Page 25
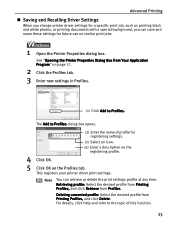
...registering profile. 4 Click OK. 5 Click OK on the Profiles tab. Advanced Printing „ Saving and Recalling Driver Settings When you change printer driver settings for a specific print job, such as printing black and white photos, or printing documents with a special background, you can retrieve ...unwanted profile: Select the desired profile from Profiles. See "Opening the Printer Properties Dialog Box from Your Application Program" on similar print jobs. 1 Open the Printer Properties dialog box. This registers your printer driver print settings. For details, click Help and refer to the ...
...registering profile. 4 Click OK. 5 Click OK on the Profiles tab. Advanced Printing „ Saving and Recalling Driver Settings When you change printer driver settings for a specific print job, such as printing black and white photos, or printing documents with a special background, you can retrieve ...unwanted profile: Select the desired profile from Profiles. See "Opening the Printer Properties Dialog Box from Your Application Program" on similar print jobs. 1 Open the Printer Properties dialog box. This registers your printer driver print settings. For details, click Help and refer to the ...

i70 Quick Start Guide
Page 26
... under which to retrieve from the Settings list and click Remove. 24 Deleting unwanted drivers settings: Select the name of the settings to register your printer driver print settings. This registers your settings. 4 Click OK. 5 Click Close in the Register Settings dialog box. Retrieving print settings: Select the name of the...
... under which to retrieve from the Settings list and click Remove. 24 Deleting unwanted drivers settings: Select the name of the settings to register your printer driver print settings. This registers your settings. 4 Click OK. 5 Click Close in the Register Settings dialog box. Retrieving print settings: Select the name of the...


