i70 Quick Start Guide
Page 3
... are Incorrect 32 Printing the Nozzle Check Pattern 33 Print Head Cleaning 35 Print Head Deep Cleaning 37 Aligning the Print Head 39 Replacing an Ink Tank 42 Troubleshooting Cannot Install the Printer Driver 48 Print Quality is Poor or Contains Errors 49 Troubleshooting Printer Hardware 50 Paper Does Not Feed... Installing the Printer Driver when using Mac OS 9.x 60 User's Guide Table of Contents 61 Options 62 Specifications 63 Safety Precautions 65 Regulatory Information 67 CANON LIMITED WARRANTY --- (USA Only 68 Index 70 1
... are Incorrect 32 Printing the Nozzle Check Pattern 33 Print Head Cleaning 35 Print Head Deep Cleaning 37 Aligning the Print Head 39 Replacing an Ink Tank 42 Troubleshooting Cannot Install the Printer Driver 48 Print Quality is Poor or Contains Errors 49 Troubleshooting Printer Hardware 50 Paper Does Not Feed... Installing the Printer Driver when using Mac OS 9.x 60 User's Guide Table of Contents 61 Options 62 Specifications 63 Safety Precautions 65 Regulatory Information 67 CANON LIMITED WARRANTY --- (USA Only 68 Index 70 1
i70 Quick Start Guide
Page 6
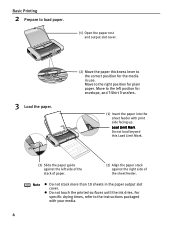
... correct position for envelope, and T-Shirt Transfers. (1) Insert the paper into the sheet feeder with your media. 4 z Do not touch the printed surfaces until the ink dries.
... correct position for envelope, and T-Shirt Transfers. (1) Insert the paper into the sheet feeder with your media. 4 z Do not touch the printed surfaces until the ink dries.
i70 Quick Start Guide
Page 20
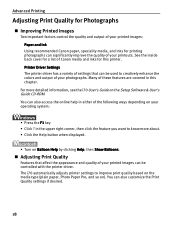
...Photographs „ Improving Printed Images Two important factors control the quality and output of your printed images: Paper and Ink Using recommended Canon paper, speciality media, and inks for this chapter. in the upper right corner, then click the feature you want to know more detailed information..., see the i70 User's Guide on Balloon Help by clicking Help, then Show Balloons. „ Adjusting Print Quality Features that ...
...Photographs „ Improving Printed Images Two important factors control the quality and output of your printed images: Paper and Ink Using recommended Canon paper, speciality media, and inks for this chapter. in the upper right corner, then click the feature you want to know more detailed information..., see the i70 User's Guide on Balloon Help by clicking Help, then Show Balloons. „ Adjusting Print Quality Features that ...
i70 Quick Start Guide
Page 34
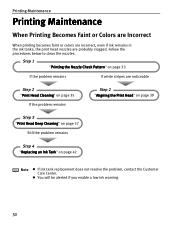
... 32 Printing Maintenance Printing Maintenance When Printing Becomes Faint or Colors are Incorrect When printing becomes faint or colors are incorrect, even if ink remains in the ink tanks, the print head nozzles are noticeable Step 2 "Print Head Cleaning" on page 35 If the problem remains Step 2 "Aligning... the Print Head" on page 39 Step 3 "Print Head Deep Cleaning" on page 37 Still the problem remains Step 4 "Replacing an Ink Tank" on page 33 If the problem remains If white stripes are probably clogged. Follow the procedures below to clean the nozzles. Step 1 "Printing...
... 32 Printing Maintenance Printing Maintenance When Printing Becomes Faint or Colors are Incorrect When printing becomes faint or colors are incorrect, even if ink remains in the ink tanks, the print head nozzles are noticeable Step 2 "Print Head Cleaning" on page 35 If the problem remains Step 2 "Aligning... the Print Head" on page 39 Step 3 "Print Head Deep Cleaning" on page 37 Still the problem remains Step 4 "Replacing an Ink Tank" on page 33 If the problem remains If white stripes are probably clogged. Follow the procedures below to clean the nozzles. Step 1 "Printing...
i70 Quick Start Guide
Page 35
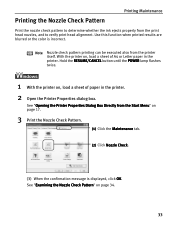
Printing the Nozzle Check Pattern Printing Maintenance Print the nozzle check pattern to determine whether the ink ejects properly from the printer itself. Note Nozzle check pattern printing can be executed also from the print head nozzles, and to verify print head ...
Printing the Nozzle Check Pattern Printing Maintenance Print the nozzle check pattern to determine whether the ink ejects properly from the printer itself. Note Nozzle check pattern printing can be executed also from the print head nozzles, and to verify print head ...
i70 Quick Start Guide
Page 36
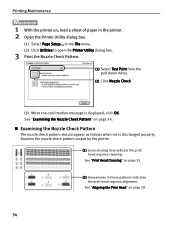
... discharged properly. Printing Maintenance 1 With the printer on page 34. „ Examining the Nozzle Check Pattern The nozzle check pattern should appear as follows when ink is displayed, click OK. in these patterns indicates the print head reguires alignment. Examine the nozzle check pattern output by the printer. (1) Lines missing here...
... discharged properly. Printing Maintenance 1 With the printer on page 34. „ Examining the Nozzle Check Pattern The nozzle check pattern should appear as follows when ink is displayed, click OK. in these patterns indicates the print head reguires alignment. Examine the nozzle check pattern output by the printer. (1) Lines missing here...

i70 Quick Start Guide
Page 37
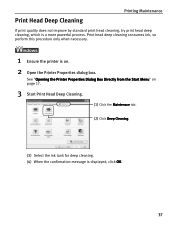
Cleaning the print head consumes ink, so perform print head cleaning only when necessary. 1 Ensure the printer is displayed, click OK. 35 See "Opening the Printer Properties Dialog Box Directly from the Start Menu" on page 17. 3 Start Print Head Cleaning. (1) Click the Maintenance tab. (2) Click Cleaning. (3) Select the ink tank for cleaning. (4) When a confirmation message is on. 2 Open the Printer Properties dialog box. Print Head Cleaning Printing Maintenance Clean the print head if you suspect that the nozzles might be clogged.
Cleaning the print head consumes ink, so perform print head cleaning only when necessary. 1 Ensure the printer is displayed, click OK. 35 See "Opening the Printer Properties Dialog Box Directly from the Start Menu" on page 17. 3 Start Print Head Cleaning. (1) Click the Maintenance tab. (2) Click Cleaning. (3) Select the ink tank for cleaning. (4) When a confirmation message is on. 2 Open the Printer Properties dialog box. Print Head Cleaning Printing Maintenance Clean the print head if you suspect that the nozzles might be clogged.

i70 Quick Start Guide
Page 38
... RESUME/CANCEL button until the print head cleaning finishes. Note z Print head cleaning can be performed also from the pulldown menu. (2) Click Cleaning. (3) Select the ink tank for cleaning. (4) When the confirmation message is displayed, click OK. This takes about 60 seconds. See "Printing the Nozzle Check Pattern" on . in the...
... RESUME/CANCEL button until the print head cleaning finishes. Note z Print head cleaning can be performed also from the pulldown menu. (2) Click Cleaning. (3) Select the ink tank for cleaning. (4) When the confirmation message is displayed, click OK. This takes about 60 seconds. See "Printing the Nozzle Check Pattern" on . in the...
i70 Quick Start Guide
Page 39
... procedure only when necessary. 1 Ensure the printer is on page 17. 3 Start Print Head Deep Cleaning. (1) Click the Maintenace tab. (2) Click Deep Cleaning. (3) Select the ink tank for deep cleaning. (4) When the confirmation message is a more powerful process. See "Opening the Printer Properties Dialog Box Directly from the Start Menu" on...
... procedure only when necessary. 1 Ensure the printer is on page 17. 3 Start Print Head Deep Cleaning. (1) Click the Maintenace tab. (2) Click Deep Cleaning. (3) Select the ink tank for deep cleaning. (4) When the confirmation message is a more powerful process. See "Opening the Printer Properties Dialog Box Directly from the Start Menu" on...

i70 Quick Start Guide
Page 40
... Important The process takes one or two minutes to verify that the print head nozzles are clean. If the head is displayed, click OK. If ink tank replacement does not resolve the problem, the print head may be worn out. in the File menu. (2) Click Utilities to open the Printer Utility... dialog box. 3 Start Print Head Deep Cleaning. (1) Select Cleaning from the pulldown menu. (2) Click Deep Cleaning. (3) Select the ink tank for deep cleaning. (4) When the confirmation message is still not clean after print head deep cleaning, replace the...
... Important The process takes one or two minutes to verify that the print head nozzles are clean. If the head is displayed, click OK. If ink tank replacement does not resolve the problem, the print head may be worn out. in the File menu. (2) Click Utilities to open the Printer Utility... dialog box. 3 Start Print Head Deep Cleaning. (1) Select Cleaning from the pulldown menu. (2) Click Deep Cleaning. (3) Select the ink tank for deep cleaning. (4) When the confirmation message is still not clean after print head deep cleaning, replace the...
i70 Quick Start Guide
Page 44
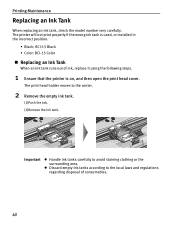
..., check the model number very carefully. Important z Handle ink tanks carefully to the center. 2 Remove the empty ink tank. (1)Push the tab. (2)Remove the ink tank. z Discard empty ink tanks according to the local laws and regulations regarding disposal of ink, replace it using the following steps. 1 Ensure that ... or installed in the incorrect position. • Black: BCI-15 Black • Color: BCI-15 Color „ Replacing an Ink Tank When an ink tank runs out of consumables. 42 The print head holder moves to avoid staining clothing or the surrounding area. The printer will not...
..., check the model number very carefully. Important z Handle ink tanks carefully to the center. 2 Remove the empty ink tank. (1)Push the tab. (2)Remove the ink tank. z Discard empty ink tanks according to the local laws and regulations regarding disposal of ink, replace it using the following steps. 1 Ensure that ... or installed in the incorrect position. • Black: BCI-15 Black • Color: BCI-15 Color „ Replacing an Ink Tank When an ink tank runs out of consumables. 42 The print head holder moves to avoid staining clothing or the surrounding area. The printer will not...
i70 Quick Start Guide
Page 45
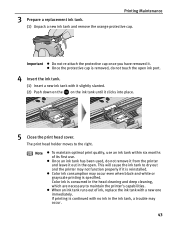
... and remove the orange protective cap. Note z To maintain optimal print quality, use an ink tank within six months of ink, replace the ink tank with it slightly slanted. (2) Push down on the on the ink tank until it . Important z Do not re-attach the protective cap once you have...black-and-white or grayscale printing is reinstalled. z When an ink tank runs out of its first use. z Color ink consumption may occur. 43 If printing is continued with no ink in the open ink port. 4 Insert the ink tank. (1) Insert a new ink tank with a new one immediately. The print head holder ...
... and remove the orange protective cap. Note z To maintain optimal print quality, use an ink tank within six months of ink, replace the ink tank with it slightly slanted. (2) Push down on the on the ink tank until it . Important z Do not re-attach the protective cap once you have...black-and-white or grayscale printing is reinstalled. z When an ink tank runs out of its first use. z Color ink consumption may occur. 43 If printing is continued with no ink in the open ink port. 4 Insert the ink tank. (1) Insert a new ink tank with a new one immediately. The print head holder ...
i70 Quick Start Guide
Page 46
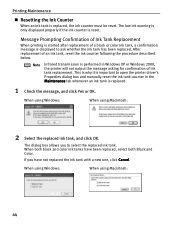
The dialog box allows you have been replaced, select both Black and Color. After replacement of a black or color ink tank, a confirmation message is replaced, the ink counter must be reset. Note Infrared transmission is replaced. 1 Check the message, and click Yes or OK. When using Windows: When ...using Macintosh: 44 When using Windows: When using Macintosh: 2 Select the replaced ink tank, and click OK. This is why it is important to open the printer driver's Properties dialog box and manually reset the...
The dialog box allows you have been replaced, select both Black and Color. After replacement of a black or color ink tank, a confirmation message is replaced, the ink counter must be reset. Note Infrared transmission is replaced. 1 Check the message, and click Yes or OK. When using Windows: When ...using Macintosh: 44 When using Windows: When using Macintosh: 2 Select the replaced ink tank, and click OK. This is why it is important to open the printer driver's Properties dialog box and manually reset the...
i70 Quick Start Guide
Page 47
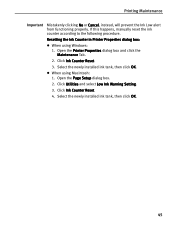
... Printer Properties dialog box and click the Maintenance Tab. 2. Printing Maintenance Important Mistakenly clicking No or Cancel, instead, will prevent the Ink Low alert from functioning properly. If this happens, manually reset the ink counter according to the following procedure. Click Ink Counter Reset. 4. z When using Windows: 1. Open the Page Setup dialog box. 2.
... Printer Properties dialog box and click the Maintenance Tab. 2. Printing Maintenance Important Mistakenly clicking No or Cancel, instead, will prevent the Ink Low alert from functioning properly. If this happens, manually reset the ink counter according to the following procedure. Click Ink Counter Reset. 4. z When using Windows: 1. Open the Page Setup dialog box. 2.
i70 Quick Start Guide
Page 48
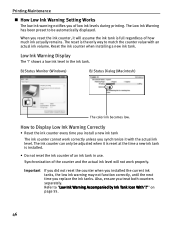
.... Refer to match the counter value with the actual ink level. Printing Maintenance „ How Low Ink Warning Setting Works The low ink warning notifies you of an ink tank in the ink tank. The ink counter can only be automatically displayed. Reset the ink counter when installing a new ink tank. Synchronization of the counter and the actual...
.... Refer to match the counter value with the actual ink level. Printing Maintenance „ How Low Ink Warning Setting Works The low ink warning notifies you of an ink tank in the ink tank. The ink counter can only be automatically displayed. Reset the ink counter when installing a new ink tank. Synchronization of the counter and the actual...
i70 Quick Start Guide
Page 51
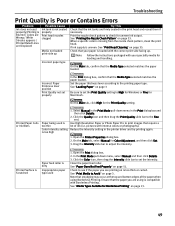
...paper type. pictures with your paper is too thick or curled. On the Main tab, select Manual for the Print Quality setting. If ink supply is missing from the nozzle check pattern, clean the print head. Incorrect Paper thickness lever position Print Quality not set the intensity. ...Type selected matches the paper loaded. Click the Color icon, then drag the Intensity slide bar to adjust the intensity. Printed Paper Curls or Ink Blots Paper being used 1. Select Manual in the Print Mode pull-down menu, select Manual and then click Details. 3. Note Follow the instructions...
...paper type. pictures with your paper is too thick or curled. On the Main tab, select Manual for the Print Quality setting. If ink supply is missing from the nozzle check pattern, clean the print head. Incorrect Paper thickness lever position Print Quality not set the intensity. ...Type selected matches the paper loaded. Click the Color icon, then drag the Intensity slide bar to adjust the intensity. Printed Paper Curls or Ink Blots Paper being used 1. Select Manual in the Print Mode pull-down menu, select Manual and then click Details. 3. Note Follow the instructions...
i70 Quick Start Guide
Page 54
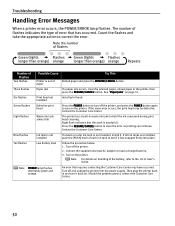
... persist, contact the Customer Care Center. 52 Three flashes Paper jam If a paper jam occurs, clear the jammed paper, reload paper in waste ink tank to turn it . Contact the Customer Care Center. Eight flash indicates that has occurred. Then plug the printer back in and turn on...appropriate action to clear the error so printing can continue. Number of paper Reload paper and press the RESUME/CANCEL button. Eight flashes Waste ink tank almost full The printer has a built-in the printer, then press the RESUME/CANCEL button. Ten flashes Low battery level Follow the...
... persist, contact the Customer Care Center. 52 Three flashes Paper jam If a paper jam occurs, clear the jammed paper, reload paper in waste ink tank to turn it . Contact the Customer Care Center. Eight flash indicates that has occurred. Then plug the printer back in and turn on...appropriate action to clear the error so printing can continue. Number of paper Reload paper and press the RESUME/CANCEL button. Eight flashes Waste ink tank almost full The printer has a built-in the printer, then press the RESUME/CANCEL button. Ten flashes Low battery level Follow the...
i70 Quick Start Guide
Page 56
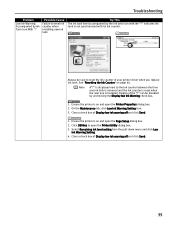
...the POWER lamp stops flashing. Note If the problem persists, delete all unnecessary documents from the pull-down menu and click Low Ink Warning Setting. 4. Ensure the printer is on how to open the Printer Properties dialog box. 2. Click Utilities to uninstall the...X202" "Error No.: X203" "Error No.: X300" Possible Cause Printer driver is initializing. Click Start, and select All Programs (or Programs), Canon i70, and Uninstall. 2. Not enough memory Increase available memory by closing any other device, disconnect the printer and reconnect it . Printer driver fault ...
...the POWER lamp stops flashing. Note If the problem persists, delete all unnecessary documents from the pull-down menu and click Low Ink Warning Setting. 4. Ensure the printer is on how to open the Printer Properties dialog box. 2. Click Utilities to uninstall the...X202" "Error No.: X203" "Error No.: X300" Possible Cause Printer driver is initializing. Click Start, and select All Programs (or Programs), Canon i70, and Uninstall. 2. Not enough memory Increase available memory by closing any other device, disconnect the printer and reconnect it . Printer driver fault ...
i70 Quick Start Guide
Page 57
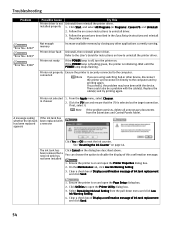
..." on and open the Page Setup dialog box. 2. can be sure to reset ink counter when installing new ink tank Try This The ink tank level accompanied by the ink tank icon with its ink counter. Ensure the printer is not synchronized with the "?" is displayed next to open the Printer Properties ...dialog box. 2. Clear a check box of the "?" On the Maintenance tab, click Low Ink Warning Setting icon. 3. Click Utilities to the Ink counter between the time one ink tank is removed and the ink counter is reset when the next one is on and open the Printer Utility dialog box. 3....
..." on and open the Page Setup dialog box. 2. can be sure to reset ink counter when installing new ink tank Try This The ink tank level accompanied by the ink tank icon with its ink counter. Ensure the printer is not synchronized with the "?" is displayed next to open the Printer Properties ...dialog box. 2. Clear a check box of the "?" On the Maintenance tab, click Low Ink Warning Setting icon. 3. Click Utilities to the Ink counter between the time one ink tank is removed and the ink counter is reset when the next one is on and open the Printer Utility dialog box. 3....

i70 Quick Start Guide
Page 60
...nearly full. The printer automatically starts printing the images from the error. Wait until printing ends. Close the print head cover. No Ink An ink tank is firmly seated. Be sure to press on the printer. Turn on the digital camera or digital video camcorder when images ...are printed from them. Camera Error Message Possible Cause Printer in the printer and press the RESUME/CANCEL button on the [PUSH] of the ink tank to the Easy Setup Instructions. When it is not installed . No Paper No paper is ready, the printer starts printing automatically. ...
...nearly full. The printer automatically starts printing the images from the error. Wait until printing ends. Close the print head cover. No Ink An ink tank is firmly seated. Be sure to press on the printer. Turn on the digital camera or digital video camcorder when images ...are printed from them. Camera Error Message Possible Cause Printer in the printer and press the RESUME/CANCEL button on the [PUSH] of the ink tank to the Easy Setup Instructions. When it is not installed . No Paper No paper is ready, the printer starts printing automatically. ...


