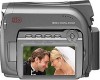
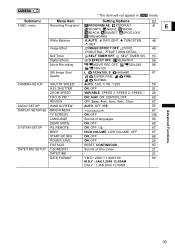
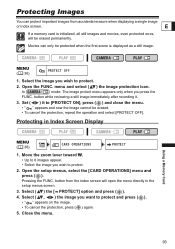
Digital Video Software (Windows) Ver.20 Instruction Manual
Page 3
Extracting Still Images from Movies (Windows XP Only 74 Saving on CD-R/RW Disks (Windows XP Only 77 Adding Still Images from Your Computer to the Memory Card 80 Adding Still Images to the Memory Card 80 Adding Sample Images to the Memory Card 82 Using Various Functions 85 E Attaching Still Images to E-mail Messages 85 Running a Slide Show 88 Adding Sound to an Image 90 Reviewing and Changing the Owner Name of the Camcorder 91 Uninstalling the Software 93 Uninstalling ZoomBrowser EX 93 Uninstalling the TWAIN Driver/WIA Driver 94 Troubleshooting ...95 Windows Contents 3
Digital Video Software (Windows) Ver.20 Instruction Manual
Page 24
...]. You do not need to install a USB driver.) • Windows 98/Windows 2000: Canon DV TWAIN Driver • Windows Me: Canon DV WIA Driver 8 Select your country/region and click [Next]. 9 Read the license agreement and click [Yes]. 10 Review the installation settings and click [Next]. • Installation starts. • If the "Digital...
Digital Video Software (Windows) Ver.20 Instruction Manual
Page 91
Windows Using Various Functions 91 Reviewing and Changing the Owner Name of the Camcorder You can change and confirm the owner name of the camcorder. 1 Connect the camcorder to Camera] tab and click [Confirms/changes camera settings]. E 2 Select [Canon CameraWindow] and click [OK]. 3 Click the [Set to the computer ( 26).
Digital Video Software (Macintosh) Ver.20 Instruction Manual
Page 3
Playing Back Movies 54 Editing Movies ...55 Exporting Images ...58 Changing the File Type and Save 58 Extracting Still Images from Movies 61 Adding Still Images from Your Computer to the Memory Card 63 E Adding Still Images to the Memory Card 63 Adding Sample Images to the Memory Card 64 Using Various Functions 67 Attaching Images to E-mail Messages 67 Running a Slide Show 70 Adding Sound to a Still Image 71 Reviewing and Changing the Owner Name of the Camcorder 72 Uninstalling the Software 73 Uninstalling ImageBrowser 73 Troubleshooting ...74 Macintosh Contents 3
Digital Video Software (Macintosh) Ver.20 Instruction Manual
Page 23
Installing the Digital Video Software 23 Macintosh Installer Panel E 5 Select [Easy Installation] and click [Next]. To install the software individually, select [Custom Installation]. 6 Read the license agreement and click [Agree]. 7 Review the installation settings and click [Next]. 4 Click Digital Video Software [Install].
Digital Video Software (Macintosh) Ver.20 Instruction Manual
Page 72
Reviewing and Changing the Owner Name of the Camcorder You can change and confirm the owner name of the camcorder and click [OK]. Input a camcorder owner name here (up to Camera] tab and click [Confirms/changes camera settings] in the Camera Control window. 2 Change the settings of the camcorder. 1 Click the [Set to 31 characters). 72 Using Various Functions
ZR700 ZR600 Instruction Manual
Page 25
...to search back towards the beginning of the recording. • Release the joystick at the point where you wish to begin recording. • The camcorder returns to record pause mode. If the joystick guide does not appear on screen, press ( ) to display it has been recorded properly. 1. Set... the program selector to . 2. Set the program selector to . 2. EXP FOCUS Record Search In record pause mode, this function allows you to review the last few seconds, and returns to record pause mode. If the joystick guide does not appear on screen, press ( ) to display it . ...
ZR700 ZR600 Instruction Manual
Page 26
... the recording time in red when the lithium button battery is not installed, or when it needs replacing. 26 Screen Displays during recording. When the camcorder shuts off without displaying " ". • The actual battery charge may not be indicated accurately depending on the type of the tape, the indication may not.... • " " starts flashing in red when the battery pack is empty. • When you start recording. To resume normal operation turn off automatically, the record review and record search functions will not work.
ZR700 ZR600 Instruction Manual
Page 39
... SUPER FINE, FINE, NORMAL CAMERA SETUP SHUTTR SPEED* AUTO, 1/60, 1/100, 1/250 50 A.SL SHUTTER ON, OFF 51 ZOOM SPEED VARIABLE, SPEED 3, SPEED 2, SPEED 1 28 FOCUS PRI.* ON: AiAF, ON: CENTER, OFF 90 REVIEW OFF, 2sec, 4sec, 6sec, 8sec, 10sec 87 AUDIO SETUP* WIND SCREEN* AUTO, OFF 55 DISPLAY SETUP/ BRIGHTNESS 67...
ZR700 ZR600 Instruction Manual
Page 87
...card is played back. Open the FUNC. button while you are reviewing the still image immediately after recording it has been recorded. Then, select ( ) the [REVIEW] option and press ( ). 3. E MENU ( 36) CAMERA SETUP REVIEW 2sec 1. Reviewing a Still Image Right after Recording You can select to save the...displayed in yellow: 1 to protect ( 93) or erase ( 94) the image you just recorded. " " Card Access Display Indicates that the camcorder is writing on the memory card. Still Image Size and Quality Indicates the size and quality of the still image. Select ( ) the [CAMERA SETUP...
ZR700 ZR600 Instruction Manual
Page 93
... movies, even protected ones, will open the menu directly in Index Screen Display MENU ( 36) CARD OPERATIONS PROTECT 1. button while reviewing a still image immediately after recording it to protect. 2. Move the zoom lever toward W. • Up to 6 images appear. • Select the image you wish to protect and press ( ). • " " appears on...
ZR700 ZR600 Instruction Manual
Page 94
... images, then close the Erasing All Images MENU ( 36) CARD OPERATIONS ERASE ALL IMAGES 1. Then, select ( ) the [ERASE ALL IMAGES] option and press ( ). 3. button while reviewing a still image immediately after recording it . 2. Select ( ) the [CARD OPERATIONS] menu and press ( ). menu, select ( ) the icon and press ( ). 2. Select ( ) [YES] and press ( ) to erase...
ZR700 ZR600 Instruction Manual
Page 128
...Print order 100 Printing still images 96 Program AE (recording program) . . . . . 41 Protecting still images 93 Protecting tapes 116 R Record review 25 Record search 25 Recording - Still images (memory card 84 Recording mode 54 Recording programs 41 Remote sensor 67 Transferring still images to a computer ... Zoom speed 28 S SD Memory Card 80 Self timer 53 Shutter speed 50 Slide show 92 Snow (recording program 41 SP mode 54 Speaker volume 32 Sports (recording program 41 Spotlight (recording program 42 Start-up image 68 Still image quality/size 82 Still image review 87 ...