ZR40 Instruction Manual
Page 5
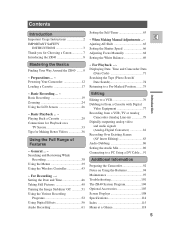
... Setting the Shutter Speed 66 Thank you for Choosing a Canon 7 Adjusting Focus Manually 68 Introducing the ZR40 8 Setting the White Balance 69 Mastering the Basics Finding Your Way Around the ZR40 ........9 ~ Preparations ... ~ Powering Your Camcorder 12 Loading a Cassette 17 ~ For Playback ...~ Displaying Date, Time ... Searching and Reviewing While Recording 38 Using the Menus 39 Using the Wireless Controller 43 ~ For Recording ...~ Setting the Date and Time 46 Taking Still Pictures 49 Turning the Image Stabilizer Off 51 Using the Various Recording Programs 52 Using Digital ...
... Setting the Shutter Speed 66 Thank you for Choosing a Canon 7 Adjusting Focus Manually 68 Introducing the ZR40 8 Setting the White Balance 69 Mastering the Basics Finding Your Way Around the ZR40 ........9 ~ Preparations ... ~ Powering Your Camcorder 12 Loading a Cassette 17 ~ For Playback ...~ Displaying Date, Time ... Searching and Reviewing While Recording 38 Using the Menus 39 Using the Wireless Controller 43 ~ For Recording ...~ Setting the Date and Time 46 Taking Still Pictures 49 Turning the Image Stabilizer Off 51 Using the Various Recording Programs 52 Using Digital ...

ZR40 Instruction Manual
Page 18
...small holes on the cassette or cover them upright. • A cassette with use, affecting information transfer. Therefore, after using a tape about 10 times, be sure to record on the cassette so that it exposes the hole. (This switch position is usually labeled SAVE or ERASE OFF.) If ... them with cellophane tape. • Handle cassettes with this cassette and put the camcorder in record pause mode ( 19), "THE TAPE IS SET FOR ERASURE PREVENTION" is closed. Protecting tapes from accidental erasure E REC SAVE REC SAVE Mastering the Basics To protect your recording from the tape...
...small holes on the cassette or cover them upright. • A cassette with use, affecting information transfer. Therefore, after using a tape about 10 times, be sure to record on the cassette so that it exposes the hole. (This switch position is usually labeled SAVE or ERASE OFF.) If ... them with cellophane tape. • Handle cassettes with this cassette and put the camcorder in record pause mode ( 19), "THE TAPE IS SET FOR ERASURE PREVENTION" is closed. Protecting tapes from accidental erasure E REC SAVE REC SAVE Mastering the Basics To protect your recording from the tape...

ZR40 Instruction Manual
Page 19
.... Press the small button on the POWER switch and hold, turn the POWER switch to OFF and then back to record pause mode. For setting the time zone, see p. 48. • The camcorder power indicator lights up. • The confirmation beep sounds. • The camcorder will turn...(both optional) attached, extend the viewfinder and rotate it in record pause mode for more than about 5 minutes. Notes: • When you haven't set the date and time display ( 46). Basic Recording 3 P E 1 POWER CAMERA OFF PLAY(VCR) 4, 5 POWER CAMERA OFF PLAY(VCR) Mastering the Basics Before you ...
.... Press the small button on the POWER switch and hold, turn the POWER switch to OFF and then back to record pause mode. For setting the time zone, see p. 48. • The camcorder power indicator lights up. • The confirmation beep sounds. • The camcorder will turn...(both optional) attached, extend the viewfinder and rotate it in record pause mode for more than about 5 minutes. Notes: • When you haven't set the date and time display ( 46). Basic Recording 3 P E 1 POWER CAMERA OFF PLAY(VCR) 4, 5 POWER CAMERA OFF PLAY(VCR) Mastering the Basics Before you ...
ZR40 Instruction Manual
Page 20
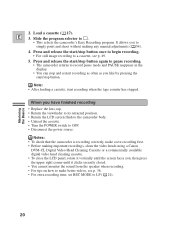
... the camcorder's Easy Recording program. It allows you to simply point and shoot without making important recordings, clean the video heads using a Canon DVM-CL Digital Video Head Cleaning Cassette or a commercially available digital video head cleaning cassette. • To close the LCD panel, rotate...You can stop button once to begin recording. • For still image recording to a cassette, see p. 36. • For extra recording time, set REC MODE to make better videos, see p. 49. 5. Slide the program selector to OFF. • Disconnect the power source. Mastering the Basics 2. E...
... the camcorder's Easy Recording program. It allows you to simply point and shoot without making important recordings, clean the video heads using a Canon DVM-CL Digital Video Head Cleaning Cassette or a commercially available digital video head cleaning cassette. • To close the LCD panel, rotate...You can stop button once to begin recording. • For still image recording to a cassette, see p. 36. • For extra recording time, set REC MODE to make better videos, see p. 49. 5. Slide the program selector to OFF. • Disconnect the power source. Mastering the Basics 2. E...
ZR40 Instruction Manual
Page 21
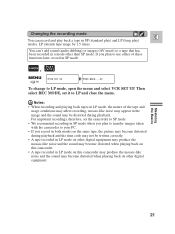
... important recordings, therefore, set it to use either of the tape and usage conditions may affect recording, mosaic-like noise and the sound may be distorted during playback and the time code may not be ...mode on other digital equipment. 21 You can record and play ) modes. Then select REC MODE, set the camcorder to SP mode. • We recommend recording in SP mode when you record in both...) to a tape that has been recorded in SP mode. , CAMERA PLAY (VCR) ( 39) VCR SET UP REC MODE••••SP To change to your PC. • If you plan to transfer...
... important recordings, therefore, set it to use either of the tape and usage conditions may affect recording, mosaic-like noise and the sound may be distorted during playback and the time code may not be ...mode on other digital equipment. 21 You can record and play ) modes. Then select REC MODE, set the camcorder to SP mode. • We recommend recording in SP mode when you record in both...) to a tape that has been recorded in SP mode. , CAMERA PLAY (VCR) ( 39) VCR SET UP REC MODE••••SP To change to your PC. • If you plan to transfer...

ZR40 Instruction Manual
Page 40
... submenu 4 To system submenu 5 Close main menu CAM.MENU SEL.SETSET MENUCLOSE 1 CAM.SET UP VCR SET UP 2 3 DISP.SET UP SYSTEM 4 5 RETURN 40 Notes: • Pressing the MENU button at any time closes the menu. • Selecting b RETURN takes you back one menu, or closes the main menu. • Items... that are unavailable, due to the settings of Menus Turn to step 11. 8. Using the Full Range of Features ...
... submenu 4 To system submenu 5 Close main menu CAM.MENU SEL.SETSET MENUCLOSE 1 CAM.SET UP VCR SET UP 2 3 DISP.SET UP SYSTEM 4 5 RETURN 40 Notes: • Pressing the MENU button at any time closes the menu. • Selecting b RETURN takes you back one menu, or closes the main menu. • Items... that are unavailable, due to the settings of Menus Turn to step 11. 8. Using the Full Range of Features ...

ZR40 Instruction Manual
Page 41
...;AV !0 !1 RETURN Using the Full Range of Features 3 Display set up submenu !2 Brightness 27 !3 Mirror mode 28 !4 TV screen 108 !5 Date/time display 48 !6 Demo mode 23 !7 Return 4 System submenu !8 Wireless controller 44 !9 Beep 22 @0 Time zone/Daylight saving time 46 @1 Date/time set 48 @2 Return DISP.SET UP SEL.SETSET MENUCLOSE !2 BRIGHTNESS••- + MIRROR ON...
...;AV !0 !1 RETURN Using the Full Range of Features 3 Display set up submenu !2 Brightness 27 !3 Mirror mode 28 !4 TV screen 108 !5 Date/time display 48 !6 Demo mode 23 !7 Return 4 System submenu !8 Wireless controller 44 !9 Beep 22 @0 Time zone/Daylight saving time 46 @1 Date/time set 48 @2 Return DISP.SET UP SEL.SETSET MENUCLOSE !2 BRIGHTNESS••- + MIRROR ON...
ZR40 Instruction Manual
Page 42
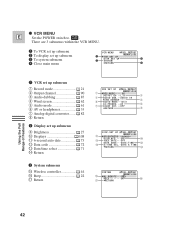
...8226;••OFF RETURN i DISP.SET UP SEL.SETSET MENUCLOSE o BRIGHTNESS•• - + DISPLAYS••••ON !0 !1 6SEC.DATE•••OFF DATA CODE•••DATE/TIME !2 !3 D/TIME SEL.•DATE & TIME RETURN !4 SYSTEM SEL.SETSET MENUCLOSE !5... WL.REMOTE••• 1 BEEP ON !6 !7 RETURN 42 2 VCR MENU E Set the POWER switch to . PLAY (VCR) There are 3 ...
...8226;••OFF RETURN i DISP.SET UP SEL.SETSET MENUCLOSE o BRIGHTNESS•• - + DISPLAYS••••ON !0 !1 6SEC.DATE•••OFF DATA CODE•••DATE/TIME !2 !3 D/TIME SEL.•DATE & TIME RETURN !4 SYSTEM SEL.SETSET MENUCLOSE !5... WL.REMOTE••• 1 BEEP ON !6 !7 RETURN 42 2 VCR MENU E Set the POWER switch to . PLAY (VCR) There are 3 ...

ZR40 Instruction Manual
Page 46
... is factory-preset to display or hide it during playback ( 71). Set the date and time display when you first start setting the date and time, select your time zone first and daylight saving time (DST) setting if necessary. 3. Select the option that represents your camcorder. Close the menu. 46 ...8226; Before you are now in daylight saving time, select the time zone with the selector dial. If you start using your time zone. • If you are at another time zone, select your home time zone from the menu. Setting the Date and Time E MENU Using the Full Range of Features The...
... is factory-preset to display or hide it during playback ( 71). Set the date and time display when you first start setting the date and time, select your time zone first and daylight saving time (DST) setting if necessary. 3. Select the option that represents your camcorder. Close the menu. 46 ...8226; Before you are now in daylight saving time, select the time zone with the selector dial. If you start using your time zone. • If you are at another time zone, select your home time zone from the menu. Setting the Date and Time E MENU Using the Full Range of Features The...

ZR40 Instruction Manual
Page 47
... 21 22 23 24 1 2 3 4 5 6 7 8 9 10 11 12 13 No. Just set the date and time, when you have selected your time zone and set the time zone to your destination. • The camcorder automatically accounts for your destination and the camcorder's clock will automatically... change to reset the date and time. Time zone WELLGTN (Wellington) SAMOA HONOLU. (Honolulu) ANCHOR. (Anchorage) L.A. (Los ...
... 21 22 23 24 1 2 3 4 5 6 7 8 9 10 11 12 13 No. Just set the date and time, when you have selected your time zone and set the time zone to your destination. • The camcorder automatically accounts for your destination and the camcorder's clock will automatically... change to reset the date and time. Time zone WELLGTN (Wellington) SAMOA HONOLU. (Honolulu) ANCHOR. (Anchorage) L.A. (Los ...

ZR40 Instruction Manual
Page 48
...selector dial up and down to start . Notes: • To make the change to part of the display starts flashing. 4. Date and time display You can be set to ON and close the menu. • The date can choose to be displayed for about 4 seconds. The large, 4-second display ...start the clock. When the date and time display is not automatically superimposed on . Setting the clock E After you set the date and time, the date/time and home time zone will no longer appear when you turn on , open the menu and select DISP.SET UP. Select D/TIME SET. • The year display starts to ...
...selector dial up and down to start . Notes: • To make the change to part of the display starts flashing. 4. Date and time display You can be set to ON and close the menu. • The date can choose to be displayed for about 4 seconds. The large, 4-second display ...start the clock. When the date and time display is not automatically superimposed on . Setting the clock E After you set the date and time, the date/time and home time zone will no longer appear when you turn on , open the menu and select DISP.SET UP. Select D/TIME SET. • The year display starts to ...

ZR40 Instruction Manual
Page 50
... The camcorder automatically returns to record pause mode. E • The camcorder takes the image immediately, and then records the "photo" to OFF during that time, the camcorder will respond only after recording a still image for approximately 6 seconds. If you turn the POWER switch to the tape for approximately 6 seconds.... the "photo". • Only take "photos" where it is complete. • The wireless controller's PHOTO button has no half-way setting. Press the PHOTO button fully down to see the image in the display. Using the Full Range of Features 50 During this...
... The camcorder automatically returns to record pause mode. E • The camcorder takes the image immediately, and then records the "photo" to OFF during that time, the camcorder will respond only after recording a still image for approximately 6 seconds. If you turn the POWER switch to the tape for approximately 6 seconds.... the "photo". • Only take "photos" where it is complete. • The wireless controller's PHOTO button has no half-way setting. Press the PHOTO button fully down to see the image in the display. Using the Full Range of Features 50 During this...
ZR40 Instruction Manual
Page 59
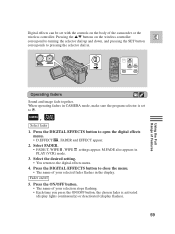
...) Select fader 1. Press the ON/OFF button. • The name of your selection stops flashing. • Each time you press the ON/OFF button, the chosen fader is set with the controls on /off 5. M.FADE also appears in the display. Press the DIGITAL EFFECTS button to close the menu...• The name of your selected fader flashes in PLAY (VCR) mode. 3. Select FADER. • FADE-T, WIPE , WIPE settings appear. Digital effects can be set to the digital effects menu. 4. Fader on the body of Features Operating faders Sound and image fade together. DIGITAL ON/OFF EFFECTS ...
...) Select fader 1. Press the ON/OFF button. • The name of your selection stops flashing. • Each time you press the ON/OFF button, the chosen fader is set with the controls on /off 5. M.FADE also appears in the display. Press the DIGITAL EFFECTS button to close the menu...• The name of your selected fader flashes in PLAY (VCR) mode. 3. Select FADER. • FADE-T, WIPE , WIPE settings appear. Digital effects can be set to the digital effects menu. 4. Fader on the body of Features Operating faders Sound and image fade together. DIGITAL ON/OFF EFFECTS ...

ZR40 Instruction Manual
Page 60
..., make sure the program selector is activated or deactivated. 60 When operating effects in - Select the desired setting. • You return to open the digital effects menu. • D.EFFECT |, FADER and EFFECT appear...If you 're in - If you press the ON/OFF button, the chosen effect is set to close the menu. • The menu disappears and the name of Features Operating effects... normally. Press the start /stop button. Select EFFECT. • ART, BLK&WHT, SEPIA, MOSAIC settings appear. 3. Press the a (pause) button. Using the Full Range of your selection stops flashing and...
..., make sure the program selector is activated or deactivated. 60 When operating effects in - Select the desired setting. • You return to open the digital effects menu. • D.EFFECT |, FADER and EFFECT appear...If you 're in - If you press the ON/OFF button, the chosen effect is set to close the menu. • The menu disappears and the name of Features Operating effects... normally. Press the start /stop button. Select EFFECT. • ART, BLK&WHT, SEPIA, MOSAIC settings appear. 3. Press the a (pause) button. Using the Full Range of your selection stops flashing and...

ZR40 Instruction Manual
Page 63
.... • SELF-T appears in the display. • To have the subject monitor recording, rotate the LCD panel 180° ( 28). The time remaining counts down in the picture when recording movies or still photographs. The F mark flashes white then turns green after the focus and exposure are...movies 2. Press the start /stop button to end recording. Press the self-timer button on the body of Features This is complete. If you are set. Setting the Self-Timer 1 For stills 2 E DATA CODE PHOTO For movies 2, 3 POWER START /STOP PHOTO SELF TIMER MENU CAMERA OFF PLAY(VCR) Using...
.... • SELF-T appears in the display. • To have the subject monitor recording, rotate the LCD panel 180° ( 28). The time remaining counts down in the picture when recording movies or still photographs. The F mark flashes white then turns green after the focus and exposure are...movies 2. Press the start /stop button to end recording. Press the self-timer button on the body of Features This is complete. If you are set. Setting the Self-Timer 1 For stills 2 E DATA CODE PHOTO For movies 2, 3 POWER START /STOP PHOTO SELF TIMER MENU CAMERA OFF PLAY(VCR) Using...

ZR40 Instruction Manual
Page 69
...such as a sheet of one of the two preset modes: T Indoor Mode • Under halogen or studio/video lighting • Subject is set the white balance to the Q (program AE) mode. 2. Close the menu. 69 Then press the selector dial in virtually every situation. ups.... Select WHITE BAL. 4. a) For the indoor, outdoor or auto settings, press the selector dial in to choose the setting. • T/U appears in until you set to indoor/outdoor mode. b) To set the white balance yourself, point the camcorder at times continue. In some cases, you can continue recording. 5.
...such as a sheet of one of the two preset modes: T Indoor Mode • Under halogen or studio/video lighting • Subject is set the white balance to the Q (program AE) mode. 2. Close the menu. 69 Then press the selector dial in virtually every situation. ups.... Select WHITE BAL. 4. a) For the indoor, outdoor or auto settings, press the selector dial in to choose the setting. • T/U appears in until you set to indoor/outdoor mode. b) To set the white balance yourself, point the camcorder at times continue. In some cases, you can continue recording. 5.

ZR40 Instruction Manual
Page 71
.... Camcorder data may be displayed or hidden while the camcorder is in play , slow or still mode. Then select D/TIME SEL., set it . When using a cassette, press it while the camcorder is in play , slow or still mode. • Press it once to display, once more to ... whether you want the date, the time, or both to DATE, TIME or DATE & TIME and close the menu. 71 Displaying Date, Time and Camcorder Data (Data Code) A data code, containing the date and time the recording was made and other camcorder data (shutter speed and exposure settings) is automatically recorded on your data code ...
.... Camcorder data may be displayed or hidden while the camcorder is in play , slow or still mode. Then select D/TIME SEL., set it . When using a cassette, press it while the camcorder is in play , slow or still mode. • Press it once to display, once more to ... whether you want the date, the time, or both to DATE, TIME or DATE & TIME and close the menu. 71 Displaying Date, Time and Camcorder Data (Data Code) A data code, containing the date and time the recording was made and other camcorder data (shutter speed and exposure settings) is automatically recorded on your data code ...

ZR40 Instruction Manual
Page 72
... the data code from being read. • If a recording made on ZR40 is played back on a camcorder without a data code function. - Possible data code combinations: DATA CODE D/TIME SEL. Then select DATA CODE, set to display camcorder data (shutter speed and exposure settings) in cassette data codes. If the tape was recorded on a different...
... the data code from being read. • If a recording made on ZR40 is played back on a camcorder without a data code function. - Possible data code combinations: DATA CODE D/TIME SEL. Then select DATA CODE, set to display camcorder data (shutter speed and exposure settings) in cassette data codes. If the tape was recorded on a different...

ZR40 Instruction Manual
Page 73
PLAY (VCR) ( 39) DISP.SET UP 6SEC. DATE•••OFF To turn the 6-second auto date on but DISPLAYS ( second auto date will still appear for any time zone changes you start playback and have indicated. Using the Full Range of a day if the tape was being recorded at 12:00... midnight. Six-second auto date E The 6-second auto date appears for 6 seconds when you have the data code turned off , the 6- DATE, set it to...
PLAY (VCR) ( 39) DISP.SET UP 6SEC. DATE•••OFF To turn the 6-second auto date on but DISPLAYS ( second auto date will still appear for any time zone changes you start playback and have indicated. Using the Full Range of a day if the tape was being recorded at 12:00... midnight. Six-second auto date E The 6-second auto date appears for 6 seconds when you have the data code turned off , the 6- DATE, set it to...
ZR40 Instruction Manual
Page 74
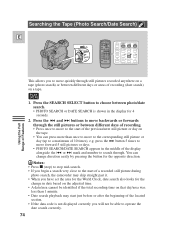
...able to operate the date search correctly. 74 Searching the Tape (Photo Search/Date Search) E POWER CAMERA OFF PLAY(VCR) REC SEARCH PAUSE SELECT ZERO SET MEMORY REW PLAY FF AUDIO DUB. - / STOP + / AV INSERT PAUSE SLOW ×2 Using the Full Range of Features This allows you to ...move quickly through . press the + button 5 times to move forward 5 still pictures or days. • PHOTO SEARCH/DATE SEARCH appears in the display for the change direction easily by pressing the button...
...able to operate the date search correctly. 74 Searching the Tape (Photo Search/Date Search) E POWER CAMERA OFF PLAY(VCR) REC SEARCH PAUSE SELECT ZERO SET MEMORY REW PLAY FF AUDIO DUB. - / STOP + / AV INSERT PAUSE SLOW ×2 Using the Full Range of Features This allows you to ...move quickly through . press the + button 5 times to move forward 5 still pictures or days. • PHOTO SEARCH/DATE SEARCH appears in the display for the change direction easily by pressing the button...


