
ZR100/200/300 Brochure
Page 1
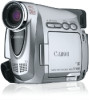
...a TV and still image quality for use the full width of Your Hand Genuine Canon Optics 22x Optical Zoom Lens (ZR300) 20x Optical Zoom Lens (ZR200/ZR100) What sets a Canon camcorder apart from all the others? Our vast expertise in designing and crafting precision lenses... for high-quality professional optics. Unlike camcorders which only record a vertically stretched picture, Canon's ZR300, ZR200 and ZR100 use with crisp, high-quality images. With the ZR300, you can record highresolution 16:9 video. Compact, Slim and Easy to...
...a TV and still image quality for use the full width of Your Hand Genuine Canon Optics 22x Optical Zoom Lens (ZR300) 20x Optical Zoom Lens (ZR200/ZR100) What sets a Canon camcorder apart from all the others? Our vast expertise in designing and crafting precision lenses... for high-quality professional optics. Unlike camcorders which only record a vertically stretched picture, Canon's ZR300, ZR200 and ZR100 use with crisp, high-quality images. With the ZR300, you can record highresolution 16:9 video. Compact, Slim and Easy to...

ZR100/200/300 Brochure
Page 2
...making it simple, quick and convenient to achieve excellent performance optimally when used with options for the full length of Genuine Canon accessories is recommended: This product is a registered trademark of their respective companies. A single cable connects the camcorder to... Off) card: approx. 450,000 pixels Lens ZR300: f=2.8-61.6mm, f/1.6-3.6, 22x power zoom ZR200: f=2.8-56mm, f/1.6-3.2, 20x power zoom ZR100: f=2.8-56mm, f/1.6-3.2, 20x power zoom LCD Screen 2.4-inch. Macintosh and Mac OS are approximate. Warning: Unauthorized recording of copyrighted materials may ...
...making it simple, quick and convenient to achieve excellent performance optimally when used with options for the full length of Genuine Canon accessories is recommended: This product is a registered trademark of their respective companies. A single cable connects the camcorder to... Off) card: approx. 450,000 pixels Lens ZR300: f=2.8-61.6mm, f/1.6-3.6, 22x power zoom ZR200: f=2.8-56mm, f/1.6-3.2, 20x power zoom ZR100: f=2.8-56mm, f/1.6-3.2, 20x power zoom LCD Screen 2.4-inch. Macintosh and Mac OS are approximate. Warning: Unauthorized recording of copyrighted materials may ...

Instruction Manual
Page 2
Digital Video Camcorder, ZR100 systems This device complies with class B limits in the ... received, including interference that may infringe on a circuit different from that to stop operation of FCC Rules. Canon U.S.A. REFER SERVICING TO QUALIFIED SERVICE PERSONNEL. 2 The lightning flash with the limits for help. These limits are... may be contrary to persons. COPYRIGHT WARNING: Unauthorized recording of electric shock to copyright laws. Inc. One Canon Plaza, Lake Success, NY 11042, U.S.A. Operation is encouraged to try to correct the interference by turning the ...
Digital Video Camcorder, ZR100 systems This device complies with class B limits in the ... received, including interference that may infringe on a circuit different from that to stop operation of FCC Rules. Canon U.S.A. REFER SERVICING TO QUALIFIED SERVICE PERSONNEL. 2 The lightning flash with the limits for help. These limits are... may be contrary to persons. COPYRIGHT WARNING: Unauthorized recording of electric shock to copyright laws. Inc. One Canon Plaza, Lake Success, NY 11042, U.S.A. Operation is encouraged to try to correct the interference by turning the ...

Instruction Manual
Page 3
... still fails to overturn. 3 All the safety and the type of serious damage to the antenna discharge unit, connection to the Canon Digital Video Camcorder Power Adapter should be operated only E ZR100 A and all its accessories. Regarding other 13. Retain Instructions - Placing or Moving - Accessories - Power Sources - Do not use this manual...
... still fails to overturn. 3 All the safety and the type of serious damage to the antenna discharge unit, connection to the Canon Digital Video Camcorder Power Adapter should be operated only E ZR100 A and all its accessories. Regarding other 13. Retain Instructions - Placing or Moving - Accessories - Power Sources - Do not use this manual...

Instruction Manual
Page 4
...When replacement of power supply is damaged. When the power-supply cord or plug is required, please return it to the responsible nearest Canon Service Center and please replace it with a power supply between 100 and 240 V AC. d. f. Unauthorized substitutions may expose you...adapter. When replacement parts are required, be used , you follow the operating instructions. The Adapter can result in performance. Contact your nearest Canon Service Center for service. 19.Replacement Parts - Use only CSA/UL Certified power supply cord set, Polarized, Type SPT-2 or heavier, ...
...When replacement of power supply is damaged. When the power-supply cord or plug is required, please return it to the responsible nearest Canon Service Center and please replace it with a power supply between 100 and 240 V AC. d. f. Unauthorized substitutions may expose you...adapter. When replacement parts are required, be used , you follow the operating instructions. The Adapter can result in performance. Contact your nearest Canon Service Center for service. 19.Replacement Parts - Use only CSA/UL Certified power supply cord set, Polarized, Type SPT-2 or heavier, ...

Instruction Manual
Page 5
CAMERA : Function cannot be used in this mode. Using this Manual Thank you use the camcorder and retain it for purchasing the Canon ZR100. Introduction Operating modes (see below) Menu item showing at its default position Button and switches to the LCD and the viewfinder screen. Trademark Acknowledgments • ...
CAMERA : Function cannot be used in this mode. Using this Manual Thank you use the camcorder and retain it for purchasing the Canon ZR100. Introduction Operating modes (see below) Menu item showing at its default position Button and switches to the LCD and the viewfinder screen. Trademark Acknowledgments • ...

Instruction Manual
Page 6
Table of contents Introduction Using this Manual 5 Checking Supplied Accessories 8 Components Guide 9 Basic Functions Preparations Preparing the Power Supply 12 Loading/Unloading a Cassette 15 Installing the Backup Battery 16 Preparing the Camcorder 17 Adjusting the LCD Screen 18 Setting the Time Zone, Date and Time 19 Recording Recording Movies on a Tape 22 Zooming...26 Tips for Making Better Videos 28 Playback Playing Back a Tape 29 Adjusting the Volume 31 Playing Back on a TV Screen 32 Advanced Functions Menus and Settings 34 Recording Using the Recording Programs 38 Using ...
Table of contents Introduction Using this Manual 5 Checking Supplied Accessories 8 Components Guide 9 Basic Functions Preparations Preparing the Power Supply 12 Loading/Unloading a Cassette 15 Installing the Backup Battery 16 Preparing the Camcorder 17 Adjusting the LCD Screen 18 Setting the Time Zone, Date and Time 19 Recording Recording Movies on a Tape 22 Zooming...26 Tips for Making Better Videos 28 Playback Playing Back a Tape 29 Adjusting the Volume 31 Playing Back on a TV Screen 32 Advanced Functions Menus and Settings 34 Recording Using the Recording Programs 38 Using ...

Instruction Manual
Page 7
Introduction Editing Recording to a VCR or Digital Video Device 67 Recording from Analog Video Devices (VCR, TV or Camcorder 69 Recording from Digital Video Devices (DV Dubbing 70 E Converting Analog Signals into Digital Signals (Analog-Digital Converter) ...72 Transferring Video Recordings to a Computer 74 Additional Information Screen Displays 75 List of Messages 77 Maintenance/Others 78 Troubleshooting 83 System Diagram (Availability differs from area to area 86 Optional Accessories 87 Specifications 90 Item Codes ...92 Index...93 7
Introduction Editing Recording to a VCR or Digital Video Device 67 Recording from Analog Video Devices (VCR, TV or Camcorder 69 Recording from Digital Video Devices (DV Dubbing 70 E Converting Analog Signals into Digital Signals (Analog-Digital Converter) ...72 Transferring Video Recordings to a Computer 74 Additional Information Screen Displays 75 List of Messages 77 Maintenance/Others 78 Troubleshooting 83 System Diagram (Availability differs from area to area 86 Optional Accessories 87 Specifications 90 Item Codes ...92 Index...93 7
Instruction Manual
Page 8
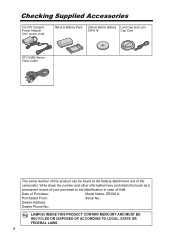
... the number and other information here and retain this product can be found at the battery attachment unit of theft. Date of Purchase: Model Name: ZR100 A Purchased From: Serial No.: Dealer Address: Dealer Phone No.: Hg LAMP(S) INSIDE THIS PRODUCT CONTAIN MERCURY AND MUST BE RECYCLED OR DISPOSED OF ACCORDING TO...
... the number and other information here and retain this product can be found at the battery attachment unit of theft. Date of Purchase: Model Name: ZR100 A Purchased From: Serial No.: Dealer Address: Dealer Phone No.: Hg LAMP(S) INSIDE THIS PRODUCT CONTAIN MERCURY AND MUST BE RECYCLED OR DISPOSED OF ACCORDING TO...

Instruction Manual
Page 9
Components Guide ZR100 E Introduction REC SEARCH - button ( 25) / (record review) button ( 25) / (rewind) button ( 29) REC SEARCH + button ( 25) / (fast forward) button ( 29) LCD BACKLIGHT button ( 18) WIDESCREEN ...
Components Guide ZR100 E Introduction REC SEARCH - button ( 25) / (record review) button ( 25) / (rewind) button ( 29) REC SEARCH + button ( 25) / (fast forward) button ( 29) LCD BACKLIGHT button ( 18) WIDESCREEN ...

Instruction Manual
Page 10
button ( 12) Power switch ( 5) Cassette compartment cover ( 15) Cassette compartment ( 15) OPEN/EJECT switch ( 15) Zoom lever ( 26) Finger rest Strap mount ( 88) Grip belt ( 17) Start/stop button ( 22) 10 Dioptric adjustment lever ( 17) Viewfinder ( 17) BATT.
button ( 12) Power switch ( 5) Cassette compartment cover ( 15) Cassette compartment ( 15) OPEN/EJECT switch ( 15) Zoom lever ( 26) Finger rest Strap mount ( 88) Grip belt ( 17) Start/stop button ( 22) 10 Dioptric adjustment lever ( 17) Viewfinder ( 17) BATT.

Instruction Manual
Page 11
E Introduction Terminal cover Stereo microphone AV terminal ( 32) DV terminal ( 67) Tripod socket ( 28) 11
E Introduction Terminal cover Stereo microphone AV terminal ( 32) DV terminal ( 67) Tripod socket ( 28) 11

Instruction Manual
Page 12
When charging is complete. 4. Press the BATT. Charging the Battery Pack 1. Remove the battery pack after use. button to OFF. 2. Basic Functions Preparing Preparations the Power Supply Attaching the Battery Pack 1. Turn the POWER switch to remove the battery. The CHARGE indicator starts flashing. DC IN terminal 12 Connect the power cord to the camcorder. • Remove the terminal cover of the battery pack. • Press lightly and slide it in the direction of the arrow until it from the camcorder. Plug the power cord into a power outlet. Unplug the power ...
When charging is complete. 4. Press the BATT. Charging the Battery Pack 1. Remove the battery pack after use. button to OFF. 2. Basic Functions Preparing Preparations the Power Supply Attaching the Battery Pack 1. Turn the POWER switch to remove the battery. The CHARGE indicator starts flashing. DC IN terminal 12 Connect the power cord to the camcorder. • Remove the terminal cover of the battery pack. • Press lightly and slide it in the direction of the arrow until it from the camcorder. Plug the power cord into a power outlet. Unplug the power ...

Instruction Manual
Page 13
You can keep the battery pack attached; Charging may not be charged correctly even if the CHARGE indicator glows steady. The battery pack may stop. Connect the power cord to OFF. 2. E 1. Plug the power cord into a power outlet. 4. Connect the power adapter to the camcorder's DC IN terminal. Turn off the camcorder before connecting or disconnecting the power adapter. If the adapter is used close to a TV, it back to the camcorder. When the power adapter or battery pack is not a malfunction. Do not disconnect and reconnect the power cord while ...
You can keep the battery pack attached; Charging may not be charged correctly even if the CHARGE indicator glows steady. The battery pack may stop. Connect the power cord to OFF. 2. E 1. Plug the power cord into a power outlet. 4. Connect the power adapter to the camcorder's DC IN terminal. Turn off the camcorder before connecting or disconnecting the power adapter. If the adapter is used close to a TV, it back to the camcorder. When the power adapter or battery pack is not a malfunction. Do not disconnect and reconnect the power cord while ...

Instruction Manual
Page 14
Charging, Recording and Playback Times Below times are approximate and vary according to 104 °F), the CHARGE indicator flashes rapidly and charging stops. A lithium ion battery pack can be shorter. We recommend charging the battery pack in record pause mode. 14 Actual time may be charged at any charge state. Outside the temperature range of leaving it before charging. We recommend that you prepare battery packs 2 to 3 times longer than you think you might need to completely use or discharge it in temperatures between 10 °C and 30 °C (50 &#...
Charging, Recording and Playback Times Below times are approximate and vary according to 104 °F), the CHARGE indicator flashes rapidly and charging stops. A lithium ion battery pack can be shorter. We recommend charging the battery pack in record pause mode. 14 Actual time may be charged at any charge state. Outside the temperature range of leaving it before charging. We recommend that you prepare battery packs 2 to 3 times longer than you think you might need to completely use or discharge it in temperatures between 10 °C and 30 °C (50 &#...
Instruction Manual
Page 15
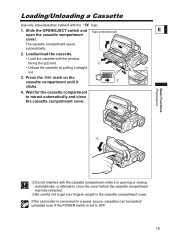
Basic Functions Preparations Do not interfere with the logo. 1. Loading/Unloading a Cassette Use only videocassettes marked with the cassette compartment while it is set to OFF. 15 Press the mark on the cassette compartment until it straight out. 3. The cassette compartment opens automatically. 2. Load/unload the cassette. • Load the cassette with the window facing the grip belt. • Unload the cassette by pulling it clicks. 4. Slide the OPEN/EJECT switch and Tape protection tab E open the cassette compartment cover. Wait for the cassette ...
Basic Functions Preparations Do not interfere with the logo. 1. Loading/Unloading a Cassette Use only videocassettes marked with the cassette compartment while it is set to OFF. 15 Press the mark on the cassette compartment until it straight out. 3. The cassette compartment opens automatically. 2. Load/unload the cassette. • Load the cassette with the window facing the grip belt. • Unload the cassette by pulling it clicks. 4. Slide the OPEN/EJECT switch and Tape protection tab E open the cassette compartment cover. Wait for the cassette ...

Instruction Manual
Page 16
Close the cover. " you that it needs to retain the settings. 1. Insert the backup battery with the + side facing outward. 3. The backup battery has a life span of about a year. Open the backup battery cover. 2. Connect a power source to the camcorder when replacing the backup battery to be replaced. Installing the Backup Battery The backup battery (lithium button battery CR1616) allows the camcorder to inform 16 " flashes in red to retain date, time ( 19) and other camcorder settings while the power source is disconnected.
Close the cover. " you that it needs to retain the settings. 1. Insert the backup battery with the + side facing outward. 3. The backup battery has a life span of about a year. Open the backup battery cover. 2. Connect a power source to the camcorder when replacing the backup battery to be replaced. Installing the Backup Battery The backup battery (lithium button battery CR1616) allows the camcorder to inform 16 " flashes in red to retain date, time ( 19) and other camcorder settings while the power source is disconnected.

Instruction Manual
Page 17
Pass the grip belt through the loop on the camcorder and keep the LCD panel closed. 2. Turn on the cord. Fastening the Grip Belt Hold the camcorder with your right hand and adjust the belt with your left. Adjust the dioptric adjustment lever. 4. Attaching the Lens Cap 1. Adjust the grip belt so that you have finished. Hook the lens cap on the lens cap when attaching/removing it over the lens when you can reach the zoom lever with your index finger, and the start/stop button with your thumb. 17 Basic Functions Preparations Preparing the Camcorder Adjusting the...
Pass the grip belt through the loop on the camcorder and keep the LCD panel closed. 2. Turn on the cord. Fastening the Grip Belt Hold the camcorder with your right hand and adjust the belt with your left. Adjust the dioptric adjustment lever. 4. Attaching the Lens Cap 1. Adjust the grip belt so that you have finished. Hook the lens cap on the lens cap when attaching/removing it over the lens when you can reach the zoom lever with your index finger, and the start/stop button with your thumb. 17 Basic Functions Preparations Preparing the Camcorder Adjusting the...

Instruction Manual
Page 18
Adjusting the LCD Screen Rotating the LCD Screen Open the LCD panel 90 degrees. • You can rotate the panel by 90 degrees outward. • You can switch the brightness of the POWER switch. The battery usage time shortens when the LCD screen is useful for outdoor recordings. Press the LCD BACKLIGHT button. This setting does not affect the brightness of the recording or the viewfinder screen. When using a battery pack, the camcorder retains the setting even if you change the position of the LCD screen between normal and bright by 180 degrees inward. LCD ...
Adjusting the LCD Screen Rotating the LCD Screen Open the LCD panel 90 degrees. • You can rotate the panel by 90 degrees outward. • You can switch the brightness of the POWER switch. The battery usage time shortens when the LCD screen is useful for outdoor recordings. Press the LCD BACKLIGHT button. This setting does not affect the brightness of the recording or the viewfinder screen. When using a battery pack, the camcorder retains the setting even if you change the position of the LCD screen between normal and bright by 180 degrees inward. LCD ...

Instruction Manual
Page 19
Turn the SET dial to select the year, and press the SET dial. • The next part of the display starts flashing. • Set the month, day, hours and minutes in the same way. 19 Turn the SET dial to select [T.ZONE/DST] and press the SET dial. Turn the SET dial to the area. To adjust for daylight saving time, select the time zone with the next to select [SYSTEM] and press the SET dial. 3. The year display starts to select the setting option that represents your camcorder, or when you have replaced the backup battery. Setting the Date and Time CAMERA PLAY (VCR) MENU ( ...
Turn the SET dial to select the year, and press the SET dial. • The next part of the display starts flashing. • Set the month, day, hours and minutes in the same way. 19 Turn the SET dial to select [T.ZONE/DST] and press the SET dial. Turn the SET dial to the area. To adjust for daylight saving time, select the time zone with the next to select [SYSTEM] and press the SET dial. 3. The year display starts to select the setting option that represents your camcorder, or when you have replaced the backup battery. Setting the Date and Time CAMERA PLAY (VCR) MENU ( ...
