
CONSOLE_V1-1_ENG.pdf
Page 1
... analyze a shooting image using a waveform monitor and a vector scope to record on the tape in the camcorder and onto the computer's hard disk by connecting the camcorder using an IEEE1394 (DV) cable. Shortcut Keys English Uninstalling the Software Troubleshooting This software is a software that enables you want. DIE-272 Image Control & Storage Software...
... analyze a shooting image using a waveform monitor and a vector scope to record on the tape in the camcorder and onto the computer's hard disk by connecting the camcorder using an IEEE1394 (DV) cable. Shortcut Keys English Uninstalling the Software Troubleshooting This software is a software that enables you want. DIE-272 Image Control & Storage Software...
CONSOLE_V1-1_ENG.pdf
Page 3
... software settings to reduce the usage. To edit a file recorded in 24F (NTSC only). XH G1 XH A1 XL H1* *Unable to use some functions XL2* Required Accessories Canon digital camcorder compatible with CONSOLE IEEE1394 (DV) Cable Check the manual of your computer has an IEEE1394 (DV) board/card in addition to the...
... software settings to reduce the usage. To edit a file recorded in 24F (NTSC only). XH G1 XH A1 XL H1* *Unable to use some functions XL2* Required Accessories Canon digital camcorder compatible with CONSOLE IEEE1394 (DV) Cable Check the manual of your computer has an IEEE1394 (DV) board/card in addition to the...
CONSOLE_V1-1_ENG.pdf
Page 4
... or load Custom Preset files. „ Functional Comparison The functions available differ depending on the tape. - EJECT switch - CONT. Camcorder XH G1/XH A1 XL H1 XL2 Mode EXT. Camera EXT. Handle and grip zoom lever - CONT. mode ( ): This mode is set to the... Some functions of the shortcut keys • Calling the registered workspace using an IEEE1394 (DV) cable. Camera EXT. When the camcorder is available for remotely controlling the camcorder. mode, only the following limitations apply to playback or output the picture recorded on the connected...
... or load Custom Preset files. „ Functional Comparison The functions available differ depending on the tape. - EJECT switch - CONT. Camcorder XH G1/XH A1 XL H1 XL2 Mode EXT. Camera EXT. Handle and grip zoom lever - CONT. mode ( ): This mode is set to the... Some functions of the shortcut keys • Calling the registered workspace using an IEEE1394 (DV) cable. Camera EXT. When the camcorder is available for remotely controlling the camcorder. mode, only the following limitations apply to playback or output the picture recorded on the connected...
CONSOLE_V1-1_ENG.pdf
Page 7
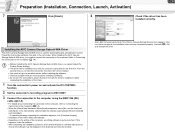
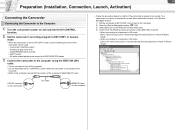
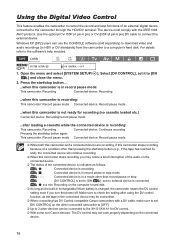
...or a window asking you to choose the software may be installed. You need to connect the camcorder to the camcorder. Open [My Computer] and check if the [Canon Camera Storage Device] icon appears. In the next window, select [Install the software automatically (Recommended)] and ...activate the DV CONTROL function. 2 Set the camcorder's recording program to EXT.CONT. 3 Connect the camcorder to the computer using the IEEE1394 (DV) cable. ( 1-8) • For details about connecting the camcorder to the computer, refer to Connecting the Camcorder to the Computer ( 1-8). Without ...
...or a window asking you to choose the software may be installed. You need to connect the camcorder to the camcorder. Open [My Computer] and check if the [Canon Camera Storage Device] icon appears. In the next window, select [Install the software automatically (Recommended)] and ...activate the DV CONTROL function. 2 Set the camcorder's recording program to EXT.CONT. 3 Connect the camcorder to the computer using the IEEE1394 (DV) cable. ( 1-8) • For details about connecting the camcorder to the computer, refer to Connecting the Camcorder to the Computer ( 1-8). Without ...
CONSOLE_V1-1_ENG.pdf
Page 8
...HDV/DV terminal on the camcorder DV cable IEEE1394 port on and activate the DV CONTROL function. 2 Set the camcorder's recording program to EXT.CONT. 1-8 Preparation (Installation, Connection, Launch, Activation) Connecting the Camcorder Connecting the Camcorder to the Computer 1 Turn the camcorder's power on the computer ...if you see items described in step 4 in the [Device Manager] window. 1) Set the camcorder to a computer in HD mode: [AV/C Tape Device], [Canon Camera Storage Device] and [Canon Virtual VCR] are shown. • When connecting to EXT.CONT. mode, only the following...
...HDV/DV terminal on the camcorder DV cable IEEE1394 port on and activate the DV CONTROL function. 2 Set the camcorder's recording program to EXT.CONT. 1-8 Preparation (Installation, Connection, Launch, Activation) Connecting the Camcorder Connecting the Camcorder to the Computer 1 Turn the camcorder's power on the computer ...if you see items described in step 4 in the [Device Manager] window. 1) Set the camcorder to a computer in HD mode: [AV/C Tape Device], [Canon Camera Storage Device] and [Canon Virtual VCR] are shown. • When connecting to EXT.CONT. mode, only the following...
CONSOLE_V1-1_ENG.pdf
Page 37
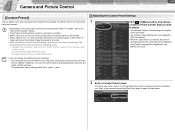
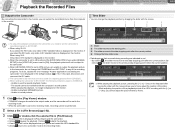
...Playback the Recorded Files Camera and Picture Control 4-37 [Custom Preset] You can adjust, load, save the new settings. For details, refer to the camcorder instruction manual. The [Custom Preset] window cannot be used when recording. When using XL2, you wish to adjust. • ... a new name and press the [Enter] key again to other modes - To enter a new name, click on the camcorder connected, some parameters differ. Disconnecting the IEEE1394 (DV) cable - For details, refer to EXT.CONT. to import and export the Custom Preset file saved on the card. After...
...Playback the Recorded Files Camera and Picture Control 4-37 [Custom Preset] You can adjust, load, save the new settings. For details, refer to the camcorder instruction manual. The [Custom Preset] window cannot be used when recording. When using XL2, you wish to adjust. • ... a new name and press the [Enter] key again to other modes - To enter a new name, click on the camcorder connected, some parameters differ. Disconnecting the IEEE1394 (DV) cable - For details, refer to EXT.CONT. to import and export the Custom Preset file saved on the card. After...
CONSOLE_V1-1_ENG.pdf
Page 40
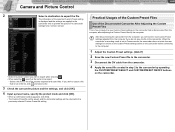
...CUSTOM PRESET SELECT and CUSTOM PRESET ON/OFF buttons on the camcorder before connecting to the computer. 1 Adjust the Custom Preset settings. ( 4-37) 2 Save the new Custom Preset file to the camcorder. 3 Disconnect the DV cable from the camcorder. 4 Apply the saved file created in the list, click ...and select a file. 3 Check the camcorder picture and the settings, and click [OK]. 4 Input a preset name, specify the...
...CUSTOM PRESET SELECT and CUSTOM PRESET ON/OFF buttons on the camcorder before connecting to the computer. 1 Adjust the Custom Preset settings. ( 4-37) 2 Save the new Custom Preset file to the camcorder. 3 Disconnect the DV cable from the camcorder. 4 Apply the saved file created in the list, click ...and select a file. 3 Check the camcorder picture and the settings, and click [OK]. 4 Input a preset name, specify the...
CONSOLE_V1-1_ENG.pdf
Page 41
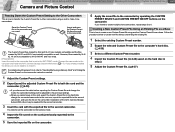
...and XL H1 are mutually compatible and the files created by XH G1 and XH A1 are not compatible to XH G1/XH A1 and vice versa. [Preparations] Insert the card to the camcorder that is how to transfer the Custom Preset file to other camcorders using another Custom Preset file as well. If you already...file to both the card and the camcorder. ( 4-39) If you disconnect the cable before exporting the Custom Preset file and change the mode, the camcorder settings will be needed for the second camcorder. 3 Insert the card with the exported file to the second camcorder. If you do not need to ...
...and XL H1 are mutually compatible and the files created by XH G1 and XH A1 are not compatible to XH G1/XH A1 and vice versa. [Preparations] Insert the card to the camcorder that is how to transfer the Custom Preset file to other camcorders using another Custom Preset file as well. If you already...file to both the card and the camcorder. ( 4-39) If you disconnect the cable before exporting the Custom Preset file and change the mode, the camcorder settings will be needed for the second camcorder. 3 Insert the card with the exported file to the second camcorder. If you do not need to ...
CONSOLE_V1-1_ENG.pdf
Page 51
.... - Unable to the receiving mode, recording cannot be used for outputting pictures from EXT.CONT. In this case, disconnect and reconnect the DV cable. The camcorder's SDI terminal cannot be performed. 2 Select a file in [File Browser] ( 6-52). 3 Click or double-click the selected file in ...[VCR/PLAY] menu is set to playback MPEG2ES picture. - to the monitor. 1 2 3 4 To output the playback pictures to the camcorder, you cannot adjust the picture frame by dragging the slider with the computer's sound system. - Unable to use the special playback modes. - The sound...
.... - Unable to the receiving mode, recording cannot be used for outputting pictures from EXT.CONT. In this case, disconnect and reconnect the DV cable. The camcorder's SDI terminal cannot be performed. 2 Select a file in [File Browser] ( 6-52). 3 Click or double-click the selected file in ...[VCR/PLAY] menu is set to playback MPEG2ES picture. - to the monitor. 1 2 3 4 To output the playback pictures to the camcorder, you cannot adjust the picture frame by dragging the slider with the computer's sound system. - Unable to use the special playback modes. - The sound...
CONSOLE_V1-1_ENG.pdf
Page 54
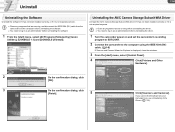
... has not been installed correctly or if it is displayed, close the windows. 3 From the [start ] menu, select [All Programs] followed by [Canon Utilities], [CONSOLE 1.1] and [CONSOLE Uninstall]. If you cannot find the [Scanners and Cameras] icon, see Uninstalling of the Drivers ( 7-55). 7-54...129; You need to the computer using the IEEE1394 (DV) cable. ( 1-8) If Scanner and Camera Wizard or Explorer is not required anymore. Close any programs that are running, and disconnect the IEEE1394 (DV) cable from the camcorder and the computer before uninstalling the software. You need...
... has not been installed correctly or if it is displayed, close the windows. 3 From the [start ] menu, select [All Programs] followed by [Canon Utilities], [CONSOLE 1.1] and [CONSOLE Uninstall]. If you cannot find the [Scanners and Cameras] icon, see Uninstalling of the Drivers ( 7-55). 7-54...129; You need to the computer using the IEEE1394 (DV) cable. ( 1-8) If Scanner and Camera Wizard or Explorer is not required anymore. Close any programs that are running, and disconnect the IEEE1394 (DV) cable from the camcorder and the computer before uninstalling the software. You need...
CONSOLE_V1-1_ENG.pdf
Page 59
... Recording will not start even when pressing the start/stop button on the camcorder. ÎThe start CONSOLE, Canon Virtual VCR or AV/C Tape Recorder/Player will not be selected as new... started. ÎWhen using XH G1, XH A1 or XL H1: If you change the computer's IEEE1394 (DV) card and start /stop button. [ ] appears on the camcorder screen and recordings cannot be.... You need to plug the IEEE1394 (DV) cable to the computer. 2) Open the [Device Manager] window. ( 7-56) 3) Select [Devices by CONSOLE is connected. Camcorder will be detected as a video folder. Close ...
... Recording will not start even when pressing the start/stop button on the camcorder. ÎThe start CONSOLE, Canon Virtual VCR or AV/C Tape Recorder/Player will not be selected as new... started. ÎWhen using XH G1, XH A1 or XL H1: If you change the computer's IEEE1394 (DV) card and start /stop button. [ ] appears on the camcorder screen and recordings cannot be.... You need to plug the IEEE1394 (DV) cable to the computer. 2) Open the [Device Manager] window. ( 7-56) 3) Select [Devices by CONSOLE is connected. Camcorder will be detected as a video folder. Close ...
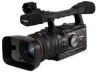
XH G1 XH A1 Instruction Manual
Page 2
... lightning flash with Part 15 of electric shock to copyright laws. Digital Video Camcorder, XH G1 A/XH A1 A Systems. This device complies with arrowhead symbol, within an equilateral triangle, is...this device must accept any changes or modifications to radio communications. Use of shielded cable is intended to alert the user to stop operation of important operating and maintenance (...point, within an equilateral triangle, is no guarantee that may cause undesired operation. One Canon Plaza, Lake Success, NY 11042, U.S.A. REFER SERVICING TO QUALIFIED SERVICE PERSONNEL. These ...
... lightning flash with Part 15 of electric shock to copyright laws. Digital Video Camcorder, XH G1 A/XH A1 A Systems. This device complies with arrowhead symbol, within an equilateral triangle, is...this device must accept any changes or modifications to radio communications. Use of shielded cable is intended to alert the user to stop operation of important operating and maintenance (...point, within an equilateral triangle, is no guarantee that may cause undesired operation. One Canon Plaza, Lake Success, NY 11042, U.S.A. REFER SERVICING TO QUALIFIED SERVICE PERSONNEL. These ...
XH G1 XH A1 Instruction Manual
Page 9
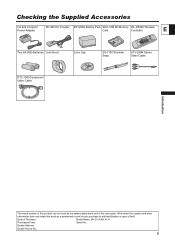
...Cap SS-1100 Shoulder Strap STV-290N Stereo Video Cable DTC-1000 Component Video Cable Introduction The serial number of this book as a permanent record of your purchase to aid identification in case of the camcorder. Write down the number and other information here ...and retain this product can be found at the battery attachment unit of theft. Date of Purchase: Model Name: XH G1 A/XH A1...
...Cap SS-1100 Shoulder Strap STV-290N Stereo Video Cable DTC-1000 Component Video Cable Introduction The serial number of this book as a permanent record of your purchase to aid identification in case of the camcorder. Write down the number and other information here ...and retain this product can be found at the battery attachment unit of theft. Date of Purchase: Model Name: XH G1 A/XH A1...
XH G1 XH A1 Instruction Manual
Page 16
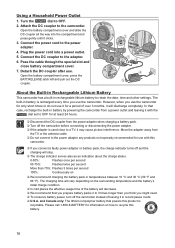
...cable. Do not connect to OFF. 2. About the Built-in Rechargeable Lithium Battery This camcorder has a built-in battery by powering the camcorder from a power outlet and leaving it with this camcorder. If you use the camcorder... this product is recharged every time you might need. To conserve battery power, turn off the camcorder instead of over 3 months, it for use . Turn the dial to the power adapter any products not...and pull out the DC coupler. Attach the DC coupler to the camcorder. Pass the cable through the special slot and close to the adapter. 6.
...cable. Do not connect to OFF. 2. About the Built-in Rechargeable Lithium Battery This camcorder has a built-in battery by powering the camcorder from a power outlet and leaving it with this camcorder. If you use the camcorder... this product is recharged every time you might need. To conserve battery power, turn off the camcorder instead of over 3 months, it for use . Turn the dial to the power adapter any products not...and pull out the DC coupler. Attach the DC coupler to the camcorder. Pass the cable through the special slot and close to the adapter. 6.
XH G1 XH A1 Instruction Manual
Page 44
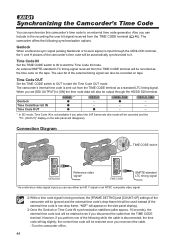
The camcorder offers the following while the cable is sent out from the TIME CODE terminal ( 46). Time Code IN ... While a time code signal is not available if you can synchronize this camcorder's time code to an external time code generator. Synchronizing the Camcorder's Time Code You can include in the recording the user bit signal received from the...panel will appear on tape. The user bit of the camcorder will be ignored and the external time code's drop-frame bit will be restored once you disconnect the cable from the TIME CODE terminal will be canceled and the "...
The camcorder offers the following while the cable is sent out from the TIME CODE terminal ( 46). Time Code IN ... While a time code signal is not available if you can synchronize this camcorder's time code to an external time code generator. Synchronizing the Camcorder's Time Code You can include in the recording the user bit signal received from the...panel will appear on tape. The user bit of the camcorder will be ignored and the external time code's drop-frame bit will be restored once you disconnect the cable from the TIME CODE terminal will be canceled and the "...

XH G1 XH A1 Instruction Manual
Page 48
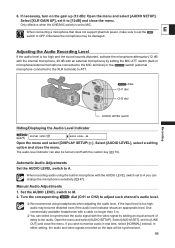
... the corresponding switch to ON. • Make sure to the MIC terminal, the built-in microphone will automatically be Connected Microphone Type: Condenser microphones with a cable no longer than 3 m. 3. Connect a microphone to one of the LINE/MIC switch applies simultaneously to MIC. 48
... the corresponding switch to ON. • Make sure to the MIC terminal, the built-in microphone will automatically be Connected Microphone Type: Condenser microphones with a cable no longer than 3 m. 3. Connect a microphone to one of the LINE/MIC switch applies simultaneously to MIC. 48
XH G1 XH A1 Instruction Manual
Page 49
...). E When connecting a microphone that does not support phantom power, make sure to set it to [12dB] and close the menu. Use commercially available headphones with a cable no longer than 3 m. You can also be synchronized. 49 If the input level is set to synchronize the audio signal with the AUDIO LEVEL...
...). E When connecting a microphone that does not support phantom power, make sure to set it to [12dB] and close the menu. Use commercially available headphones with a cable no longer than 3 m. You can also be synchronized. 49 If the input level is set to synchronize the audio signal with the AUDIO LEVEL...
XH G1 XH A1 Instruction Manual
Page 74
... external digital device connected to the software's help modules. The device must comply with a DV cable, make sure to set [DV CONTROL] on the other connected camcorder to [OFF]. Up to 2 other than pressing the start /stop button... ...when this...XH G1/XH A1 for recording (no external device is connected xxx min Recording on the computer's hard disk As long as the built-in rechargeable lithium battery is not ready for DV control. With some non-Canon devices: The DV control may be overwritten. When connecting two DV Control-compatible Canon camcorders...
... external digital device connected to the software's help modules. The device must comply with a DV cable, make sure to set [DV CONTROL] on the other connected camcorder to [OFF]. Up to 2 other than pressing the start /stop button... ...when this...XH G1/XH A1 for recording (no external device is connected xxx min Recording on the computer's hard disk As long as the built-in rechargeable lithium battery is not ready for DV control. With some non-Canon devices: The DV control may be overwritten. When connecting two DV Control-compatible Canon camcorders...
XH G1 XH A1 Instruction Manual
Page 97
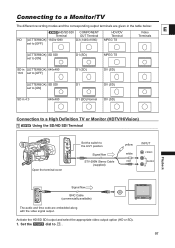
Set the dial to the A/V1 position Signal flow STV-290N Stereo Cable (supplied) yellow white red INPUT VIDEO L AUDIO R Signal flow BNC Cable (commercially available) The audio and time code are embedded along with the video signal output. Connecting to a Monitor/TV The different recording modes and the ...
Set the dial to the A/V1 position Signal flow STV-290N Stereo Cable (supplied) yellow white red INPUT VIDEO L AUDIO R Signal flow BNC Cable (commercially available) The audio and time code are embedded along with the video signal output. Connecting to a Monitor/TV The different recording modes and the ...

XH G1 XH A1 Instruction Manual
Page 98
...SETUP]. OUT], select a setting option and close the menu. 3 Using the HDV/DV Terminal CV-150F/CV-250F DV Cable (optional) Open the terminal cover 4-pin 6-pin • When connecting the camcorder to a monitor TV that supports DV, you may need to carry out a procedure on the TV or monitor you ...wish to use. 4. Close the menu. 2 Using the COMPONENT OUT Terminal Open the terminal cover Set the switch to the A/V1 position Signal flow STV-290N Stereo Cable (supplied)...
...SETUP]. OUT], select a setting option and close the menu. 3 Using the HDV/DV Terminal CV-150F/CV-250F DV Cable (optional) Open the terminal cover 4-pin 6-pin • When connecting the camcorder to a monitor TV that supports DV, you may need to carry out a procedure on the TV or monitor you ...wish to use. 4. Close the menu. 2 Using the COMPONENT OUT Terminal Open the terminal cover Set the switch to the A/V1 position Signal flow STV-290N Stereo Cable (supplied)...


