
Instruction Manual
Page 2
...special packets are attached. Therefore, the transmitter will be contrary to excessive heat such as the disconnect device. Frequecncy Tolerance: 25 ppm Canon U.S.A., Inc. The Mains plug shall remain readily operable to the following measures: • Reorient or relocate the receiving antenna. •...only the same type of batteries. • Do not expose batteries or product to copyright laws. 2 FCC/IC NOTICE HD Camcorder, XA25 / XA20 systems This device complies with any other words, this device automatically discontinue transmission in Supplement C to the following two conditions: ...
...special packets are attached. Therefore, the transmitter will be contrary to excessive heat such as the disconnect device. Frequecncy Tolerance: 25 ppm Canon U.S.A., Inc. The Mains plug shall remain readily operable to the following measures: • Reorient or relocate the receiving antenna. •...only the same type of batteries. • Do not expose batteries or product to copyright laws. 2 FCC/IC NOTICE HD Camcorder, XA25 / XA20 systems This device complies with any other words, this device automatically discontinue transmission in Supplement C to the following two conditions: ...

Instruction Manual
Page 3
...identification plate is intended to alert the user to qualified service personnel. REGIONS Canada, Hong Kong S.A.R., USA, South Korea Models ID0025: XA25 / XA20 The wide blade or the third prong are in compliance (as power-supply cord or plug is required when the apparatus... has been damaged in the literature accompanying the product. 3 IMPORTANT SAFETY INSTRUCTIONS In these safety instructions the word "product" refers to the Canon HD Camcorder XA25 / XA20 and all its accessories. 1 Read these instructions. 2 Keep these instructions. 3 Heed all warnings. 4 Follow all servicing to...
...identification plate is intended to alert the user to qualified service personnel. REGIONS Canada, Hong Kong S.A.R., USA, South Korea Models ID0025: XA25 / XA20 The wide blade or the third prong are in compliance (as power-supply cord or plug is required when the apparatus... has been damaged in the literature accompanying the product. 3 IMPORTANT SAFETY INSTRUCTIONS In these safety instructions the word "product" refers to the Canon HD Camcorder XA25 / XA20 and all its accessories. 1 Read these instructions. 2 Keep these instructions. 3 Heed all warnings. 4 Follow all servicing to...
Instruction Manual
Page 4
..., iPod, iTunes and Mac OS are trademarks of Panasonic Corporation and Sony Corporation. • Manufactured under license from Microsoft. • "Full HD 1080" refers to Canon camcorders compliant with high-definition video composed of 1,080 vertical pixels (scanning lines). • This product is licensed under AT&T patents for the MPEG-4 standard...
..., iPod, iTunes and Mac OS are trademarks of Panasonic Corporation and Sony Corporation. • Manufactured under license from Microsoft. • "Full HD 1080" refers to Canon camcorders compliant with high-definition video composed of 1,080 vertical pixels (scanning lines). • This product is licensed under AT&T patents for the MPEG-4 standard...
Instruction Manual
Page 5
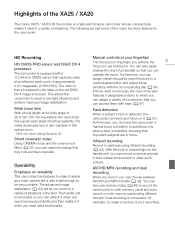
... record on the handle unit, you can access them with a 1/2.84-inch CMOS sensor that important subjects are in the field. Highlights of the XA25 / XA20 The Canon XA25 / XA20 HD Camcorder is a high-performance camcorder whose compact size makes it usable as a main camera but switch to which you need improved portability...
... record on the handle unit, you can access them with a 1/2.84-inch CMOS sensor that important subjects are in the field. Highlights of the XA25 / XA20 The Canon XA25 / XA20 HD Camcorder is a high-performance camcorder whose compact size makes it usable as a main camera but switch to which you need improved portability...
Instruction Manual
Page 6
When using an iOS device to view the camcorder's recordings (A 130), and using the INPUT terminals, you can even use the built-in the picture appear brighter (A 69). OLED screen and LCD viewfinder The OLED screen and LCD viewfinder both have access to a variety of convenient functions such as using a smartphone or tablet as a remote control (A 124), using the Web browser on a smartphone or tablet to share your videos on the Internet (A 132). Added and improved functionality Other functions include relay recording (A 49) and conversion to shoot with Wi-Fi, you can make dark areas in...
When using an iOS device to view the camcorder's recordings (A 130), and using the INPUT terminals, you can even use the built-in the picture appear brighter (A 69). OLED screen and LCD viewfinder The OLED screen and LCD viewfinder both have access to a variety of convenient functions such as using a smartphone or tablet as a remote control (A 124), using the Web browser on a smartphone or tablet to share your videos on the Internet (A 132). Added and improved functionality Other functions include relay recording (A 49) and conversion to shoot with Wi-Fi, you can make dark areas in...
Instruction Manual
Page 7
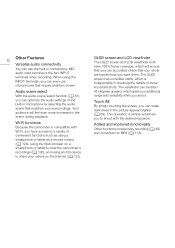
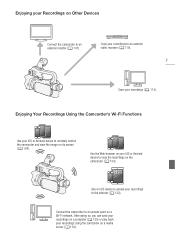
Use the Web browser on your recordings to the Internet (A 132). Use an iOS device to upload your iOS or Android device to view the recordings on the camcorder (A 130). Enjoying your iOS or Android device to remotely control the camcorder and view the image on its screen (A 124). Enjoying Your Recordings Using the Camcorder's Wi-Fi Functions Use your Recordings on Other Devices Connect the camcorder to an external monitor (A 107). After doing so, you can save your recordings on a Wi-Fi network. Connect the camcorder to an external video recorder (A 119). 7 Save your ...
Use the Web browser on your recordings to the Internet (A 132). Use an iOS device to upload your iOS or Android device to view the recordings on the camcorder (A 130). Enjoying your iOS or Android device to remotely control the camcorder and view the image on its screen (A 124). Enjoying Your Recordings Using the Camcorder's Wi-Fi Functions Use your Recordings on Other Devices Connect the camcorder to an external monitor (A 107). After doing so, you can save your recordings on a Wi-Fi network. Connect the camcorder to an external video recorder (A 119). 7 Save your ...
Instruction Manual
Page 8
Button and Joystick 32 Using the Menus 33 First Time Settings 35 Setting the Date and Time 35 Changing the Language 35 Changing the Time Zone 36 Using a Memory Card 37 Memory Cards Compatible for Use with the Camcorder 37 Inserting and Removing a Memory Card 38 Initializing a Memory Card 38 Selecting the Movie Format (AVCHD/ MP4) 39 Selecting the Memory Card for Recordings 39 3 Recording 40 Recording Movies and Photos 40 Preparing to Record 40 Recording in AUTO Mode 41 Recording in this Manual 11 Supplied Accessories 13 Names of Parts 14 8 2 Preparations 21 Attaching the Ferrite Core 21 ...
Button and Joystick 32 Using the Menus 33 First Time Settings 35 Setting the Date and Time 35 Changing the Language 35 Changing the Time Zone 36 Using a Memory Card 37 Memory Cards Compatible for Use with the Camcorder 37 Inserting and Removing a Memory Card 38 Initializing a Memory Card 38 Selecting the Movie Format (AVCHD/ MP4) 39 Selecting the Memory Card for Recordings 39 3 Recording 40 Recording Movies and Photos 40 Preparing to Record 40 Recording in AUTO Mode 41 Recording in this Manual 11 Supplied Accessories 13 Names of Parts 14 8 2 Preparations 21 Attaching the Ferrite Core 21 ...
Instruction Manual
Page 9
Recording Audio 79 Recording Audio to Channel 1 (CH1) 79 Connecting an External Microphone or External Audio Input Source to the Camcorder 80 Using the Built-in Microphone or an External Microphone Connected to the MIC Terminal 80 Audio Scenes and Other Audio Settings 81 Audio Recording Level 82 Wind Screen (Built-in Microphone) 83 Microphone Attenuator (Built-in Microphone) 83 Audio Equalizer (Built-in Microphone) 84 Microphone Directionality (Built-in Microphone) 84 Switching the Input (MIC Terminal) 85 Microphone Attenuator (MIC Terminal) 85 Low Cut Filter (MIC Terminal) 86 Using Line Input...
Recording Audio 79 Recording Audio to Channel 1 (CH1) 79 Connecting an External Microphone or External Audio Input Source to the Camcorder 80 Using the Built-in Microphone or an External Microphone Connected to the MIC Terminal 80 Audio Scenes and Other Audio Settings 81 Audio Recording Level 82 Wind Screen (Built-in Microphone) 83 Microphone Attenuator (Built-in Microphone) 83 Audio Equalizer (Built-in Microphone) 84 Microphone Directionality (Built-in Microphone) 84 Switching the Input (MIC Terminal) 85 Microphone Attenuator (MIC Terminal) 85 Low Cut Filter (MIC Terminal) 86 Using Line Input...

Instruction Manual
Page 10
8 Saving/Sharing Recordings 114 Saving Recordings to a Computer 114 Connection Diagram 114 Saving Movies Using Data Import Utility 114 10 Copying Recordings Between Memory Cards 116 Copying Scenes from the Movie Index Screen 116 Copying a Single Photo 116 Copying Photos from the Index Screen 117 Converting Movies to MP4 Format 118 Copying Recordings to an External Video Recorder 119 In High Definition 119 In Standard Definition 119 9 Wi-Fi Functions 121 Introduction to Wi-Fi 121 Remote Operation Via the Wi-Fi Remote Application 124 Setting the Camcorder's Password 124 Operating...
8 Saving/Sharing Recordings 114 Saving Recordings to a Computer 114 Connection Diagram 114 Saving Movies Using Data Import Utility 114 10 Copying Recordings Between Memory Cards 116 Copying Scenes from the Movie Index Screen 116 Copying a Single Photo 116 Copying Photos from the Index Screen 117 Converting Movies to MP4 Format 118 Copying Recordings to an External Video Recorder 119 In High Definition 119 In Standard Definition 119 9 Wi-Fi Functions 121 Introduction to Wi-Fi 121 Remote Operation Via the Wi-Fi Remote Application 124 Setting the Camcorder's Password 124 Operating...
Instruction Manual
Page 11
Please read this Manual Thank you for purchasing the Canon XA25 / XA20. Should your camcorder fail to operate correctly, refer to Troubleshooting (A 156). 11 Conventions Used in this Manual • IMPORTANT: Precautions related to the camcorder's ...
Please read this Manual Thank you for purchasing the Canon XA25 / XA20. Should your camcorder fail to operate correctly, refer to Troubleshooting (A 156). 11 Conventions Used in this Manual • IMPORTANT: Precautions related to the camcorder's ...

Instruction Manual
Page 12
For details, refer to abbreviate menu selections. The focusing range is available only in mode. The > arrow is activated, the camcorder continuously adjusts the focus on the camcorder are used to Setting the playback (MEDIA) mode. Perform the following procedure to the appendix Menu Options Lists (A 142). For a summary of icons indicate the operating mode and whether a function is in shooting (CAMERA) or mode. For example B. In this Manual The three sets of available menu options and settings, refer to set the autofocus speed. throughout the zoom range, ...
For details, refer to abbreviate menu selections. The focusing range is available only in mode. The > arrow is activated, the camcorder continuously adjusts the focus on the camcorder are used to Setting the playback (MEDIA) mode. Perform the following procedure to the appendix Menu Options Lists (A 142). For a summary of icons indicate the operating mode and whether a function is in shooting (CAMERA) or mode. For example B. In this Manual The three sets of available menu options and settings, refer to set the autofocus speed. throughout the zoom range, ...
Instruction Manual
Page 13
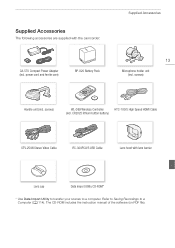
Supplied Accessories The following accessories are supplied with lens barrier Lens cap Data Import Utility CD-ROM* * Use Data Import Utility to transfer your scenes to a Computer (A 114). screws) Handle unit (incl. power cord and ferrite core) BP-820 Battery Pack Supplied Accessories 13 Microphone holder unit (incl. CR2025 lithium button battery) STV-250N Stereo Video Cable IFC-300PCU/S USB Cable Lens hood with the camcorder: CA-570 Compact Power Adapter (incl. screws) WL-D89 Wireless Controller HTC-100/S High Speed HDMI Cable (incl. The CD-ROM includes the ...
Supplied Accessories The following accessories are supplied with lens barrier Lens cap Data Import Utility CD-ROM* * Use Data Import Utility to transfer your scenes to a Computer (A 114). screws) Handle unit (incl. power cord and ferrite core) BP-820 Battery Pack Supplied Accessories 13 Microphone holder unit (incl. CR2025 lithium button battery) STV-250N Stereo Video Cable IFC-300PCU/S USB Cable Lens hood with the camcorder: CA-570 Compact Power Adapter (incl. screws) WL-D89 Wireless Controller HTC-100/S High Speed HDMI Cable (incl. The CD-ROM includes the ...

Instruction Manual
Page 14
INFO (battery information) button (A 155) Names of Parts Names of Parts Left side view 14 2 3 1 4 5 67 8 9 10 11 1 Lens barrier switch (A 40) 2 Memory card slot 2 (A 38) 3 Memory card slot 3 (A 38) 4 u (review recording) button (A 46)/ Assignable button 5 (A 97) 5 Lens hood (A 25) 6 Focus/Zoom ring (A 54, 59) 7 CUSTOM (customizable) dial (A 96) 8 CUSTOM (customizable) button (A 96) 9 INFRARED switch (A 94) 10 Double memory card slot cover 11 DISP. (onscreen display) button (A 93)/BATT.
INFO (battery information) button (A 155) Names of Parts Names of Parts Left side view 14 2 3 1 4 5 67 8 9 10 11 1 Lens barrier switch (A 40) 2 Memory card slot 2 (A 38) 3 Memory card slot 3 (A 38) 4 u (review recording) button (A 46)/ Assignable button 5 (A 97) 5 Lens hood (A 25) 6 Focus/Zoom ring (A 54, 59) 7 CUSTOM (customizable) dial (A 96) 8 CUSTOM (customizable) button (A 96) 9 INFRARED switch (A 94) 10 Double memory card slot cover 11 DISP. (onscreen display) button (A 93)/BATT.

Instruction Manual
Page 15
Right side view 1 Names of Parts 15 89 10 6 2 7 3 4 5 1 Built-in speaker (A 101) 2 MIC terminal (A 81) 3 HDMI OUT terminal (A 107, 108) 4 REMOTE terminal For connecting commercially available remote controllers. 5 HD/SD-SDI terminal (A 108) 6 × (headphones) terminal (A 89) 7 USB terminal (A 114) 8 DC IN terminal (A 21) 9 AV OUT terminal (A 107, 109) 10 Grip belt (A 27)
Right side view 1 Names of Parts 15 89 10 6 2 7 3 4 5 1 Built-in speaker (A 101) 2 MIC terminal (A 81) 3 HDMI OUT terminal (A 107, 108) 4 REMOTE terminal For connecting commercially available remote controllers. 5 HD/SD-SDI terminal (A 108) 6 × (headphones) terminal (A 89) 7 USB terminal (A 114) 8 DC IN terminal (A 21) 9 AV OUT terminal (A 107, 109) 10 Grip belt (A 27)
Instruction Manual
Page 16
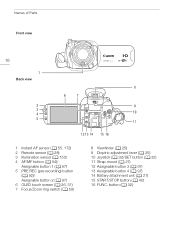
button (A 32) Names of Parts Front view 16 1 Back view 8 6 7 2 9 3 4 10 5 11 12 13 14 15 16 1 Instant AF sensor (A 55, 172) 2 Remote sensor (A 28) 3 Illumination sensor (A 150) 4 AF/MF button (A 54)/ Assignable button 1 (A 97) 5 PRE REC (pre-recording) button (A 92)/ Assignable button 2 (A 97) 6 OLED touch screen (A 26, 31) 7 Focus/Zoom ring switch (A 59) 8 Viewfinder (A 25) 9 Dioptric adjustment lever (A 25) 10 Joystick (A 32)/SET button (A 32) 11 Strap mount (A 27) 12 Assignable button 3 (A 97) 13 Assignable button 4 (A 97) 14 Battery attachment unit (A 21) 15 START/STOP ...
button (A 32) Names of Parts Front view 16 1 Back view 8 6 7 2 9 3 4 10 5 11 12 13 14 15 16 1 Instant AF sensor (A 55, 172) 2 Remote sensor (A 28) 3 Illumination sensor (A 150) 4 AF/MF button (A 54)/ Assignable button 1 (A 97) 5 PRE REC (pre-recording) button (A 92)/ Assignable button 2 (A 97) 6 OLED touch screen (A 26, 31) 7 Focus/Zoom ring switch (A 59) 8 Viewfinder (A 25) 9 Dioptric adjustment lever (A 25) 10 Joystick (A 32)/SET button (A 32) 11 Strap mount (A 27) 12 Assignable button 3 (A 97) 13 Assignable button 4 (A 97) 14 Battery attachment unit (A 21) 15 START/STOP ...

Instruction Manual
Page 17
Top view Names of Parts 1 23 45 17 2 67 1 Built-in stereo microphone (A 79) 2 Handle attachment unit (A 24) 3 Mode switch (A 31) 4 Zoom rocker (A 59) 5 ACCESS indicator (A 40) 6 Power switch (A 30) 7 POWER / CHG (battery charging) indicator (A 21)
Top view Names of Parts 1 23 45 17 2 67 1 Built-in stereo microphone (A 79) 2 Handle attachment unit (A 24) 3 Mode switch (A 31) 4 Zoom rocker (A 59) 5 ACCESS indicator (A 40) 6 Power switch (A 30) 7 POWER / CHG (battery charging) indicator (A 21)
Instruction Manual
Page 18
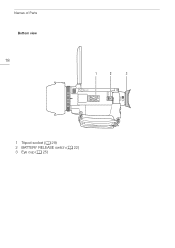
Names of Parts Bottom view 18 1 2 3 1 Tripod socket (A 29) 2 BATTERY RELEASE switch (A 22) 3 Eye cup (A 25)
Names of Parts Bottom view 18 1 2 3 1 Tripod socket (A 29) 2 BATTERY RELEASE switch (A 22) 3 Eye cup (A 25)

Instruction Manual
Page 19
Handle unit 1 Names of Parts 23 4 5 67 89 10 19 11 12 13 14 15 16 1 Microphone holder unit (A 79) 2 Microphone lock screw (A 79) 3 Accessory shoe Cold shoe for attaching accessories. 4 Handle zoom rocker (A 60) 5 START/STOP lock (C) lever (A 45) 6 START/STOP button (A 40) 7 Sensitivity switches for INPUT 1 (CH1) and INPUT 2 (CH2) (A 86) 8 INPUT terminal ON/OFF switch (A 80) 9 Audio level switches for INPUT 1 (CH1) and INPUT 2 (CH2) (A 87) 10 Audio level dials for INPUT 1 (CH1) and INPUT 2 (CH2) (A 87) 11 Microphone cable clamp (A 79) 12 INPUT 1 (CH1) and INPUT 2 (CH2) terminals (...
Handle unit 1 Names of Parts 23 4 5 67 89 10 19 11 12 13 14 15 16 1 Microphone holder unit (A 79) 2 Microphone lock screw (A 79) 3 Accessory shoe Cold shoe for attaching accessories. 4 Handle zoom rocker (A 60) 5 START/STOP lock (C) lever (A 45) 6 START/STOP button (A 40) 7 Sensitivity switches for INPUT 1 (CH1) and INPUT 2 (CH2) (A 86) 8 INPUT terminal ON/OFF switch (A 80) 9 Audio level switches for INPUT 1 (CH1) and INPUT 2 (CH2) (A 87) 10 Audio level dials for INPUT 1 (CH1) and INPUT 2 (CH2) (A 87) 11 Microphone cable clamp (A 79) 12 INPUT 1 (CH1) and INPUT 2 (CH2) terminals (...
Instruction Manual
Page 20
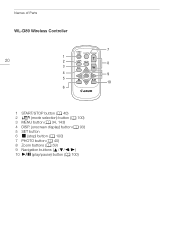
Names of Parts WL-D89 Wireless Controller 7 1 20 2 8 3 4 9 5 10 6 1 START/STOP button (A 40) 2 G (mode selection) button (A 100) 3 MENU button (A 34, 143) 4 DISP. (onscreen display) button (A 93) 5 SET button 6 Ñ (stop) button (A 100) 7 PHOTO button (A 40) 8 Zoom buttons (A 59) 9 Navigation buttons 10 Ò (play/pause) button (A 100)
Names of Parts WL-D89 Wireless Controller 7 1 20 2 8 3 4 9 5 10 6 1 START/STOP button (A 40) 2 G (mode selection) button (A 100) 3 MENU button (A 34, 143) 4 DISP. (onscreen display) button (A 93) 5 SET button 6 Ñ (stop) button (A 100) 7 PHOTO button (A 40) 8 Zoom buttons (A 59) 9 Navigation buttons 10 Ò (play/pause) button (A 100)

Instruction Manual
Page 21
DC IN terminal 4 Attach the battery pack to the camcorder. • Press the battery pack softly into a power outlet. 3 Connect the compact power adapter to the camcorder's DC IN terminal. Pass the cable through the center of the core and wrap it around the core, then close the unit until it clicks in .) from the plug end (the plug to be powered with a fully charged battery pack, refer to Charging, Recording and Playback Times (A 175). 1 Connect the power cord to the camcorder) of the compact power adapter cable. For approximate charging times and recording/playback times ...
DC IN terminal 4 Attach the battery pack to the camcorder. • Press the battery pack softly into a power outlet. 3 Connect the compact power adapter to the camcorder's DC IN terminal. Pass the cable through the center of the core and wrap it around the core, then close the unit until it clicks in .) from the plug end (the plug to be powered with a fully charged battery pack, refer to Charging, Recording and Playback Times (A 175). 1 Connect the power cord to the camcorder) of the compact power adapter cable. For approximate charging times and recording/playback times ...
