
Ultura Instruction Manual
Page 2
... radio or television reception, which the receiver is connected. • Consult the dealer or an experienced radio/TV technician for class B digital device, pursuant to comply with arrowhead symbol, within an equilateral triangle, is intended to alert the user to the presence of uninsulated "...has been tested and found to Part 15 of the FCC Rules. Canon U.S.A. Tel No. (516)328-5600 CAUTION: TO PREVENT ELECTRIC SHOCK, MATCH WIDE BLADE OF PLUG TO WIDE SLOT, FULLY INSERT. Digital Video Camcorder, ULTURA and Compact Power Adapter, CA-500A This device complies with the instructions...
... radio or television reception, which the receiver is connected. • Consult the dealer or an experienced radio/TV technician for class B digital device, pursuant to comply with arrowhead symbol, within an equilateral triangle, is intended to alert the user to the presence of uninsulated "...has been tested and found to Part 15 of the FCC Rules. Canon U.S.A. Tel No. (516)328-5600 CAUTION: TO PREVENT ELECTRIC SHOCK, MATCH WIDE BLADE OF PLUG TO WIDE SLOT, FULLY INSERT. Digital Video Camcorder, ULTURA and Compact Power Adapter, CA-500A This device complies with the instructions...
Ultura Instruction Manual
Page 3
... in this product near water or in wire to an antenna discharge unit, size of grounding conductors, location of antenna discharge unit, connection to the Canon Digital Video Camcorder ULTURA and all its accessories. Heed Warnings - The product should be cleaned only as battery power, refer to insert the plug fully into the power...
... in this product near water or in wire to an antenna discharge unit, size of grounding conductors, location of antenna discharge unit, connection to the Canon Digital Video Camcorder ULTURA and all its accessories. Heed Warnings - The product should be cleaned only as battery power, refer to insert the plug fully into the power...
Ultura Instruction Manual
Page 4
... other hazards. When installing an outside antenna system should be sure the service technician has used 16. Replacement Parts - replacement parts that are specified by Canon or that are required, be taken to technician to restore the product to lightning and power-line surges. Never push fire, electric shock or other...
... other hazards. When installing an outside antenna system should be sure the service technician has used 16. Replacement Parts - replacement parts that are specified by Canon or that are required, be taken to technician to restore the product to lightning and power-line surges. Never push fire, electric shock or other...

Ultura Instruction Manual
Page 5
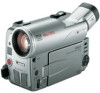
... camera. Contents Introduction Using the Various Recording Programs 41 E Important Usage Instructions 2 Using Digital Effects 45 IMPORTANT SAFETY Audio Recording 48 INSTRUCTIONS 3 Setting the Self-Timer 50 Thank you for Choosing a Canon Camcorder 6 ~ When Making Manual Adjustments ...~ Introducing the ULTURA 7 Adjusting Focus Manually 51 Mastering the Basics Adjusting Exposure Manually 53 Setting the White...
... camera. Contents Introduction Using the Various Recording Programs 41 E Important Usage Instructions 2 Using Digital Effects 45 IMPORTANT SAFETY Audio Recording 48 INSTRUCTIONS 3 Setting the Self-Timer 50 Thank you for Choosing a Canon Camcorder 6 ~ When Making Manual Adjustments ...~ Introducing the ULTURA 7 Adjusting Focus Manually 51 Mastering the Basics Adjusting Exposure Manually 53 Setting the White...

Ultura Instruction Manual
Page 6
...To get started To get the most out of the camcorder first, before moving on the camcorder itself e.g. BP-915 Battery Pack CA-500 Compact Power Adapter Lithium button battery S-150 S-video Cable STV-250 Stereo Video Digital Video Cassette Cable 6 Its following accessories: advanced technology... in addition to the contents and index) please refer to: • Finding Your Way Around ULTURA (p. 91) • Screen Displays (p. 94) • Troubleshooting - Thank you for Choosing a Canon Camcorder First, we'd like to thank you for years to come. SS-600 Shoulder Strap Lens cap...
...To get started To get the most out of the camcorder first, before moving on the camcorder itself e.g. BP-915 Battery Pack CA-500 Compact Power Adapter Lithium button battery S-150 S-video Cable STV-250 Stereo Video Digital Video Cassette Cable 6 Its following accessories: advanced technology... in addition to the contents and index) please refer to: • Finding Your Way Around ULTURA (p. 91) • Screen Displays (p. 94) • Troubleshooting - Thank you for Choosing a Canon Camcorder First, we'd like to thank you for years to come. SS-600 Shoulder Strap Lens cap...

Ultura Instruction Manual
Page 7
... easy for even more camcorder that conforms to IEEE 1394. PCM Digital Sound DV Terminal (IEEE 1394) ULTURA is equipped with unparalleled optical quality. with a DV terminal that conforms flexible than automatic to the new digital video functions, Canon's D standard to give... innovative FlexiZone you to 16× telephoto - Photo mode The ULTURA has the technology to use a video camera. Internal charging ULTURA charges a battery pack internally, smoothing the ...
... easy for even more camcorder that conforms to IEEE 1394. PCM Digital Sound DV Terminal (IEEE 1394) ULTURA is equipped with unparalleled optical quality. with a DV terminal that conforms flexible than automatic to the new digital video functions, Canon's D standard to give... innovative FlexiZone you to 16× telephoto - Photo mode The ULTURA has the technology to use a video camera. Internal charging ULTURA charges a battery pack internally, smoothing the ...
Ultura Instruction Manual
Page 8
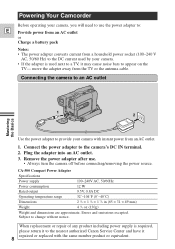
Powering Your Camcorder Before operating your camera, you will need to use . • Always turn the camera off before connecting/removing the power source. Connect the power adapter ... outlet Mastering the Basics 1 2 Use the power adapter to provide your camera. • If the adapter is required, please return it to the nearest authorized Canon Service Center and have it may cause noise bars to a TV, it 8 repaired or replaced with instant power from the TV or the antenna cable.
Powering Your Camcorder Before operating your camera, you will need to use . • Always turn the camera off before connecting/removing the power source. Connect the power adapter ... outlet Mastering the Basics 1 2 Use the power adapter to provide your camera. • If the adapter is required, please return it to the nearest authorized Canon Service Center and have it may cause noise bars to a TV, it 8 repaired or replaced with instant power from the TV or the antenna cable.

Ultura Instruction Manual
Page 9
However, you must charge the battery pack fully if you want it to show that charging is working properly. Open the battery cover and insert the battery into the camera. • Insert the battery in the direction of the arrow until it left . • Always turn the camera off in stop mode during VCR mode, or the power is set to the camera. 3. Plug the adapter into an AC outlet. • The charge indicator flashes red to power the camera for more than 50% charged. Note: • You can find detailed notes for you charge the battery pack. 2. These notes include charging and ...
However, you must charge the battery pack fully if you want it to show that charging is working properly. Open the battery cover and insert the battery into the camera. • Insert the battery in the direction of the arrow until it left . • Always turn the camera off in stop mode during VCR mode, or the power is set to the camera. 3. Plug the adapter into an AC outlet. • The charge indicator flashes red to power the camera for more than 50% charged. Note: • You can find detailed notes for you charge the battery pack. 2. These notes include charging and ...

Ultura Instruction Manual
Page 10
Loading a Cassette E OPEN PUSH CLOSE THIS FIRST. Slide the OPEN button to open . 3. Press the EJECT I button and wait for the cassette compartment to release the cover (the camera's grip). • Pull the cover fully open . 4. Click the cover back into place. * D is a trade mark Notes: • After loading a cassette, use record search (p. 40) to find the point where you have inserted a power source. 2. EJECT Mastering the Basics Only use - Load or unload the cassette. • Insert the cassette gently with the D logo.* Loading and unloading 1. Press the P mark on the ...
Loading a Cassette E OPEN PUSH CLOSE THIS FIRST. Slide the OPEN button to open . 3. Press the EJECT I button and wait for the cassette compartment to release the cover (the camera's grip). • Pull the cover fully open . 4. Click the cover back into place. * D is a trade mark Notes: • After loading a cassette, use record search (p. 40) to find the point where you have inserted a power source. 2. EJECT Mastering the Basics Only use - Load or unload the cassette. • Insert the cassette gently with the D logo.* Loading and unloading 1. Press the P mark on the ...
Ultura Instruction Manual
Page 11
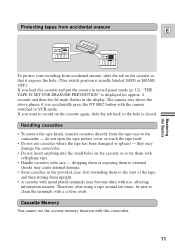
they may damage the camcorder. • Do not insert anything into the small holes on the cassette or cover them upright. • A cassette with metal plated terminals ... clean the terminals with this cassette and put the camera in the display. The camera also shows the above phrase if you load this camcorder. 11 If you want to record on the cassette so that it exposes the hole. (This switch position is usually labeled SAVE or.... Protecting tapes from accidental erasure E Mastering the Basics REC SAVE REC SAVE To protect your recording from the tape case to the camcorder -
they may damage the camcorder. • Do not insert anything into the small holes on the cassette or cover them upright. • A cassette with metal plated terminals ... clean the terminals with this cassette and put the camera in the display. The camera also shows the above phrase if you load this camcorder. 11 If you want to record on the cassette so that it exposes the hole. (This switch position is usually labeled SAVE or.... Protecting tapes from accidental erasure E Mastering the Basics REC SAVE REC SAVE To protect your recording from the tape case to the camcorder -
Ultura Instruction Manual
Page 12
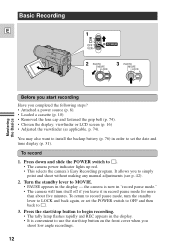
To record 1. It allows you leave it in the display - You may also want to install the backup battery (p. 76) in order to set the POWER switch to OFF and then back to [. 3. the camera is convenient to LOCK and back again, or set the date and time display (p. 31). Press down and slide the POWER switch to simply point and shoot without making any manual adjustments (see p. 42). 2. To return to record pause mode, turn itself off if you to [. • The camera power indicator lights up red. • This selects the camera's Easy Recording program. Press the start/stop button ...
To record 1. It allows you leave it in the display - You may also want to install the backup battery (p. 76) in order to set the POWER switch to OFF and then back to [. 3. the camera is convenient to LOCK and back again, or set the date and time display (p. 31). Press down and slide the POWER switch to simply point and shoot without making any manual adjustments (see p. 42). 2. To return to record pause mode, turn itself off if you to [. • The camera power indicator lights up red. • This selects the camera's Easy Recording program. Press the start/stop button ...

Ultura Instruction Manual
Page 13
... is recording correctly, make a test recording first. • Before making important recordings, clean the video heads using a Canon DVM-CL Digital Video Head Cleaning Cassette or a commercially available digital video head cleaning cassette. • To close -up recording, or when recording through glass. 4. Turn the standby lever...other recording programs. Slide the POWER switch to the Q position to give you access to these recording programs (p. 41) and also to the digital effects (p. 45). • To check that the camera is set REC MODE in the E display. • You can use the ...
... is recording correctly, make a test recording first. • Before making important recordings, clean the video heads using a Canon DVM-CL Digital Video Head Cleaning Cassette or a commercially available digital video head cleaning cassette. • To close -up recording, or when recording through glass. 4. Turn the standby lever...other recording programs. Slide the POWER switch to the Q position to give you access to these recording programs (p. 41) and also to the digital effects (p. 45). • To check that the camera is set REC MODE in the E display. • You can use the ...

Ultura Instruction Manual
Page 14
... may affect recording. Mastering the Basics 14 Changing the recording mode (SP/LP) E You can record and play back a tape in LP mode on other digital equipment may produce mosaiclike noise and the sound may become distorted during playback and the time code may not be distorted during playback of the... menus, refer to LP mode, select REC MODE from the camera or VCR menu, select LP and then close the menu (for instructions on this camcorder, and vice versa. LP extends tape usage by 1.5 times. Mosaic-like noise may appear in the image and the sound may be written correctly. •...
... may affect recording. Mastering the Basics 14 Changing the recording mode (SP/LP) E You can record and play back a tape in LP mode on other digital equipment may produce mosaiclike noise and the sound may become distorted during playback and the time code may not be distorted during playback of the... menus, refer to LP mode, select REC MODE from the camera or VCR menu, select LP and then close the menu (for instructions on this camcorder, and vice versa. LP extends tape usage by 1.5 times. Mosaic-like noise may appear in the image and the sound may be written correctly. •...
Ultura Instruction Manual
Page 15
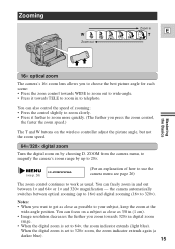
... switches between 1× and 64× or 1× and 320× magnification - When the digital zoom is set to 320× zoom, the zoom indicator extends again (a darker blue). 15 Zooming...further to zoom more quickly. (The further you zoom towards TELE to zoom in digital zoom range. • When the digital zoom is set to 64×, the zoom indicator extends (light blue). Notes...wireless controller adjust the picture angle, but not the zoom speed. 64×/320× digital zoom Turn the digital zoom on a subject as close as usual. You can freely zoom in and out between...
... switches between 1× and 64× or 1× and 320× magnification - When the digital zoom is set to 320× zoom, the zoom indicator extends again (a darker blue). 15 Zooming...further to zoom more quickly. (The further you zoom towards TELE to zoom in digital zoom range. • When the digital zoom is set to 64×, the zoom indicator extends (light blue). Notes...wireless controller adjust the picture angle, but not the zoom speed. 64×/320× digital zoom Turn the digital zoom on a subject as close as usual. You can freely zoom in and out between...

Ultura Instruction Manual
Page 16
When the LCD screen is closed with its screen side facing up, the LCD screen remains on . In this camcorder is not a malfunction of the LCD screen and they are not recorded on instead. Notes: • Avoid touching the LCD screen when moving the LCD ...
When the LCD screen is closed with its screen side facing up, the LCD screen remains on . In this camcorder is not a malfunction of the LCD screen and they are not recorded on instead. Notes: • Avoid touching the LCD screen when moving the LCD ...
Ultura Instruction Manual
Page 17
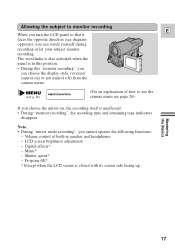
... recording", you can watch yourself during recording or let your subject monitor recording. Note: • During "mirror mode recording", you cannot operate the following functions; - Digital effects* - Menu* -
... recording", you can watch yourself during recording or let your subject monitor recording. Note: • During "mirror mode recording", you cannot operate the following functions; - Digital effects* - Menu* -

Ultura Instruction Manual
Page 18
... bar appears in the display to camera mode or when you adjusted for the built-in the viewfinder. Mastering the Basics Built-in speaker The camcorder has a built-in speaker so you can also adjust the headphones volume separately from the built-in speaker. • The levels you use headphones. 18...
... bar appears in the display to camera mode or when you adjusted for the built-in the viewfinder. Mastering the Basics Built-in speaker The camcorder has a built-in speaker so you can also adjust the headphones volume separately from the built-in speaker. • The levels you use headphones. 18...

Ultura Instruction Manual
Page 19
... lights up . • When the LCD screen is closed with its screen side facing inwards, you can monitor the playback using a Canon DVM-CL Digital Video Head Cleaning Cassette or a commercially available digital video head cleaning cassette. 19 E REW PLAY FF - / STOP + / PAUSE SLOW × 2 Mastering the Basics You can use the wireless...
... lights up . • When the LCD screen is closed with its screen side facing inwards, you can monitor the playback using a Canon DVM-CL Digital Video Head Cleaning Cassette or a commercially available digital video head cleaning cassette. 19 E REW PLAY FF - / STOP + / PAUSE SLOW × 2 Mastering the Basics You can use the wireless...
Ultura Instruction Manual
Page 20
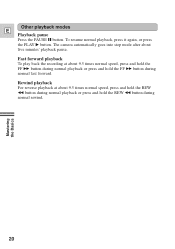
Rewind playback For reverse playback at about 9.5 times normal speed, press and hold the FF 1 button during normal playback or press and hold the REW ` button during normal fast forward. Mastering the Basics Other playback modes E Playback pause Press the PAUSE a button. To resume normal playback, press it again, or press the PLAY e button. The camera automatically goes into stop mode after about 9.5 times normal speed, press and hold the REW ` button during normal playback or press and hold the FF 1 button during normal rewind. 20 Fast forward playback To play back the recording ...
Rewind playback For reverse playback at about 9.5 times normal speed, press and hold the FF 1 button during normal playback or press and hold the REW ` button during normal fast forward. Mastering the Basics Other playback modes E Playback pause Press the PAUSE a button. To resume normal playback, press it again, or press the PLAY e button. The camera automatically goes into stop mode after about 9.5 times normal speed, press and hold the REW ` button during normal playback or press and hold the FF 1 button during normal rewind. 20 Fast forward playback To play back the recording ...
Ultura Instruction Manual
Page 21
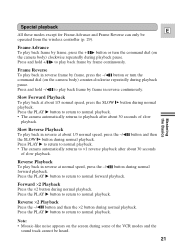
Reverse Playback To play back in reverse at normal speed, press the -/4a button during some of the VCR modes and the sound track cannot be operated from the wireless controller (p. 29). Press the PLAY e button to return to normal forward playback. Note: • Mosaic-like noise appears on the screen during normal forward playback. Reverse ×2 Playback Press the -/4a button and then the ×2 button during normal playback. Slow Reverse Playback To play back in reverse frame by frame in reverse at about 1/5 normal speed, press the -/4a button and then the SLOW M ...
Reverse Playback To play back in reverse at normal speed, press the -/4a button during some of the VCR modes and the sound track cannot be operated from the wireless controller (p. 29). Press the PLAY e button to return to normal forward playback. Note: • Mosaic-like noise appears on the screen during normal forward playback. Reverse ×2 Playback Press the -/4a button and then the ×2 button during normal playback. Slow Reverse Playback To play back in reverse frame by frame in reverse at about 1/5 normal speed, press the -/4a button and then the SLOW M ...