User Guide
Page 2
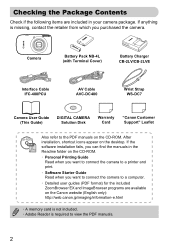
...) Battery Charger CB-2LV/CB-2LVE Interface Cable IFC-400PCU AV Cable AVC-DC400 Wrist Strap WS-DC7 Camera User Guide (This Guide) DIGITAL CAMERA Solution Disk Warranty Card "Canon Customer Support" Leaflet Also refer to the PDF manuals on the desktop. If the software installation fails, you can find the manuals in your camera package. Checking the Package Contents Check if the following items are available on the Canon website (English only...
...) Battery Charger CB-2LV/CB-2LVE Interface Cable IFC-400PCU AV Cable AVC-DC400 Wrist Strap WS-DC7 Camera User Guide (This Guide) DIGITAL CAMERA Solution Disk Warranty Card "Canon Customer Support" Leaflet Also refer to the PDF manuals on the desktop. If the software installation fails, you can find the manuals in your camera package. Checking the Package Contents Check if the following items are available on the Canon website (English only...

User Guide
Page 4
...; Focus on faces 24, 64, 80 ● Shoot in places where I cannot use the flash (turn off the flash) 59 ● Shoot pictures with me in them too (self-timer 63, 64 ● Insert the date and time into my shots 62 ● Take close-up pictures of subjects (macro shooting 68 ● Take close-up pictures of subjects using the zoom (digital macro shooting 69 ● Take sepia toned or black and white pictures 75 ● Change the size...
...; Focus on faces 24, 64, 80 ● Shoot in places where I cannot use the flash (turn off the flash) 59 ● Shoot pictures with me in them too (self-timer 63, 64 ● Insert the date and time into my shots 62 ● Take close-up pictures of subjects (macro shooting 68 ● Take close-up pictures of subjects using the zoom (digital macro shooting 69 ● Take sepia toned or black and white pictures 75 ● Change the size...

User Guide
Page 6
... used functions of this Guide ........8 Safety Precautions 9 1 Getting Started 13 Charging the Battery 14 Inserting the Battery and Memory Card 16 Setting the Date and Time 19 Setting the Display Language..........21 Formatting Memory Cards 22 Pressing the Shutter Button 23 A Taking Pictures 24 1 Viewing Images 27 Erasing Images 29 Printing Images 30 E Shooting Movies 32 1 Viewing Movies 34 Transferring Images to a Computer.35 Accessories 38 Separately Sold Accessories ...........40 2 Learning More 41 Components Guide 42 Information Displayed on Close Subjects (Digital Macro...
... used functions of this Guide ........8 Safety Precautions 9 1 Getting Started 13 Charging the Battery 14 Inserting the Battery and Memory Card 16 Setting the Date and Time 19 Setting the Display Language..........21 Formatting Memory Cards 22 Pressing the Shutter Button 23 A Taking Pictures 24 1 Viewing Images 27 Erasing Images 29 Printing Images 30 E Shooting Movies 32 1 Viewing Movies 34 Transferring Images to a Computer.35 Accessories 38 Separately Sold Accessories ...........40 2 Learning More 41 Components Guide 42 Information Displayed on Close Subjects (Digital Macro...

User Guide
Page 7
...87 Changing the Color and Shooting... 88 L Shooting Stitch Assist Images . 90 6 Using Various Functions for Printing (DPOF 121 7 Viewing Slideshows 101 Checking the Focus 103 k Magnifying Images 104 + Changing Image Transitions..... 104 Viewing Images on a TV 105 Viewing Images on a High-Definition TV 106 / Erasing All Images 107 : Protecting Images 110 ; Adding Effects with the FE Lock ........ 84 ... Table of Contents Changing the ISO Speed 72 Adjusting the White Balance 73 Adjusting the Brightness (Exposure Compensation) ........ 74 W Continuous Shooting 74 Changing the...
...87 Changing the Color and Shooting... 88 L Shooting Stitch Assist Images . 90 6 Using Various Functions for Printing (DPOF 121 7 Viewing Slideshows 101 Checking the Focus 103 k Magnifying Images 104 + Changing Image Transitions..... 104 Viewing Images on a TV 105 Viewing Images on a High-Definition TV 106 / Erasing All Images 107 : Protecting Images 110 ; Adding Effects with the FE Lock ........ 84 ... Table of Contents Changing the ISO Speed 72 Adjusting the White Balance 73 Adjusting the Brightness (Exposure Compensation) ........ 74 W Continuous Shooting 74 Changing the...
User Guide
Page 15
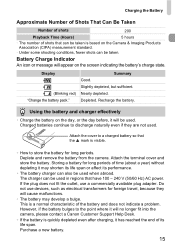
... affect its life span. Depleted. Deplete and remove the battery from the camera. If the plug does not fit the outlet, use devices, such as electrical transformers for long periods. Attach the terminal cover and store the battery. Nearly depleted. Purchase a new battery. 15 Charged batteries continue to a charged battery so that have 100 - 240 V (50/60 Hz) AC power. Display (Blinking red) "Change the battery pack."
... affect its life span. Depleted. Deplete and remove the battery from the camera. If the plug does not fit the outlet, use devices, such as electrical transformers for long periods. Attach the terminal cover and store the battery. Nearly depleted. Purchase a new battery. 15 Charged batteries continue to a charged battery so that have 100 - 240 V (50/60 Hz) AC power. Display (Blinking red) "Change the battery pack."

User Guide
Page 21
.... Set the display language. ● Press the opqr buttons or turn the  dial to remove the clock and repeat Step 2. Once the display language has been set, the language menu will display if too much time passes between pressing the m button and the n button in the LCD monitor menus and messages. What if the clock appears when the m button is pressed? You can change the display language by pressing the n button...
.... Set the display language. ● Press the opqr buttons or turn the  dial to remove the clock and repeat Step 2. Once the display language has been set, the language menu will display if too much time passes between pressing the m button and the n button in the LCD monitor menus and messages. What if the clock appears when the m button is pressed? You can change the display language by pressing the n button...

User Guide
Page 35
... or more Viewing movies 1 GB or more USB Canon Utilities ZoomBrowser EX: 200 MB or more PhotoStitch: 40 MB or more 1,024 × 768 pixels or higher Items to a computer. System Requirements Even though these are recommended system requirements, not all computer functions can use the included software to transfer your camera images to Prepare • Camera and computer • DIGITAL CAMERA Solution Disk supplied with...
... or more Viewing movies 1 GB or more USB Canon Utilities ZoomBrowser EX: 200 MB or more PhotoStitch: 40 MB or more 1,024 × 768 pixels or higher Items to a computer. System Requirements Even though these are recommended system requirements, not all computer functions can use the included software to transfer your camera images to Prepare • Camera and computer • DIGITAL CAMERA Solution Disk supplied with...

User Guide
Page 36
... the user guide provided with the installation. For connection details, refer to the computer. ● Turn off the camera. ● Open the cover, and insert the cable's small plug into the camera terminal in the computer's CD-ROM drive. Begin installation. ● Click [Easy Installation] and follow the onscreen instructions to a Computer Preparations Windows XP and Mac OS X (v10.4) are used for these explanations. Windows Place the DIGITAL CAMERA Solution Disk...
... the user guide provided with the installation. For connection details, refer to the computer. ● Turn off the camera. ● Open the cover, and insert the cable's small plug into the camera terminal in the computer's CD-ROM drive. Begin installation. ● Click [Easy Installation] and follow the onscreen instructions to a Computer Preparations Windows XP and Mac OS X (v10.4) are used for these explanations. Windows Place the DIGITAL CAMERA Solution Disk...

User Guide
Page 43
Shooting mode Lens extended 1 Playback mode Lens retracted 1 Turning the Camera Off 43 Components Guide Screen (LCD Monitor) (p. 44) Indicator (p. 46) 1 (Playback) Button (pp. 27, 134) HDMI Out Mini Terminal A/V OUT (Audio/Video Output) and DIGITAL Terminal n Button (p. 48) Q (Self-Timer) (pp. 63, 64, 76, 77)/ o Button e (Macro) (p. 68)/u (Infinity) (p. 67)/ q Button m FUNC./SET (Function/Set) Button (p. 47) h (Flash) (p. 67)/ r Button l (Display) Button (pp. 44, 45)/ p Button Control Dial (p. 43) Control Dial Turning the control dial allows you can use it to playback mode, a ...
Shooting mode Lens extended 1 Playback mode Lens retracted 1 Turning the Camera Off 43 Components Guide Screen (LCD Monitor) (p. 44) Indicator (p. 46) 1 (Playback) Button (pp. 27, 134) HDMI Out Mini Terminal A/V OUT (Audio/Video Output) and DIGITAL Terminal n Button (p. 48) Q (Self-Timer) (pp. 63, 64, 76, 77)/ o Button e (Macro) (p. 68)/u (Infinity) (p. 67)/ q Button m FUNC./SET (Function/Set) Button (p. 47) h (Flash) (p. 67)/ r Button l (Display) Button (pp. 44, 45)/ p Button Control Dial (p. 43) Control Dial Turning the control dial allows you can use it to playback mode, a ...
User Guide
Page 46
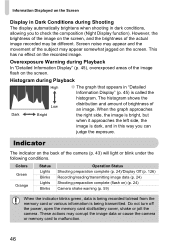
... the memory card or various information is called the histogram. Indicator The indicator on the screen, and the brightness of Low an image. Information Displayed on the Screen Display in Dark Conditions during Shooting The display automatically brightens when shooting in this way you to check the composition (Night Display function). Colors Green Orange Status Lights Blinks Lights Blinks Operation Status Shooting preparation complete (p. 24)/Display Off (p. 126) Recording/reading/transmitting image data (p. 24) Shooting preparation complete (flash...
... the memory card or various information is called the histogram. Indicator The indicator on the screen, and the brightness of Low an image. Information Displayed on the Screen Display in Dark Conditions during Shooting The display automatically brightens when shooting in this way you to check the composition (Night Display function). Colors Green Orange Status Lights Blinks Lights Blinks Operation Status Shooting preparation complete (p. 24)/Display Off (p. 126) Recording/reading/transmitting image data (p. 24) Shooting preparation complete (flash...

User Guide
Page 61
... n button will restore the shooting screen. Zooming in More Closely on Subjects (Digital Zoom) Digital Tele-Converter The focal length of the lens can be increased by itself at a recording pixel setting of , or will cause image deterioration (the zoom factor will display in blue). • Using [2.0x] at the same zoom factor. This enables a faster shutter speed and less chance of 1.5x or 2.0x. The view will...
... n button will restore the shooting screen. Zooming in More Closely on Subjects (Digital Zoom) Digital Tele-Converter The focal length of the lens can be increased by itself at a recording pixel setting of , or will cause image deterioration (the zoom factor will display in blue). • Using [2.0x] at the same zoom factor. This enables a faster shutter speed and less chance of 1.5x or 2.0x. The view will...
User Guide
Page 94
... Playback (p. 100) • . Viewing Slideshows (p. 101) • + Changing Image Transitions (p. 104) • Viewing Images on Subjects (Digital Zoom) (p. 60) You can be used . The sound of the zoom will be recorded. • Ò Using the Self-Timer (p. 63)* • e Shooting Close-ups (Macro) (p. 68)* • u Shooting Far Away Subjects (Infinity) (p. 67)* • Adjusting the White Balance (p. 73) • Changing the Tone of an Image (My Colors) (p. 75) • Î Shooting Using the Two Second Self-Timer (p. 76)* • Shooting Using...
... Playback (p. 100) • . Viewing Slideshows (p. 101) • + Changing Image Transitions (p. 104) • Viewing Images on Subjects (Digital Zoom) (p. 60) You can be used . The sound of the zoom will be recorded. • Ò Using the Self-Timer (p. 63)* • e Shooting Close-ups (Macro) (p. 68)* • u Shooting Far Away Subjects (Infinity) (p. 67)* • Adjusting the White Balance (p. 73) • Changing the Tone of an Image (My Colors) (p. 75) • Î Shooting Using the Two Second Self-Timer (p. 76)* • Shooting Using...

User Guide
Page 119
... image and display. ● Press the opqr buttons, or turn the  dial, select the image. ● You can zoom the image using the procedures in "k Magnifying Images" (p. 104). Select [Red-Eye Correction]. ● Press the n button, select the 1 tab and [Red-Eye Correction], then press the m button. ] Correcting the Red-Eye Effect You can automatically correct red eyes in images and save them as a new file. ● Display the new image using the operation in...
... image and display. ● Press the opqr buttons, or turn the  dial, select the image. ● You can zoom the image using the procedures in "k Magnifying Images" (p. 104). Select [Red-Eye Correction]. ● Press the n button, select the 1 tab and [Red-Eye Correction], then press the m button. ] Correcting the Red-Eye Effect You can automatically correct red eyes in images and save them as a new file. ● Display the new image using the operation in...
User Guide
Page 130
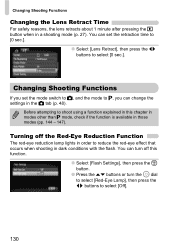
... flash. You can set the mode switch to 4, and the mode to select [Off]. 130 You can turn the  dial to select [Red-Eye Lamp], then press the qr buttons to G, you set the retraction time to [0 sec.]. ● Select [Lens Retract], then press the qr buttons to reduce the red-eye effect that occurs when shooting in those modes (pp. 144 - 147). Changing Shooting Functions If you can change...
... flash. You can set the mode switch to 4, and the mode to select [Off]. 130 You can turn the  dial to select [Red-Eye Lamp], then press the qr buttons to G, you set the retraction time to [0 sec.]. ● Select [Lens Retract], then press the qr buttons to reduce the red-eye effect that occurs when shooting in those modes (pp. 144 - 147). Changing Shooting Functions If you can change...
User Guide
Page 133
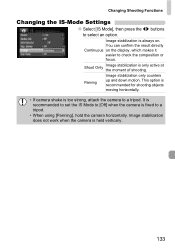
... result directly Continuous on . Image stabilization does not work when the camera is only active at the moment of shooting. Image stabilization is always on the display, which makes it easier to select an option. Panning Image stabilization only counters up and down motion. Changing Shooting Functions Changing the IS-Mode Settings ● Select [IS Mode], then press the qr buttons to check the composition or focus. Shoot Only Image stabilization...
... result directly Continuous on . Image stabilization does not work when the camera is only active at the moment of shooting. Image stabilization is always on the display, which makes it easier to select an option. Panning Image stabilization only counters up and down motion. Changing Shooting Functions Changing the IS-Mode Settings ● Select [IS Mode], then press the qr buttons to check the composition or focus. Shoot Only Image stabilization...

User Guide
Page 139
... the battery several times. Battery is on . Shooting Cannot shoot. • Set the mode switch to powerful light sources, the display may darken. • Under fluorescent lighting, the screen may flicker. • When shooting bright light sources, a bar of light (purplish red) may appear on the included customer support list. appears when the shutter button was pressed halfway (p. 59). • Set [IS Mode] to [Continuous] (p. 133). • Set the flash to h (p. 67). • Increase the ISO speed...
... the battery several times. Battery is on . Shooting Cannot shoot. • Set the mode switch to powerful light sources, the display may darken. • Under fluorescent lighting, the screen may flicker. • When shooting bright light sources, a bar of light (purplish red) may appear on the included customer support list. appears when the shutter button was pressed halfway (p. 59). • Set [IS Mode] to [Continuous] (p. 133). • Set the flash to h (p. 67). • Increase the ISO speed...
User Guide
Page 141
... can use a memory card capable of recording at high speeds. Camera's internal memory was actually shot (p. 33). displayed on a computer with insufficient system resources. 141 Troubleshooting Recording images to the memory card takes a long time, or continuous shooting slows down. • Perform a low-level format of recording at high speeds. Even when the shooting time does not display properly, the video recorded will be able to play back images or movies. • If the file name or folder structure is changed on the shooting mode...
... can use a memory card capable of recording at high speeds. Camera's internal memory was actually shot (p. 33). displayed on a computer with insufficient system resources. 141 Troubleshooting Recording images to the memory card takes a long time, or continuous shooting slows down. • Perform a low-level format of recording at high speeds. Even when the shooting time does not display properly, the video recorded will be able to play back images or movies. • If the file name or folder structure is changed on the shooting mode...

User Guide
Page 143
... the memory card into the printer's card slot to [Auto Reset] (p. 128) or format the memory card (p. 22). Reduce the number of settings and try again (p. 121). Use a commercially available USB card reader to print settings. Press the power button to turn the camera off and back on the memory card. Please tilt camera gently! • The camera was after taking a picture, the shot may not have been recorded. If this error code reappears, note the number and contact your Canon Customer Support Help...
... the memory card into the printer's card slot to [Auto Reset] (p. 128) or format the memory card (p. 22). Reduce the number of settings and try again (p. 121). Use a commercially available USB card reader to print settings. Press the power button to turn the camera off and back on the memory card. Please tilt camera gently! • The camera was after taking a picture, the shot may not have been recorded. If this error code reappears, note the number and contact your Canon Customer Support Help...

User Guide
Page 154
... Cable 2, 105 B Battery Battery Charger 2, 14, 40 Charge Indicator 15 Charging 14 Date/Time Battery 20 Power Saving 53 Beach (Scene Mode 57 Black and White Images 75 C Camera Default Settings 51 Holding 13 Camera Shake 59, 133 Clock Functions 53 Color Accent (Scene Mode 88, 92 Color Swap (Scene Mode 89, 92 Components Guide 42 Compression Ratio Image Quality (Compression Ratio) Continuous Shooting 74 Control Dial 8, 43 D Date and Time Adding to Image 62 Changing 20 Date/Time Battery 20 Setting 19 154 Date/Time Date and Time Default Settings 51 DIGITAL CAMERA Solution Disk...
... Cable 2, 105 B Battery Battery Charger 2, 14, 40 Charge Indicator 15 Charging 14 Date/Time Battery 20 Power Saving 53 Beach (Scene Mode 57 Black and White Images 75 C Camera Default Settings 51 Holding 13 Camera Shake 59, 133 Clock Functions 53 Color Accent (Scene Mode 88, 92 Color Swap (Scene Mode 89, 92 Components Guide 42 Compression Ratio Image Quality (Compression Ratio) Continuous Shooting 74 Control Dial 8, 43 D Date and Time Adding to Image 62 Changing 20 Date/Time Battery 20 Setting 19 154 Date/Time Date and Time Default Settings 51 DIGITAL CAMERA Solution Disk...
User Guide
Page 156
... Switching the Display 44, 45 SD/SDHC Card Memory Card Self-Timer 10 second Self-Timer 63 Changing Delay and Number of Shots 77 Face Self-Timer 64 Two Second Self-Timer 76 Sepia Tones 75 Servo AF 82 Shooting Date and Time Date and Time Shooting Using a TV Monitor 78 Shooting With Macro 68 Shutter Button 23 Slideshow 101 Snow (Scene Mode 58 Software DIGITAL CAMERA Solution Disk 2, 35 Transferring Images to a Computer ...... 35 sound 49 Stitch Assist (Scene Mode 90 Strap 2, 13 Sunset (Scene Mode 57 Supplementary Flash...
... Switching the Display 44, 45 SD/SDHC Card Memory Card Self-Timer 10 second Self-Timer 63 Changing Delay and Number of Shots 77 Face Self-Timer 64 Two Second Self-Timer 76 Sepia Tones 75 Servo AF 82 Shooting Date and Time Date and Time Shooting Using a TV Monitor 78 Shooting With Macro 68 Shutter Button 23 Slideshow 101 Snow (Scene Mode 58 Software DIGITAL CAMERA Solution Disk 2, 35 Transferring Images to a Computer ...... 35 sound 49 Stitch Assist (Scene Mode 90 Strap 2, 13 Sunset (Scene Mode 57 Supplementary Flash...


