
PowerShot Pro90IS Camera User Guide
Page 3
...Components Guide 10 Front View 10 Back View 11 Controls 12 Main Dial / Mode Dial 13 Display Panel 15 Viewfinder / LCD Monitor 16 Preparing the Camera 19 Charging the Battery Pack 19 Installing the Battery Pack 21 Using a Household Power Source 23 Using a Charge Adapter / Car Battery Cable Kit (...Optional 24 Installing a CF Card 27 Attaching the Strap 29 Attaching the Lens Cap 29 Using the Semi-Hard Case (Optional 30 Basic Functions 31 Turning the Power On / Off 31 Setting the Date / Time 32 Switching ...
...Components Guide 10 Front View 10 Back View 11 Controls 12 Main Dial / Mode Dial 13 Display Panel 15 Viewfinder / LCD Monitor 16 Preparing the Camera 19 Charging the Battery Pack 19 Installing the Battery Pack 21 Using a Household Power Source 23 Using a Charge Adapter / Car Battery Cable Kit (...Optional 24 Installing a CF Card 27 Attaching the Strap 29 Attaching the Lens Cap 29 Using the Semi-Hard Case (Optional 30 Basic Functions 31 Turning the Power On / Off 31 Setting the Date / Time 32 Switching ...

PowerShot Pro90IS Camera User Guide
Page 5
...97 Resetting the Print Settings 99 List of Messages 127 Specifications 129 Index 134 Canon Customer Support 137 Icon Conventions in the Text This mark denotes topics about the camera and photography. This mark denotes tips about issues that complement the basic operating ... Controller 106 Installing the Battery 106 Shooting / Replaying 107 Using an Externally Mounted Flash (Optional 108 Using a Lens (Optional) / Lens Hood (Optional 110 Attaching a Lens / Lens Hood 111 Downloading Images to a Computer 112 Downloading Directly from a CF Card 112 Using the Supplied Interface Cables...
...97 Resetting the Print Settings 99 List of Messages 127 Specifications 129 Index 134 Canon Customer Support 137 Icon Conventions in the Text This mark denotes topics about the camera and photography. This mark denotes tips about issues that complement the basic operating ... Controller 106 Installing the Battery 106 Shooting / Replaying 107 Using an Externally Mounted Flash (Optional 108 Using a Lens (Optional) / Lens Hood (Optional 110 Attaching a Lens / Lens Hood 111 Downloading Images to a Computer 112 Downloading Directly from a CF Card 112 Using the Supplied Interface Cables...
PowerShot Pro90IS Camera User Guide
Page 9
...8226; Avoid using, placing or storing the equipment in places subject to bang the camera or subject it from the bag. Storage in close -up lens. Preventing Malfunctions Avoid Strong Magnetic Fields Never place the camera in such areas could lead to fire, electrical shock or other damage. •.... • If your hands may cause condensation (water droplets) to form on the separately sold wide converter lens or close proximity to charge the battery pack or power the camera. • Do not store the equipment in fire, burns or other equipment generating strong electromagnetic fields.
...8226; Avoid using, placing or storing the equipment in places subject to bang the camera or subject it from the bag. Storage in close -up lens. Preventing Malfunctions Avoid Strong Magnetic Fields Never place the camera in such areas could lead to fire, electrical shock or other damage. •.... • If your hands may cause condensation (water droplets) to form on the separately sold wide converter lens or close proximity to charge the battery pack or power the camera. • Do not store the equipment in fire, burns or other equipment generating strong electromagnetic fields.

PowerShot Pro90IS Camera User Guide
Page 10
...). Quick Start Battery Lock 1 Install the battery. After charging, detach the compact power adapter's DC plug from the Orange camera (p. 19). Open the CF card slot and insert a CF card (p. 27). 4 Remove the lens cap. Turn the main dial (lower dial) to remove it. 5 Turn the power on the back panel stops...
...). Quick Start Battery Lock 1 Install the battery. After charging, detach the compact power adapter's DC plug from the Orange camera (p. 19). Open the CF card slot and insert a CF card (p. 27). 4 Remove the lens cap. Turn the main dial (lower dial) to remove it. 5 Turn the power on the back panel stops...

PowerShot Pro90IS Camera User Guide
Page 12
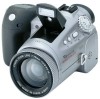
...) Main Dial (p. 13) (Image Stabilizer) Switch (p. 37) (Manual Focus) button (p. 74) (Flash) Button (p. 44) Speaker Terminal Cover Strap Eyelet (p. 29) Microphone Lens Lens Accessory Mounting Thread (p. 111) Zoom Ring (p. 43) DIGITAL (Digital) Terminal* (pp. 118, 119) A/V OUT (Audio/Video Out) Terminal (p. 105) DC IN Terminal ...(p. 19) * To connect the camera to the computer with the USB interface, attach the supplied USB cable to a serial port, the separately sold serial cable (IFC-200PCS for Windows...
...) Main Dial (p. 13) (Image Stabilizer) Switch (p. 37) (Manual Focus) button (p. 74) (Flash) Button (p. 44) Speaker Terminal Cover Strap Eyelet (p. 29) Microphone Lens Lens Accessory Mounting Thread (p. 111) Zoom Ring (p. 43) DIGITAL (Digital) Terminal* (pp. 118, 119) A/V OUT (Audio/Video Out) Terminal (p. 105) DC IN Terminal ...(p. 19) * To connect the camera to the computer with the USB interface, attach the supplied USB cable to a serial port, the separately sold serial cable (IFC-200PCS for Windows...

PowerShot Pro90IS Camera User Guide
Page 18
...turns on when it assumes the last mode. • The LCD monitor will appear at the center of the camera) (p. 35). 16 Components Guide on , or a shooting mode or menu setting is changed, even if the... display mode is opened to the left and tilted 180o toward the lens (so that it can be used to see and compose the actual image as it will be ... to see outdoors or in bright surroundings, adjust the LCD Brightness setting in low light conditions while the camera is turned on again it is set to the LCD monitor. Pressing the button a second time switches the...
...turns on when it assumes the last mode. • The LCD monitor will appear at the center of the camera) (p. 35). 16 Components Guide on , or a shooting mode or menu setting is changed, even if the... display mode is opened to the left and tilted 180o toward the lens (so that it can be used to see and compose the actual image as it will be ... to see outdoors or in bright surroundings, adjust the LCD Brightness setting in low light conditions while the camera is turned on again it is set to the LCD monitor. Pressing the button a second time switches the...

PowerShot Pro90IS Camera User Guide
Page 31
Take the slack out of the strap through the camera eyelet. Always store the camera with the lens cap on other items when suspending it through the inside slots in the fastener after passing it from slipping. • Avoid waving the camera about or catching it on . Attaching the Strap Pass the tip of the strap above and below the fastener to prevent it from the strap. Preparing the Camera 29 Attaching the Lens Cap Pinch the lens cap between your fingers and fit it over the lens casing.
Take the slack out of the strap through the camera eyelet. Always store the camera with the lens cap on other items when suspending it through the inside slots in the fastener after passing it from slipping. • Avoid waving the camera about or catching it on . Attaching the Strap Pass the tip of the strap above and below the fastener to prevent it from the strap. Preparing the Camera 29 Attaching the Lens Cap Pinch the lens cap between your fingers and fit it over the lens casing.

PowerShot Pro90IS Camera User Guide
Page 32
Case Holder Semi-Hard Case 1 Screw the case holder screw into the tripod socket on the bottom of the camera. 2 Fasten the snap on the bottom of the semi-hard case to the corresponding snap on the case holder. 3 Fasten the snap on the back ... semi-hard case can conveniently be used to store CF cards, the wireless controller or the lens cap. • The appearance and specifications of the optional semi-hard case may vary by region. 30 Preparing the Camera Attach it with the following procedures. Using the Semi-Hard Case (Optional) The semi-hard...
Case Holder Semi-Hard Case 1 Screw the case holder screw into the tripod socket on the bottom of the camera. 2 Fasten the snap on the bottom of the semi-hard case to the corresponding snap on the case holder. 3 Fasten the snap on the back ... semi-hard case can conveniently be used to store CF cards, the wireless controller or the lens cap. • The appearance and specifications of the optional semi-hard case may vary by region. 30 Preparing the Camera Attach it with the following procedures. Using the Semi-Hard Case (Optional) The semi-hard...

PowerShot Pro90IS Camera User Guide
Page 36
... right 180 degrees. It locks temporarily at 90 degrees. • Tilted forward 180 degrees toward the lens or backward 90 degrees. • The LCD monitor will automatically turn off when it clicks shut against the camera body. Using the LCD Monitor The LCD monitor can adjust the LCD Brightness setting in the...
... right 180 degrees. It locks temporarily at 90 degrees. • Tilted forward 180 degrees toward the lens or backward 90 degrees. • The LCD monitor will automatically turn off when it clicks shut against the camera body. Using the LCD Monitor The LCD monitor can adjust the LCD Brightness setting in the...

PowerShot Pro90IS Camera User Guide
Page 37
... Functions 35 The LCD monitor can also be positioned as below. 1 Open the LCD monitor left 180 degrees and tilt it 180 degrees toward the lens. • In this position, icons and messages do not appear on the LCD monitor. • The image shown on the LCD monitor is automatically flipped... and reversed so that it appears correctly from in front of the lens. 2 Fold the LCD monitor back against the camera body. • Fold it until it clicks into place against the camera until it is not fully closed, the image will appear reversed and icons and messages will...
... Functions 35 The LCD monitor can also be positioned as below. 1 Open the LCD monitor left 180 degrees and tilt it 180 degrees toward the lens. • In this position, icons and messages do not appear on the LCD monitor. • The image shown on the LCD monitor is automatically flipped... and reversed so that it appears correctly from in front of the lens. 2 Fold the LCD monitor back against the camera body. • Fold it until it clicks into place against the camera until it is not fully closed, the image will appear reversed and icons and messages will...

PowerShot Pro90IS Camera User Guide
Page 45
... zoom ring toward (wide angle). The resolution is coarser than with a digital teleconverter function. Letting the Camera Select Settings 43 to zoom out Digital Zoom • An image already zoomed with the optical zoom lens can be adjusted from 7 to 70 mm (equivalent to 37 to 370 mm in to zoom in...
... zoom ring toward (wide angle). The resolution is coarser than with a digital teleconverter function. Letting the Camera Select Settings 43 to zoom out Digital Zoom • An image already zoomed with the optical zoom lens can be adjusted from 7 to 70 mm (equivalent to 37 to 370 mm in to zoom in...

PowerShot Pro90IS Camera User Guide
Page 48
... background blur (making the subject stand out from a very indistinct background), fill the frame with the subject and use the lens at a high or maximum telephoto position. 46 Shooting - Letting the Camera Select Settings Portrait Mode Use this mode when you cannot predetermine the subject's position or focal distance. Use this mode...
... background blur (making the subject stand out from a very indistinct background), fill the frame with the subject and use the lens at a high or maximum telephoto position. 46 Shooting - Letting the Camera Select Settings Portrait Mode Use this mode when you cannot predetermine the subject's position or focal distance. Use this mode...

PowerShot Pro90IS Camera User Guide
Page 57
...digital zoom off. The more the image is set it to 4x. • When the factor is zoomed, the coarser it becomes. Letting the Camera Select Settings 55 Digital Zoom Images can be selected in the Quick Start section (p. 9). Shooting - Zoom Setting • This mode cannot be ...digitally zoomed by the optical zoom lens with the digital teleconverter function. 1 Turn the mode dial to any shooting mode except for or . 2 In the [ (Rec.)] menu, select [Digital Zoom...
...digital zoom off. The more the image is set it to 4x. • When the factor is zoomed, the coarser it becomes. Letting the Camera Select Settings 55 Digital Zoom Images can be selected in the Quick Start section (p. 9). Shooting - Zoom Setting • This mode cannot be ...digitally zoomed by the optical zoom lens with the digital teleconverter function. 1 Turn the mode dial to any shooting mode except for or . 2 In the [ (Rec.)] menu, select [Digital Zoom...

PowerShot Pro90IS Camera User Guide
Page 65
Aperture Value Display Panel LCD Monitor/Viewfinder F2.8 . . . F8.0 . . . F2.8 . . . Selecting Particular Effects 63 F8.0 Shooting - F2.8 F3.2 F3.5 F4.0 F4.5 F5.0 F5.6 F6.3 F7.1 F8.0 The display of aperture settings differs between the display panel and LCD monitor or viewfinder. Aperture Setting Display The larger the aperture value, the smaller the lens aperture.
Aperture Value Display Panel LCD Monitor/Viewfinder F2.8 . . . F8.0 . . . F2.8 . . . Selecting Particular Effects 63 F8.0 Shooting - F2.8 F3.2 F3.5 F4.0 F4.5 F5.0 F5.6 F6.3 F7.1 F8.0 The display of aperture settings differs between the display panel and LCD monitor or viewfinder. Aperture Setting Display The larger the aperture value, the smaller the lens aperture.

PowerShot Pro90IS Camera User Guide
Page 112
... 0.8. • An externally mounted flash may be blocked and appear darker. • Use the wide converter lens with a 58 mm diameter makes macro shooting easier. The lens augments the focal distance of the camera body's lens by a factor of the image may not automatically adjust its output when a wide converter...focal length set the shutter speed and aperture to appropriate settings in this case. • Filters or lens hoods cannot be fitted on the camera. Close-up lens are firmly screwed onto the lens thread. It could lead to the loss of 34 to 50 cm (1.1 to shoot images. •...
... 0.8. • An externally mounted flash may be blocked and appear darker. • Use the wide converter lens with a 58 mm diameter makes macro shooting easier. The lens augments the focal distance of the camera body's lens by a factor of the image may not automatically adjust its output when a wide converter...focal length set the shutter speed and aperture to appropriate settings in this case. • Filters or lens hoods cannot be fitted on the camera. Close-up lens are firmly screwed onto the lens thread. It could lead to the loss of 34 to 50 cm (1.1 to shoot images. •...

PowerShot Pro90IS Camera User Guide
Page 113
... it with one hand while screwing it on with the other. • Clean the lens completely of the arrow. Using a Lens (Optional) / Lens Hood (Optional) 111 Attaching a Lens / Lens Hood 1 Attach a lens or lens hood by aligning it with the lens mounting thread and screwing it on them, which confuses the focus. • Do not use ... in the direction of all dust and dirt before installing it on in a blacklit scene for example, and helps to leave fingerprints on the camera. Dirt may confuse the focus. • Please take due caution when handling the lenses because it is attached to the...
... it with one hand while screwing it on with the other. • Clean the lens completely of the arrow. Using a Lens (Optional) / Lens Hood (Optional) 111 Attaching a Lens / Lens Hood 1 Attach a lens or lens hood by aligning it with the lens mounting thread and screwing it on them, which confuses the focus. • Do not use ... in the direction of all dust and dirt before installing it on in a blacklit scene for example, and helps to leave fingerprints on the camera. Dirt may confuse the focus. • Please take due caution when handling the lenses because it is attached to the...

PowerShot Pro90IS Camera User Guide
Page 125
... use thinners, benzene, synthetic cleansers or water to clean the camera. Lens First use synthetic cleansers on the LCD monitor. Camera body Wipe the body clean with a soft cloth. • Never use a lens blower brush to other parts. If dirt remains, contact the nearest Canon Customer Support Help Desk (see the back of this guide...
... use thinners, benzene, synthetic cleansers or water to clean the camera. Lens First use synthetic cleansers on the LCD monitor. Camera body Wipe the body clean with a soft cloth. • Never use a lens blower brush to other parts. If dirt remains, contact the nearest Canon Customer Support Help Desk (see the back of this guide...

PowerShot Pro90IS Camera User Guide
Page 127
... Flash set to Off fire • Set the flash to on subject or reflected off subject into the electrical outlet. Poor contact between the camera lens and subject at maximum wide angle and at least 1 m (3.3 ft.) at the maximum telephoto setting. • Use an externally mounted flash ... Flash set to On • Set the flash to a positive (+) setting. to the compact power adapter and insert its plug firmly into camera • Change the shooting angle. Subject bright in comparison • Set the exposure compensation to Auto or Off. Flash will not charge ....
... Flash set to Off fire • Set the flash to on subject or reflected off subject into the electrical outlet. Poor contact between the camera lens and subject at maximum wide angle and at least 1 m (3.3 ft.) at the maximum telephoto setting. • Use an externally mounted flash ... Flash set to On • Set the flash to a positive (+) setting. to the compact power adapter and insert its plug firmly into camera • Change the shooting angle. Subject bright in comparison • Set the exposure compensation to Auto or Off. Flash will not charge ....
PowerShot Pro90IS Camera User Guide
Page 131
shutter is recommended: Canon Speedlite 220EX, 380EX, 420EX and 550EX Flash exposure compensation: ±...mode 1/1000 sec. available at accessory shoe Use of the lens barrel) (3.9 in. (W) / 3.3 ft. (T) - ∞) Shutter: Mechanical shutter + electronic shutter Shutter speeds: 8 - 1 / 1000 sec. 8 sec. Specifications PowerShot Pro90 IS Image sensor: Approx. 3.34 million-pixel (total),...) : Auto, ISO 50, ISO 100, ISO 200 and ISO 400 equivalent (In Auto mode, camera automatically adjusts sensitivity in the range of pixels: approx. 3.24 million, recording pixels: approx. 2.58 million...
shutter is recommended: Canon Speedlite 220EX, 380EX, 420EX and 550EX Flash exposure compensation: ±...mode 1/1000 sec. available at accessory shoe Use of the lens barrel) (3.9 in. (W) / 3.3 ft. (T) - ∞) Shutter: Mechanical shutter + electronic shutter Shutter speeds: 8 - 1 / 1000 sec. 8 sec. Specifications PowerShot Pro90 IS Image sensor: Approx. 3.34 million-pixel (total),...) : Auto, ISO 50, ISO 100, ISO 200 and ISO 400 equivalent (In Auto mode, camera automatically adjusts sensitivity in the range of pixels: approx. 3.24 million, recording pixels: approx. 2.58 million...
PowerShot Pro90IS Camera User Guide
Page 135
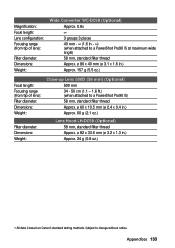
... of lens): Filter diameter: Dimensions: Weight: Wide Converter WC-DC58 (Optional) Approx. 0.8x ∞ 3 groups 3 pieces 40 mm - ∞ (1.6 in - ∞) (when attached to a PowerShot Pro90 IS at maximum wide angle) 58 mm, standard filter thread Approx. ø 80 x 40 mm (ø 3.1 x 1.6 in .) Approx. 24 g (0.8 oz.) • All data is based on Canon's standard...
... of lens): Filter diameter: Dimensions: Weight: Wide Converter WC-DC58 (Optional) Approx. 0.8x ∞ 3 groups 3 pieces 40 mm - ∞ (1.6 in - ∞) (when attached to a PowerShot Pro90 IS at maximum wide angle) 58 mm, standard filter thread Approx. ø 80 x 40 mm (ø 3.1 x 1.6 in .) Approx. 24 g (0.8 oz.) • All data is based on Canon's standard...


