PowerShot S2 IS Camera User Guide
Page 15
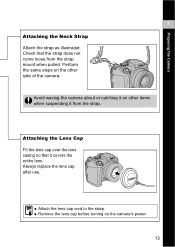
Perform the same steps on the camera's power. 13 Always replace the lens cap after use. ‹ Attach the lens cap cord to the strap. ‹ Remove the lens cap before turning on the other items when suspending it covers the entire lens. Check that it from the strap mount when pulled. Avoid waving the camera about or catching it on other side of the camera. Attaching the Lens Cap Fit the lens cap over the lens casing so that the strap does not come loose from the strap. Preparing the Camera 1 Attaching the Neck Strap Attach the strap as illustrated.
Perform the same steps on the camera's power. 13 Always replace the lens cap after use. ‹ Attach the lens cap cord to the strap. ‹ Remove the lens cap before turning on the other items when suspending it covers the entire lens. Check that it from the strap mount when pulled. Avoid waving the camera about or catching it on other side of the camera. Attaching the Lens Cap Fit the lens cap over the lens casing so that the strap does not come loose from the strap. Preparing the Camera 1 Attaching the Neck Strap Attach the strap as illustrated.
PowerShot S2 IS Camera User Guide
Page 26
... once more). Shooting Mode Playback Mode Remove the lens cap and press the shutter button halfway. The [ (Setup)] menu appears. 24 z The camera switches to Playback mode, but the lens does not retract (the lens will retract if you turn on the camera the first time, and when the lithium cointype ...date on them, refer to the Direct Print User Guide or Software Starter Guide. ‹ Replacing the Date Battery (p. 164) 1 Turn the camera on (p. 23), press the MENU button, and then use the X button on images. Switching Between Shooting and Playback You can quickly switch between...
... once more). Shooting Mode Playback Mode Remove the lens cap and press the shutter button halfway. The [ (Setup)] menu appears. 24 z The camera switches to Playback mode, but the lens does not retract (the lens will retract if you turn on the camera the first time, and when the lithium cointype ...date on them, refer to the Direct Print User Guide or Software Starter Guide. ‹ Replacing the Date Battery (p. 164) 1 Turn the camera on (p. 23), press the MENU button, and then use the X button on images. Switching Between Shooting and Playback You can quickly switch between...
PowerShot S2 IS Camera User Guide
Page 180
... 15 Information View 27 Intervalometer 78, 107 IS 35 ISO Speed 93 J Jump 14, 45 L Landscape 49 LCD Brightness 79 LCD Monitor 14, 27 Lens Cap 13 Lens Hood 156 List of Messages 149 M Macro 56 Magnifying Images 43 Manual Focus 111 MENU 14, 74 Metering 14 Modes 89 MF 14 MF-Point... Microphone Button 14, 115 Level 68 Mode Dial 15, 49 Mode Lever 14 Movie Editing Movies 69 Shooting a Movie 63 Mute 79 My Camera Menu 81 My Camera Settings 127 Operation 128 Self-timer 128 Shutter sounds 128 Start-up image 128 My Colors 95 N Neck Strap 13 Night Display 28 Night...
... 15 Information View 27 Intervalometer 78, 107 IS 35 ISO Speed 93 J Jump 14, 45 L Landscape 49 LCD Brightness 79 LCD Monitor 14, 27 Lens Cap 13 Lens Hood 156 List of Messages 149 M Macro 56 Magnifying Images 43 Manual Focus 111 MENU 14, 74 Metering 14 Modes 89 MF 14 MF-Point... Microphone Button 14, 115 Level 68 Mode Dial 15, 49 Mode Lever 14 Movie Editing Movies 69 Shooting a Movie 63 Mute 79 My Camera Menu 81 My Camera Settings 127 Operation 128 Self-timer 128 Shutter sounds 128 Start-up image 128 My Colors 95 N Neck Strap 13 Night Display 28 Night...

PowerShot S2 IS System Map
Page 1
... Inter- To connect the camera to the Card Photo Printers CP-100/CP-10. face Cable IFC-400PCU supplied with the camera. (*1) Also sold separately. (*2) See the user guide supplied with the printers. PRINTED IN JAPAN SYSTEM MAP Lens Adapter/Hood Set LAH-DC20... Tele-converter TC-DC58B Close-up Lens 500D (58mm) Supplied with Camera Interface Cable IFC-400PCU (*1) Neck Strap NS-DC3 Lens Cap SD Memory Card SDC-16M Stereo/Video Cable STV-250N (*1) AA Alkaline Batteries (x4) Canon Digital Camera Solution Disk Conversion Lens Hood Lens Adapter LH-DC40 LA-DC58E USB ...
... Inter- To connect the camera to the Card Photo Printers CP-100/CP-10. face Cable IFC-400PCU supplied with the camera. (*1) Also sold separately. (*2) See the user guide supplied with the printers. PRINTED IN JAPAN SYSTEM MAP Lens Adapter/Hood Set LAH-DC20... Tele-converter TC-DC58B Close-up Lens 500D (58mm) Supplied with Camera Interface Cable IFC-400PCU (*1) Neck Strap NS-DC3 Lens Cap SD Memory Card SDC-16M Stereo/Video Cable STV-250N (*1) AA Alkaline Batteries (x4) Canon Digital Camera Solution Disk Conversion Lens Hood Lens Adapter LH-DC40 LA-DC58E USB ...
PowerShot S2 IS System Map
Page 2
... connecting them to your nearest Canon retailer. Convenient when taking or playing back large numbers of images. • NiMH Battery NB4-200 A set of these items are missing, please contact the dealer for assistance. • Digital Camera • Lens Cap • Neck Strap NS-DC3... • AA Alkaline Batteries (x4) • SD Memory Card SDC-16M • Interface Cable IFC-400PCU • Stereo/Video Cable STV-250N • Canon Digital Camera Solution Disk • Quick Start Guide • Camera User Guide &#...
... connecting them to your nearest Canon retailer. Convenient when taking or playing back large numbers of images. • NiMH Battery NB4-200 A set of these items are missing, please contact the dealer for assistance. • Digital Camera • Lens Cap • Neck Strap NS-DC3... • AA Alkaline Batteries (x4) • SD Memory Card SDC-16M • Interface Cable IFC-400PCU • Stereo/Video Cable STV-250N • Canon Digital Camera Solution Disk • Quick Start Guide • Camera User Guide &#...
Software Starter Guide (For the Canon Digital Camera Solution Disk Ver.24)
Page 45
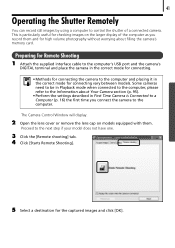
...display. 2 Open the lens cover or remove the lens cap on models equipped with them and for checking images on the larger display of a connected camera. Some cameras need to be in Playback mode when connected to the computer, please refer to the Information about Your Camera section (p. 95). ... vary between models. Preparing for Remote Shooting 1 Attach the supplied interface cable to the computer's USB port and the camera's DIGITAL terminal and place the camera in the correct mode for the captured images and click [OK]. 41 Operating the Shutter Remotely You can record still images...
...display. 2 Open the lens cover or remove the lens cap on models equipped with them and for checking images on the larger display of a connected camera. Some cameras need to be in Playback mode when connected to the computer, please refer to the Information about Your Camera section (p. 95). ... vary between models. Preparing for Remote Shooting 1 Attach the supplied interface cable to the computer's USB port and the camera's DIGITAL terminal and place the camera in the correct mode for the captured images and click [OK]. 41 Operating the Shutter Remotely You can record still images...
Software Starter Guide (For the Canon Digital Camera Solution Disk Ver.24)
Page 77
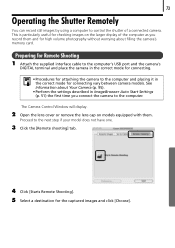
...for Remote Shooting 1 Attach the supplied interface cable to the computer's USB port and the camera's DIGITAL terminal and place the camera in the correct mode for connecting. • Procedures for attaching the camera to the computer and placing it in ImageBrowser Auto Start Settings (p. 51) the first ...the settings described in the correct mode for the captured images and click [Choose]. The Camera Control Window will display. 2 Open the lens cover or remove the lens cap on the larger display of a connected camera. Proceed to the next step if your model does not have one. 3 Click the ...
...for Remote Shooting 1 Attach the supplied interface cable to the computer's USB port and the camera's DIGITAL terminal and place the camera in the correct mode for connecting. • Procedures for attaching the camera to the computer and placing it in ImageBrowser Auto Start Settings (p. 51) the first ...the settings described in the correct mode for the captured images and click [Choose]. The Camera Control Window will display. 2 Open the lens cover or remove the lens cap on the larger display of a connected camera. Proceed to the next step if your model does not have one. 3 Click the ...


