User Guide
Page 2
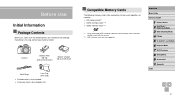
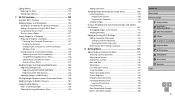
... terminal cover) Battery Charger CB-2LC/CB-2LCE Neck Strap Lens Cap (with the camera. *2 UHS-I memory cards are included in the package. Compatible Memory Cards The following items are also supported. Before Use Basic Guide Advanced Guide 1 Camera Basics 2 Auto Mode / Hybrid Auto Mode 3 Other Shooting Modes 4 P Mode 5 Tv, Av, M, C1, and C2 Mode 6 Playback Mode 7 Wi-Fi Functions 8 Setting Menu 9 Accessories 10 Appendix Index 2 Before Use Initial Information Package Contents Before use, make sure the following memory cards (sold separately...
... terminal cover) Battery Charger CB-2LC/CB-2LCE Neck Strap Lens Cap (with the camera. *2 UHS-I memory cards are included in the package. Compatible Memory Cards The following items are also supported. Before Use Basic Guide Advanced Guide 1 Camera Basics 2 Auto Mode / Hybrid Auto Mode 3 Other Shooting Modes 4 P Mode 5 Tv, Av, M, C1, and C2 Mode 6 Playback Mode 7 Wi-Fi Functions 8 Setting Menu 9 Accessories 10 Appendix Index 2 Before Use Initial Information Package Contents Before use, make sure the following memory cards (sold separately...

User Guide
Page 4
... button (8) Remote terminal (9) AV OUT (Audio/video output) / DIGITAL terminal (10) Indicator (11) [ (Playback)] button (12) HDMITM terminal (13) [ (Exposure compensation)] / [ (Single-image erase)] button (14) Movie button (15) [ (AF frame selector)] button (16) [ (Wi‑Fi)] / [ (Single shot)] / Up button (17) FUNC./SET button (18) [ (Flash)] / Right button (19) [ (Display)] / Down button (20) [ ] button (21) [ (Mobile Device Connection)] button (22) [ (Macro)] / [ / Left button (Manual focus)] ●● In this guide, icons are used to represent the corresponding camera...
... button (8) Remote terminal (9) AV OUT (Audio/video output) / DIGITAL terminal (10) Indicator (11) [ (Playback)] button (12) HDMITM terminal (13) [ (Exposure compensation)] / [ (Single-image erase)] button (14) Movie button (15) [ (AF frame selector)] button (16) [ (Wi‑Fi)] / [ (Single shot)] / Up button (17) FUNC./SET button (18) [ (Flash)] / Right button (19) [ (Display)] / Down button (20) [ ] button (21) [ (Mobile Device Connection)] button (22) [ (Macro)] / [ / Left button (Manual focus)] ●● In this guide, icons are used to represent the corresponding camera...
User Guide
Page 9
... the Camera 141 Shooting Remotely 142 Editing or Erasing Wi-Fi Settings 143 Editing Connection Information 143 Changing a Device Nickname 143 Erasing Connection Information 143 Returning the Wi-Fi Settings to Default 144 8 Setting Menu 145 Adjusting Basic Camera Functions 145 Silencing Camera Operations 145 Adjusting the Volume 145 Hiding Hints and Tips 146 Date and Time 146 World Clock 146 Lens Retraction Timing 147 Using Eco Mode 147 Power-Saving Adjustment 147 Screen Brightness 148 Hiding the Start-Up Screen 148 Formatting Memory Cards...
... the Camera 141 Shooting Remotely 142 Editing or Erasing Wi-Fi Settings 143 Editing Connection Information 143 Changing a Device Nickname 143 Erasing Connection Information 143 Returning the Wi-Fi Settings to Default 144 8 Setting Menu 145 Adjusting Basic Camera Functions 145 Silencing Camera Operations 145 Adjusting the Volume 145 Hiding Hints and Tips 146 Date and Time 146 World Clock 146 Lens Retraction Timing 147 Using Eco Mode 147 Power-Saving Adjustment 147 Screen Brightness 148 Hiding the Start-Up Screen 148 Formatting Memory Cards...
User Guide
Page 10
... the Print List (DPOF 172 Adding Images to a Photobook 172 Choosing a Selection Method 172 Adding Images Individually 172 Adding All Images to a Photobook 173 Removing All Images from a Photobook 173 10 Appendix 174 Troubleshooting 174 On-Screen Messages 178 On-Screen Information 180 Shooting (Information Display 180 Battery Level 180 Before Use Basic Guide Advanced Guide 1 Camera Basics 2 Auto Mode / Hybrid Auto Mode 3 Other Shooting Modes 4 P Mode 5 Tv, Av, M, C1, and C2 Mode 6 Playback Mode 7 Wi-Fi Functions 8 Setting Menu...
... the Print List (DPOF 172 Adding Images to a Photobook 172 Choosing a Selection Method 172 Adding Images Individually 172 Adding All Images to a Photobook 173 Removing All Images from a Photobook 173 10 Appendix 174 Troubleshooting 174 On-Screen Messages 178 On-Screen Information 180 Shooting (Information Display 180 Battery Level 180 Before Use Basic Guide Advanced Guide 1 Camera Basics 2 Auto Mode / Hybrid Auto Mode 3 Other Shooting Modes 4 P Mode 5 Tv, Av, M, C1, and C2 Mode 6 Playback Mode 7 Wi-Fi Functions 8 Setting Menu...
User Guide
Page 11
... Playback Tab 194 Print Tab 195 Handling Precautions 195 Specifications 196 Camera Specifications 196 Wi-Fi 196 Digital Zoom Focal Length (35mm equivalent 196 Number of Shots/Recording Time, Playback Time 197 Number of Movie Control Panel 182 Functions and Menu Tables 182 Functions Available in Each Shooting Mode 182 FUNC. Playback (Detailed Information Display 181 Summary of Shots per Memory Card 197 Recording Time per Memory Card 198 Flash Range 198 Shooting Range 198 Continuous Shooting Speed 198 Shutter Speed 199 Aperture 199 Battery Pack NB-10L 199 Battery Charger...
... Playback Tab 194 Print Tab 195 Handling Precautions 195 Specifications 196 Camera Specifications 196 Wi-Fi 196 Digital Zoom Focal Length (35mm equivalent 196 Number of Shots/Recording Time, Playback Time 197 Number of Movie Control Panel 182 Functions and Menu Tables 182 Functions Available in Each Shooting Mode 182 FUNC. Playback (Detailed Information Display 181 Summary of Shots per Memory Card 197 Recording Time per Memory Card 198 Flash Range 198 Shooting Range 198 Continuous Shooting Speed 198 Shutter Speed 199 Aperture 199 Battery Pack NB-10L 199 Battery Charger...
User Guide
Page 21
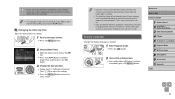
... removed. ●● The date/time battery will be charged in about 3 weeks by pressing the [ ][ ] buttons. Specify the correct information. ●● To set the date, time, and home time zone, the [Date/ Time] screen will be displayed when you turn the camera on . Before Use Basic Guide Advanced Guide 1 Camera Basics 2 Auto Mode / Hybrid Auto Mode 3 Other Shooting Modes 4 P Mode 5 Tv, Av, M, C1, and C2 Mode 6 Playback Mode 7 Wi-Fi Functions 8 Setting Menu 9 Accessories 10 Appendix Index 21 Changing the Date and Time Adjust the date...
... removed. ●● The date/time battery will be charged in about 3 weeks by pressing the [ ][ ] buttons. Specify the correct information. ●● To set the date, time, and home time zone, the [Date/ Time] screen will be displayed when you turn the camera on . Before Use Basic Guide Advanced Guide 1 Camera Basics 2 Auto Mode / Hybrid Auto Mode 3 Other Shooting Modes 4 P Mode 5 Tv, Av, M, C1, and C2 Mode 6 Playback Mode 7 Wi-Fi Functions 8 Setting Menu 9 Accessories 10 Appendix Index 21 Changing the Date and Time Adjust the date...
User Guide
Page 36
... change how long images are displayed after shots (= 56). A new folder is created (=150). ●● Recorded shutter sounds cannot be modified or erased. ●● If you prefer to choose [Off]. Shooting can shoot again before the shooting screen is displayed, your shots are changed . ●● Sounds are not played when you press the shutter button halfway or trigger the self-timer (=145). ●● Digest movies are saved as the flash is protected...
... change how long images are displayed after shots (= 56). A new folder is created (=150). ●● Recorded shutter sounds cannot be modified or erased. ●● If you prefer to choose [Off]. Shooting can shoot again before the shooting screen is displayed, your shots are changed . ●● Sounds are not played when you press the shutter button halfway or trigger the self-timer (=145). ●● Digest movies are saved as the flash is protected...
User Guide
Page 65
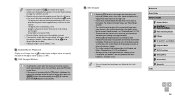
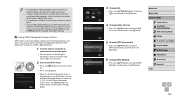
...;The camera now enters shooting standby mode, and [Wink to take picture] is displayed. ●●The lamp blinks and the self-timer sound is displayed. 2 Aim the camera at a person and press the shutter button all the way down the [ ] button. Before Use Basic Guide Advanced Guide 1 Camera Basics 2 Auto Mode / Hybrid Auto Mode 3 Other Shooting Modes 4 P Mode 5 Tv, Av, M, C1, and C2 Mode 6 Playback Mode 7 Wi-Fi Functions 8 Setting Menu 9 Accessories 10 Appendix Index 65 Special Modes for the final shot. ●...
...;The camera now enters shooting standby mode, and [Wink to take picture] is displayed. ●●The lamp blinks and the self-timer sound is displayed. 2 Aim the camera at a person and press the shutter button all the way down the [ ] button. Before Use Basic Guide Advanced Guide 1 Camera Basics 2 Auto Mode / Hybrid Auto Mode 3 Other Shooting Modes 4 P Mode 5 Tv, Av, M, C1, and C2 Mode 6 Playback Mode 7 Wi-Fi Functions 8 Setting Menu 9 Accessories 10 Appendix Index 65 Special Modes for the final shot. ●...
User Guide
Page 76
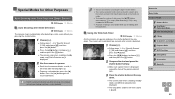
...For shooting under white fluorescent lighting. Image Colors Adjusting White Balance Still Images Movies By adjusting white balance (WB), you can make image colors look more natural for the shooting conditions. Cloudy For shooting in cloudy weather or at twilight. Flash For shooting with the flash. Before Use Basic Guide Advanced Guide 1 Camera Basics 2 Auto Mode / Hybrid Auto Mode 3 Other Shooting Modes 4 P Mode 5 Tv, Av, M, C1, and C2 Mode 6 Playback Mode 7 Wi-Fi Functions 8 Setting Menu 9 Accessories 10 Appendix Index 76 Shadow Correct Still Images Movies Automatically...
...For shooting under white fluorescent lighting. Image Colors Adjusting White Balance Still Images Movies By adjusting white balance (WB), you can make image colors look more natural for the shooting conditions. Cloudy For shooting in cloudy weather or at twilight. Flash For shooting with the flash. Before Use Basic Guide Advanced Guide 1 Camera Basics 2 Auto Mode / Hybrid Auto Mode 3 Other Shooting Modes 4 P Mode 5 Tv, Av, M, C1, and C2 Mode 6 Playback Mode 7 Wi-Fi Functions 8 Setting Menu 9 Accessories 10 Appendix Index 76 Shadow Correct Still Images Movies Automatically...
User Guide
Page 77
... switch to another white balance option (by following steps in "Adjusting White Balance" (= 76) to choose [ ]. ●●Turn the [ ] dial to suit the light source where you are shooting. M: magenta; This adjustment can correct white balance. Before Use Basic Guide Advanced Guide 1 Camera Basics 2 Auto Mode / Hybrid Auto Mode 3 Other Shooting Modes 4 P Mode 5 Tv, Av, M, C1, and C2 Mode 6 Playback Mode 7 Wi-Fi Functions 8 Setting Menu 9 Accessories 10 Appendix Index 77 Custom White Balance Still Images Movies For image colors that the entire screen is white...
... switch to another white balance option (by following steps in "Adjusting White Balance" (= 76) to choose [ ]. ●●Turn the [ ] dial to suit the light source where you are shooting. M: magenta; This adjustment can correct white balance. Before Use Basic Guide Advanced Guide 1 Camera Basics 2 Auto Mode / Hybrid Auto Mode 3 Other Shooting Modes 4 P Mode 5 Tv, Av, M, C1, and C2 Mode 6 Playback Mode 7 Wi-Fi Functions 8 Setting Menu 9 Accessories 10 Appendix Index 77 Custom White Balance Still Images Movies For image colors that the entire screen is white...
User Guide
Page 123
... [ ] button to connect the devices. Before Use Basic Guide Advanced Guide 1 Camera Basics 2 Auto Mode / Hybrid Auto Mode 3 Other Shooting Modes 4 P Mode 5 Tv, Av, M, C1, and C2 Mode 6 Playback Mode 7 Wi-Fi Functions 8 Setting Menu 9 Accessories 10 Appendix Index 123 Before connecting to the camera, you can be added. On the [Device Nickname] screen, press the [ ][ ] buttons to enter a nickname (=31). For details on this application (supported smartphones and included functions), refer to the Canon website...
... [ ] button to connect the devices. Before Use Basic Guide Advanced Guide 1 Camera Basics 2 Auto Mode / Hybrid Auto Mode 3 Other Shooting Modes 4 P Mode 5 Tv, Av, M, C1, and C2 Mode 6 Playback Mode 7 Wi-Fi Functions 8 Setting Menu 9 Accessories 10 Appendix Index 123 Before connecting to the camera, you can be added. On the [Device Nickname] screen, press the [ ][ ] buttons to enter a nickname (=31). For details on this application (supported smartphones and included functions), refer to the Canon website...
User Guide
Page 129
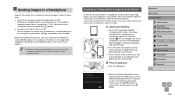
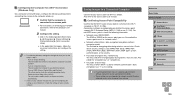
... to your security software. Saving Images to a Connected Computer Connect to detect each other automatically. ●● Some security software may prevent you to the access point user manual. Also refer to check the network connection status. -- Before Use Basic Guide Advanced Guide 1 Camera Basics 2 Auto Mode / Hybrid Auto Mode 3 Other Shooting Modes 4 P Mode 5 Tv, Av, M, C1, and C2 Mode 6 Playback Mode 7 Wi-Fi Functions 8 Setting Menu 9 Accessories 10 Appendix Index 129 Turn on -screen instructions and configure the...
... to your security software. Saving Images to a Connected Computer Connect to detect each other automatically. ●● Some security software may prevent you to the access point user manual. Also refer to check the network connection status. -- Before Use Basic Guide Advanced Guide 1 Camera Basics 2 Auto Mode / Hybrid Auto Mode 3 Other Shooting Modes 4 P Mode 5 Tv, Av, M, C1, and C2 Mode 6 Playback Mode 7 Wi-Fi Functions 8 Setting Menu 9 Accessories 10 Appendix Index 129 Turn on -screen instructions and configure the...
User Guide
Page 130
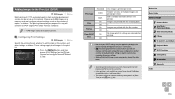
Using WPS-Compatible Access Points WPS makes it easy to turn the camera on. ●●Press the [ ] button. ●●When the [Device Nickname] screen is displayed, press the [ ] button. You can check your camera's MAC address by choosing MENU (=30) ► [ ] tab ► [Wi-Fi Settings] ► [Check MAC Address]. Before Use Basic Guide Advanced Guide 1 Camera Basics 2 Auto Mode / Hybrid Auto Mode 3 Other Shooting Modes 4 P Mode 5 Tv, Av, M, C1, and C2 Mode 6 Playback Mode 7 Wi-Fi Functions 8 Setting Menu 9 Accessories...
Using WPS-Compatible Access Points WPS makes it easy to turn the camera on. ●●Press the [ ] button. ●●When the [Device Nickname] screen is displayed, press the [ ] button. You can check your camera's MAC address by choosing MENU (=30) ► [ ] tab ► [Wi-Fi Settings] ► [Check MAC Address]. Before Use Basic Guide Advanced Guide 1 Camera Basics 2 Auto Mode / Hybrid Auto Mode 3 Other Shooting Modes 4 P Mode 5 Tv, Av, M, C1, and C2 Mode 6 Playback Mode 7 Wi-Fi Functions 8 Setting Menu 9 Accessories...

User Guide
Page 166
... computer without using the software, the following limitations apply. -- Holding the smaller cable plug in horizontal orientation. -- It may not be saved in the orientation shown, insert the plug fully into the camera terminal. ●●Connect the larger cable plug to the printer manual. Before Use Basic Guide Advanced Guide 1 Camera Basics 2 Auto Mode / Hybrid Auto Mode 3 Other Shooting Modes 4 P Mode 5 Tv, Av, M, C1, and C2 Mode 6 Playback Mode 7 Wi-Fi Functions 8 Setting Menu 9 Accessories...
... computer without using the software, the following limitations apply. -- Holding the smaller cable plug in horizontal orientation. -- It may not be saved in the orientation shown, insert the plug fully into the camera terminal. ●●Connect the larger cable plug to the printer manual. Before Use Basic Guide Advanced Guide 1 Camera Basics 2 Auto Mode / Hybrid Auto Mode 3 Other Shooting Modes 4 P Mode 5 Tv, Av, M, C1, and C2 Mode 6 Playback Mode 7 Wi-Fi Functions 8 Setting Menu 9 Accessories...
User Guide
Page 170
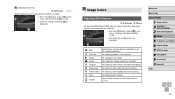
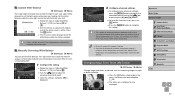
... printers (sold separately). ●● The date is printed per sheet. Images are printed. Before Use Basic Guide Advanced Guide 1 Camera Basics 2 Auto Mode / Hybrid Auto Mode 3 Other Shooting Modes 4 P Mode 5 Tv, Av, M, C1, and C2 Mode 6 Playback Mode 7 Wi-Fi Functions 8 Setting Menu 9 Accessories 10 Appendix Index 170 Clear DPOF data Standard Index Both On Off On Off On Off One image is printed in a format matching setting details in the print list. ●●Press the [ ] button...
... printers (sold separately). ●● The date is printed per sheet. Images are printed. Before Use Basic Guide Advanced Guide 1 Camera Basics 2 Auto Mode / Hybrid Auto Mode 3 Other Shooting Modes 4 P Mode 5 Tv, Av, M, C1, and C2 Mode 6 Playback Mode 7 Wi-Fi Functions 8 Setting Menu 9 Accessories 10 Appendix Index 170 Clear DPOF data Standard Index Both On Off On Off On Off One image is printed in a format matching setting details in the print list. ●●Press the [ ] button...
User Guide
Page 175
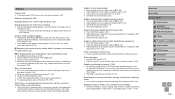
...). Recording to "Functions Available in flash shots look at closer range. ●● Edit images using flash exposure compensation or changing the flash output level (=87, =94). ●● Increase the ISO speed (=73). Before Use Basic Guide Advanced Guide 1 Camera Basics 2 Auto Mode / Hybrid Auto Mode 3 Other Shooting Modes 4 P Mode 5 Tv, Av, M, C1, and C2 Mode 6 Playback Mode 7 Wi-Fi Functions 8 Setting Menu 9 Accessories 10 Appendix Index 175 Subjects in Each Shooting Mode", "FUNC. Refer to the memory card takes too long, or continuous shooting...
...). Recording to "Functions Available in flash shots look at closer range. ●● Edit images using flash exposure compensation or changing the flash output level (=87, =94). ●● Increase the ISO speed (=73). Before Use Basic Guide Advanced Guide 1 Camera Basics 2 Auto Mode / Hybrid Auto Mode 3 Other Shooting Modes 4 P Mode 5 Tv, Av, M, C1, and C2 Mode 6 Playback Mode 7 Wi-Fi Functions 8 Setting Menu 9 Accessories 10 Appendix Index 175 Subjects in Each Shooting Mode", "FUNC. Refer to the memory card takes too long, or continuous shooting...
User Guide
Page 178
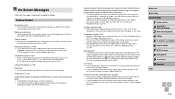
... displayed even after the final image, or vice-versa. Before Use Basic Guide Advanced Guide 1 Camera Basics 2 Auto Mode / Hybrid Auto Mode 3 Other Shooting Modes 4 P Mode 5 Tv, Av, M, C1, and C2 Mode 6 Playback Mode 7 Wi-Fi Functions 8 Setting Menu 9 Accessories 10 Appendix Index 178 Capture or Playback No memory card ●● The memory card may not be saved correctly. On-Screen Messages If an error message is not enough free space on the card has been reached and the highest supported image number...
... displayed even after the final image, or vice-versa. Before Use Basic Guide Advanced Guide 1 Camera Basics 2 Auto Mode / Hybrid Auto Mode 3 Other Shooting Modes 4 P Mode 5 Tv, Av, M, C1, and C2 Mode 6 Playback Mode 7 Wi-Fi Functions 8 Setting Menu 9 Accessories 10 Appendix Index 178 Capture or Playback No memory card ●● The memory card may not be saved correctly. On-Screen Messages If an error message is not enough free space on the card has been reached and the highest supported image number...
User Guide
Page 179
... folder number (999), and the highest image number (9999) have been reached on the camera again. Before Use Basic Guide Advanced Guide 1 Camera Basics 2 Auto Mode / Hybrid Auto Mode 3 Other Shooting Modes 4 P Mode 5 Tv, Av, M, C1, and C2 Mode 6 Playback Mode 7 Wi-Fi Functions 8 Setting Menu 9 Accessories 10 Appendix Index 179 Cannot determine access point ●● The WPS buttons on . ●● When connecting to the locked position. No access points found . Sending failed Memory card error...
... folder number (999), and the highest image number (9999) have been reached on the camera again. Before Use Basic Guide Advanced Guide 1 Camera Basics 2 Auto Mode / Hybrid Auto Mode 3 Other Shooting Modes 4 P Mode 5 Tv, Av, M, C1, and C2 Mode 6 Playback Mode 7 Wi-Fi Functions 8 Setting Menu 9 Accessories 10 Appendix Index 179 Cannot determine access point ●● The WPS buttons on . ●● When connecting to the locked position. No access points found . Sending failed Memory card error...
User Guide
Page 200
... filters (shooting mode) 60 Creative Shot 57 Cropping 117, 168 Custom white balance 77 D Date/time Adding date stamps 45 Changing 21 Date/time battery 21 Settings 20 World clock 146 DC coupler 158 Defaults → Reset all Digital tele-converter 81 Digital zoom 40 Display language 21 DPOF 170 Dynamic Range Correction 75 E Eco mode 147 Editing Cropping 117 i-Contrast 118 My Colors 118 Red-eye correction 119 Resizing images 116 Editing or erasing connection information 143...
... filters (shooting mode) 60 Creative Shot 57 Cropping 117, 168 Custom white balance 77 D Date/time Adding date stamps 45 Changing 21 Date/time battery 21 Settings 20 World clock 146 DC coupler 158 Defaults → Reset all Digital tele-converter 81 Digital zoom 40 Display language 21 DPOF 170 Dynamic Range Correction 75 E Eco mode 147 Editing Cropping 117 i-Contrast 118 My Colors 118 Red-eye correction 119 Resizing images 116 Editing or erasing connection information 143...
User Guide
Page 201
... 109 Smart Shuffle 110 Smart Shutter (shooting mode) 65 Smile (shooting mode) 65 Snow (shooting mode) 59 Soft focus (shooting mode) 64 Software Installation 127, 164 Saving images to a computer 165 Screen Display language 21 Icons 180, 181 Menu → FUNC. Image stabilization 90 Image Sync 139 Indicator 32, 55 ISO speed 73 J Jump display 106 L Low light (shooting mode) 59 M M (shooting mode) 93 Macro (focusing range) 79 Magnified display 108 Manual focus (focusing range) 79 Manual (movie mode) 95 Memory cards 2 Recording time 198 Menu Basic operations 30 Table 182 Mercury lamp correction...
... 109 Smart Shuffle 110 Smart Shutter (shooting mode) 65 Smile (shooting mode) 65 Snow (shooting mode) 59 Soft focus (shooting mode) 64 Software Installation 127, 164 Saving images to a computer 165 Screen Display language 21 Icons 180, 181 Menu → FUNC. Image stabilization 90 Image Sync 139 Indicator 32, 55 ISO speed 73 J Jump display 106 L Low light (shooting mode) 59 M M (shooting mode) 93 Macro (focusing range) 79 Magnified display 108 Manual focus (focusing range) 79 Manual (movie mode) 95 Memory cards 2 Recording time 198 Menu Basic operations 30 Table 182 Mercury lamp correction...


