User Manual
Page 3
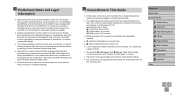
... conditions and more than 99.99% of purchase. This does not indicate damage. Preliminary Notes and Legal Information ●● Take and review some test shots initially to as red or black dots. Refrain from any malfunction of a camera or accessory, including memory cards, that ...[ ] Right button (11) on back [ ] Down button (12) on back ●● Shooting modes and on copyright law, and note that Canon Inc., its subsidiaries and affiliates, and its distributors are represented by the camera shall be for personal use . ●● =xx: Pages with related information...
... conditions and more than 99.99% of purchase. This does not indicate damage. Preliminary Notes and Legal Information ●● Take and review some test shots initially to as red or black dots. Refrain from any malfunction of a camera or accessory, including memory cards, that ...[ ] Right button (11) on back [ ] Down button (12) on back ●● Shooting modes and on copyright law, and note that Canon Inc., its subsidiaries and affiliates, and its distributors are represented by the camera shall be for personal use . ●● =xx: Pages with related information...
User Manual
Page 40
... choose [Off] (=25). ●●To restore the original setting, repeat this process but choose [On]. Hold Off 1 Access the [Review image after shooting] screen. ●●Press the [ ] button, choose [Review image after shots. Displays images for the specified time. Displays images until you can change how long images are displayed...
... choose [Off] (=25). ●●To restore the original setting, repeat this process but choose [On]. Hold Off 1 Access the [Review image after shooting] screen. ●●Press the [ ] button, choose [Review image after shots. Displays images for the specified time. Displays images until you can change how long images are displayed...
User Manual
Page 61
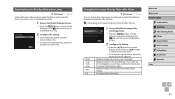
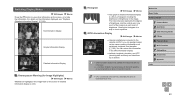
5 Playback Mode Have fun reviewing your shots, and browse or edit them on a computer, or images from other cameras. To view the next image, press the [ ] button. ●●To ...
5 Playback Mode Have fun reviewing your shots, and browse or edit them on a computer, or images from other cameras. To view the next image, press the [ ] button. ●●To ...
User Manual
Page 63
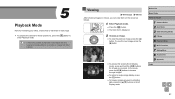
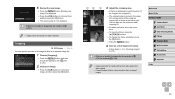
... information display. ●●Latitude, longitude, elevation, and UTC (shooting date and time) are listed from top to the camera via Wi-Fi, you can review this information. Before Use Basic Guide Advanced Guide 1 Camera Basics 2 Auto Mode 3 Other Shooting Modes 4 P Mode 5 Playback Mode 6 Wi-Fi Functions 7 Setting Menu 8 Accessories 9 Appendix...
... information display. ●●Latitude, longitude, elevation, and UTC (shooting date and time) are listed from top to the camera via Wi-Fi, you can review this information. Before Use Basic Guide Advanced Guide 1 Camera Basics 2 Auto Mode 3 Other Shooting Modes 4 P Mode 5 Playback Mode 6 Wi-Fi Functions 7 Setting Menu 8 Accessories 9 Appendix...
User Manual
Page 74
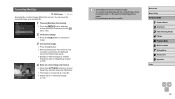
.... Before Use Basic Guide Advanced Guide 1 Camera Basics 2 Auto Mode 3 Other Shooting Modes 4 P Mode 5 Playback Mode 6 Wi-Fi Functions 7 Setting Menu 8 Accessories 9 Appendix Index 74 5 Review the new image. ●●Press the [ ] button. [Display new image?] is displayed. ●●Press the [ ][ ] buttons to choose [Yes], and then press the... the frame, press the buttons. ●●To change the frame orientation, press the [ ] button. ●●Press the [ ] button. 4 Save as a new image and review. ●●Follow steps 4 - 5 in the lower right.
.... Before Use Basic Guide Advanced Guide 1 Camera Basics 2 Auto Mode 3 Other Shooting Modes 4 P Mode 5 Playback Mode 6 Wi-Fi Functions 7 Setting Menu 8 Accessories 9 Appendix Index 74 5 Review the new image. ●●Press the [ ] button. [Display new image?] is displayed. ●●Press the [ ][ ] buttons to choose [Yes], and then press the... the frame, press the buttons. ●●To change the frame orientation, press the [ ] button. ●●Press the [ ] button. 4 Save as a new image and review. ●●Follow steps 4 - 5 in the lower right.

User Manual
Page 75
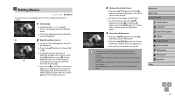
...Choose an option. ●●Press the [ ][ ] buttons to choose an option, and then press the [ ] button. 4 Save as a new image and review. ●●Follow steps 4 - 5 in "Resizing Images" (= 73). ●● Image quality of pictures you repeatedly edit this way will be a little ...Choose an option. ●●Press the [ ][ ] buttons to choose an option, and then press the [ ] button. 4 Save as a new image and review. ●●Follow steps 4 - 5 in "Resizing Images" (= 73). ●● For some images, correction may vary slightly from the color of images shot...
...Choose an option. ●●Press the [ ][ ] buttons to choose an option, and then press the [ ] button. 4 Save as a new image and review. ●●Follow steps 4 - 5 in "Resizing Images" (= 73). ●● Image quality of pictures you repeatedly edit this way will be a little ...Choose an option. ●●Press the [ ][ ] buttons to choose an option, and then press the [ ] button. 4 Save as a new image and review. ●●Follow steps 4 - 5 in "Resizing Images" (= 73). ●● For some images, correction may vary slightly from the color of images shot...
User Manual
Page 76
Follow the steps in "Magnifying Images" (= 65). 4 Save as a new image and review. ●●Press the buttons to choose an image. 3 Correct the image. ●●Press the [ ] button. ●●Red-eye detected by red-eye. ...
Follow the steps in "Magnifying Images" (= 65). 4 Save as a new image and review. ●●Press the buttons to choose an image. 3 Correct the image. ●●Press the [ ] button. ●●Red-eye detected by red-eye. ...
User Manual
Page 77
... left will be cut, while in [ ] the portion after the nearest [ ] mark on the right will be available. ●● Movies may not be cut. 3 Review the edited movie. ●●Press the [ ][ ] buttons to choose [ ]. Press the [ ] button, press the [ ][ ] buttons to choose [OK], and then press the [ ] button again...
... left will be cut, while in [ ] the portion after the nearest [ ] mark on the right will be available. ●● Movies may not be cut. 3 Review the edited movie. ●●Press the [ ][ ] buttons to choose [ ]. Press the [ ] button, press the [ ][ ] buttons to choose [OK], and then press the [ ] button again...

User Manual
Page 138
... 8 Accessories 9 Appendix Index 138 Shooting Mode Function AF-assist Beam (=39) On Off Flash Settings (=40) Red-Eye Lamp On/Off i-Contrast (=51) Auto Off Review Image after Shooting (=40) Display Time Off/Quick/2 sec./4 sec./ 8 sec./Hold Display Info Off/Detailed Grid Lines (=38) On/Off IS Settings (=59) IS...
... 8 Accessories 9 Appendix Index 138 Shooting Mode Function AF-assist Beam (=39) On Off Flash Settings (=40) Red-Eye Lamp On/Off i-Contrast (=51) Auto Off Review Image after Shooting (=40) Display Time Off/Quick/2 sec./4 sec./ 8 sec./Hold Display Info Off/Detailed Grid Lines (=38) On/Off IS Settings (=59) IS...
