
User Guide
Page 5
... Accessories 14 Holding the Camera 15 Charging the Battery Pack 15 Inserting the Battery Pack and Memory Card 16 Removing the Battery Pack and Memory Card 16 Setting the Date and Time 17 Changing the Date and Time 17 Display Language 18 Trying the Camera Out 19 Shooting (Smart Auto 19 Viewing 20 Erasing Images 21 Advanced Guide 1 Camera Basics 22 On/Off 22 Power-Saving Features (Auto Power Down 23 Power Saving in Shooting Mode 23 Power Saving in Playback Mode 23 Shutter Button 23 Shooting Display Options 24 Using the FUNC.
... Accessories 14 Holding the Camera 15 Charging the Battery Pack 15 Inserting the Battery Pack and Memory Card 16 Removing the Battery Pack and Memory Card 16 Setting the Date and Time 17 Changing the Date and Time 17 Display Language 18 Trying the Camera Out 19 Shooting (Smart Auto 19 Viewing 20 Erasing Images 21 Advanced Guide 1 Camera Basics 22 On/Off 22 Power-Saving Features (Auto Power Down 23 Power Saving in Shooting Mode 23 Power Saving in Playback Mode 23 Shutter Button 23 Shooting Display Options 24 Using the FUNC.

User Guide
Page 6
... Paper Size (for 4:3 Images 37 Red-Eye Correction 37 Changing Movie Image Quality 38 Helpful Shooting Features 38 Displaying Grid Lines 38 Magnifying the Area in Focus 39 Checking for Closed Eyes 39 Customizing Camera Operation 40 Deactivating the AF-Assist Beam 40 Deactivating the Red-Eye Reduction Lamp 40 Changing the Image Display Style after Shots 40 Changing the Image Display Period after Shots 40 Changing the Screen Displayed after Shots 41 3 Other Shooting Modes 42 Brightness / Color Customization (Live View Control 42 Specific...
... Paper Size (for 4:3 Images 37 Red-Eye Correction 37 Changing Movie Image Quality 38 Helpful Shooting Features 38 Displaying Grid Lines 38 Magnifying the Area in Focus 39 Checking for Closed Eyes 39 Customizing Camera Operation 40 Deactivating the AF-Assist Beam 40 Deactivating the Red-Eye Reduction Lamp 40 Changing the Image Display Style after Shots 40 Changing the Image Display Period after Shots 40 Changing the Screen Displayed after Shots 41 3 Other Shooting Modes 42 Brightness / Color Customization (Live View Control 42 Specific...

User Guide
Page 7
... Functions 77 Silencing Camera Operations 77 Adjusting the Volume 77 Hiding Hints and Tips 78 Date and Time 78 World Clock 78 Lens Retraction Timing 79 Using Eco Mode 79 Power-Saving Adjustment 79 Screen Brightness 80 Hiding the Start-Up Screen 80 Formatting Memory Cards 80 Low-Level Formatting 81 File Numbering 81 Date-Based Image Storage 82 Checking Certification Logos 82 Display Language 82 Adjusting Other Settings 82 Restoring Defaults 83 Before Use Basic Guide Advanced Guide 1 Camera Basics 2 Auto Mode 3 Other Shooting Modes 4 P Mode 5 Playback Mode 6 Setting Menu...
... Functions 77 Silencing Camera Operations 77 Adjusting the Volume 77 Hiding Hints and Tips 78 Date and Time 78 World Clock 78 Lens Retraction Timing 79 Using Eco Mode 79 Power-Saving Adjustment 79 Screen Brightness 80 Hiding the Start-Up Screen 80 Formatting Memory Cards 80 Low-Level Formatting 81 File Numbering 81 Date-Based Image Storage 82 Checking Certification Logos 82 Display Language 82 Adjusting Other Settings 82 Restoring Defaults 83 Before Use Basic Guide Advanced Guide 1 Camera Basics 2 Auto Mode 3 Other Shooting Modes 4 P Mode 5 Playback Mode 6 Setting Menu...
User Guide
Page 8
... 98 Removing All Images from a Photobook 98 Using an Eye-Fi Card 99 Checking Connection Information 99 Disabling Eye-Fi Transfer 100 8 Appendix 101 Troubleshooting 101 On-Screen Messages 104 On-Screen Information 105 Shooting (Information Display 105 Battery Level 106 Playback (Detailed Information Display 106 Summary of Shots per Memory Card 115 Recording Time per Memory Card 116 Before Use Basic Guide Advanced Guide 1 Camera Basics 2 Auto Mode 3 Other Shooting Modes 4 P Mode 5 Playback Mode 6 Setting Menu 7 Accessories 8 Appendix Index 8 Menu 108 Shooting Tab 110 Set Up...
... 98 Removing All Images from a Photobook 98 Using an Eye-Fi Card 99 Checking Connection Information 99 Disabling Eye-Fi Transfer 100 8 Appendix 101 Troubleshooting 101 On-Screen Messages 104 On-Screen Information 105 Shooting (Information Display 105 Battery Level 106 Playback (Detailed Information Display 106 Summary of Shots per Memory Card 115 Recording Time per Memory Card 116 Before Use Basic Guide Advanced Guide 1 Camera Basics 2 Auto Mode 3 Other Shooting Modes 4 P Mode 5 Playback Mode 6 Setting Menu 7 Accessories 8 Appendix Index 8 Menu 108 Shooting Tab 110 Set Up...

User Guide
Page 10
... in the shot (Self-Timer) -- =33, =47 ●● Add a date stamp -- =35 View ●● View images (Playback Mode) -- =61 ●● Automatic playback (Slideshow) -- =65 ●● On a TV -- =87 ●● On a computer -- =89 ●● Browse through images quickly -- =63 ●● Erase images -- =69 Shoot/View Movies ●● Shoot movies -- =28 ●● View movies (Playback Mode) -- =61 Before Use Basic Guide Advanced Guide 1 Camera Basics 2 Auto Mode 3 Other Shooting Modes 4 P Mode 5 Playback Mode 6 Setting Menu 7 Accessories 8 Appendix...
... in the shot (Self-Timer) -- =33, =47 ●● Add a date stamp -- =35 View ●● View images (Playback Mode) -- =61 ●● Automatic playback (Slideshow) -- =65 ●● On a TV -- =87 ●● On a computer -- =89 ●● Browse through images quickly -- =63 ●● Erase images -- =69 Shoot/View Movies ●● Shoot movies -- =28 ●● View movies (Playback Mode) -- =61 Before Use Basic Guide Advanced Guide 1 Camera Basics 2 Auto Mode 3 Other Shooting Modes 4 P Mode 5 Playback Mode 6 Setting Menu 7 Accessories 8 Appendix...

User Guide
Page 17
... camera on. ●●Press the power button. ●●The [Date/Time] screen is displayed when you manage images by pressing the [ ][ ] buttons. You can also add a date stamp to close the Before Use Basic Guide Advanced Guide 1 Camera Basics 2 Auto Mode 3 Other Shooting Modes 4 P Mode 5 Playback Mode 6 Setting Menu 7 Accessories 8 Appendix Index 17 Setting the Date and Time Set the current date and time correctly as follows. 1 Access the menu screen. ●●Press the [ ] button. 2 Choose [Date/Time]. ●●Move the zoom...
... camera on. ●●Press the power button. ●●The [Date/Time] screen is displayed when you manage images by pressing the [ ][ ] buttons. You can also add a date stamp to close the Before Use Basic Guide Advanced Guide 1 Camera Basics 2 Auto Mode 3 Other Shooting Modes 4 P Mode 5 Playback Mode 6 Setting Menu 7 Accessories 8 Appendix Index 17 Setting the Date and Time Set the current date and time correctly as follows. 1 Access the menu screen. ●●Press the [ ] button. 2 Choose [Date/Time]. ●●Move the zoom...

User Guide
Page 18
Before Use Basic Guide Advanced Guide 1 Camera Basics 2 Auto Mode 3 Other Shooting Modes 4 P Mode 5 Playback Mode 6 Setting Menu 7 Accessories 8 Appendix Index ●● The current time is depleted, the [Date/Time] screen will be charged in about 4 hours once you insert a charged battery pack or connect the camera to an AC adapter kit (sold separately, =85), even if the camera is left off. ●● Once the date/time battery is displayed if you wait too long in step...
Before Use Basic Guide Advanced Guide 1 Camera Basics 2 Auto Mode 3 Other Shooting Modes 4 P Mode 5 Playback Mode 6 Setting Menu 7 Accessories 8 Appendix Index ●● The current time is depleted, the [Date/Time] screen will be charged in about 4 hours once you insert a charged battery pack or connect the camera to an AC adapter kit (sold separately, =85), even if the camera is left off. ●● Once the date/time battery is displayed if you wait too long in step...
User Guide
Page 47
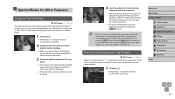
...;Follow step 1 in "Specific Scenes" (=43) and choose [ ]. 2 Compose the shot and press the shutter button halfway. ●●Make sure a green frame is displayed around the face you focus on a tripod or take other faces. 3 Press the shutter button all the way down ] is displayed. ●●The lamp blinks and the self-timer sound is played. 4 Join the subjects in the shooting area and look at...
...;Follow step 1 in "Specific Scenes" (=43) and choose [ ]. 2 Compose the shot and press the shutter button halfway. ●●Make sure a green frame is displayed around the face you focus on a tripod or take other faces. 3 Press the shutter button all the way down ] is displayed. ●●The lamp blinks and the self-timer sound is played. 4 Join the subjects in the shooting area and look at...

User Guide
Page 53
... the white balance data has been recorded. ●● Colors may look natural under the same light source that the entire screen is now displayed. Emphasizes reds in images. Before Use Basic Guide Advanced Guide 1 Camera Basics 2 Auto Mode 3 Other Shooting Modes 4 P Mode 5 Playback Mode 6 Setting Menu 7 Accessories 8 Appendix Index 53 Makes the sky, ocean, and other than people's skin tone may not produce the expected results with some skin tones. Creates sepia tone images. Makes red...
... the white balance data has been recorded. ●● Colors may look natural under the same light source that the entire screen is now displayed. Emphasizes reds in images. Before Use Basic Guide Advanced Guide 1 Camera Basics 2 Auto Mode 3 Other Shooting Modes 4 P Mode 5 Playback Mode 6 Setting Menu 7 Accessories 8 Appendix Index 53 Makes the sky, ocean, and other than people's skin tone may not produce the expected results with some skin tones. Creates sepia tone images. Makes red...

User Guide
Page 81
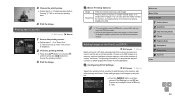
.... Before Use Basic Guide Advanced Guide 1 Camera Basics 2 Auto Mode 3 Other Shooting Modes 4 P Mode 5 Playback Mode 6 Setting Menu 7 Accessories 8 Appendix Index 81 Before lowlevel formatting, copy images on the memory card to a computer, or take other steps to back them up to continue with the formatting process. ●● Low-level formatting takes longer than the advertised capacity. In this case, all data will be erased, but the memory card can change how the camera assigns file numbers. ●●Choose [File Numbering...
.... Before Use Basic Guide Advanced Guide 1 Camera Basics 2 Auto Mode 3 Other Shooting Modes 4 P Mode 5 Playback Mode 6 Setting Menu 7 Accessories 8 Appendix Index 81 Before lowlevel formatting, copy images on the memory card to a computer, or take other steps to back them up to continue with the formatting process. ●● Low-level formatting takes longer than the advertised capacity. In this case, all data will be erased, but the memory card can change how the camera assigns file numbers. ●●Choose [File Numbering...

User Guide
Page 86
...;●External flash for traveling, which may damage the battery pack. AV Cable AVC-DC400 ●●Connect the camera to a TV to a computer or printer. Before Use Basic Guide Advanced Guide 1 Camera Basics 2 Auto Mode 3 Other Shooting Modes 4 P Mode 5 Playback Mode 6 Setting Menu 7 Accessories 8 Appendix Index 86 Other Accessories Interface Cable IFC-400PCU ●●For connecting the camera to enjoy playback on the larger TV screen. For details, visit your nearest Canon retailer.
...;●External flash for traveling, which may damage the battery pack. AV Cable AVC-DC400 ●●Connect the camera to a TV to a computer or printer. Before Use Basic Guide Advanced Guide 1 Camera Basics 2 Auto Mode 3 Other Shooting Modes 4 P Mode 5 Playback Mode 6 Setting Menu 7 Accessories 8 Appendix Index 86 Other Accessories Interface Cable IFC-400PCU ●●For connecting the camera to enjoy playback on the larger TV screen. For details, visit your nearest Canon retailer.

User Guide
Page 91
... connecting your camera to the Pictures folder on the operating system version, the software in horizontal orientation. -- Some functions provided by date. ●●After images are accessible. -- Before Use Basic Guide Advanced Guide 1 Camera Basics 2 Auto Mode 3 Other Shooting Modes 4 P Mode 5 Playback Mode 6 Setting Menu 7 Accessories 8 Appendix Index 91 Images shot in vertical orientation may occur when saving images or image information, depending on the computer, in separate folders named by the software may be saved in use, or image file sizes. -- Some problems...
... connecting your camera to the Pictures folder on the operating system version, the software in horizontal orientation. -- Some functions provided by date. ●●After images are accessible. -- Before Use Basic Guide Advanced Guide 1 Camera Basics 2 Auto Mode 3 Other Shooting Modes 4 P Mode 5 Playback Mode 6 Setting Menu 7 Accessories 8 Appendix Index 91 Images shot in vertical orientation may occur when saving images or image information, depending on the computer, in separate folders named by the software may be saved in use, or image file sizes. -- Some problems...
User Guide
Page 95
... paper. Configuring Print Settings Still Images Movies Specify the printing format, whether to 998 images on a memory card and configure relevant settings, such as the number of copies, as follows. You can be chosen on the camera. Choose up on Canon-brand PictBridge-compatible printers from a photo development service can also print the folder number, file number, and elapsed time for the frame by setting [Caption] to [On]. ●● To cancel printing, press the [ ] button, choose...
... paper. Configuring Print Settings Still Images Movies Specify the printing format, whether to 998 images on a memory card and configure relevant settings, such as the number of copies, as follows. You can be chosen on the camera. Choose up on Canon-brand PictBridge-compatible printers from a photo development service can also print the folder number, file number, and elapsed time for the frame by setting [Caption] to [On]. ●● To cancel printing, press the [ ] button, choose...

User Guide
Page 96
... that the memory card has print settings that were configured on the [ ] tab (=17). Clear DPOF data Standard Index Both On Off On Off On Off One image is labeled with the file number. - Changing the print settings using this camera may overwrite all of multiple images are cleared after printing. - ●● Not all previous settings. ●● Setting [Date] to the menu screen. ] button Before Use Basic Guide Advanced Guide 1 Camera Basics 2 Auto Mode 3 Other Shooting Modes 4 P Mode 5 Playback Mode 6 Setting Menu 7 Accessories...
... that the memory card has print settings that were configured on the [ ] tab (=17). Clear DPOF data Standard Index Both On Off On Off On Off One image is labeled with the file number. - Changing the print settings using this camera may overwrite all of multiple images are cleared after printing. - ●● Not all previous settings. ●● Setting [Date] to the menu screen. ] button Before Use Basic Guide Advanced Guide 1 Camera Basics 2 Auto Mode 3 Other Shooting Modes 4 P Mode 5 Playback Mode 6 Setting Menu 7 Accessories...

User Guide
Page 99
To resolve this icon may indicate a problem with a [ ] icon have been transferred. Images labeled with the card. Refer to [Disable]. Cards may continue to transmit radio waves even when [EyeFi trans.] is set to take a long time, and transfer may cause image transfer to [Disable] (=100). Poor Eye-Fi connections may be interrupted in mind. -- Before Use Basic Guide Advanced Guide 1 Camera Basics 2 Auto Mode 3 Other Shooting Modes 4 P Mode 5 Playback Mode 6 Setting Menu 7 Accessories 8 Appendix Index 99 Remove the Eye-Fi card before entering hospitals, aircraft...
To resolve this icon may indicate a problem with a [ ] icon have been transferred. Images labeled with the card. Refer to [Disable]. Cards may continue to transmit radio waves even when [EyeFi trans.] is set to take a long time, and transfer may cause image transfer to [Disable] (=100). Poor Eye-Fi connections may be interrupted in mind. -- Before Use Basic Guide Advanced Guide 1 Camera Basics 2 Auto Mode 3 Other Shooting Modes 4 P Mode 5 Playback Mode 6 Setting Menu 7 Accessories 8 Appendix Index 99 Remove the Eye-Fi card before entering hospitals, aircraft...

User Guide
Page 102
... shot with focus lock or AF lock (=55, =58). Before Use Basic Guide Advanced Guide 1 Camera Basics 2 Auto Mode 3 Other Shooting Modes 4 P Mode 5 Playback Mode 6 Setting Menu 7 Accessories 8 Appendix Index 102 Strange display on the screen under bright light. -- Subjects in indoor scenes and shooting at the red-eye reduction lamp. Also try pressing the shutter button halfway repeatedly. Subjects are displayed and the camera does not focus when the shutter button is added to [ ] (=58). ●● Adjust brightness by using exposure...
... shot with focus lock or AF lock (=55, =58). Before Use Basic Guide Advanced Guide 1 Camera Basics 2 Auto Mode 3 Other Shooting Modes 4 P Mode 5 Playback Mode 6 Setting Menu 7 Accessories 8 Appendix Index 102 Strange display on the screen under bright light. -- Subjects in indoor scenes and shooting at the red-eye reduction lamp. Also try pressing the shutter button halfway repeatedly. Subjects are displayed and the camera does not focus when the shutter button is added to [ ] (=58). ●● Adjust brightness by using exposure...

User Guide
Page 103
... folder structure and file names. Recording to the memory card takes too long, or continuous shooting is interrupted. ●● Use the camera to format the memory card, or switch to a card that supports high-speed recording. Switch to a memory card that even if the elapsed time display is incorrect, the length of the memory card (=81). -- Computer Cannot transfer images to a computer. ●● When attempting to transfer images to "Software Instruction Manual" (= 89) for movies shot in [ ] mode (=45) because audio is inadequate. menu settings...
... folder structure and file names. Recording to the memory card takes too long, or continuous shooting is interrupted. ●● Use the camera to format the memory card, or switch to a card that supports high-speed recording. Switch to a memory card that even if the elapsed time display is incorrect, the length of the memory card (=81). -- Computer Cannot transfer images to a computer. ●● When attempting to transfer images to "Software Instruction Manual" (= 89) for movies shot in [ ] mode (=45) because audio is inadequate. menu settings...

User Guide
Page 104
... formatted a supported memory card (=2) and have inserted it is moving, or when the camera is set to display images that were renamed or already edited on a computer, or images shot with enough free space (=16). In this case, write down the error number (Exx) and contact a Canon Customer Support Help Desk. Before Use Basic Guide Advanced Guide 1 Camera Basics 2 Auto Mode 3 Other Shooting Modes 4 P Mode 5 Playback Mode 6 Setting Menu 7 Accessories 8 Appendix Index 104 On-Screen Messages If an error message is displayed immediately after a shot, the image...
... formatted a supported memory card (=2) and have inserted it is moving, or when the camera is set to display images that were renamed or already edited on a computer, or images shot with enough free space (=16). In this case, write down the error number (Exx) and contact a Canon Customer Support Help Desk. Before Use Basic Guide Advanced Guide 1 Camera Basics 2 Auto Mode 3 Other Shooting Modes 4 P Mode 5 Playback Mode 6 Setting Menu 7 Accessories 8 Appendix Index 104 On-Screen Messages If an error message is displayed immediately after a shot, the image...
User Guide
Page 106
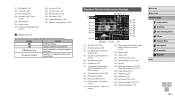
...) Movies: Playback time (=116) (20) Image editing (=73) (21) Protection (=67) (22) Favorites (=72) (23) My Colors (=53, =74) (24) Red-eye correction (=37, =75) (25) Shooting date/time (=17) Before Use Basic Guide Advanced Guide 1 Camera Basics 2 Auto Mode 3 Other Shooting Modes 4 P Mode 5 Playback Mode 6 Setting Menu 7 Accessories 8 Appendix Index 106 (21) ISO speed (=51) (22) i-Contrast (=52) (23) Grid lines (=38) (24) AE lock (=50), FE lock (= 59) (25) Shutter speed (26) Aperture value (27) Exposure compensation level (= 50) (28) Zoom...
...) Movies: Playback time (=116) (20) Image editing (=73) (21) Protection (=67) (22) Favorites (=72) (23) My Colors (=53, =74) (24) Red-eye correction (=37, =75) (25) Shooting date/time (=17) Before Use Basic Guide Advanced Guide 1 Camera Basics 2 Auto Mode 3 Other Shooting Modes 4 P Mode 5 Playback Mode 6 Setting Menu 7 Accessories 8 Appendix Index 106 (21) ISO speed (=51) (22) i-Contrast (=52) (23) Grid lines (=38) (24) AE lock (=50), FE lock (= 59) (25) Shutter speed (26) Aperture value (27) Exposure compensation level (= 50) (28) Zoom...

User Guide
Page 118
... Erasing 69 Playback → Viewing Protecting 67 Image stabilization 60 Indicator 26 Infinity (focusing range) 55 ISO speed 51 L Lamp 40 Live View Control (shooting mode) 42 Long shutter (shooting mode) 47 Low light (shooting mode) 43 M Macro (focusing range) 54 Magnified display 65 Memory cards 2 Recording time 116 Menu Basic operations 25 Table 107 Metering method 51 Miniature effect (shooting mode) 45 Monochrome (shooting mode) 46 Movies Editing 76 Image quality (resolution/frame rate) 38 Recording time 116 My Colors 53, 74 P P (shooting mode) 49 Package contents 2 Photobook set...
... Erasing 69 Playback → Viewing Protecting 67 Image stabilization 60 Indicator 26 Infinity (focusing range) 55 ISO speed 51 L Lamp 40 Live View Control (shooting mode) 42 Long shutter (shooting mode) 47 Low light (shooting mode) 43 M Macro (focusing range) 54 Magnified display 65 Memory cards 2 Recording time 116 Menu Basic operations 25 Table 107 Metering method 51 Miniature effect (shooting mode) 45 Monochrome (shooting mode) 46 Movies Editing 76 Image quality (resolution/frame rate) 38 Recording time 116 My Colors 53, 74 P P (shooting mode) 49 Package contents 2 Photobook set...


