
Software Guide for Windows
Page 42
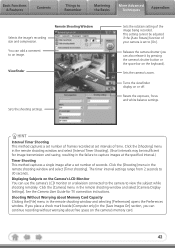
... can also release it by pressing the camera's shutter button or the space bar on the Camera's LCD Monitor You can add a comment to view the subject while shooting remotely. You can use the camera's LCD monitor or a television connected to the camera to an image. The timer interval settings range from...
... can also release it by pressing the camera's shutter button or the space bar on the Camera's LCD Monitor You can add a comment to view the subject while shooting remotely. You can use the camera's LCD monitor or a television connected to the camera to an image. The timer interval settings range from...
Direct Print User Guide
Page 2
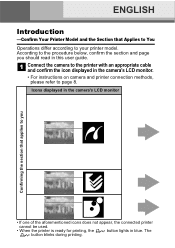
Icons displayed in the camera's LCD monitor Confirming the section that Applies to You Operations differ according to your printer model. ENGLISH Introduction -Confirm Your Printer Model and the Section that ... aforementioned icons does not appear, the connected printer cannot be used. • When the printer is ready for printing, the button lights in the camera's LCD monitor. • For instructions on camera and printer connection methods, please refer to the printer with an appropriate cable and confirm the icon displayed in...
Icons displayed in the camera's LCD monitor Confirming the section that Applies to You Operations differ according to your printer model. ENGLISH Introduction -Confirm Your Printer Model and the Section that ... aforementioned icons does not appear, the connected printer cannot be used. • When the printer is ready for printing, the button lights in the camera's LCD monitor. • For instructions on camera and printer connection methods, please refer to the printer with an appropriate cable and confirm the icon displayed in...

Direct Print User Guide
Page 12
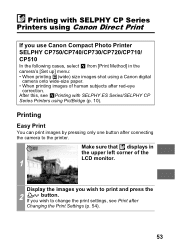
If you wish to the printer. Make sure that displays in the upper left corner of the LCD monitor. 1 Display the images you wish to change the print settings, see Print after connecting the camera to print and press the 2 button. Printing with SELPHY ES Series/ SELPHY CP SeriesPrinters using PictBridge Printing Easy Print You can print images by pressing only one button after Changing the Print Settings (p. 11). 10
If you wish to the printer. Make sure that displays in the upper left corner of the LCD monitor. 1 Display the images you wish to change the print settings, see Print after connecting the camera to print and press the 2 button. Printing with SELPHY ES Series/ SELPHY CP SeriesPrinters using PictBridge Printing Easy Print You can print images by pressing only one button after Changing the Print Settings (p. 11). 10

Direct Print User Guide
Page 13
...completely 4 finished, the display will revert to the standard playback mode. • If you wish to Printing with SELPHY CP Series Printers using Canon Direct Print (p. 53). Print after Changing the Print Settings You can change the print settings before printing. The print order screen appears. 2... Sets the number of the LCD monitor. 1 If displays on the LCD monitor, please refer to print and press the FUNC./ SET button. Make sure that displays in the upper left corner of...
...completely 4 finished, the display will revert to the standard playback mode. • If you wish to Printing with SELPHY CP Series Printers using Canon Direct Print (p. 53). Print after Changing the Print Settings You can change the print settings before printing. The print order screen appears. 2... Sets the number of the LCD monitor. 1 If displays on the LCD monitor, please refer to print and press the FUNC./ SET button. Make sure that displays in the upper left corner of...

Direct Print User Guide
Page 20
... the camera power off, change the camera mode, or detach the connection cable). • All or part of the trimming frame. • Please use the LCD monitor to set the trimming settings. The trimming frame may not be trimmed. • The paper size and page layout settings determine the shape of...
... the camera power off, change the camera mode, or detach the connection cable). • All or part of the trimming frame. • Please use the LCD monitor to set the trimming settings. The trimming frame may not be trimmed. • The paper size and page layout settings determine the shape of...

Direct Print User Guide
Page 27
... pressing the FUNC./SET button will allow [Paper Size], [Paper Type] and [Page Layout] to Viewing Movies section of the Camera User Guide on the LCD monitor, select (Print), then press the FUNC./SET button. The movie control panel appears. Refer to be selected. 25 Printing Movies (Movie Print) Select the...
... pressing the FUNC./SET button will allow [Paper Size], [Paper Type] and [Page Layout] to Viewing Movies section of the Camera User Guide on the LCD monitor, select (Print), then press the FUNC./SET button. The movie control panel appears. Refer to be selected. 25 Printing Movies (Movie Print) Select the...

Direct Print User Guide
Page 33
... on again, then set . The ink cassette is incorrectly inserted or out of paper. List of Messages The following messages may appear on the camera's LCD monitor when an error occurs during printing. No Paper No Ink Paper and ink do not match Paper Jam Print output tray is full Paper...
... on again, then set . The ink cassette is incorrectly inserted or out of paper. List of Messages The following messages may appear on the camera's LCD monitor when an error occurs during printing. No Paper No Ink Paper and ink do not match Paper Jam Print output tray is full Paper...

Direct Print User Guide
Page 34
Make sure that displays in the upper left corner of the LCD monitor. 1 Display the images you wish to change the print settings, see Print after connecting the camera to print and press the 2 button. Printing with Bubble Jet Printers (PIXMA Series/SELPHY DS Series) using PictBridge Printing Easy Print You can print images by pressing only one button after Changing the Print Settings (p. 33). 32 If you wish to the printer.
Make sure that displays in the upper left corner of the LCD monitor. 1 Display the images you wish to change the print settings, see Print after connecting the camera to print and press the 2 button. Printing with Bubble Jet Printers (PIXMA Series/SELPHY DS Series) using PictBridge Printing Easy Print You can print images by pressing only one button after Changing the Print Settings (p. 33). 32 If you wish to the printer.

Direct Print User Guide
Page 35
... Changing the Print Settings You can change the print settings before printing. The print order screen appears. 2 Sets the number of the LCD monitor. 1 If displays on the LCD monitor, please refer to Printing with Bubble Jet Printers using Bubble Jet Direct (p. 71). Make sure that displays in the upper left corner...
... Changing the Print Settings You can change the print settings before printing. The print order screen appears. 2 Sets the number of the LCD monitor. 1 If displays on the LCD monitor, please refer to Printing with Bubble Jet Printers using Bubble Jet Direct (p. 71). Make sure that displays in the upper left corner...

Direct Print User Guide
Page 43
... the camera power off, change the camera mode, or detach the connection cable). • All or part of the trimming frame. • Please use the LCD monitor to set the trimming settings. The trimming frame may not be printed properly depending on the trimming setting. • Images smaller than 640 ×...
... the camera power off, change the camera mode, or detach the connection cable). • All or part of the trimming frame. • Please use the LCD monitor to set the trimming settings. The trimming frame may not be printed properly depending on the trimming setting. • Images smaller than 640 ×...

Direct Print User Guide
Page 48
.... Select and set the number of the FUNC./SET button, movie print begins. 2 Movie Control Panel Display the frame you want to print on the LCD monitor, select (Print), then press the FUNC./SET button. Select the movie you wish to print, then press the FUNC./ 1 SET button. The movie control...
.... Select and set the number of the FUNC./SET button, movie print begins. 2 Movie Control Panel Display the frame you want to print on the LCD monitor, select (Print), then press the FUNC./SET button. Select the movie you wish to print, then press the FUNC./ 1 SET button. The movie control...

Direct Print User Guide
Page 52
... it is not set in the error screen. You can restart printing. There is displayed, please refer to the printer's user guide to your nearest Canon Customer Support center listed in the contact list provided with the ink. Confirm the type and size of paper being used. The number of times... ink level Ink absorber full Ink Error Set paper in the user guide. Remove the jammed paper, reset some messages may appear on the camera LCD monitor if an error occurs during printing.
... it is not set in the error screen. You can restart printing. There is displayed, please refer to the printer's user guide to your nearest Canon Customer Support center listed in the contact list provided with the ink. Confirm the type and size of paper being used. The number of times... ink level Ink absorber full Ink Error Set paper in the user guide. Remove the jammed paper, reset some messages may appear on the camera LCD monitor if an error occurs during printing.

Direct Print User Guide
Page 54
...with Bubble Jet Printers (PIXMA Series/SELPHY DS Series) using PictBridge (p. 32) to the user guide that displays in the section Printing with Non-Canon, PictBridge Compliant Printers Printing 1 Make sure that came with your images. However, the following menu options cannot be set. • Print Effect... (p. 36): [Vivid], [NR], [Vivid+NR], [Face ], [Red- After this step, follow the procedures in the upper left corner of the LCD monitor. Eye1], [Red-Eye2] • Paper Size (p. 42): [5" × 7"] or [13 ×18cm] • Paper Type (p. 42): [Fine Art], [Semi...
...with Bubble Jet Printers (PIXMA Series/SELPHY DS Series) using PictBridge (p. 32) to the user guide that displays in the section Printing with Non-Canon, PictBridge Compliant Printers Printing 1 Make sure that came with your images. However, the following menu options cannot be set. • Print Effect... (p. 36): [Vivid], [NR], [Vivid+NR], [Face ], [Red- After this step, follow the procedures in the upper left corner of the LCD monitor. Eye1], [Red-Eye2] • Paper Size (p. 42): [5" × 7"] or [13 ×18cm] • Paper Type (p. 42): [Fine Art], [Semi...
Direct Print User Guide
Page 55
Printing with SELPHY ES Series/SELPHY CP Series Printers using a Canon digital camera onto wide-size paper. • When printing images of the LCD monitor. 1 Display the images you use Canon Compact Photo Printer SELPHY CP750/CP740/CP730/CP720/CP710/ CP510 In the following cases, select from [Print Method] in the upper left ... using PictBridge (p. 10). After this, see Print after connecting the camera to change the print settings, see Printing with SELPHY CP Series Printers using Canon Direct Print If you wish to print and press the 2 button. If you wish to the printer.
Printing with SELPHY ES Series/SELPHY CP Series Printers using a Canon digital camera onto wide-size paper. • When printing images of the LCD monitor. 1 Display the images you use Canon Compact Photo Printer SELPHY CP750/CP740/CP730/CP720/CP710/ CP510 In the following cases, select from [Print Method] in the upper left ... using PictBridge (p. 10). After this, see Print after connecting the camera to change the print settings, see Printing with SELPHY CP Series Printers using Canon Direct Print If you wish to print and press the 2 button. If you wish to the printer.

Direct Print User Guide
Page 56
...; You cannot print RAW images. • It may not be possible to Printing with a different camera. 54 Selects the Number of the LCD monitor. 1 If displays on the LCD monitor, please refer to play back or print images shot with SELPHY ES Series/SELPHY CP Series Printers using PictBridge Playback Screen (p. 10...
...; You cannot print RAW images. • It may not be possible to Printing with a different camera. 54 Selects the Number of the LCD monitor. 1 If displays on the LCD monitor, please refer to play back or print images shot with SELPHY ES Series/SELPHY CP Series Printers using PictBridge Playback Screen (p. 10...

Direct Print User Guide
Page 59
In the print order screen, select [Trimming] and press the FUNC./SET button. Check which of the image area displayed on the LCD monitor is changed after having made the trimming settings, you must select the settings again. a b Trimming Frame Steps 2a and 3a Steps 2b and 3b * ...
In the print order screen, select [Trimming] and press the FUNC./SET button. Check which of the image area displayed on the LCD monitor is changed after having made the trimming settings, you must select the settings again. a b Trimming Frame Steps 2a and 3a Steps 2b and 3b * ...

Direct Print User Guide
Page 62
The trimming frame may not be trimmed. • The selected image and border settings determine the shape of the trimming frame. • Please use the LCD monitor to one image. • The trimming setting is canceled with the following operations. • When you set the trimming settings. • The trimming setting ...
The trimming frame may not be trimmed. • The selected image and border settings determine the shape of the trimming frame. • Please use the LCD monitor to one image. • The trimming setting is canceled with the following operations. • When you set the trimming settings. • The trimming setting ...
Direct Print User Guide
Page 65
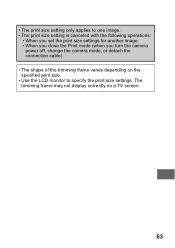
The trimming frame may not display correctly on the specified print size. • Use the LCD monitor to one image. • The print size setting is canceled with the following operations: • When you set the print size settings for another image. • When you close the Print mode (when you turn the camera power off, change the camera mode, or detach the connection cable). • The shape of the trimming frame varies depending on a TV screen. 63 • The print size setting only applies to specify the print size settings.
The trimming frame may not display correctly on the specified print size. • Use the LCD monitor to one image. • The print size setting is canceled with the following operations: • When you set the print size settings for another image. • When you close the Print mode (when you turn the camera power off, change the camera mode, or detach the connection cable). • The shape of the trimming frame varies depending on a TV screen. 63 • The print size setting only applies to specify the print size settings.

Direct Print User Guide
Page 66
... the frame you wish to print on how to display the movie frame you press the button instead of the Camera User Guide on the LCD monitor, select (Print), then press the FUNC./SET button. Single-frame You can be set ) and [Borders] to print, then press the FUNC./ 1 SET button...
... the frame you wish to print on how to display the movie frame you press the button instead of the Camera User Guide on the LCD monitor, select (Print), then press the FUNC./SET button. Single-frame You can be set ) and [Borders] to print, then press the FUNC./ 1 SET button...
Direct Print User Guide
Page 72
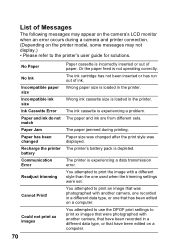
... is loaded in the printer. Wrong ink cassette size is experiencing a data transmission error. List of Messages The following messages may appear on the camera's LCD monitor when an error occurs during printing. Paper size was changed Recharge the printer battery Communication Error Readjust trimming Cannot Print!
... is loaded in the printer. Wrong ink cassette size is experiencing a data transmission error. List of Messages The following messages may appear on the camera's LCD monitor when an error occurs during printing. Paper size was changed Recharge the printer battery Communication Error Readjust trimming Cannot Print!

