User Guide for ImageBrowser version 3.6
Page 4
... mode to transfer data. 2. Please see the manual supplied with Mac OS X IMPORTANT • You can also use this procedure to start ImageBrowser in the guides for these models, set them to the computer. Starting ImageBrowser with your camera for starting the program, downloading images from the camera and printing images. Some models cannot connect with your computer. IMPORTANT • This guide assumes that all the relevant software programs and drivers have not yet installed the software...
... mode to transfer data. 2. Please see the manual supplied with Mac OS X IMPORTANT • You can also use this procedure to start ImageBrowser in the guides for these models, set them to the computer. Starting ImageBrowser with your camera for starting the program, downloading images from the camera and printing images. Some models cannot connect with your computer. IMPORTANT • This guide assumes that all the relevant software programs and drivers have not yet installed the software...

User Guide for ImageBrowser version 3.6
Page 5
... application using the following sequence. Click [Canon Camera] in the [Port] category and that your camera model name or [Canon Camera] is started.) Your camera model name or [Canon Camera] and the USB port number (i.e. @1) appears here. 5. The Camera Window will only appear the first time the program is selected in the camera. 5 ImageBrowser Software User Guide Locate and open the [Canon Utilities] folder, then open and display the images in the [Detected Camera] category and click [Set]. 6. Chapter...
... application using the following sequence. Click [Canon Camera] in the [Port] category and that your camera model name or [Canon Camera] is started.) Your camera model name or [Canon Camera] and the USB port number (i.e. @1) appears here. 5. The Camera Window will only appear the first time the program is selected in the camera. 5 ImageBrowser Software User Guide Locate and open the [Canon Utilities] folder, then open and display the images in the [Detected Camera] category and click [Set]. 6. Chapter...
User Guide for ImageBrowser version 3.6
Page 7
... ImageoBwr ser Statrups When you start ImageBrowser again the next time, the previously selected auto processing option will display in the Appendices for information about [Download Images] or [Launch RemoteCapture]. Chapter 1 Try It! ImageBrowser Starting ImageBrowser (4/5) 2. The Camera window will open and display the camera's images. 7 ImageBrowser Software User Guide The previously selected option will not appear when you start ImageBrowser by using appears here. 3. To execute the...
... ImageoBwr ser Statrups When you start ImageBrowser again the next time, the previously selected auto processing option will display in the Appendices for information about [Download Images] or [Launch RemoteCapture]. Chapter 1 Try It! ImageBrowser Starting ImageBrowser (4/5) 2. The Camera window will open and display the camera's images. 7 ImageBrowser Software User Guide The previously selected option will not appear when you start ImageBrowser by using appears here. 3. To execute the...
User Guide for ImageBrowser version 3.6
Page 15
... adjusting their shooting dates. • Create and edit movies, adding various effects: link movies and still images, superimpose titles and other settings as the shooting date and camera settings. • Use your computer to set up sound, shutter sound, operation sound and self-timer sound are automatically copied to : • Categorize, sort and manage image files on models supporting remote shooting). • Convert RAW format images (change them . Or to perform interval timer shooting after specifying an interval and the number of ImageBrowser. Use the file...
... adjusting their shooting dates. • Create and edit movies, adding various effects: link movies and still images, superimpose titles and other settings as the shooting date and camera settings. • Use your computer to set up sound, shutter sound, operation sound and self-timer sound are automatically copied to : • Categorize, sort and manage image files on models supporting remote shooting). • Convert RAW format images (change them . Or to perform interval timer shooting after specifying an interval and the number of ImageBrowser. Use the file...

User Guide for ImageBrowser version 3.6
Page 17
...-click the disk containing the folder you selected above. Image files appear in the folder that you move or copy with ImageBrowser? Double-click the folder that you created earlier. 2. Thus, the images displayed in the Finder. 17 ImageBrowser Software User Guide Where are actually the files in the folder as follows: As you select [My Pictures] from the Browser Window, images are moved or copied accordingly in...
...-click the disk containing the folder you selected above. Image files appear in the folder that you move or copy with ImageBrowser? Double-click the folder that you created earlier. 2. Thus, the images displayed in the Finder. 17 ImageBrowser Software User Guide Where are actually the files in the folder as follows: As you select [My Pictures] from the Browser Window, images are moved or copied accordingly in...

User Guide for ImageBrowser version 3.6
Page 42
... ImageBrowser Software User Guide If you connect the camera to the computer with an interface cable and are ready to communicate before you perform this procedure. • If you are using a memory card reader, open the Browser Window and the ImageBrowser Automation Wizard. REFERENCE • ImageBrowser will start and open the memory card icon in the Explorer View Section In the Explorer View Section, click [Canon Camera] to display the Camera Window. Let...
... ImageBrowser Software User Guide If you connect the camera to the computer with an interface cable and are ready to communicate before you perform this procedure. • If you are using a memory card reader, open the Browser Window and the ImageBrowser Automation Wizard. REFERENCE • ImageBrowser will start and open the memory card icon in the Explorer View Section In the Explorer View Section, click [Canon Camera] to display the Camera Window. Let...
User Guide for ImageBrowser version 3.6
Page 50
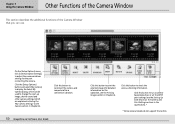
... or set the DPOF print settings (see the Printing Images section in Chapter 6). Click this button to check the various shooting information. Click the [Setup Options] button and select [My Camera] to display the Select My Camera dialog, which can use. Chapter 5 Using the Camera Window Other Functions of the Camera Window This section describes the additional functions of the Camera Window that you can be used to change the start-up image, shutter sound and other camera settings (which...
... or set the DPOF print settings (see the Printing Images section in Chapter 6). Click this button to check the various shooting information. Click the [Setup Options] button and select [My Camera] to display the Select My Camera dialog, which can use. Chapter 5 Using the Camera Window Other Functions of the Camera Window This section describes the additional functions of the Camera Window that you can be used to change the start-up image, shutter sound and other camera settings (which...
User Guide for ImageBrowser version 3.6
Page 62
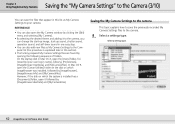
... and adding it to the camera, you can change the start-up image, start-up sound, shutter sound, operation sound, and self-timer sound in one easy step. • You can also add new files as My Camera Settings to your user log-in this list as My Camera Settings to the Computer list (the procedure is installed has a [Documents] folder, open the [Users] folder, followed by [your camera. However, if the disk on which the system...
... and adding it to the camera, you can change the start-up image, start-up sound, shutter sound, operation sound, and self-timer sound in one easy step. • You can also add new files as My Camera Settings to your user log-in this list as My Camera Settings to the Computer list (the procedure is installed has a [Documents] folder, open the [Users] folder, followed by [your camera. However, if the disk on which the system...
User Guide for ImageBrowser version 3.6
Page 64
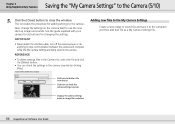
...] button to the camera. IMPORTANT • Never detach the interface cable, turn off the camera power, or do anything to stop communication between the camera and computer while the My Camera Settings are being saved to close the window. See the guide supplied with your camera for instructions for adding settings to use the new start-up image and sounds. Adding new files to the My Camera Settings Create a new image or sound file and save it...
...] button to the camera. IMPORTANT • Never detach the interface cable, turn off the camera power, or do anything to stop communication between the camera and computer while the My Camera Settings are being saved to close the window. See the guide supplied with your camera for instructions for adding settings to use the new start-up image and sounds. Adding new files to the My Camera Settings Create a new image or sound file and save it...
Software Starter Guide DC SD
Page 8
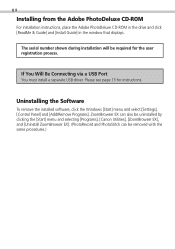
... displays. If You Will Be Connecting via a USB Port You must install a separate USB driver. ZoomBrowser EX can also be uninstalled by clicking the [Start] menu and selecting [Programs], [Canon Utilities], [ZoomBrowser EX], and [Uninstall ZoomBrowser EX]. (PhotoRecord and PhotoStitch can be required for instructions. The serial number shown during installation will be removed with the same procedures.) Uninstalling the Software To remove the installed software, click the Windows [Start] menu and select [Settings], [Control...
... displays. If You Will Be Connecting via a USB Port You must install a separate USB driver. ZoomBrowser EX can also be uninstalled by clicking the [Start] menu and selecting [Programs], [Canon Utilities], [ZoomBrowser EX], and [Uninstall ZoomBrowser EX]. (PhotoRecord and PhotoStitch can be required for instructions. The serial number shown during installation will be removed with the same procedures.) Uninstalling the Software To remove the installed software, click the Windows [Start] menu and select [Settings], [Control...
Software Starter Guide DC SD
Page 12
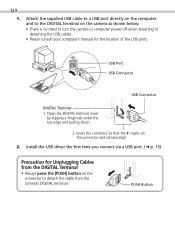
... and pulling down. 2. Attach the supplied USB cable to a USB port directly on the computer and to the DIGITAL terminal on the camera as shown below. • There is no need to detach the cable from the DIGITAL Terminal • Always press the [PUSH] button on the connector and camera align. 2. Install the USB driver the first time you connect via a USB port. (§ p. 13) Precaution for...
... and pulling down. 2. Attach the supplied USB cable to a USB port directly on the computer and to the DIGITAL terminal on the camera as shown below. • There is no need to detach the cable from the DIGITAL Terminal • Always press the [PUSH] button on the connector and camera align. 2. Install the USB driver the first time you connect via a USB port. (§ p. 13) Precaution for...
Software Starter Guide DC SD
Page 13
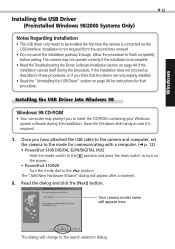
... the power. • PowerShot S10/S20 Turn the mode dial to the position. Read the dialog and click the [Next] button. Windows 13 Installing the USB Driver (Preinstalled Windows 98/2000 Systems Only) Notes Regarding Installation • The USB driver only needs to be installed the first time the camera is not required from the second time onward. • Do not cancel the installation partway through. Installing the USB Driver into Windows 98 Windows...
... the power. • PowerShot S10/S20 Turn the mode dial to the position. Read the dialog and click the [Next] button. Windows 13 Installing the USB Driver (Preinstalled Windows 98/2000 Systems Only) Notes Regarding Installation • The USB driver only needs to be installed the first time the camera is not required from the second time onward. • Do not cancel the installation partway through. Installing the USB Driver into Windows 98 Windows...
Software Starter Guide DC SD
Page 16
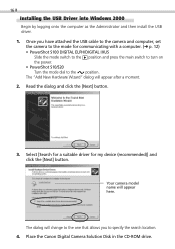
...; p. 12) • PowerShot S100 DIGITAL ELPH/DIGITAL IXUS Slide the mode switch to the position and press the main switch to turn on the power. • PowerShot S10/S20 Turn the mode dial to specify the search location. 4. Your camera model name will appear after a moment. 2. Once you to the position. Read the dialog and click the [Next] button. 3. 16 Installing the USB Driver into Windows 2000 Begin by...
...; p. 12) • PowerShot S100 DIGITAL ELPH/DIGITAL IXUS Slide the mode switch to the position and press the main switch to turn on the power. • PowerShot S10/S20 Turn the mode dial to specify the search location. 4. Your camera model name will appear after a moment. 2. Once you to the position. Read the dialog and click the [Next] button. 3. 16 Installing the USB Driver into Windows 2000 Begin by...
Software Starter Guide DC SD
Page 41
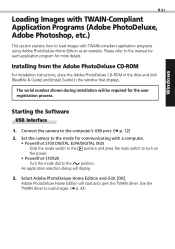
... [ReadMe & Guide] and [Install Guide] in the window that displays. Connect the camera to the manual for each application program for more details. An application selection dialog will start and open the TWAIN driver. The serial number shown during installation will be required for communicating with TWAIN-compliant application programs using Adobe PhotoDeluxe Home Edition as an example. Set the camera to the mode for the user registration...
... [ReadMe & Guide] and [Install Guide] in the window that displays. Connect the camera to the manual for each application program for more details. An application selection dialog will start and open the TWAIN driver. The serial number shown during installation will be required for communicating with TWAIN-compliant application programs using Adobe PhotoDeluxe Home Edition as an example. Set the camera to the mode for the user registration...
Software Starter Guide DC SD
Page 44
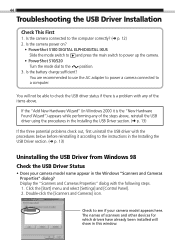
... the [Start] menu and select [Settings] and [Control Panel]. 2. The names of scanners and other devices for which drivers have already been installed will not be able to the instructions in the Installing the USB Driver section. (§ p. 13) Uninstalling the USB Driver from Windows 98 Check the USB Driver Status • Does your camera model appears here. Is the camera power on? • PowerShot S100 DIGITAL ELPH/DIGITAL IXUS Slide the mode switch to...
... the [Start] menu and select [Settings] and [Control Panel]. 2. The names of scanners and other devices for which drivers have already been installed will not be able to the instructions in the Installing the USB Driver section. (§ p. 13) Uninstalling the USB Driver from Windows 98 Check the USB Driver Status • Does your camera model appears here. Is the camera power on? • PowerShot S100 DIGITAL ELPH/DIGITAL IXUS Slide the mode switch to...

Software Starter Guide DC SD
Page 63
Use the procedure below to reconnect. • PowerShot S100 DIGITAL ELPH/DIGITAL IXUS Press the camera's main switch. • PowerShot S10/S20 Press the camera's shutter button. (The dialog will not appear and the camera will automatically start and display the "communication settings" dialog. 3. Please refer to load and print images. Confirm that [USB Port] and your camera model are selected and click the [Set] button. Windows 63 From Loading to Printing This section provides...
Use the procedure below to reconnect. • PowerShot S100 DIGITAL ELPH/DIGITAL IXUS Press the camera's main switch. • PowerShot S10/S20 Press the camera's shutter button. (The dialog will not appear and the camera will automatically start and display the "communication settings" dialog. 3. Please refer to load and print images. Confirm that [USB Port] and your camera model are selected and click the [Set] button. Windows 63 From Loading to Printing This section provides...
Software Starter Guide DC SD
Page 77
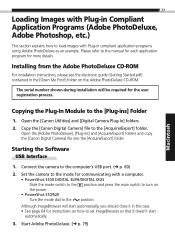
... how to load images with a computer. • PowerShot S100 DIGITAL ELPH/DIGITAL IXUS Slide the mode switch to the position and press the main switch to turn on the power. • PowerShot S10/S20 Turn the mode dial to the position. The serial number shown during installation will start automatically, you should close it doesn't start automatically. 3. Open the [Canon Utilities] and [Digital Camera Plug-In] folders. 2. Copy the [Canon Digital Camera] file to the manual for each...
... how to load images with a computer. • PowerShot S100 DIGITAL ELPH/DIGITAL IXUS Slide the mode switch to the position and press the main switch to turn on the power. • PowerShot S10/S20 Turn the mode dial to the position. The serial number shown during installation will start automatically, you should close it doesn't start automatically. 3. Open the [Canon Utilities] and [Digital Camera Plug-In] folders. 2. Copy the [Canon Digital Camera] file to the manual for each...
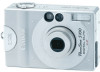
PowerShot S100 Camera User Guide
Page 16
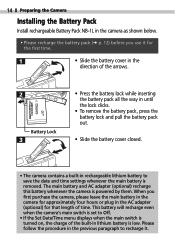
... remove the battery pack, press the battery lock and pull the battery pack out. • Slide the battery cover closed. • The camera contains a built-in rechargeable lithium battery to Off. • If the Set Date/Time menu displays when the main switch is low. This battery will recharge even when the camera's main switch is set to save the date and time settings whenever the main battery is powered by them. The main battery...
... remove the battery pack, press the battery lock and pull the battery pack out. • Slide the battery cover closed. • The camera contains a built-in rechargeable lithium battery to Off. • If the Set Date/Time menu displays when the main switch is low. This battery will recharge even when the camera's main switch is set to save the date and time settings whenever the main battery is powered by them. The main battery...

PowerShot S100 Camera User Guide
Page 63
... or button to 100 images. The starting file number is reset to assign file numbers with the File No. Reset set to Off is useful for avoiding file name duplication when the images are assigned individual frame numbers ranging from 100 to a computer and organized in a single directory or album. About File Numbers • Images are uploaded to 998. (Folder numbers cannot contain 99 in the last two digits.) • Since images shot in folders...
... or button to 100 images. The starting file number is reset to assign file numbers with the File No. Reset set to Off is useful for avoiding file name duplication when the images are assigned individual frame numbers ranging from 100 to a computer and organized in a single directory or album. About File Numbers • Images are uploaded to 998. (Folder numbers cannot contain 99 in the last two digits.) • Since images shot in folders...
PowerShot S100 Camera User Guide
Page 76
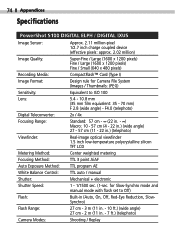
..., Red-Eye Reduction, SlowSynchro) Flash Range: 27 cm - 3 m (11 in. - 10 ft.) (wide angle) 27 cm - 2 m (11 in .) (telephoto) Viewfinder: Real-image optical viewfinder 1.5 inch low-temperature polycrystalline silicon TFT LCD Metering Method: Center weighted metering Focusing Method: TTL 3 point AiAF Auto Exposure Method: TTL program AE White Balance Control: TTL auto / manual Shutter: Mechanical + electronic Shutter Speed: 1 - 1/1500 sec. (1-sec. F4.0 (telephoto) Digital Teleconverter: 2x / 4x Focusing...
..., Red-Eye Reduction, SlowSynchro) Flash Range: 27 cm - 3 m (11 in. - 10 ft.) (wide angle) 27 cm - 2 m (11 in .) (telephoto) Viewfinder: Real-image optical viewfinder 1.5 inch low-temperature polycrystalline silicon TFT LCD Metering Method: Center weighted metering Focusing Method: TTL 3 point AiAF Auto Exposure Method: TTL program AE White Balance Control: TTL auto / manual Shutter: Mechanical + electronic Shutter Speed: 1 - 1/1500 sec. (1-sec. F4.0 (telephoto) Digital Teleconverter: 2x / 4x Focusing...


