
PowerShot G12 Camera User Guide
Page 1
Camera User Guide • Make sure you read this guide, including the "Safety Precautions" section, before using the camera. • Store this guide safely so that you can use it in the future. ENGLISH
Camera User Guide • Make sure you read this guide, including the "Safety Precautions" section, before using the camera. • Store this guide safely so that you can use it in the future. ENGLISH
PowerShot G12 Camera User Guide
Page 2
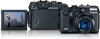
...• Adobe Reader is missing, contact the retailer from which you want to connect the camera to a printer (sold separately) and print. • Software Guide Read when you purchased the camera. Camera Battery Pack NB-7L (with Terminal Cover) Battery Charger CB-2LZ/CB-2LZE Interface Cable ...IFC-400PCU Stereo AV Cable AVC-DC400ST Neck Strap NS-DC9 Getting Started DIGITAL CAMERA Solution Disk Warranty "Canon Customer Card Support" Leaflet Using the PDF Manuals Also refer to view the PDF manuals. 2 If anything is required to...
...• Adobe Reader is missing, contact the retailer from which you want to connect the camera to a printer (sold separately) and print. • Software Guide Read when you purchased the camera. Camera Battery Pack NB-7L (with Terminal Cover) Battery Charger CB-2LZ/CB-2LZE Interface Cable ...IFC-400PCU Stereo AV Cable AVC-DC400ST Neck Strap NS-DC9 Getting Started DIGITAL CAMERA Solution Disk Warranty "Canon Customer Card Support" Leaflet Using the PDF Manuals Also refer to view the PDF manuals. 2 If anything is required to...

PowerShot G12 Camera User Guide
Page 3
... with a warranty claim to the country of sale. If there is not a malfunction. 3 This is a problem with the camera while abroad, please return it to a Canon Customer Support Help Desk. If so, remove the film before proceeding with extremely high-precision manufacturing techniques. Warranty Limitations This...that results in the failure of an image to be recorded or to be recorded in the country of sale before using the camera. For Canon Customer Support contacts, please see the customer support list supplied with a thin plastic film for personal use . Please note that ...
... with a warranty claim to the country of sale. If there is not a malfunction. 3 This is a problem with the camera while abroad, please return it to a Canon Customer Support Help Desk. If so, remove the film before proceeding with extremely high-precision manufacturing techniques. Warranty Limitations This...that results in the failure of an image to be recorded or to be recorded in the country of sale before using the camera. For Canon Customer Support contacts, please see the customer support list supplied with a thin plastic film for personal use . Please note that ...
PowerShot G12 Camera User Guide
Page 4
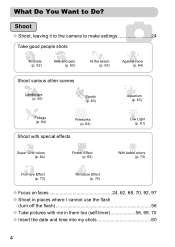
What Do You Want to Do? 4 Shoot ● Shoot, leaving it to the camera to make settings 24 Take good people shots I Portraits V Kids and pets (p. 62) (p. 63) w At the beach (p. 63) P Against snow (p. 64) Shoot various other scenes J ...
What Do You Want to Do? 4 Shoot ● Shoot, leaving it to the camera to make settings 24 Take good people shots I Portraits V Kids and pets (p. 62) (p. 63) w At the beach (p. 63) P Against snow (p. 64) Shoot various other scenes J ...

PowerShot G12 Camera User Guide
Page 5
... movies 30, 117 2 Print ● Easily print pictures 152 Save ● Save images to a computer 32 3 Other ● Turn off sounds 49 ● Use the camera abroad 15, 164 ● Use the front dial to change settings 171 ● Understand what is displayed on the screen 196 5
... movies 30, 117 2 Print ● Easily print pictures 152 Save ● Save images to a computer 32 3 Other ● Turn off sounds 49 ● Use the camera abroad 15, 164 ● Use the front dial to change settings 171 ● Understand what is displayed on the screen 196 5
PowerShot G12 Camera User Guide
Page 6
... - Basic Operations ....46 6 MENU - Basic Operations 48 Changing the Sound Settings ......... 49 Changing the Screen Brightness .... 50 Returning the Camera to Default Settings 51 Low Level Memory Card Formatting 52 Power Saving Function (Auto Power Down 53 Clock Functions 54 3 Shooting with Commonly ... Self-Timer 70 Shooting High Contrast Scenes (High Dynamic Range 71 Shooting with Faded Colors (Nostalgic 73 Shoot with the Effects of this camera. Chapters 4 onward explain the advanced functions, letting you learn more as you read each chapter. Table of Contents Chapters 1 - 3...
... - Basic Operations ....46 6 MENU - Basic Operations 48 Changing the Sound Settings ......... 49 Changing the Screen Brightness .... 50 Returning the Camera to Default Settings 51 Low Level Memory Card Formatting 52 Power Saving Function (Auto Power Down 53 Clock Functions 54 3 Shooting with Commonly ... Self-Timer 70 Shooting High Contrast Scenes (High Dynamic Range 71 Shooting with Faded Colors (Nostalgic 73 Shoot with the Effects of this camera. Chapters 4 onward explain the advanced functions, letting you learn more as you read each chapter. Table of Contents Chapters 1 - 3...

PowerShot G12 Camera User Guide
Page 7
... Colors 87 Shooting Using the Viewfinder........ 89 Changing the Composition with the Focus Lock 90 Shooting Using a TV Monitor .......... 90 5 Getting More Out of Your Camera 91 Changing the AF Frame Mode........ 92 Changing the AF Frame Position and Size 93 Shooting with Servo AF 94 Choosing the Subject to Focus...
... Colors 87 Shooting Using the Viewfinder........ 89 Changing the Composition with the Focus Lock 90 Shooting Using a TV Monitor .......... 90 5 Getting More Out of Your Camera 91 Changing the AF Frame Mode........ 92 Changing the AF Frame Position and Size 93 Shooting with Servo AF 94 Choosing the Subject to Focus...

PowerShot G12 Camera User Guide
Page 8
... 8 Printing 151 Printing Images 152 Printing from the Print List (DPOF 154 Choosing Images for Printing (DPOF 155 Print Added Images 158 9 Customizing Camera Settings 159 Changing Camera Settings 160 Changing Shooting Function Settings 167 Registering Commonly Used Shooting Menus (My Menu 173 Changing Playback Function Settings 174 10 Useful Information ..........175...
... 8 Printing 151 Printing Images 152 Printing from the Print List (DPOF 154 Choosing Images for Printing (DPOF 155 Print Added Images 158 9 Customizing Camera Settings 159 Changing Camera Settings 160 Changing Shooting Function Settings 167 Registering Commonly Used Shooting Menus (My Menu 173 Changing Playback Function Settings 174 10 Useful Information ..........175...

PowerShot G12 Camera User Guide
Page 9
...smell, or otherwise behaves abnormally. • Do not use organic solvents such as the sun on a clear day). This could damage your camera distributor or the closest Canon Customer Support Help Desk. • Do not use . It is used correctly. • The safety precautions noted on the following pages ... or foreign objects to clean the equipment. • Do not let the product come into contact with any CD player that you use the camera's viewfinder in an audio CD player (music player) could result in asphyxiation. • Use only recommended power sources. • Do not attempt...
...smell, or otherwise behaves abnormally. • Do not use organic solvents such as the sun on a clear day). This could damage your camera distributor or the closest Canon Customer Support Help Desk. • Do not use . It is used correctly. • The safety precautions noted on the following pages ... or foreign objects to clean the equipment. • Do not let the product come into contact with any CD player that you use the camera's viewfinder in an audio CD player (music player) could result in asphyxiation. • Use only recommended power sources. • Do not attempt...

PowerShot G12 Camera User Guide
Page 10
..., overheating or an explosion of glass may explode or leak, resulting in the following places. - This could lead to injury or damage the camera. • When using the flash, be sure to cuts. 10 Humid or dusty areas. The battery may lead to attach them firmly. ...• Avoid using the separately sold optional lenses, be careful not to contact the terminals or plug. High temperatures may cause deformation of the camera or battery charger casing. • The slideshow transition effects may crack, and the shards of the battery, resulting in electrical shock, fire, burns...
..., overheating or an explosion of glass may explode or leak, resulting in the following places. - This could lead to injury or damage the camera. • When using the flash, be sure to cuts. 10 Humid or dusty areas. The battery may lead to attach them firmly. ...• Avoid using the separately sold optional lenses, be careful not to contact the terminals or plug. High temperatures may cause deformation of the camera or battery charger casing. • The slideshow transition effects may crack, and the shards of the battery, resulting in electrical shock, fire, burns...
PowerShot G12 Camera User Guide
Page 11
...such as cloth on a beach or at bright light sources (the sun, etc.). Doing so may damage the image sensor. • When using the camera. Contacting other insulators. This may occur. • Before you discard the battery, cover the terminals with the screen. • Do not attach accessories to...• Do not place the battery near pets. Safety Precautions Caution Denotes the possibility of damage to the equipment. • Do not aim the camera at a windy location, be emitted from the flash. Leaving the unit plugged in a bag, close the screen to face inward to ensure that ...
...such as cloth on a beach or at bright light sources (the sun, etc.). Doing so may damage the image sensor. • When using the camera. Contacting other insulators. This may occur. • Before you discard the battery, cover the terminals with the screen. • Do not attach accessories to...• Do not place the battery near pets. Safety Precautions Caution Denotes the possibility of damage to the equipment. • Do not aim the camera at a windy location, be emitted from the flash. Leaving the unit plugged in a bag, close the screen to face inward to ensure that ...
PowerShot G12 Camera User Guide
Page 12
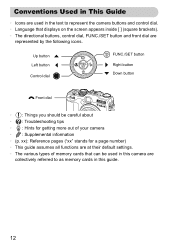
...brackets). • The directional buttons, control dial, FUNC./SET button and front dial are at their default settings. • The various types of your camera • : Supplemental information • (p. Up button Left button Control dial FUNC./SET button Right button Down button ÷ Front dial • :... Things you should be used in the text to represent the camera buttons and control dial. • Language that can be careful about • : Troubleshooting tips • : Hints for a page number) ...
...brackets). • The directional buttons, control dial, FUNC./SET button and front dial are at their default settings. • The various types of your camera • : Supplemental information • (p. Up button Left button Control dial FUNC./SET button Right button Down button ÷ Front dial • :... Things you should be used in the text to represent the camera buttons and control dial. • Language that can be careful about • : Troubleshooting tips • : Hints for a page number) ...
PowerShot G12 Camera User Guide
Page 13
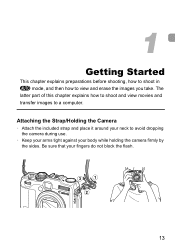
The latter part of this chapter explains how to shoot and view movies and transfer images to view and erase the images you take. Attaching the Strap/Holding the Camera • Attach the included strap and place it around your neck to avoid dropping the camera during use. • Keep your arms tight against your fingers do not block the flash. 13 1 Getting Started This chapter explains preparations before shooting, how to shoot in A mode, and then how to a computer. Be sure that your body while holding the camera firmly by the sides.
The latter part of this chapter explains how to shoot and view movies and transfer images to view and erase the images you take. Attaching the Strap/Holding the Camera • Attach the included strap and place it around your neck to avoid dropping the camera during use. • Keep your arms tight against your fingers do not block the flash. 13 1 Getting Started This chapter explains preparations before shooting, how to shoot in A mode, and then how to a computer. Be sure that your body while holding the camera firmly by the sides.

PowerShot G12 Camera User Guide
Page 14
... to charge the battery. X The charge lamp lights orange and charging starts. CB-2LZ CB-2LZE Insert the battery. ● Align the o marks on the Camera & Imaging Products Association (CIPA) measurement standard. • Under some shooting conditions, the number of purchase. Charge the battery. ● For CB-2LZ: Flip out the...
... to charge the battery. X The charge lamp lights orange and charging starts. CB-2LZ CB-2LZE Insert the battery. ● Align the o marks on the Camera & Imaging Products Association (CIPA) measurement standard. • Under some shooting conditions, the number of purchase. Charge the battery. ● For CB-2LZ: Flip out the...
PowerShot G12 Camera User Guide
Page 15
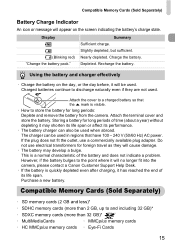
...the battery and does not indicate a problem. However, if the battery bulges to the point where it will no longer fit into the camera, please contact a Canon Customer Support Help Desk. • If the battery is quickly depleted even after charging, it has reached the end of time (about ...used . Purchase a new battery. Nearly depleted. Attach the cover to store the battery for long periods: Deplete and remove the battery from the camera. Compatible Memory Cards (Sold Separately) Battery Charge Indicator An icon or message will appear on the day, or the day before, it may ...
...the battery and does not indicate a problem. However, if the battery bulges to the point where it will no longer fit into the camera, please contact a Canon Customer Support Help Desk. • If the battery is quickly depleted even after charging, it has reached the end of time (about ...used . Purchase a new battery. Nearly depleted. Attach the cover to store the battery for long periods: Deplete and remove the battery from the camera. Compatible Memory Cards (Sold Separately) Battery Charge Indicator An icon or message will appear on the day, or the day before, it may ...

PowerShot G12 Camera User Guide
Page 17
... locked position, [Memory card locked] will appear on the screen and you will vary depending on the screen? What if [Memory card locked] appears on camera settings, the subject and the memory card used. 17 If this tab is oriented correctly. Close the cover. ● Close the cover ( ), and ...downward as shown until it clicks into place with a click. ● Be sure the memory card is in the wrong direction could damage the camera. Removing the Battery and Memory Card Remove the battery. ● Open the cover and press the battery lock in until you slide it until it...
... locked position, [Memory card locked] will appear on the screen and you will vary depending on the screen? What if [Memory card locked] appears on camera settings, the subject and the memory card used. 17 If this tab is oriented correctly. Close the cover. ● Close the cover ( ), and ...downward as shown until it clicks into place with a click. ● Be sure the memory card is in the wrong direction could damage the camera. Removing the Battery and Memory Card Remove the battery. ● Open the cover and press the battery lock in until you slide it until it...
PowerShot G12 Camera User Guide
Page 18
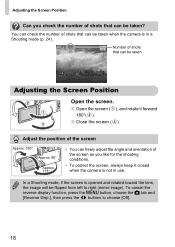
... the number of shots that can be taken Adjusting the Screen Position Open the screen. ● Open the screen ( ), and rotate it closed when the camera is in use. Adjust the position of the screen Approx. 180° Approx. 90° Approx. 177° • You can freely adjust the angle... buttons to right (mirror image). In a Shooting mode, if the screen is opened and rotated toward the lens, the image will be taken when the camera is not in a Shooting mode (p. 24).
... the number of shots that can be taken Adjusting the Screen Position Open the screen. ● Open the screen ( ), and rotate it closed when the camera is in use. Adjust the position of the screen Approx. 180° Approx. 90° Approx. 177° • You can freely adjust the angle... buttons to right (mirror image). In a Shooting mode, if the screen is opened and rotated toward the lens, the image will be taken when the camera is not in a Shooting mode (p. 24).
PowerShot G12 Camera User Guide
Page 19
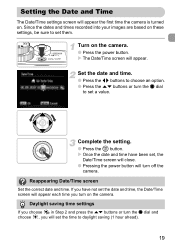
... on these settings, be sure to choose an option. ● Press the op buttons or turn on the camera. X The Date/Time screen will appear the first time the camera is turned on the camera. ● Press the power button. If you turn the Ê dial to daylight saving (1 hour ahead). 19 X Once... been set the time to set them. Daylight saving time settings If you choose in Step 2 and press the op buttons or turn off the camera.
... on these settings, be sure to choose an option. ● Press the op buttons or turn on the camera. X The Date/Time screen will appear the first time the camera is turned on the camera. ● Press the power button. If you turn the Ê dial to daylight saving (1 hour ahead). 19 X Once... been set the time to set them. Daylight saving time settings If you choose in Step 2 and press the op buttons or turn off the camera.
PowerShot G12 Camera User Guide
Page 20
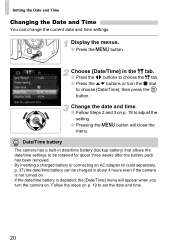
... setting. ● Pressing the n button will appear when you turn the Ê dial to choose the 3 tab. ● Press the op buttons or turn the camera on. Display the menus. ● Press the n button. Follow the steps on p. 19 to be retained for about three weeks after the battery pack has... settings. Choose [Date/Time] in the 3 tab. ● Press the qr buttons to choose [Date/Time], then press the m button. Date/Time battery • The camera has a built-in date/time battery (backup battery) that allows the date/time settings to set the date and time. 20 Setting the Date and...
... setting. ● Pressing the n button will appear when you turn the Ê dial to choose the 3 tab. ● Press the op buttons or turn the camera on. Display the menus. ● Press the n button. Follow the steps on p. 19 to be retained for about three weeks after the battery pack has... settings. Choose [Date/Time] in the 3 tab. ● Press the qr buttons to choose [Date/Time], then press the m button. Date/Time battery • The camera has a built-in date/time battery (backup battery) that allows the date/time settings to set the date and time. 20 Setting the Date and...
PowerShot G12 Camera User Guide
Page 22
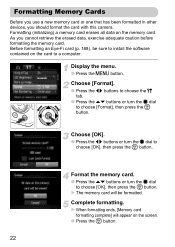
Before formatting an Eye-Fi card (p. 188), be formatted. As you should format the card with this camera. Display the menu. ● Press the n button. Format the memory card. ● Press the op buttons or turn the Ê dial to choose [OK], then ...
Before formatting an Eye-Fi card (p. 188), be formatted. As you should format the card with this camera. Display the menu. ● Press the n button. Format the memory card. ● Press the op buttons or turn the Ê dial to choose [OK], then ...


