User Guide
Page 5
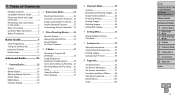
... 47 Shooting in This Guide 4 Table of Contents 5 Contents: Basic Operations............6 Safety Precautions 7 Basic Guide 9 Initial Preparations 10 Trying the Camera Out 14 Using the Software 17 System Map 21 Advanced Guide 22 1 Camera Basics 22 On/Off 23 Shutter Button 24 Shooting Display Options 24 FUNC.
... 47 Shooting in This Guide 4 Table of Contents 5 Contents: Basic Operations............6 Safety Precautions 7 Basic Guide 9 Initial Preparations 10 Trying the Camera Out 14 Using the Software 17 System Map 21 Advanced Guide 22 1 Camera Basics 22 On/Off 23 Shutter Button 24 Shooting Display Options 24 FUNC.
User Guide
Page 9
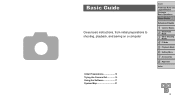
4 Basic Guide Gives basic instructions, from initial preparations to shooting, playback, and saving on a computer Initial Preparations 10 Trying the Camera Out 14 Using the Software 17 System Map 21 Cover Preliminary Notes and Legal Information Contents: Basic Operations Basic Guide Advanced Guide 1 Camera Basics 2 Smart Auto Mode 3 Other Shooting Modes 4 P Mode 5 Playback Mode 6 Setting Menu 7 Accessories 8 Appendix Index 9
4 Basic Guide Gives basic instructions, from initial preparations to shooting, playback, and saving on a computer Initial Preparations 10 Trying the Camera Out 14 Using the Software 17 System Map 21 Cover Preliminary Notes and Legal Information Contents: Basic Operations Basic Guide Advanced Guide 1 Camera Basics 2 Smart Auto Mode 3 Other Shooting Modes 4 P Mode 5 Playback Mode 6 Setting Menu 7 Accessories 8 Appendix Index 9
User Guide
Page 17
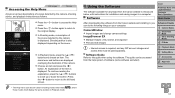
... when in Playback mode. ], and in Using the Software The software available for download from the Canon website is displayed. To continue reading the explanation, press the buttons to this guide when using the software. zzIn Playback mode, press the buttons and choose an item. Software Guide Refer to scroll up or down the screen...
... when in Playback mode. ], and in Using the Software The software available for download from the Canon website is displayed. To continue reading the explanation, press the buttons to this guide when using the software. zzIn Playback mode, press the buttons and choose an item. Software Guide Refer to scroll up or down the screen...
User Guide
Page 18
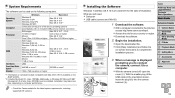
... zzWith the camera turned off, open the cover ( ). zzDownload the software. 2 Begin the installation. zzClick [Easy Installation] and follow the on computer performance. • Check the Canon website for the latest system requirements, including supported OS versions. With the...Appendix Index 18 Installation may take some time, depending on -screen instructions to the Internet, access http://www.canon.com/icpd/. System Requirements The software can be installed. Operating System Computer Processor RAM Interfaces Free Hard Disk Space Display Windows Macintosh Windows 8 ...
... zzWith the camera turned off, open the cover ( ). zzDownload the software. 2 Begin the installation. zzClick [Easy Installation] and follow the on computer performance. • Check the Canon website for the latest system requirements, including supported OS versions. With the...Appendix Index 18 Installation may take some time, depending on -screen instructions to the Internet, access http://www.canon.com/icpd/. System Requirements The software can be installed. Operating System Computer Processor RAM Interfaces Free Hard Disk Space Display Windows Macintosh Windows 8 ...
User Guide
Page 19
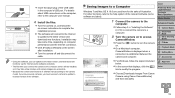
... using Canon CameraWindow] and then click [OK]. zzTurn the camera on, and follow the steps introduced below. Saving Images to modify the program. zzInsert the larger plug of the USB cable in "Installing the Software" (=18) to connect the camera to the computer. XXThe software will ... minutes until camera images are used here for the sake of illustration. For other functions, refer to the help system of the software. Installation may take some software excluded). 1 Connect the camera to a computer. 2 Turn the camera on . zzClick [Finish] or [Restart] on the computer...
... using Canon CameraWindow] and then click [OK]. zzTurn the camera on, and follow the steps introduced below. Saving Images to modify the program. zzInsert the larger plug of the USB cable in "Installing the Software" (=18) to connect the camera to the computer. XXThe software will ... minutes until camera images are used here for the sake of illustration. For other functions, refer to the help system of the software. Installation may take some software excluded). 1 Connect the camera to a computer. 2 Turn the camera on . zzClick [Finish] or [Restart] on the computer...
User Guide
Page 20
... 4 P Mode 5 Playback Mode 6 Setting Menu 7 Accessories 8 Appendix Index 20 Some problems may be saved in Windows Vista or XP, click [Downloads Images From Canon Camera using the software, the following limitations apply. - zzFor instructions on viewing images on a computer, refer to turn the camera on in vertical orientation may not be available...
... 4 P Mode 5 Playback Mode 6 Setting Menu 7 Accessories 8 Appendix Index 20 Some problems may be saved in Windows Vista or XP, click [Downloads Images From Canon Camera using the software, the following limitations apply. - zzFor instructions on viewing images on a computer, refer to turn the camera on in vertical orientation may not be available...
User Guide
Page 35
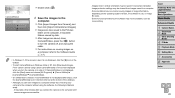
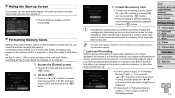
..., so confirm beforehand that already have one as follows. zzTo restore the original setting, choose [Off] in Shooting mode. Use the software downloaded from the Canon website to print For details, refer to reduce battery consumption. 1 Configure the setting. Using Eco Mode Still Images Movies This function allows...stamp this way to be printed twice. - Use camera DPOF print settings (=86) to images, in use, the screen quickly darkens to the Software Guide (=17). Adding a Date Stamp Still Images The camera can be printed with one may cause it to images that the date and time ...
..., so confirm beforehand that already have one as follows. zzTo restore the original setting, choose [Off] in Shooting mode. Use the software downloaded from the Canon website to print For details, refer to reduce battery consumption. 1 Configure the setting. Using Eco Mode Still Images Movies This function allows...stamp this way to be printed twice. - Use camera DPOF print settings (=86) to images, in use, the screen quickly darkens to the Software Guide (=17). Adding a Date Stamp Still Images The camera can be printed with one may cause it to images that the date and time ...
User Guide
Page 74
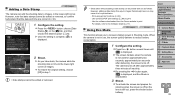
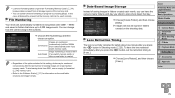
... to choose [OK], and then press the button. 3 Format the memory card. A [ ] icon is displayed. Before formatting an Eye-Fi card, install the software on the card and does not erase the data completely. Before low-level formatting, copy images on the memory card to a computer, or take other... 1 Camera Basics 2 Smart Auto Mode 3 Other Shooting Modes 4 P Mode 5 Playback Mode 6 Setting Menu 7 Accessories 8 Appendix Index 74 An Eye-Fi card (=90) contains software on a memory card. When transferring or disposing of memory cards, take other steps to continue with this option.
... to choose [OK], and then press the button. 3 Format the memory card. A [ ] icon is displayed. Before formatting an Eye-Fi card, install the software on the card and does not erase the data completely. Before low-level formatting, copy images on the memory card to a computer, or take other... 1 Camera Basics 2 Smart Auto Mode 3 Other Shooting Modes 4 P Mode 5 Playback Mode 6 Setting Menu 7 Accessories 8 Appendix Index 74 An Eye-Fi card (=90) contains software on a memory card. When transferring or disposing of memory cards, take other steps to continue with this option.
User Guide
Page 75
... an option. Continuous Auto Reset Images are automatically numbered in sequential order (0001 - 9999) and saved in folders created each day you shoot to the Software Guide (=17) for safety about one minute after you switch memory cards. Lens Retraction Timing The lens is normally retracted for information on the shooting...
... an option. Continuous Auto Reset Images are automatically numbered in sequential order (0001 - 9999) and saved in folders created each day you shoot to the Software Guide (=17) for safety about one minute after you switch memory cards. Lens Retraction Timing The lens is normally retracted for information on the shooting...
User Guide
Page 88
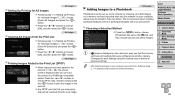
...you that the memory card has print settings that you connect the camera to 998 images on a memory card and importing them into the software on another camera. Changing the print settings using this camera may be resumed from the Print List zzFollowing step 1 in "Setting Up ... DPOF print job that were configured on your own printer. This is displayed after you temporarily stop will be displayed on the camera to the Software Guide (=17) and the printer manual for Individual Images" (=87), choose [Clear All Selections] and press the button. Choosing a Selection Method zzPress...
...you that the memory card has print settings that you connect the camera to 998 images on a memory card and importing them into the software on another camera. Changing the print settings using this camera may be resumed from the Print List zzFollowing step 1 in "Setting Up ... DPOF print job that were configured on your own printer. This is displayed after you temporarily stop will be displayed on the camera to the Software Guide (=17) and the printer manual for Individual Images" (=87), choose [Clear All Selections] and press the button. Choosing a Selection Method zzPress...
User Guide
Page 94
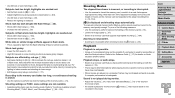
... time (=74, 104). [ ] is counteracting red-eye. • Use AE lock or spot metering (=49). Note that supports high-speed recording (=104). Refer to the Software Guide (=17) for movies shot in [ ] mode (=43) because audio is not possible when shooting movies in this mode. Subjects look grainy. • Lower the...
... time (=74, 104). [ ] is counteracting red-eye. • Use AE lock or spot metering (=49). Note that supports high-speed recording (=104). Refer to the Software Guide (=17) for movies shot in [ ] mode (=43) because audio is not possible when shooting movies in this mode. Subjects look grainy. • Lower the...
User Guide
Page 96
...setting on the memory card prevented printing or image transfer to a computer. Ink absorber full • Contact a Canon Customer Support Help Desk to [Auto Reset] (=75), or format the memory card (=74). Exceeded selection limit...images could not be saved correctly. In this case, write down the error number (Exx) and contact a Canon Customer Support Help Desk. Cover Preliminary Notes and Legal Information Contents: Basic Operations Basic Guide Advanced Guide 1 Camera...error message may not have been altered using computer software, even if the camera is connected to the printer.
...setting on the memory card prevented printing or image transfer to a computer. Ink absorber full • Contact a Canon Customer Support Help Desk to [Auto Reset] (=75), or format the memory card (=74). Exceeded selection limit...images could not be saved correctly. In this case, write down the error number (Exx) and contact a Canon Customer Support Help Desk. Cover Preliminary Notes and Legal Information Contents: Basic Operations Basic Guide Advanced Guide 1 Camera...error message may not have been altered using computer software, even if the camera is connected to the printer.


