User Guide
Page 2
.... Without approval, use of an issue with an Eye-Fi card, please check with the card manufacturer. Package Contents Before use, make sure the following memory cards (sold separately) can be used, regardless of capacity. • SD memory cards* • SDHC memory cards* • SDXC memory cards* • Eye-Fi cards * Cards conforming to work with the camera. Camera Battery Pack NB...
.... Without approval, use of an issue with an Eye-Fi card, please check with the card manufacturer. Package Contents Before use, make sure the following memory cards (sold separately) can be used, regardless of capacity. • SD memory cards* • SDHC memory cards* • SDXC memory cards* • Eye-Fi cards * Cards conforming to work with the camera. Camera Battery Pack NB...
User Guide
Page 3
Refrain from any malfunction of a camera or accessory, including memory cards, that result in the failure of purchase. In case of camera problems while abroad, return to the area of purchase before using the camera. • ...: Basic Operations Basic Guide Advanced Guide 1 Camera Basics 2 Smart Auto Mode 3 Other Shooting Modes 4 P Mode 5 Playback Mode 6 Setting Menu 7 Accessories 8 Appendix Index 3 Please note that Canon Inc., its subsidiaries and affiliates, and its distributors are intended for personal use. If covered, remove the film before contacting...
Refrain from any malfunction of a camera or accessory, including memory cards, that result in the failure of purchase. In case of camera problems while abroad, return to the area of purchase before using the camera. • ...: Basic Operations Basic Guide Advanced Guide 1 Camera Basics 2 Smart Auto Mode 3 Other Shooting Modes 4 P Mode 5 Playback Mode 6 Setting Menu 7 Accessories 8 Appendix Index 3 Please note that Canon Inc., its subsidiaries and affiliates, and its distributors are intended for personal use. If covered, remove the film before contacting...
User Guide
Page 4
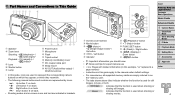
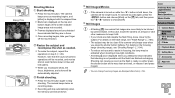
... Part Names and Conventions in This Guide Speaker Zoom lever Shooting: / Playback: / Lens Shutter button Lamp Power button Microphone Flash Tripod socket Memory card/battery cover DC coupler cable port Strap mount AV OUT (Audio/video output) / DIGITAL terminal • In this guide apply to the... camera under default settings. • For convenience, all supported memory cards are simply referred to as the "memory card". • The tabs shown above titles indicate whether the function is used for expert camera use • =xx: ...
... Part Names and Conventions in This Guide Speaker Zoom lever Shooting: / Playback: / Lens Shutter button Lamp Power button Microphone Flash Tripod socket Memory card/battery cover DC coupler cable port Strap mount AV OUT (Audio/video output) / DIGITAL terminal • In this guide apply to the... camera under default settings. • For convenience, all supported memory cards are simply referred to as the "memory card". • The tabs shown above titles indicate whether the function is used for expert camera use • =xx: ...
User Guide
Page 5
Table of Contents Package Contents 2 Compatible Memory Cards 2 Preliminary Notes and Legal Information 3 Part Names and Conventions in Program AE ([P] Mode 48 Image Brightness (Exposure Compensation 48 Color and Continuous Shooting....... Setting Menu 72 Adjusting Basic Camera Functions 73 7 Accessories 79 Optional Accessories 80 Using Optional Accessories..........81 Printing Images 83 Using an Eye-Fi Card 90 8 Appendix 92 Troubleshooting 93 On-Screen Messages 95 On-Screen Information 97 Functions and Menu Tables..........99 Handling Precautions 103 Specifications 103 Index ...
Table of Contents Package Contents 2 Compatible Memory Cards 2 Preliminary Notes and Legal Information 3 Part Names and Conventions in Program AE ([P] Mode 48 Image Brightness (Exposure Compensation 48 Color and Continuous Shooting....... Setting Menu 72 Adjusting Basic Camera Functions 73 7 Accessories 79 Optional Accessories 80 Using Optional Accessories..........81 Printing Images 83 Using an Eye-Fi Card 90 8 Appendix 92 Troubleshooting 93 On-Screen Messages 95 On-Screen Information 97 Functions and Menu Tables..........99 Handling Precautions 103 Specifications 103 Index ...
User Guide
Page 11
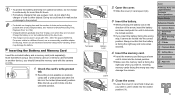
..."Number of shots and recording time possible with 100 - 240 V AC power (50/60 Hz). Inserting the Battery and Memory Card Insert the included battery and a memory card (sold separately). Slide the tab up until it continuously for more than 24 hours. • For battery chargers that use ..., do not attach the charger or cord to the product. • For details on (or immediately before using a new memory card (or a memory card formatted in a different format, use an electrical transformer designed for the plug. Cover Preliminary Notes and Legal Information Contents: Basic ...
..."Number of shots and recording time possible with 100 - 240 V AC power (50/60 Hz). Inserting the Battery and Memory Card Insert the included battery and a memory card (sold separately). Slide the tab up until it continuously for more than 24 hours. • For battery chargers that use ..., do not attach the charger or cord to the product. • For details on (or immediately before using a new memory card (or a memory card formatted in a different format, use an electrical transformer designed for the plug. Cover Preliminary Notes and Legal Information Contents: Basic ...
User Guide
Page 12
... the power button. zzPress the buttons to specify the date and time. XXThe memory card will pop up . zzPush the memory card in image properties when you shoot, and it . You can be saved on one memory card, see "Number of 4:3 Shots per Memory Card" (=104). zzOpen the cover and press the battery lock in the direction of... 1 Camera Basics 2 Smart Auto Mode 3 Other Shooting Modes 4 P Mode 5 Playback Mode 6 Setting Menu 7 Accessories 8 Appendix Index 3 Set the home time zone. Removing the Battery and Memory Card Remove the battery.
... the power button. zzPress the buttons to specify the date and time. XXThe memory card will pop up . zzPush the memory card in image properties when you shoot, and it . You can be saved on one memory card, see "Number of 4:3 Shots per Memory Card" (=104). zzOpen the cover and press the battery lock in the direction of... 1 Camera Basics 2 Smart Auto Mode 3 Other Shooting Modes 4 P Mode 5 Playback Mode 6 Setting Menu 7 Accessories 8 Appendix Index 3 Set the home time zone. Removing the Battery and Memory Card Remove the battery.
User Guide
Page 21
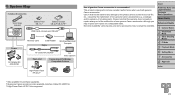
...Note that this warranty does not apply to repairs arising out of the malfunction of non-genuine Canon accessories, although you may no longer be liable for purchase separately. *2 A genuine Canon accessory is designed to this product and/or accidents such as fire, etc., caused by ...11L*1 Battery Charger CB-2LF/CB-2LFE*1 USB Cable (camera end: Mini-B)*2 Power AC Adapter Kit ACK-DC90 Memory Card Card Reader Cable Windows/Macintosh Compute AV Cable AVC-DC400 TV/ Video System Flash Unit Canon-brand PictBridgeCompatible Printers High-Power Flash HF-DC2*3 Use of a battery pack).
...Note that this warranty does not apply to repairs arising out of the malfunction of non-genuine Canon accessories, although you may no longer be liable for purchase separately. *2 A genuine Canon accessory is designed to this product and/or accidents such as fire, etc., caused by ...11L*1 Battery Charger CB-2LF/CB-2LFE*1 USB Cable (camera end: Mini-B)*2 Power AC Adapter Kit ACK-DC90 Memory Card Card Reader Cable Windows/Macintosh Compute AV Cable AVC-DC400 TV/ Video System Flash Unit Canon-brand PictBridgeCompatible Printers High-Power Flash HF-DC2*3 Use of a battery pack).
User Guide
Page 27
Open the memory card/battery cover Cover Preliminary Notes and Legal Information Contents: Basic Operations Basic Guide Advanced Guide 1 Camera Basics 2 Smart Auto Mode 3 Other Shooting Modes 4 P Mode 5 Playback ... exposures (=46) • When the indicator blinks green, never do any of the following things, as they may corrupt images, or damage the camera or memory card. - Color Indicator Status Camera Status Green On Blinking Connected to a computer (=19), or display off -
Open the memory card/battery cover Cover Preliminary Notes and Legal Information Contents: Basic Operations Basic Guide Advanced Guide 1 Camera Basics 2 Smart Auto Mode 3 Other Shooting Modes 4 P Mode 5 Playback ... exposures (=46) • When the indicator blinks green, never do any of the following things, as they may corrupt images, or damage the camera or memory card. - Color Indicator Status Camera Status Green On Blinking Connected to a computer (=19), or display off -
User Guide
Page 30
... is displayed with the elapsed time. zzOnce recording begins, take other measures to shoot indicates that they are more likely to stop automatically when the memory card becomes full. However, note that images are in step 3 (=29). Still Images/Movies • If the camera is turned on the focusing range (shooting range...
... is displayed with the elapsed time. zzOnce recording begins, take other measures to shoot indicates that they are more likely to stop automatically when the memory card becomes full. However, note that images are in step 3 (=29). Still Images/Movies • If the camera is turned on the focusing range (shooting range...
User Guide
Page 34
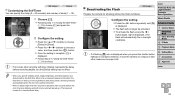
... Shooting Modes 4 P Mode 5 Playback Mode 6 Setting Menu 7 Accessories 8 Appendix Index 34 zzPress the button repeatedly until [!] is displayed. XXThe flash will stop automatically when the memory card becomes full. • When a delay longer than two seconds is displayed when you press the shutter button halfway in case the flash fires.) Deactivating the...
... Shooting Modes 4 P Mode 5 Playback Mode 6 Setting Menu 7 Accessories 8 Appendix Index 34 zzPress the button repeatedly until [!] is displayed. XXThe flash will stop automatically when the memory card becomes full. • When a delay longer than two seconds is displayed when you press the shutter button halfway in case the flash fires.) Deactivating the...
User Guide
Page 36
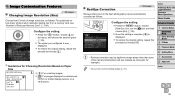
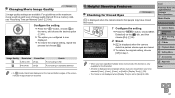
... to image areas other than eyes (if the camera misinterprets red eye makeup as red pupils, for Choosing Resolution Based on a memory card, see "Number of image resolution, as follows. zz[ ]: For e-mailing images. Red-Eye Correction Still Images Red-eye that... XXOnce the setting is complete, [R] is now displayed. Image Customization Features Changing Image Resolution (Size) Still Images Choose from 5 levels of Shots per Memory Card" (=104). Configure the setting. Postcard 3.5 x 5 in the menu, and choose the desired option (=25). zzPress the button, choose [ ] ...
... to image areas other than eyes (if the camera misinterprets red eye makeup as red pupils, for Choosing Resolution Based on a memory card, see "Number of image resolution, as follows. zz[ ]: For e-mailing images. Red-Eye Correction Still Images Red-eye that... XXOnce the setting is complete, [R] is now displayed. Image Customization Features Changing Image Resolution (Size) Still Images Choose from 5 levels of Shots per Memory Card" (=104). Configure the setting. Postcard 3.5 x 5 in the menu, and choose the desired option (=25). zzPress the button, choose [ ] ...
User Guide
Page 37
... 1280 x 720 25 fps For shooting in HD 640 x 480 30 fps For shooting in [$] mode, this process but choose [ ]. For guidelines on a memory card, see "Recording Time per Memory Card" (=104). zzTo restore the original setting, repeat this function is only available for Closed Eyes Still Images [ ] is displayed when the camera detects...
... 1280 x 720 25 fps For shooting in HD 640 x 480 30 fps For shooting in [$] mode, this process but choose [ ]. For guidelines on a memory card, see "Recording Time per Memory Card" (=104). zzTo restore the original setting, repeat this function is only available for Closed Eyes Still Images [ ] is displayed when the camera detects...
User Guide
Page 63
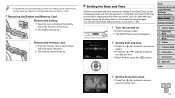
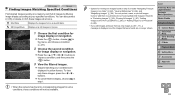
... the camera has found (in step 3) include "Navigating Through Images in yellow frames. zzImages matching your specified conditions. Shot Date Displays the images shot on a memory card full of images by choosing [Select All Images in Search] in the menu, and choose a condition (= 25). 2 Choose the second condition for image display or...
... the camera has found (in step 3) include "Navigating Through Images in yellow frames. zzImages matching your specified conditions. Shot Date Displays the images shot on a memory card full of images by choosing [Select All Images in Search] in the menu, and choose a condition (= 25). 2 Choose the second condition for image display or...
User Guide
Page 64
... images as follows. Choose a slideshow transition and start a few seconds after [Loading image] is displayed for about 10x by continuing to single-image display from a memory card as needed.
... images as follows. Choose a slideshow transition and start a few seconds after [Loading image] is displayed for about 10x by continuing to single-image display from a memory card as needed.

User Guide
Page 66
... images. 3 Protect the image. Specifying All Images at Once 1 Choose [Select All Images]. zzFollowing step 2 in step 3. • Protected images on a memory card will not be protected if you format the card (=74). • Protected images cannot be erased if you switch to Shooting mode or turn the camera off before finishing the...
... images. 3 Protect the image. Specifying All Images at Once 1 Choose [Select All Images]. zzFollowing step 2 in step 3. • Protected images on a memory card will not be protected if you format the card (=74). • Protected images cannot be erased if you switch to Shooting mode or turn the camera off before finishing the...

User Guide
Page 69
... Rotation Follow these steps to [Off]. Editing Still Images • Image editing (=69 - 71) is displayed. XX[Save new image?] is only available when the memory card has sufficient free space. zzPress the button and choose [Resize] on the camera. zzPress the buttons to choose an image. XXThe image is rotated 90...
... Rotation Follow these steps to [Off]. Editing Still Images • Image editing (=69 - 71) is displayed. XX[Save new image?] is only available when the memory card has sufficient free space. zzPress the button and choose [Resize] on the camera. zzPress the buttons to choose an image. XXThe image is rotated 90...
User Guide
Page 74
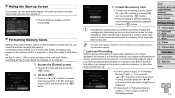
... press the buttons to select this camera. Formatting erases all data on a computer. 1 Access the [Format] screen. zzWhen formatting is finished, [Memory card formatting complete] is displayed. A [ ] icon is displayed. Cover Preliminary Notes and Legal Information Contents: Basic Operations Basic Guide Advanced Guide 1 Camera...suddenly stops. zzTo begin the formatting process, press the buttons to choose [OK], and then press the button. 3 Format the memory card. Hiding the Start-up Screen If you prefer, you can deactivate display of the start-up Image], and then choose [Off]....
... press the buttons to select this camera. Formatting erases all data on a computer. 1 Access the [Format] screen. zzWhen formatting is finished, [Memory card formatting complete] is displayed. A [ ] icon is displayed. Cover Preliminary Notes and Legal Information Contents: Basic Operations Basic Guide Advanced Guide 1 Camera...suddenly stops. zzTo begin the formatting process, press the buttons to choose [OK], and then press the button. 3 Format the memory card. Hiding the Start-up Screen If you prefer, you can deactivate display of the start-up Image], and then choose [Off]....
User Guide
Page 75
...]. zzChoose [Lens Retract], and then choose [0 sec.]. • Low-level formatting takes longer than "Formatting Memory Cards" (=74), because data is taken/saved) even if you switch memory cards. Continuous Auto Reset Images are automatically numbered in sequential order (0001 - 9999) and saved in Shooting mode ... images on the shooting date. Image numbering is reset to [0 sec.]. In this setting, shots may be erased, but the memory card can cancel low-level formatting in folders created each . zzChoose [File Numbering], and then choose an option. To start saving shots...
...]. zzChoose [Lens Retract], and then choose [0 sec.]. • Low-level formatting takes longer than "Formatting Memory Cards" (=74), because data is taken/saved) even if you switch memory cards. Continuous Auto Reset Images are automatically numbered in sequential order (0001 - 9999) and saved in Shooting mode ... images on the shooting date. Image numbering is reset to [0 sec.]. In this setting, shots may be erased, but the memory card can cancel low-level formatting in folders created each . zzChoose [File Numbering], and then choose an option. To start saving shots...
User Guide
Page 82
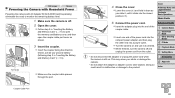
... Close the cover. zzLower the cover ( ) and hold it down as you would a battery (following step 3 in "Inserting the Battery and Memory Card" (=11) to monitor the remaining battery level. 1 Make sure the camera is off and unplug the power cord from the outlet. • Do...into the end of the power cord into the compact power adapter, and then plug the other objects. zzFollow step 2 in "Inserting the Battery and Memory Card" (=11)). Cover Preliminary Notes and Legal Information Contents: Basic Operations Basic Guide Advanced Guide 1 Camera Basics 2 Smart Auto Mode 3 Other Shooting Modes...
... Close the cover. zzLower the cover ( ) and hold it down as you would a battery (following step 3 in "Inserting the Battery and Memory Card" (=11) to monitor the remaining battery level. 1 Make sure the camera is off and unplug the power cord from the outlet. • Do...into the end of the power cord into the compact power adapter, and then plug the other objects. zzFollow step 2 in "Inserting the Battery and Memory Card" (=11)). Cover Preliminary Notes and Legal Information Contents: Basic Operations Basic Guide Advanced Guide 1 Camera Basics 2 Smart Auto Mode 3 Other Shooting Modes...
User Guide
Page 86
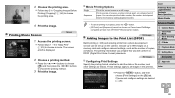
...number, and other settings as follows. Still Images Configuring Print Settings Specify the printing format, whether to [On]. You can be chosen on a memory card and configure relevant settings, such as the number of paper. Advanced Guide 1 Camera Basics 2 Smart Auto Mode 3 Other Shooting Modes 4 P Mode...Digital Print Order Format) standards. zzPress the buttons to choose [ ], and then press the buttons to 998 images on Canon-brand PictBridge- Prints a series of scenes, a certain interval apart, on the [2] tab. Printing Movie Scenes Movies 1 Access the printing screen.
...number, and other settings as follows. Still Images Configuring Print Settings Specify the printing format, whether to [On]. You can be chosen on a memory card and configure relevant settings, such as the number of paper. Advanced Guide 1 Camera Basics 2 Smart Auto Mode 3 Other Shooting Modes 4 P Mode...Digital Print Order Format) standards. zzPress the buttons to choose [ ], and then press the buttons to 998 images on Canon-brand PictBridge- Prints a series of scenes, a certain interval apart, on the [2] tab. Printing Movie Scenes Movies 1 Access the printing screen.


