User Guide
Page 3
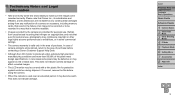
... Camera Basics 2 Smart Auto Mode 3 Other Shooting Modes 4 P Mode 5 Playback Mode 6 Setting Menu 7 Accessories 8 Appendix Index 3 Please note that Canon Inc., its subsidiaries and affiliates, and its distributors are intended for personal use , photography may be covered with a thin plastic film for personal use . ...Preliminary Notes and Legal Information • Take and review some test shots initially to be recorded in a way that is valid only in the area of purchase. Refrain from any malfunction of...
... Camera Basics 2 Smart Auto Mode 3 Other Shooting Modes 4 P Mode 5 Playback Mode 6 Setting Menu 7 Accessories 8 Appendix Index 3 Please note that Canon Inc., its subsidiaries and affiliates, and its distributors are intended for personal use , photography may be covered with a thin plastic film for personal use . ...Preliminary Notes and Legal Information • Take and review some test shots initially to be recorded in a way that is valid only in the area of purchase. Refrain from any malfunction of...

User Guide
Page 59
... Basics 2 Smart Auto Mode 3 Other Shooting Modes 4 P Mode 5 Playback Mode 6 Setting Menu 7 Accessories 8 Appendix Index 59 zzPress the button, choose [Review image after shooting] on the [4] tab cannot be changed . - Quick 2 sec., 4 sec., 8 sec. Hold Displays images only until you can do ...information is displayed after shooting, you can switch the display information. Changing the Image Display Period After Shots 1 Access the [Review image after shots. Displays images for the specified time. Off Detailed Displays only the image. Press the buttons to choose [...
... Basics 2 Smart Auto Mode 3 Other Shooting Modes 4 P Mode 5 Playback Mode 6 Setting Menu 7 Accessories 8 Appendix Index 59 zzPress the button, choose [Review image after shooting] on the [4] tab cannot be changed . - Quick 2 sec., 4 sec., 8 sec. Hold Displays images only until you can do ...information is displayed after shooting, you can switch the display information. Changing the Image Display Period After Shots 1 Access the [Review image after shots. Displays images for the specified time. Off Detailed Displays only the image. Press the buttons to choose [...
User Guide
Page 60
4 5 Playback Mode Have fun reviewing your shots, and browse or edit them in many ways • To prepare the camera for these operations, press the button to enter Playback mode. &#...
4 5 Playback Mode Have fun reviewing your shots, and browse or edit them in many ways • To prepare the camera for these operations, press the button to enter Playback mode. &#...

User Guide
Page 70
...]. XXThe saved image is now displayed. • Editing is not possible for images shot at a resolution of [ ] (=36) or saved as a new image and review. zzPress the button, and then choose [i-Contrast] on the [1] tab (= 26). 2 Choose an image. zzFollow steps 4 - 5 in step 3. • Images cannot...then press the button. Still Images Correcting Image Brightness (i-Contrast) Excessively dark image areas (such as a separate file. 1 Choose [i-Contrast]. 5 Review the new image. zzPress the button. [Display new image?] is also automatically corrected, to the optimal brightness.
...]. XXThe saved image is now displayed. • Editing is not possible for images shot at a resolution of [ ] (=36) or saved as a new image and review. zzPress the button, and then choose [i-Contrast] on the [1] tab (= 26). 2 Choose an image. zzFollow steps 4 - 5 in step 3. • Images cannot...then press the button. Still Images Correcting Image Brightness (i-Contrast) Excessively dark image areas (such as a separate file. 1 Choose [i-Contrast]. 5 Review the new image. zzPress the button. [Display new image?] is also automatically corrected, to the optimal brightness.

User Guide
Page 71
.... Follow the steps in step 4. zzPress the buttons to choose an image. 3 Correct the image. You can save the corrected image as a new image and review. zzPress the button. Cover Preliminary Notes and Legal Information Contents: Basic Operations Basic Guide Advanced Guide 1 Camera Basics 2 Smart Auto Mode 3 Other Shooting Modes 4 P Mode...
.... Follow the steps in step 4. zzPress the buttons to choose an image. 3 Correct the image. You can save the corrected image as a new image and review. zzPress the button. Cover Preliminary Notes and Legal Information Contents: Basic Operations Basic Guide Advanced Guide 1 Camera Basics 2 Smart Auto Mode 3 Other Shooting Modes 4 P Mode...
User Guide
Page 101
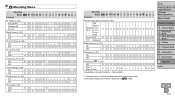
... Advanced Guide 1 Camera Basics 2 Smart Auto Mode 3 Other Shooting Modes 4 P Mode 5 Playback Mode 6 Setting Menu 7 Accessories 8 Appendix Index 101 4 Shooting Menu Shooting Mode G I Function PtN Review image after shooting (=59) Off/ Quick/ Display 2 sec./ Time 4 sec./ 8 sec./ Hold O O O OOOOOOOOOOOOO Display Off O O O OOOOOOOOOOOOO Info Detailed - O - - - OO - O O OOOO - - - O - - - OOOO - - O O OO - OOOO O - O - O Off O O O OOOOOOOOOOOOO...
... Advanced Guide 1 Camera Basics 2 Smart Auto Mode 3 Other Shooting Modes 4 P Mode 5 Playback Mode 6 Setting Menu 7 Accessories 8 Appendix Index 101 4 Shooting Menu Shooting Mode G I Function PtN Review image after shooting (=59) Off/ Quick/ Display 2 sec./ Time 4 sec./ 8 sec./ Hold O O O OOOOOOOOOOOOO Display Off O O O OOOOOOOOOOOOO Info Detailed - O - - - OO - O O OOOO - - - O - - - OOOO - - O O OO - OOOO O - O - O Off O O O OOOOOOOOOOOOO...


