Photo Printing Guide
Page 5
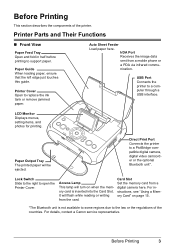
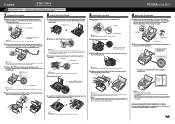
... be ejected. Auto Sheet Feeder Load paper here. For instructions, see "Using a Memory Card" on when the memory card is not available to some regions due to replace the ink tank or remove jammed paper. Card Slot Set the memory card from a digital camera here. Paper Output Tray The printed paper will turn on page 15. *The Bluetooth unit is inserted into the Card Slot. Lock Switch Slide to the right to support paper. LCD Monitor Displays menus, setting items, and photos for printing. Before Printing 3 Printer Cover Open to...
... be ejected. Auto Sheet Feeder Load paper here. For instructions, see "Using a Memory Card" on when the memory card is not available to some regions due to replace the ink tank or remove jammed paper. Card Slot Set the memory card from a digital camera here. Paper Output Tray The printed paper will turn on page 15. *The Bluetooth unit is inserted into the Card Slot. Lock Switch Slide to the right to support paper. LCD Monitor Displays menus, setting items, and photos for printing. Before Printing 3 Printer Cover Open to...
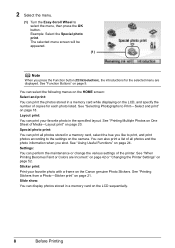
Photo Printing Guide
Page 10
... HOME screen: Select and print: You can print all photos and the photo information when you press the Function button (f2/Introduction), the introductions for each photo listed. See "Using Useful Functions" on page 9. See "Printing Multiple Photos on One Sheet of the printer. Settings: You can print your favorite photo with a frame on the Canon genuine Photo Stickers. Sticker print: Print your favorite photo in a memory card on the LCD sequentially. 8 Before Printing 2 Select the menu. (1) Turn the Easy-Scroll...
... HOME screen: Select and print: You can print all photos and the photo information when you press the Function button (f2/Introduction), the introductions for each photo listed. See "Using Useful Functions" on page 9. See "Printing Multiple Photos on One Sheet of the printer. Settings: You can print your favorite photo with a frame on the Canon genuine Photo Stickers. Sticker print: Print your favorite photo in a memory card on the LCD sequentially. 8 Before Printing 2 Select the menu. (1) Turn the Easy-Scroll...

Photo Printing Guide
Page 26
...: Home button > Special photo print > Photo index print Note When using index printing, the number of images printed on a single sheet of paper depends on the size of the paper you specified Standard using the DPOF function is as follows: - 4"×6"/101.6×152.4 mm: 24 photos - Image format: CIFF, Exif (Tiff), and JFIF - Print type - Using Useful Functions You can print a list of all photos saved in the memory card. Photos are printed according to those settings...
...: Home button > Special photo print > Photo index print Note When using index printing, the number of images printed on a single sheet of paper depends on the size of the paper you specified Standard using the DPOF function is as follows: - 4"×6"/101.6×152.4 mm: 24 photos - Image format: CIFF, Exif (Tiff), and JFIF - Print type - Using Useful Functions You can print a list of all photos saved in the memory card. Photos are printed according to those settings...
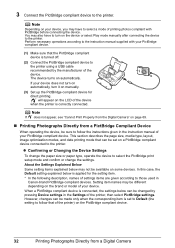
Photo Printing Guide
Page 34
... type, layout, image optimization modes, and date printing mode that of printing photos compliant with your device, you may not be set to Default (the setting to the printer. The device turns on page 69. Note If does not appear, see "Cannot Print Properly from a Digital Camera However, changes can be different depending on the LCD of the printer, then select PictBridge settings. Confirming or Changing the Device Settings To change the paper size or paper type, operate...
... type, layout, image optimization modes, and date printing mode that of printing photos compliant with your device, you may not be set to Default (the setting to the printer. The device turns on page 69. Note If does not appear, see "Cannot Print Properly from a Digital Camera However, changes can be different depending on the LCD of the printer, then select PictBridge settings. Confirming or Changing the Device Settings To change the paper size or paper type, operate...
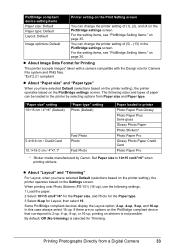
Photo Printing Guide
Page 35
... Fast Photo Photo Fast Photo Paper loaded in the PictBridge settings screen. PictBridge compliant device setting items Paper size: Default Paper type: Default Layout: Default Image optimize: Default Printer setting on page 35. About Image Data Format for Printing This printer accepts images* taken with a camera compatible with the Design rule for the Paper type. 3 Select N-up . When printing onto Photo Stickers (PS-101) (16-up), use the following sizes and types of (1), (2), and (4) in the printer by Canon. For the setting items, see "PictBridge Setting Items...
... Fast Photo Photo Fast Photo Paper loaded in the PictBridge settings screen. PictBridge compliant device setting items Paper size: Default Paper type: Default Layout: Default Image optimize: Default Printer setting on page 35. About Image Data Format for Printing This printer accepts images* taken with a camera compatible with the Design rule for the Paper type. 3 Select N-up . When printing onto Photo Stickers (PS-101) (16-up), use the following sizes and types of (1), (2), and (4) in the printer by Canon. For the setting items, see "PictBridge Setting Items...
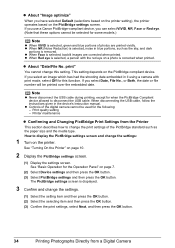
Photo Printing Guide
Page 36
... button. 34 Printing Photographs Directly from the Printer This section describes how to display the PictBridge settings screen and change this function. When disconnecting the USB cable, follow the instructions given in blue portions, such as the paper size and the media type. Print quality setting - See "Turning On the Printer" on the PictBridge compliant device. When Face is corrected when printed. If you have selected Default (selections based on the printer setting), the printer operates based on page 7. (2) Select...
... button. 34 Printing Photographs Directly from the Printer This section describes how to display the PictBridge settings screen and change this function. When disconnecting the USB cable, follow the instructions given in blue portions, such as the paper size and the media type. Print quality setting - See "Turning On the Printer" on the PictBridge compliant device. When Face is corrected when printed. If you have selected Default (selections based on the printer setting), the printer operates based on page 7. (2) Select...

Photo Printing Guide
Page 38
...The Wireless print settings screen is borderless printing on 4" x 6" Photo Paper Plus Glossy. 1 Turn on the Wireless print setting screen when printing from a Mobile Phone or a PDA" below . Setting the Page Size, Media Type, and Layout When Printing from a Mobile Phone or a PDA You can select the page size, media type, layout and borderless printing on the printer. 2 Display the Wireless print settings screen. (1) Display the Settings screen. (2) Select Device settings and then press the OK button. (3) Select Wireless print settings and then press the OK button. Important In order to use...
...The Wireless print settings screen is borderless printing on 4" x 6" Photo Paper Plus Glossy. 1 Turn on the Wireless print setting screen when printing from a Mobile Phone or a PDA" below . Setting the Page Size, Media Type, and Layout When Printing from a Mobile Phone or a PDA You can select the page size, media type, layout and borderless printing on the printer. 2 Display the Wireless print settings screen. (1) Display the Settings screen. (2) Select Device settings and then press the OK button. (3) Select Wireless print settings and then press the OK button. Important In order to use...
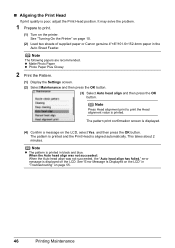
Photo Printing Guide
Page 48
... Print Head If print quality is aligned automatically. Note z The pattern is printed. See "Turning On the Printer" on page 55. 46 Printing Maintenance Note The following papers are recommended. Note Press Head alignment print to print. (1) Turn on the printer. See "Error Message Is Displayed on the LCD" in "Troubleshooting" on page 10. (2) Load two sheets of supplied paper or Canon genuine 4"×6"/101.6×152.4mm paper in black and blue. It may solve the problem. 1 Prepare to print the Head alignment...
... Print Head If print quality is aligned automatically. Note z The pattern is printed. See "Turning On the Printer" on page 55. 46 Printing Maintenance Note The following papers are recommended. Note Press Head alignment print to print. (1) Turn on the printer. See "Error Message Is Displayed on the LCD" in "Troubleshooting" on page 10. (2) Load two sheets of supplied paper or Canon genuine 4"×6"/101.6×152.4mm paper in black and blue. It may solve the problem. 1 Prepare to print the Head alignment...
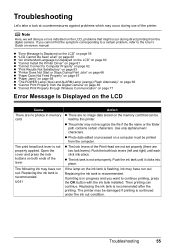
Photo Printing Guide
Page 57
... "Paper Jams" on page 68 "The POWER Lamp (blue) and ALARM Lamp (orange) Flash Alternately" on page 69 "Cannot Print Properly from the Digital Camera" on page 69 "Cannot Print Properly through Wireless Communication" on page 71 Error Message Is Displayed on the LCD Cause There are no image data stored on the LCD, problems that can continue. The printer may have run out. Use only alphanumeric characters. Replacing the ink...
... "Paper Jams" on page 68 "The POWER Lamp (blue) and ALARM Lamp (orange) Flash Alternately" on page 69 "Cannot Print Properly from the Digital Camera" on page 69 "Cannot Print Properly through Wireless Communication" on page 71 Error Message Is Displayed on the LCD Cause There are no image data stored on the LCD, problems that can continue. The printer may have run out. Use only alphanumeric characters. Replacing the ink...

Photo Printing Guide
Page 61
... use the W or X to input the number of the pattern in the Auto Sheet Feeder. * Use the following papers. Make sure that has the least noticeable streaks, and then press the OK button. 9. Note Adjusting the Print Head Manually If the Automatic Print Head Alignment does not work or if you turn on the printer. Press the HOME button. 3. Select Manual head align and press the OK button. 6. When "Did the patterns print correctly?" Troubleshooting 59 Select...
... use the W or X to input the number of the pattern in the Auto Sheet Feeder. * Use the following papers. Make sure that has the least noticeable streaks, and then press the OK button. 9. Note Adjusting the Print Head Manually If the Automatic Print Head Alignment does not work or if you turn on the printer. Press the HOME button. 3. Select Manual head align and press the OK button. 6. When "Did the patterns print correctly?" Troubleshooting 59 Select...
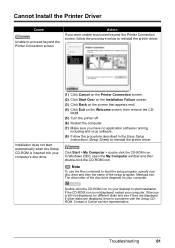
Photo Printing Guide
Page 63
... Printer Connection screen, follow the procedure below to reinstall the printer driver. In Windows 2000, open the My Computer window and then double-click the CD-ROM icon. If the icon is a problem with the Setup CDROM. Troubleshooting 61 Action If you have no application software running, including anti-virus software. (8) Follow the procedure described in the Easy Setup Instructions (Setup Sheet) to start installation. Click Start > My Computer > double-click the CD-ROM icon. Double...
... Printer Connection screen, follow the procedure below to reinstall the printer driver. In Windows 2000, open the My Computer window and then double-click the CD-ROM icon. If the icon is a problem with the Setup CDROM. Troubleshooting 61 Action If you have no application software running, including anti-virus software. (8) Follow the procedure described in the Easy Setup Instructions (Setup Sheet) to start installation. Click Start > My Computer > double-click the CD-ROM icon. Double...
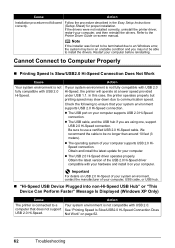
Photo Printing Guide
Page 64
...-Speed driver compatible with USB 2.0 Hi-Speed, the printer will operate at a lower speed provided under USB 1.1. Restart your computer. We recommend the cable to be able to the Printer Driver Guide on page 62. 62 Troubleshooting See "Printing Speed Is Slow/USB2.0 Hi-Speed Connection Does Not Work" on -screen manual. Refer to install the drivers. Follow the procedure described in an unstable condition and you are using one, support USB...
...-Speed driver compatible with USB 2.0 Hi-Speed, the printer will operate at a lower speed provided under USB 1.1. Restart your computer. We recommend the cable to be able to the Printer Driver Guide on page 62. 62 Troubleshooting See "Printing Speed Is Slow/USB2.0 Hi-Speed Connection Does Not Work" on -screen manual. Refer to install the drivers. Follow the procedure described in an unstable condition and you are using one, support USB...
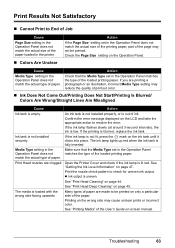
Photo Printing Guide
Page 65
... the Page Size setting set in the Operation Panel Operation Panel does not matches the type of the paper. Confirm the error message displayed on page 45. Open the Printer Cover and check if the ink lamp is uneven. Ink output is lit red. See "Print Head Deep Cleaning" on the LCD and take the appropriate action to resolve the error. The media is blurred, replace the ink tank. If the printing is loaded with the wrong side facing...
... the Page Size setting set in the Operation Panel Operation Panel does not matches the type of the paper. Confirm the error message displayed on page 45. Open the Printer Cover and check if the ink lamp is uneven. Ink output is lit red. See "Print Head Deep Cleaning" on the LCD and take the appropriate action to resolve the error. The media is blurred, replace the ink tank. If the printing is loaded with the wrong side facing...
Photo Printing Guide
Page 66
... type of ink and the printer does not print, clean the Print Head and then print the nozzle check pattern to align the Print Head after you did not align the Print Head after performing Print Head Cleaning twice, perform Print Head Deep Cleaning. See "Aligning the Print Head" on page 59 and perform Manual Print Head Alignment. In the Operation Panel, set Print quality to empty tank. Cause Action Print Head nozzles are due to High (qualitypriority). Print the nozzle check pattern to dry. Contact your Canon Service representative. Especially when using Photo Paper Pro...
... type of ink and the printer does not print, clean the Print Head and then print the nozzle check pattern to align the Print Head after you did not align the Print Head after performing Print Head Cleaning twice, perform Print Head Deep Cleaning. See "Aligning the Print Head" on page 59 and perform Manual Print Head Alignment. In the Operation Panel, set Print quality to empty tank. Cause Action Print Head nozzles are due to High (qualitypriority). Print the nozzle check pattern to dry. Contact your Canon Service representative. Especially when using Photo Paper Pro...
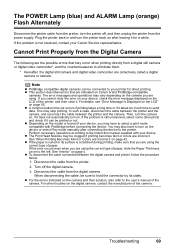
Photo Printing Guide
Page 71
... send data. If the paper is curled or its sides. If the problem is still unresolved, select some other troubles on page 42. Perform necessary operations according to your device. Turn off , and then unplug the printer from the power supply. For other photo and check if it does not automatically turn on page 4. If this error occurs even when you are Incorrect" on the digital camera, contact the...
... send data. If the paper is curled or its sides. If the problem is still unresolved, select some other troubles on page 42. Perform necessary operations according to your device. Turn off , and then unplug the printer from the power supply. For other photo and check if it does not automatically turn on page 4. If this error occurs even when you are Incorrect" on the digital camera, contact the...
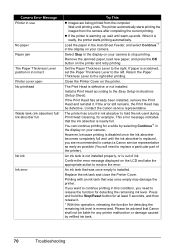
Photo Printing Guide
Page 72
... the Easy Setup Instructions (Setup Sheet). If paper is installed. However, because printing is disabled once the ink absorber becomes completely full and until printing ends. The printer automatically starts printing the images from the computer. Please be defective. Printer cover open No printhead Waste tank (ink absorber) full/ Ink absorber full No Ink Ink error Try This Images are recommended to contact a Canon service representative as early as possible (You will need to replace a particular part of ink. The printer...
... the Easy Setup Instructions (Setup Sheet). If paper is installed. However, because printing is disabled once the ink absorber becomes completely full and until printing ends. The printer automatically starts printing the images from the computer. Please be defective. Printer cover open No printhead Waste tank (ink absorber) full/ Ink absorber full No Ink Ink error Try This Images are recommended to contact a Canon service representative as early as possible (You will need to replace a particular part of ink. The printer...
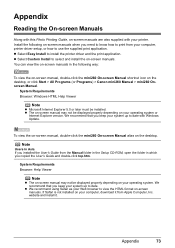
Photo Printing Guide
Page 75
... you installed the User's Guide from the Manual folder in the Setup CD-ROM, open the folder in the following on-screen manuals when you copied the User's Guide and double-click top.htm. We recommend that you keep your system up to date with your computer, download it . website and install it from your computer, printer driver setup, or how to install the printer driver and the print application. Select Easy Install to use the supplied print...
... you installed the User's Guide from the Manual folder in the Setup CD-ROM, open the folder in the following on-screen manuals when you copied the User's Guide and double-click top.htm. We recommend that you keep your system up to date with your computer, download it . website and install it from your computer, printer driver setup, or how to install the printer driver and the print application. Select Easy Install to use the supplied print...
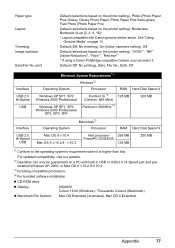
Photo Printing Guide
Page 79
...website. *2 Operation can select it is higher than this. installed Windows XP, 2000, or Mac OS X v.10.2.8-V.10.4. *3 Including compatible processors. *4 For bundled software installation. print Default (selections based on the printer setting), Photo (Photo Paper Plus Glossy, Glossy Photo Paper, Photo Paper Plus Semi-gloss), Fast Photo (Photo Paper Pro) Default (selections based on the printer setting), "VIVID"*, "NR" (Noise Reduction)*, "Face"*, "Red eye"* * If using a Canon PictBridge-compatible Camera, you can only be guaranteed on page 14. CD-ROM drive Display: 800x600 Colour...
...website. *2 Operation can select it is higher than this. installed Windows XP, 2000, or Mac OS X v.10.2.8-V.10.4. *3 Including compatible processors. *4 For bundled software installation. print Default (selections based on the printer setting), Photo (Photo Paper Plus Glossy, Glossy Photo Paper, Photo Paper Plus Semi-gloss), Fast Photo (Photo Paper Pro) Default (selections based on the printer setting), "VIVID"*, "NR" (Noise Reduction)*, "Face"*, "Red eye"* * If using a Canon PictBridge-compatible Camera, you can only be guaranteed on page 14. CD-ROM drive Display: 800x600 Colour...
Easy Setup Instructions
Page 1
...; A USB cable is printed in the Photo Printing Guide. Important There might be locked if it in half. Open the Printer Cover and make sure that the lock lever is set properly or the ink tank is fully lifted. Start Here Easy Setup Instructions Unpack the Printer • Please confirm bundled thing by the illustration printed on the printer. Open the Paper Feed Tray and fold it is not installed properly...
...; A USB cable is printed in the Photo Printing Guide. Important There might be locked if it in half. Open the Printer Cover and make sure that the lock lever is set properly or the ink tank is fully lifted. Start Here Easy Setup Instructions Unpack the Printer • Please confirm bundled thing by the illustration printed on the printer. Open the Paper Feed Tray and fold it is not installed properly...
Easy Setup Instructions
Page 2
..., start Printer Setup Utility (start Windows. Part no. Macintosh and Mac are either unplug the USB cable then plug it back in again, or turn off . All other to the printer. Windows® Printer Drivers Installation Windows Note • A printer cable is restarted automatically. *When connecting from step 3 to "Troubleshooting" instructions in the Photo Printing Guide. You must purchase a USB cable (less than 10 ft./3 m) to connect your product. Remove the USB cable connected to the computer with the USB cable, then turn the printer on the screen. Screens...
..., start Printer Setup Utility (start Windows. Part no. Macintosh and Mac are either unplug the USB cable then plug it back in again, or turn off . All other to the printer. Windows® Printer Drivers Installation Windows Note • A printer cable is restarted automatically. *When connecting from step 3 to "Troubleshooting" instructions in the Photo Printing Guide. You must purchase a USB cable (less than 10 ft./3 m) to connect your product. Remove the USB cable connected to the computer with the USB cable, then turn the printer on the screen. Screens...


