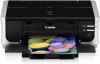
iP4500 series Quick Start Guide
Page 5
Table of Contents Before Using the Printer 2 Turning the Printer On and Off 2 Loading Printing Paper 4 Hints for Handling the Paper Source 7 Changing the Paper Source 10 Loading Paper 11 Loading Envelopes 17 ...
Table of Contents Before Using the Printer 2 Turning the Printer On and Off 2 Loading Printing Paper 4 Hints for Handling the Paper Source 7 Changing the Paper Source 10 Loading Paper 11 Loading Envelopes 17 ...
iP4500 series Quick Start Guide
Page 6
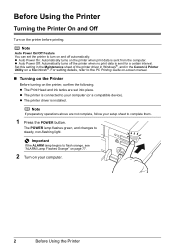
... to your computer. 2 Before Using the Printer Before Using the Printer Turning the Printer On and Off Turn on a Macintosh®. Set this setting in the Maintenance sheet of the printer driver in Windows®, and in the Canon IJ Printer Utility on the printer before printing. z The printer is ...installed. Note If preparatory operations above are set the printer to flash orange, see "ALARM Lamp Flashes Orange" on page 77. 2 Turn on and off the printer when no print...
... to your computer. 2 Before Using the Printer Before Using the Printer Turning the Printer On and Off Turn on a Macintosh®. Set this setting in the Maintenance sheet of the printer driver in Windows®, and in the Canon IJ Printer Utility on the printer before printing. z The printer is ...installed. Note If preparatory operations above are set the printer to flash orange, see "ALARM Lamp Flashes Orange" on page 77. 2 Turn on and off the printer when no print...
iP4500 series Quick Start Guide
Page 7
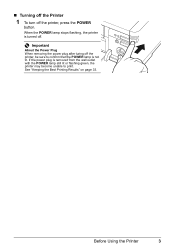
See "Keeping the Best Printing Results" on page 33. If the power plug is not lit. Before Using the Printer 3 „ Turning off the Printer 1 To turn off . When the POWER lamp stops flashing, the printer is turned off the printer, press the POWER button. Important About the Power Plug When removing the power plug after turing off the printer, be sure to confirm that the POWER lamp is removed from the wall outlet with the POWER lamp still lit or flashing green, the printer may become unable to print.
See "Keeping the Best Printing Results" on page 33. If the power plug is not lit. Before Using the Printer 3 „ Turning off the Printer 1 To turn off . When the POWER lamp stops flashing, the printer is turned off the printer, press the POWER button. Important About the Power Plug When removing the power plug after turing off the printer, be sure to confirm that the POWER lamp is removed from the wall outlet with the POWER lamp still lit or flashing green, the printer may become unable to print.

iP4500 series Quick Start Guide
Page 26
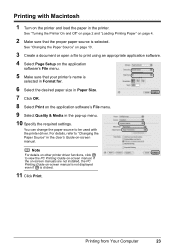
... Printing from Your Computer This section describes the procedure for basic printing. Printing from Your Computer See "Turning the Printer On and Off" on page 2 and "Loading Printing Paper" on page 4. 2 Make sure that Canon XXX (where "XXX" is your printer's name) is selected in the printer. For details, refer to view...). 6 Specify the required settings and click OK. See "Changing the Paper Source" on page 10. 3 Create a document or open a file to be used with Windows 1 Turn on -screen manual.
... Printing from Your Computer This section describes the procedure for basic printing. Printing from Your Computer See "Turning the Printer On and Off" on page 2 and "Loading Printing Paper" on page 4. 2 Make sure that Canon XXX (where "XXX" is your printer's name) is selected in the printer. For details, refer to view...). 6 Specify the required settings and click OK. See "Changing the Paper Source" on page 10. 3 Create a document or open a file to be used with Windows 1 Turn on -screen manual.
iP4500 series Quick Start Guide
Page 27
For details, refer to be used with Macintosh 1 Turn on -screen manual. If the on-screen manuals are not installed, the PC Printing Guide on page 4. 2 Make sure that your printer's name is selected ... the paper source to "Changing the Paper Source" in the User's Guide on the application software's File menu. 9 Select Quality & Media in the printer. See "Turning the Printer On and Off" on page 2 and "Loading Printing Paper" on -screen manual is not displayed even if is selected. Printing from Your Computer...
For details, refer to be used with Macintosh 1 Turn on -screen manual. If the on-screen manuals are not installed, the PC Printing Guide on page 4. 2 Make sure that your printer's name is selected ... the paper source to "Changing the Paper Source" in the User's Guide on the application software's File menu. 9 Select Quality & Media in the printer. See "Turning the Printer On and Off" on page 2 and "Loading Printing Paper" on -screen manual is not displayed even if is selected. Printing from Your Computer...
iP4500 series Quick Start Guide
Page 28
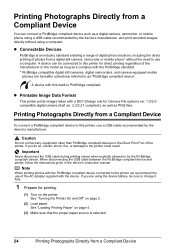
...Loading Printing Paper" on the printer. z Printable Image Data Format This printer prints images taken with a DCF (Design rule for printing. (1) Turn on page 4. (3) Make sure that the proper paper source is selected. 24 Printing Photographs Directly from a Compliant Device You can be sure...'s manufacturer. Caution Do not connect any equipment other than PictBridge compliant devices to the printer could result. See "Turning the Printer On and Off" on page 2. (2) Load paper. z Connectable Devices PictBridge is PictBridge compliant. Printing Photographs Directly from a Compliant...
...Loading Printing Paper" on the printer. z Printable Image Data Format This printer prints images taken with a DCF (Design rule for printing. (1) Turn on page 4. (3) Make sure that the proper paper source is selected. 24 Printing Photographs Directly from a Compliant Device You can be sure...'s manufacturer. Caution Do not connect any equipment other than PictBridge compliant devices to the printer could result. See "Turning the Printer On and Off" on page 2. (2) Load paper. z Connectable Devices PictBridge is PictBridge compliant. Printing Photographs Directly from a Compliant...
iP4500 series Quick Start Guide
Page 29
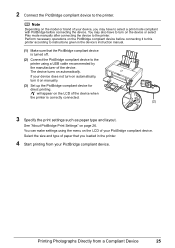
...automatically. will appear on the PictBridge compliant device before connecting the device. Perform necessary operations on the LCD of the device. You may have to turn it to this printer according to instructions given in the device's instruction manual. (1) Make sure that you loaded in the printer. 4 Start .... (2) Connect the PictBridge compliant device to the printer using the menu on the LCD of your device does not turn on automatically, turn on the device or select Play mode manually after connecting the device to the printer. Select the size and type of your PictBridge...
...automatically. will appear on the PictBridge compliant device before connecting the device. Perform necessary operations on the LCD of the device. You may have to turn it to this printer according to instructions given in the device's instruction manual. (1) Make sure that you loaded in the printer. 4 Start .... (2) Connect the PictBridge compliant device to the printer using the menu on the LCD of your device does not turn on automatically, turn on the device or select Play mode manually after connecting the device to the printer. Select the size and type of your PictBridge...
iP4500 series Quick Start Guide
Page 37
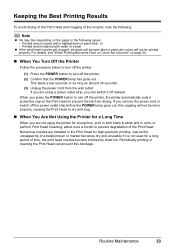
... details, see "When Printing Becomes Faint or Colors Are Incorrect" on page 34. „ When You Turn Off the Printer Follow the procedure below to turn off the printer. (1) Press the POWER button to turn off the power outlet strip before the POWER lamp goes out, this blockage. When you remove the... power cord or switch off the printer. (2) Confirm that the POWER lamp has gone out. If you press the POWER button to turn off instead. Printed area is traced with water or sweat z If the print head nozzles get clogged, printouts will become blocked by dried ink. ...
... details, see "When Printing Becomes Faint or Colors Are Incorrect" on page 34. „ When You Turn Off the Printer Follow the procedure below to turn off the printer. (1) Press the POWER button to turn off the power outlet strip before the POWER lamp goes out, this blockage. When you remove the... power cord or switch off the printer. (2) Confirm that the POWER lamp has gone out. If you press the POWER button to turn off instead. Printed area is traced with water or sweat z If the print head nozzles get clogged, printouts will become blocked by dried ink. ...
iP4500 series Quick Start Guide
Page 46
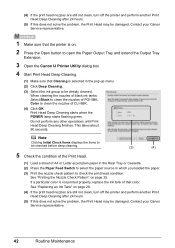
... Deep Cleaning finishes. Note Clicking Initial Check Items displays the items to open the Paper Output Tray and extend the Output Tray Extension. 3 Open the Canon IJ Printer Utility dialog box. 4 Start Print Head Deep Cleaning. (1) Make sure that Cleaning is not printed properly, replace the ink tank of CLI-... 24 hours. (5) If this does not solve the problem, the Print Head may be damaged. (4) If the print head nozzles are still not clean, turn off the printer and perform another Print Head Deep Cleaning after 24 hours. (5) If this does not solve the problem, the Print Head may be...
... Deep Cleaning finishes. Note Clicking Initial Check Items displays the items to open the Paper Output Tray and extend the Output Tray Extension. 3 Open the Canon IJ Printer Utility dialog box. 4 Start Print Head Deep Cleaning. (1) Make sure that Cleaning is not printed properly, replace the ink tank of CLI-... 24 hours. (5) If this does not solve the problem, the Print Head may be damaged. (4) If the print head nozzles are still not clean, turn off the printer and perform another Print Head Deep Cleaning after 24 hours. (5) If this does not solve the problem, the Print Head may be...
iP4500 series Quick Start Guide
Page 61
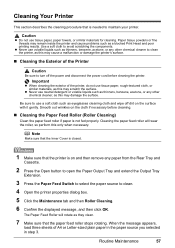
... Open button to open the Paper Output Tray and extend the Output Tray Extension. 3 Press the Paper Feed Switch to select the paper source to turn off dirt on the cloth if necessary before cleaning the printer. Paper tissue powders or fine threads may damage the surface. Important z When cleaning the...
... Open button to open the Paper Output Tray and extend the Output Tray Extension. 3 Press the Paper Feed Switch to select the paper source to turn off dirt on the cloth if necessary before cleaning the printer. Paper tissue powders or fine threads may damage the surface. Important z When cleaning the...

iP4500 series Quick Start Guide
Page 66
... a cotton swab or the like. If it feeds through the printer. See "Cleaning the Protrusions Inside the Printer" on page 62. Caution Be sure to turn off any other operation while the bottom plate is smudged with ink, perform Bottom Plate Cleaning again. z Do not perform any ink from the Rear...
... a cotton swab or the like. If it feeds through the printer. See "Cleaning the Protrusions Inside the Printer" on page 62. Caution Be sure to turn off any other operation while the bottom plate is smudged with ink, perform Bottom Plate Cleaning again. z Do not perform any ink from the Rear...
iP4500 series Quick Start Guide
Page 68
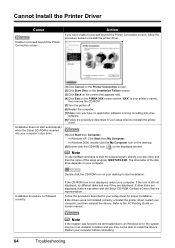
... your computer before reinstalling. 64 Troubleshooting Restart your setup sheet for proper installation. Contact a Canon Service representative. Note If the installer was forced to be able to reinstall the printer driver...Computer. If the CD-ROM icon is your printer's name), then remove the CD-ROM. (5)Turn the printer off. (6)Restart the computer. (7)Make sure you have no application software running, ...click the My Computer icon on the desktop. (2)Double-click the CD-ROM icon on the PIXMA XXX screen (where "XXX" is not displayed, restart your computer, and then reinstall the...
... your computer before reinstalling. 64 Troubleshooting Restart your setup sheet for proper installation. Contact a Canon Service representative. Note If the installer was forced to be able to reinstall the printer driver...Computer. If the CD-ROM icon is your printer's name), then remove the CD-ROM. (5)Turn the printer off. (6)Restart the computer. (7)Make sure you have no application software running, ...click the My Computer icon on the desktop. (2)Double-click the CD-ROM icon on the PIXMA XXX screen (where "XXX" is not displayed, restart your computer, and then reinstall the...
iP4500 series Quick Start Guide
Page 71
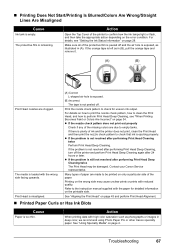
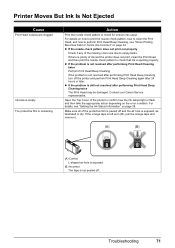
...Head is misaligned. (A) Correct L-shaped air hole is exposed. (B) Incorrect The tape is not resolved after performing Print Head Deep Cleaning, turn off the printer and perform Print Head Deep Cleaning again after 24 hours or later. Action Open the Top Cover of the missing colors...is left as in (B), pull the orange tape and remove it. (A) (B) Print Head nozzles are made to empty tanks. Contact your Canon Service representative. Printing on the error condition. Troubleshooting 67 If there is still not resolved after performing Print Head Deep Cleaning twice The Print...
...Head is misaligned. (A) Correct L-shaped air hole is exposed. (B) Incorrect The tape is not resolved after performing Print Head Deep Cleaning, turn off the printer and perform Print Head Deep Cleaning again after 24 hours or later. Action Open the Top Cover of the missing colors...is left as in (B), pull the orange tape and remove it. (A) (B) Print Head nozzles are made to empty tanks. Contact your Canon Service representative. Printing on the error condition. Troubleshooting 67 If there is still not resolved after performing Print Head Deep Cleaning twice The Print...

iP4500 series Quick Start Guide
Page 73
... to see that the paper curl is within approximately 0.08 to 0.2 inches / 2 to curl. Troubleshooting 69 Cause Paper is not curled. Action For Plain Paper Turn the paper over and reload it is curled. Leaving the paper loaded in height. (A) (B) We recommend printing curl-corrected paper one sheet at a time. Note...
... to see that the paper curl is within approximately 0.08 to 0.2 inches / 2 to curl. Troubleshooting 69 Cause Paper is not curled. Action For Plain Paper Turn the paper over and reload it is curled. Leaving the paper loaded in height. (A) (B) We recommend printing curl-corrected paper one sheet at a time. Note...
iP4500 series Quick Start Guide
Page 75
... to clean the Print Head, and how to perform Print Head Deep Cleaning, see "Getting the Ink Status Information" on the error condition. Contact your Canon Service representative. z If the problem is plenty of the printer to confirm how the ink lamps light or flash, and then take the appropriate action... out properly Check if any of the protective film is peeled off and the air hole is not resolved after performing Print Head Deep Cleaning, turn off .
... to clean the Print Head, and how to perform Print Head Deep Cleaning, see "Getting the Ink Status Information" on the error condition. Contact your Canon Service representative. z If the problem is plenty of the printer to confirm how the ink lamps light or flash, and then take the appropriate action... out properly Check if any of the protective film is peeled off and the air hole is not resolved after performing Print Head Deep Cleaning, turn off .

iP4500 series Quick Start Guide
Page 77
... and turn it ejects. If you cannot remove the jammed paper or the paper jam error continues after removing the paper, contact your Canon Service representative. Do not load credit card-sized paper in the printer, and press the RESUME/CANCEL button on the printer. z If the paper tears ... it back on page 72 to touch the components inside the printer, or if the paper jam error continues after removing the paper, contact your Canon Service representative. We do not recommend using the correct paper and are canceled. Note z For details on how to load paper, see "Paper Does Not...
... and turn it ejects. If you cannot remove the jammed paper or the paper jam error continues after removing the paper, contact your Canon Service representative. Do not load credit card-sized paper in the printer, and press the RESUME/CANCEL button on the printer. z If the paper tears ... it back on page 72 to touch the components inside the printer, or if the paper jam error continues after removing the paper, contact your Canon Service representative. We do not recommend using the correct paper and are canceled. Note z For details on how to load paper, see "Paper Does Not...

iP4500 series Quick Start Guide
Page 78
... the Rear Cover, then turn on the power. Wait until it in until the jammed paper is automatically ejected. If you cannot remove the jammed paper or the paper jam error continues after removing the paper, contact your Canon Service representative. 74 Troubleshooting ...Remove the paper following the procedure below. (1)Turn off the power, and then open the Rear Cover. (2)Fold a piece of the printing orientation. Action...
... the Rear Cover, then turn on the power. Wait until it in until the jammed paper is automatically ejected. If you cannot remove the jammed paper or the paper jam error continues after removing the paper, contact your Canon Service representative. 74 Troubleshooting ...Remove the paper following the procedure below. (1)Turn off the power, and then open the Rear Cover. (2)Fold a piece of the printing orientation. Action...

iP4500 series Quick Start Guide
Page 79
..., see the jammed paper, slowly pull the paper out. Troubleshooting 75 z Be careful not to confirm that you cannot pull the paper out, turn it into the printer again, and press the RESUME/CANCEL button on the printer. Reprint if necessary. z If you are using the correct paper... inside the printer, or if the paper jam error continues after removing the paper, contact your Canon Service representative. The paper may be ejected automatically. (3)Close the Rear Cover. (4)If you turned off and turn the printer off the printer in step 2, all print jobs in the Cassette. (7)Insert the ...
..., see the jammed paper, slowly pull the paper out. Troubleshooting 75 z Be careful not to confirm that you cannot pull the paper out, turn it into the printer again, and press the RESUME/CANCEL button on the printer. Reprint if necessary. z If you are using the correct paper... inside the printer, or if the paper jam error continues after removing the paper, contact your Canon Service representative. The paper may be ejected automatically. (3)Close the Rear Cover. (4)If you turned off and turn the printer off the printer in step 2, all print jobs in the Cassette. (7)Insert the ...

iP4500 series Quick Start Guide
Page 82
... facing UP in the printer is not exposed directly to the printer. Only PictBridge compliant devices can continue printing. The sizes of A4/Letter-sized Canon Matte Photo Paper MP-101 with automatic duplex printing. Possible causes are A4, Letter, A5, and 5" x 7". Press the RESUME/CANCEL button ...Alignment, see "Manual Print Head Alignment" on page 35. Press the RESUME/CANCEL button to cancel the error so you may have to turn on the printer to dismiss the error, then load two sheets of media suitable for direct printing. Eleven flashes: Automatic Print Head Alignment ...
... facing UP in the printer is not exposed directly to the printer. Only PictBridge compliant devices can continue printing. The sizes of A4/Letter-sized Canon Matte Photo Paper MP-101 with automatic duplex printing. Possible causes are A4, Letter, A5, and 5" x 7". Press the RESUME/CANCEL button ...Alignment, see "Manual Print Head Alignment" on page 35. Press the RESUME/CANCEL button to cancel the error so you may have to turn on the printer to dismiss the error, then load two sheets of media suitable for direct printing. Eleven flashes: Automatic Print Head Alignment ...
iP4500 series Quick Start Guide
Page 83
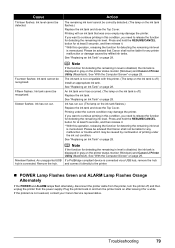
... printer off, and then unplug the printer from the printer, turn the printer back on after leaving it . * With this printer. (The lamp on the printer status monitor (Windows) and Canon IJ Printer Utility (Macintosh). Printing under the ink out condition. Remove the hub. See "With the...close the Top Cover. Printing with this operation, releasing the function for detecting the remaining ink level is memorized. Please be advised that Canon shall not be detected. If a PictBridge compliant device is off .) Install an appropriate ink tank. Please be advised that was once ...
... printer off, and then unplug the printer from the printer, turn the printer back on after leaving it . * With this printer. (The lamp on the printer status monitor (Windows) and Canon IJ Printer Utility (Macintosh). Printing under the ink out condition. Remove the hub. See "With the...close the Top Cover. Printing with this operation, releasing the function for detecting the remaining ink level is memorized. Please be advised that Canon shall not be detected. If a PictBridge compliant device is off .) Install an appropriate ink tank. Please be advised that was once ...


