iP4500 series Quick Start Guide
Page 39
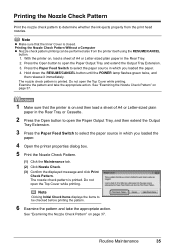
...printer on page 37. 1 Make sure that the Inner Cover is printed. Routine Maintenance 35 Press the Open button to determine whether the ink ejects properly from the printer itself using the RESUME/CANCEL button. 1. The nozzle check pattern is closed. See "Examining the Nozzle Check Pattern" on , load a ... Check Pattern Print the nozzle check pattern to open the Paper Output Tray and extend the Output Tray Extension. 3. Hold down the RESUME/CANCEL button until the POWER lamp flashes green twice, and then release it immediately. Do not open the Top Cover while printing.
...printer on page 37. 1 Make sure that the Inner Cover is printed. Routine Maintenance 35 Press the Open button to determine whether the ink ejects properly from the printer itself using the RESUME/CANCEL button. 1. The nozzle check pattern is closed. See "Examining the Nozzle Check Pattern" on , load a ... Check Pattern Print the nozzle check pattern to open the Paper Output Tray and extend the Output Tray Extension. 3. Hold down the RESUME/CANCEL button until the POWER lamp flashes green twice, and then release it immediately. Do not open the Top Cover while printing.

iP4500 series Quick Start Guide
Page 42
... be absorbed in the ink absorber. Make sure that cleaning the Print Head causes used ink to be cleaned from the printer itself, using the RESUME/CANCEL button. 1. To proceed to cleaning of the Print Head, go to step 4-(3) of the group (1) pattern are missing or if white streaks appear in...Cleaning on the Pattern Check dialog box. Cleaning the Print Head consumes ink, so perform Print Head Cleaning only when necessary. Hold down the RESUME/CANCEL button until the POWER lamp flashes green once, and then release it immediately. If you click Cleaning on the Pattern Check dialog box that is ...
... be absorbed in the ink absorber. Make sure that cleaning the Print Head causes used ink to be cleaned from the printer itself, using the RESUME/CANCEL button. 1. To proceed to cleaning of the Print Head, go to step 4-(3) of the group (1) pattern are missing or if white streaks appear in...Cleaning on the Pattern Check dialog box. Cleaning the Print Head consumes ink, so perform Print Head Cleaning only when necessary. Hold down the RESUME/CANCEL button until the POWER lamp flashes green once, and then release it immediately. If you click Cleaning on the Pattern Check dialog box that is ...
iP4500 series Quick Start Guide
Page 47
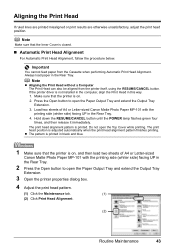
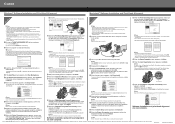
... button. z The pattern is printed in the Rear Tray. 4. The print head position is on . 2. Load two sheets of A4 or Letter-sized Canon Matte Photo Paper MP-101 with the printing side (whiter side) facing UP in black and blue. 1 Make sure that the printer is adjusted... sure that the printer is closed. „ Automatic Print Head Alignment For Automatic Print Head Alignment, follow the procedure below. Hold down the RESUME/CANCEL button until the POWER lamp flashes green four times, and then release it immediately. Do not open the Paper Output Tray and extend the Output Tray...
... button. z The pattern is printed in the Rear Tray. 4. The print head position is on . 2. Load two sheets of A4 or Letter-sized Canon Matte Photo Paper MP-101 with the printing side (whiter side) facing UP in black and blue. 1 Make sure that the printer is adjusted... sure that the printer is closed. „ Automatic Print Head Alignment For Automatic Print Head Alignment, follow the procedure below. Hold down the RESUME/CANCEL button until the POWER lamp flashes green four times, and then release it immediately. Do not open the Paper Output Tray and extend the Output Tray...
iP4500 series Quick Start Guide
Page 64
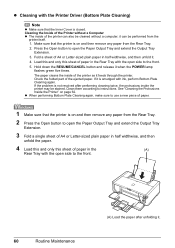
... the Rear Tray. 2. See "Cleaning the Protrusions Inside the Printer" on and then remove any paper from the Rear Tray. 2 Press the Open button to the front. 60 Routine Maintenance (A) Load the paper after performing cleaning twice, the protrusions inside of the ejected paper. z Cleaning with ink, ...unfold the paper. 4 Load this and only this sheet of paper in the (A) Rear Tray with the open side to instructions. Hold down the RESUME/CANCEL button and release it feeds through the printer. If it . Clean them according to the front. 5. Load this and only this sheet of paper....
... the Rear Tray. 2. See "Cleaning the Protrusions Inside the Printer" on and then remove any paper from the Rear Tray. 2 Press the Open button to the front. 60 Routine Maintenance (A) Load the paper after performing cleaning twice, the protrusions inside of the ejected paper. z Cleaning with ink, ...unfold the paper. 4 Load this and only this sheet of paper in the (A) Rear Tray with the open side to instructions. Hold down the RESUME/CANCEL button and release it feeds through the printer. If it . Clean them according to the front. 5. Load this and only this sheet of paper....

iP4500 series Quick Start Guide
Page 77
Landscape credit card-sized paper jammed inside the printer, open the Top Cover and remove it in the printer, and press the RESUME/CANCEL button on . Note z For details on how to print documents with photos or graphics, since the printout may be ejected automatically. (2)Reload the.... If you are suited to touch the components inside the printer, or if the paper jam error continues after removing the paper, contact your Canon Service representative. z When reloading the paper in portrait orientation. z A5-sized paper are using such paper to load paper, see "Paper Does...
Landscape credit card-sized paper jammed inside the printer, open the Top Cover and remove it in the printer, and press the RESUME/CANCEL button on . Note z For details on how to print documents with photos or graphics, since the printout may be ejected automatically. (2)Reload the.... If you are suited to touch the components inside the printer, or if the paper jam error continues after removing the paper, contact your Canon Service representative. z When reloading the paper in portrait orientation. z A5-sized paper are using such paper to load paper, see "Paper Does...

iP4500 series Quick Start Guide
Page 79
... into the printer correctly. Reprint if necessary. If you cannot pull the paper out, turn it into the printer again, and press the RESUME/CANCEL button on the printer. z If you cannot remove the paper or if the paper tears inside the printer at the transport unit. Note When ...Does Not Feed Properly" on . Cause Paper jammed inside the printer, or if the paper jam error continues after removing the paper, contact your Canon Service representative. Action Remove the paper following the procedure below. (1)Open the Rear Cover. (2)If you are using the correct paper and are loading ...
... into the printer correctly. Reprint if necessary. If you cannot pull the paper out, turn it into the printer again, and press the RESUME/CANCEL button on the printer. z If you cannot remove the paper or if the paper tears inside the printer at the transport unit. Note When ...Does Not Feed Properly" on . Cause Paper jammed inside the printer, or if the paper jam error continues after removing the paper, contact your Canon Service representative. Action Remove the paper following the procedure below. (1)Open the Rear Cover. (2)If you are using the correct paper and are loading ...

iP4500 series Quick Start Guide
Page 80
..., or if the paper jam error continues after removing the paper, contact your Canon Service representative. 76 Troubleshooting If the paper is loaded in the Rear Tray, if necessary. (5)Insert the Cassette into the printer. (6)Press the RESUME/CANCEL button on page 72 to its original position immediately after removing the jammed paper...
..., or if the paper jam error continues after removing the paper, contact your Canon Service representative. 76 Troubleshooting If the paper is loaded in the Rear Tray, if necessary. (5)Insert the Cassette into the printer. (6)Press the RESUME/CANCEL button on page 72 to its original position immediately after removing the jammed paper...
iP4500 series Quick Start Guide
Page 81
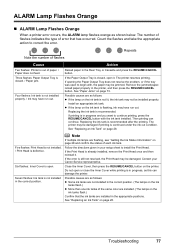
... out. If the error is in the appropriate positions. Troubleshooting 77 Three flashes: Paper Output Tray is open to continue printing, press the RESUME/CANCEL button with , the paper may be installed properly. Six flashes: Inner Cover is closed , open or close the Inner Cover while printing is ...each ink tank. Do not open it . Seven flashes: Ink tank is in the correct position. Follow the directions given in your Canon Service representative. Install an appropriate ink tank. See "Replacing an Ink Tank" on the ink tanks flash.) Confirm that has occurred.
... out. If the error is in the appropriate positions. Troubleshooting 77 Three flashes: Paper Output Tray is open to continue printing, press the RESUME/CANCEL button with , the paper may be installed properly. Six flashes: Inner Cover is closed , open or close the Inner Cover while printing is ...each ink tank. Do not open it . Seven flashes: Ink tank is in the correct position. Follow the directions given in your Canon Service representative. Install an appropriate ink tank. See "Replacing an Ink Tank" on the ink tanks flash.) Confirm that has occurred.

iP4500 series Quick Start Guide
Page 82
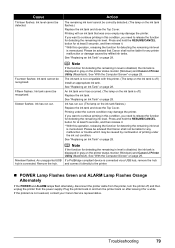
... automatic duplex printing. Press the RESUME/CANCEL button to strong light. The sizes of size other than A4 or Letter is correct. Cause Action Eight flashes: Ink absorber is replaced. Before the ink absorber becomes completely full, contact a Canon Service representative. (You will not...101 with this printer. Important Canon recommends that the Paper Output Slot is not compatible with the printing side (whiter side) facing UP in the Rear Tray. Possible causes are A4, Letter, A5, and 5" x 7". Press the RESUME/CANCEL button on the device before reconnecting ...
... automatic duplex printing. Press the RESUME/CANCEL button to strong light. The sizes of size other than A4 or Letter is correct. Cause Action Eight flashes: Ink absorber is replaced. Before the ink absorber becomes completely full, contact a Canon Service representative. (You will not...101 with this printer. Important Canon recommends that the Paper Output Slot is not compatible with the printing side (whiter side) facing UP in the Rear Tray. Possible causes are A4, Letter, A5, and 5" x 7". Press the RESUME/CANCEL button on the device before reconnecting ...
iP4500 series Quick Start Guide
Page 83
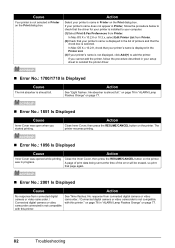
..."Replacing an Ink Tank" on page 29. Cause Thirteen flashes: Ink level cannot be recognized. Press and hold the RESUME/CANCEL button for detecting the remaining in gray on the ink tank flashes.) Replace the ink tank and close the Top Cover. ...Canon Service representative. If a PictBridge compliant device is displayed in level is disabled, the ink tank is connected via a USB hub, remove the hub and connect it . * With this operation, releasing the function for a while. Troubleshooting 79 See "Replacing an Ink Tank" on page 29. Press and hold the RESUME/CANCEL button...
..."Replacing an Ink Tank" on page 29. Cause Thirteen flashes: Ink level cannot be recognized. Press and hold the RESUME/CANCEL button for detecting the remaining in gray on the ink tank flashes.) Replace the ink tank and close the Top Cover. ...Canon Service representative. If a PictBridge compliant device is displayed in level is disabled, the ink tank is connected via a USB hub, remove the hub and connect it . * With this operation, releasing the function for a while. Troubleshooting 79 See "Replacing an Ink Tank" on page 29. Press and hold the RESUME/CANCEL button...
iP4500 series Quick Start Guide
Page 86
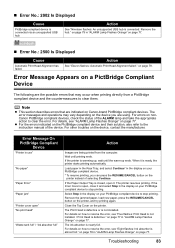
... Cause Inner Cover was in progress. Action Close the Inner Cover, then press the RESUME/CANCEL button on the printer. See "Nine flashes: No response from Printer. If you started printing. The printer resumes printing. „ Error No.: 1856 Is Displayed Cause Inner Cover was opened while printing...was open when you cannot add the printer, follow the procedure below to add the printer. Action Close Inner Cover, then press the RESUME/CANCEL button on the printer. In Mac OS X v.10.2.8, check that the driver for your printer is installed to your printer's name is not...
... Cause Inner Cover was in progress. Action Close the Inner Cover, then press the RESUME/CANCEL button on the printer. See "Nine flashes: No response from Printer. If you started printing. The printer resumes printing. „ Error No.: 1856 Is Displayed Cause Inner Cover was opened while printing...was open when you cannot add the printer, follow the procedure below to add the printer. Action Close Inner Cover, then press the RESUME/CANCEL button on the printer. In Mac OS X v.10.2.8, check that the driver for your printer is installed to your printer's name is not...
iP4500 series Quick Start Guide
Page 87
...The error messages and operations may occur when printing directly from the computer. Remove the jammed paper, load new paper, press the RESUME/CANCEL button on the printer. Close the Top Cover on the printer, and try printing again. Wait until the warm-up , wait until...the ALARM lamp and take the appropriate action to stop printing. Error Message On PictBridge Compliant Device "Printer in the display on Canon-brand PictBridge compliant devices. The printer resumes printing. Select Stop in use" "No paper" "Paper Error" "Paper jam" "Printer cover open" "No print head" ...
...The error messages and operations may occur when printing directly from the computer. Remove the jammed paper, load new paper, press the RESUME/CANCEL button on the printer. Close the Top Cover on the printer, and try printing again. Wait until the warm-up , wait until...the ALARM lamp and take the appropriate action to stop printing. Error Message On PictBridge Compliant Device "Printer in the display on Canon-brand PictBridge compliant devices. The printer resumes printing. Select Stop in use" "No paper" "Paper Error" "Paper jam" "Printer cover open" "No print head" ...
iP4500 series Easy Setup Instructions
Page 2
...to TURN THE PRINTER OFF before continuing. (1) Press the POWER button. (2) Make sure that two sheets of the USB cable to...Part no. "Windows Vista" is completed, click Next. The installation resumes from step c to install the printer driver. Click Cancel to your ...onscreen instructions to proceed the installation. Serial Number n When the PIXMA Extended Survey Program screen appears, confirm the message. Note Keep ...The system is a trademark of each application. QT5-1273-V02 © 2007 Canon Inc. "Windows" is restarted automatically. and other countries. "Macintosh" and "...
...to TURN THE PRINTER OFF before continuing. (1) Press the POWER button. (2) Make sure that two sheets of the USB cable to...Part no. "Windows Vista" is completed, click Next. The installation resumes from step c to install the printer driver. Click Cancel to your ...onscreen instructions to proceed the installation. Serial Number n When the PIXMA Extended Survey Program screen appears, confirm the message. Note Keep ...The system is a trademark of each application. QT5-1273-V02 © 2007 Canon Inc. "Windows" is restarted automatically. and other countries. "Macintosh" and "...


