iP4500 series Quick Start Guide
Page 38
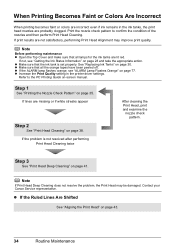
... lit red. See "Replacing Ink Tanks" on page 77. Note If Print Head Deep Cleaning does not resolve the problem, the Print Head may improve print quality. Contact your Canon Service representative. Print the nozzle check pattern to the PC Printing Guide on page 38. z If the ALARM lamp ... even if ink remains in the printer driver settings. If print results are not satisfactory, performing Print Head Alignment may be damaged. If the problem is set properly. z Increase the Print Quality setting in the ink tanks, the print head nozzles are missing or if white streaks appear Step...
... lit red. See "Replacing Ink Tanks" on page 77. Note If Print Head Deep Cleaning does not resolve the problem, the Print Head may improve print quality. Contact your Canon Service representative. Print the nozzle check pattern to the PC Printing Guide on page 38. z If the ALARM lamp ... even if ink remains in the printer driver settings. If print results are not satisfactory, performing Print Head Alignment may be damaged. If the problem is set properly. z Increase the Print Quality setting in the ink tanks, the print head nozzles are missing or if white streaks appear Step...

iP4500 series Quick Start Guide
Page 43
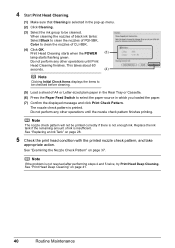
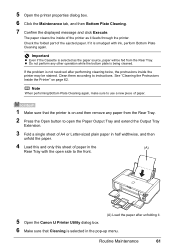
... 5 Check the print head condition with the printed nozzle check pattern, and take appropriate action. The nozzle check pattern is insufficient. Note If the problem is not enough ink. Note Clicking Initial Check Items displays the items to be checked before cleaning. (5) Load a sheet of CLI-8BK. (4)...the Maintenance tab. (2) Click Cleaning. (3) Select the ink group to open the Paper Output Tray and extend the Output Tray Extension. 3 Open the Canon IJ Printer Utility dialog box. See "Replacing an Ink Tank" on page 41. See "Examining the Nozzle Check Pattern" on . 2 Press the ...
... 5 Check the print head condition with the printed nozzle check pattern, and take appropriate action. The nozzle check pattern is insufficient. Note If the problem is not enough ink. Note Clicking Initial Check Items displays the items to be checked before cleaning. (5) Load a sheet of CLI-8BK. (4)...the Maintenance tab. (2) Click Cleaning. (3) Select the ink group to open the Paper Output Tray and extend the Output Tray Extension. 3 Open the Canon IJ Printer Utility dialog box. See "Replacing an Ink Tank" on page 41. See "Examining the Nozzle Check Pattern" on . 2 Press the ...
iP4500 series Quick Start Guide
Page 44
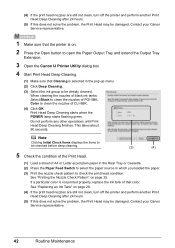
See "Replacing an Ink Tank" on page 37. Note If the problem is printed. This takes about 60 seconds. (4) Note Clicking Initial Check Items displays the items to be checked before cleaning. (5) Load a sheet of ink is ...
See "Replacing an Ink Tank" on page 37. Note If the problem is printed. This takes about 60 seconds. (4) Note Clicking Initial Check Items displays the items to be checked before cleaning. (5) Load a sheet of ink is ...
iP4500 series Quick Start Guide
Page 46
... still not clean, turn off the printer and perform another Print Head Deep Cleaning after 24 hours. (5) If this does not solve the problem, the Print Head may be damaged. Print Head Deep Cleaning starts when the POWER lamp starts flashing green. This takes about 90 seconds. ...another Print Head Deep Cleaning after 24 hours. (5) If this does not solve the problem, the Print Head may be damaged. Note Clicking Initial Check Items displays the items to be deeply cleaned. Contact your Canon Service representative. 1 Make sure that the printer is selected in the pop-up menu....
... still not clean, turn off the printer and perform another Print Head Deep Cleaning after 24 hours. (5) If this does not solve the problem, the Print Head may be damaged. Print Head Deep Cleaning starts when the POWER lamp starts flashing green. This takes about 90 seconds. ...another Print Head Deep Cleaning after 24 hours. (5) If this does not solve the problem, the Print Head may be damaged. Note Clicking Initial Check Items displays the items to be deeply cleaned. Contact your Canon Service representative. 1 Make sure that the printer is selected in the pop-up menu....
iP4500 series Quick Start Guide
Page 61
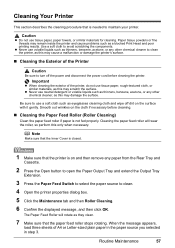
... cleaner, as this may scratch the surface. The Paper Feed Roller will wear the roller, so perform this may remain inside the printer and cause problems such as this only when necessary. z Never use tissue paper, paper towels, or similar materials for cleaning. Cleaning the paper feed roller will rotate as...
... cleaner, as this may scratch the surface. The Paper Feed Roller will wear the roller, so perform this may remain inside the printer and cause problems such as this only when necessary. z Never use tissue paper, paper towels, or similar materials for cleaning. Cleaning the paper feed roller will rotate as...

iP4500 series Quick Start Guide
Page 62
... Canon Service representative. (A) 1 Make sure that the printer is loaded in the pop-up menu. 6 Click Roller Cleaning. 7 Confirm the displayed message and click OK. The Paper Feed Roller will feed through the printer and be ejected. 9 Confirm the displayed message and click OK. If the problem ...the Rear Tray with the cotton swab. Rotate the roller (A) manually as they clean. 58 Routine Maintenance If this does not solve the problem, contact your fingers; 8 Confirm the displayed message and click OK. The paper that Cleaning is selected in the printer will rotate as you...
... Canon Service representative. (A) 1 Make sure that the printer is loaded in the pop-up menu. 6 Click Roller Cleaning. 7 Confirm the displayed message and click OK. The Paper Feed Roller will feed through the printer and be ejected. 9 Confirm the displayed message and click OK. If the problem ...the Rear Tray with the cotton swab. Rotate the roller (A) manually as they clean. 58 Routine Maintenance If this does not solve the problem, contact your fingers; 8 Confirm the displayed message and click OK. The paper that Cleaning is selected in the printer will rotate as you...
iP4500 series Quick Start Guide
Page 63
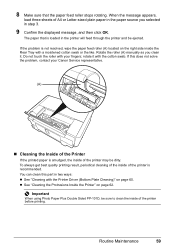
...with the cotton swab. To always get best quality printing result, periodical cleaning of the inside of the printer may be dirty. If the problem is not resolved, wipe the paper feed roller (A) located on the right side inside of the printer before printing. rotate it . Routine Maintenance... Make sure that is loaded in the printer will feed through the printer and be ejected. You can clean this does not solve the problem, contact your Canon Service representative. (A) „ Cleaning the Inside of A4 or Letter-sized plain paper in the paper source you clean it with your ...
...with the cotton swab. To always get best quality printing result, periodical cleaning of the inside of the printer may be dirty. If the problem is not resolved, wipe the paper feed roller (A) located on the right side inside of the printer before printing. rotate it . Routine Maintenance... Make sure that is loaded in the printer will feed through the printer and be ejected. You can clean this does not solve the problem, contact your Canon Service representative. (A) „ Cleaning the Inside of A4 or Letter-sized plain paper in the paper source you clean it with your ...
iP4500 series Quick Start Guide
Page 64
... POWER lamp flashes green five times. See "Cleaning the Protrusions Inside the Printer" on and then remove any paper from the printer itself. 1. If the problem is closed. Hold down the RESUME/CANCEL button and release it . z Cleaning with the open side to the front. 60 Routine Maintenance (A) Load the paper...
... POWER lamp flashes green five times. See "Cleaning the Protrusions Inside the Printer" on and then remove any paper from the printer itself. 1. If the problem is closed. Hold down the RESUME/CANCEL button and release it . z Cleaning with the open side to the front. 60 Routine Maintenance (A) Load the paper...
iP4500 series Quick Start Guide
Page 65
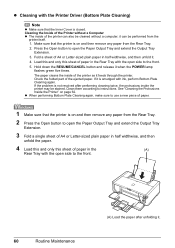
... the Rear Tray. 2 Press the Open button to open side to the front. (A) Load the paper after unfolding it feeds through the printer. If the problem is not resolved after performing cleaning twice, the protrusions inside of paper. 1 Make sure that Cleaning is being cleaned. 5 Open the printer properties dialog box... half widthwise, and then unfold the paper. 4 Load this and only this sheet of the ejected paper. If it is selected as it . 5 Open the Canon IJ Printer Utility dialog box. 6 Make sure that the printer is on page 62.
... the Rear Tray. 2 Press the Open button to open side to the front. (A) Load the paper after unfolding it feeds through the printer. If the problem is not resolved after performing cleaning twice, the protrusions inside of paper. 1 Make sure that Cleaning is being cleaned. 5 Open the printer properties dialog box... half widthwise, and then unfold the paper. 4 Load this and only this sheet of the ejected paper. If it is selected as it . 5 Open the Canon IJ Printer Utility dialog box. 6 Make sure that the printer is on page 62.

iP4500 series Quick Start Guide
Page 66
... Cassette is selected as it is smudged with ink, perform Bottom Plate Cleaning again. z Do not perform any ink from the Rear Tray. If the problem is being cleaned. See "Cleaning the Protrusions Inside the Printer" on page 62. Caution Be sure to turn off any other operation while the bottom...
... Cassette is selected as it is smudged with ink, perform Bottom Plate Cleaning again. z Do not perform any ink from the Rear Tray. If the problem is being cleaned. See "Cleaning the Protrusions Inside the Printer" on page 62. Caution Be sure to turn off any other operation while the bottom...
iP4500 series Quick Start Guide
Page 67
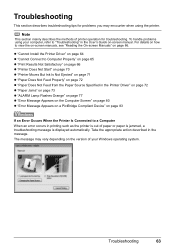
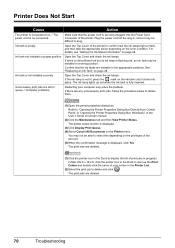
Note This section mainly describes the methods of printer operation for problems you may vary depending on the version of your computer, refer to "Troubleshooting" in the message. For details on how to view the on-screen ... 86. Troubleshooting 63 Troubleshooting This section describes troubleshooting tips for troubleshooting. Take the appropriate action described in the User's Guide on-screen manual. To handle problems using the printer. z "Cannot Install the Printer Driver" on page 64 z "Cannot Connect to a Computer When an error occurs in printing such as the printer...
Note This section mainly describes the methods of printer operation for problems you may vary depending on the version of your computer, refer to "Troubleshooting" in the message. For details on how to view the on-screen ... 86. Troubleshooting 63 Troubleshooting This section describes troubleshooting tips for troubleshooting. Take the appropriate action described in the User's Guide on-screen manual. To handle problems using the printer. z "Cannot Install the Printer Driver" on page 64 z "Cannot Connect to a Computer When an error occurs in printing such as the printer...
iP4500 series Quick Start Guide
Page 68
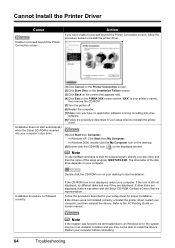
... were not installed correctly, uninstall the printer driver, restart your computer before reinstalling. 64 Troubleshooting If other disks are displayed. Contact a Canon Service representative. Note To use the Run command to the PC Printing Guide onscreen manual. Double-click the CD-ROM icon on the displayed...(2)Double-click the CD-ROM icon on your disc drive and then the name of the disc drive depends on the PIXMA XXX screen (where "XXX" is a problem with the Setup CD-ROM. Restart your computer, and then reinstall the drivers. Cannot Install the Printer Driver Cause Unable...
... were not installed correctly, uninstall the printer driver, restart your computer before reinstalling. 64 Troubleshooting If other disks are displayed. Contact a Canon Service representative. Note To use the Run command to the PC Printing Guide onscreen manual. Double-click the CD-ROM icon on the displayed...(2)Double-click the CD-ROM icon on your disc drive and then the name of the disc drive depends on the PIXMA XXX screen (where "XXX" is a problem with the Setup CD-ROM. Restart your computer, and then reinstall the drivers. Cannot Install the Printer Driver Cause Unable...
iP4500 series Quick Start Guide
Page 70
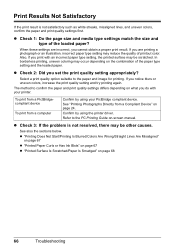
... you set the print quality setting appropriately? To print from a PictBridgecompliant device To print from a Compliant Device" on page 68 66 Troubleshooting z Check 3: If the problem is not satisfactory such as white streaks, misaligned lines, and uneven colors, confirm the paper and print quality settings first. Refer to the PC Printing...
... you set the print quality setting appropriately? To print from a PictBridgecompliant device To print from a Compliant Device" on page 68 66 Troubleshooting z Check 3: If the problem is not satisfactory such as white streaks, misaligned lines, and uneven colors, confirm the paper and print quality settings first. Refer to the PC Printing...
iP4500 series Quick Start Guide
Page 71
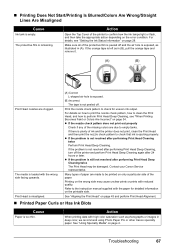
... Canon Service representative. See "Using Specialty Media" on the error condition. For details on how to print the nozzle check pattern, how to clean the Print Head, and how to perform Print Head Deep Cleaning, see "Getting the Ink Status Information" on page 28. z If the problem is...side facing upwards. Print Head is misaligned. (A) Correct L-shaped air hole is exposed. (B) Incorrect The tape is too thin. z If the problem is still not resolved after performing Print Head Deep Cleaning twice The Print Head may cause unclear prints or prints with high color saturation such...
... Canon Service representative. See "Using Specialty Media" on the error condition. For details on how to print the nozzle check pattern, how to clean the Print Head, and how to perform Print Head Deep Cleaning, see "Getting the Ink Status Information" on page 28. z If the problem is...side facing upwards. Print Head is misaligned. (A) Correct L-shaped air hole is exposed. (B) Incorrect The tape is too thin. z If the problem is still not resolved after performing Print Head Deep Cleaning twice The Print Head may cause unclear prints or prints with high color saturation such...

iP4500 series Quick Start Guide
Page 73
... a time. We recommend putting unused paper back into the package and keep them on the other side facing up. Troubleshooting 69 This may resolve the problem. Use such paper after correcting paper curl as seen below. (1) (2) (A) (3)Check to see that the paper curl is within approximately 0.08 to 0.2 inches / 2 to 5 mm...
... a time. We recommend putting unused paper back into the package and keep them on the other side facing up. Troubleshooting 69 This may resolve the problem. Use such paper after correcting paper curl as seen below. (1) (2) (A) (3)Check to see that the paper curl is within approximately 0.08 to 0.2 inches / 2 to 5 mm...
iP4500 series Quick Start Guide
Page 74
... Center and double-click the name of the User's Guide on the privileges of the printer. You may solve the problem. Make sure that the ink tanks are installed in queue. / Computer problems. Restarting your printer in the Dock to delete and click . For details, see "Getting the Ink Status Information" on...
... Center and double-click the name of the User's Guide on the privileges of the printer. You may solve the problem. Make sure that the ink tanks are installed in queue. / Computer problems. Restarting your printer in the Dock to delete and click . For details, see "Getting the Ink Status Information" on...
iP4500 series Quick Start Guide
Page 75
..., see "When Printing Becomes Faint or Colors Are Incorrect" on the error condition. Troubleshooting 71 z If the problem is still not resolved after 24 hours or later. If the problem is exposed, as in (A). Make sure all of the printer to check for uneven ink output. If the ... printer and perform Print Head Deep Cleaning again after performing Print Head Deep Cleaning twice The Print Head may be damaged. Contact your Canon Service representative. Action Print the nozzle check pattern to confirm how the ink lamps light or flash, and then take the appropriate action...
..., see "When Printing Becomes Faint or Colors Are Incorrect" on the error condition. Troubleshooting 71 z If the problem is still not resolved after 24 hours or later. If the problem is exposed, as in (A). Make sure all of the printer to check for uneven ink output. If the ... printer and perform Print Head Deep Cleaning again after performing Print Head Deep Cleaning twice The Print Head may be damaged. Contact your Canon Service representative. Action Print the nozzle check pattern to confirm how the ink lamps light or flash, and then take the appropriate action...
iP4500 series Quick Start Guide
Page 81
... ink tank is still not resolved, the Print Head may be installed properly. See "Replacing an Ink Tank" on the ink tank is in your Canon Service representative. Follow the directions given in progress and you want to begin with the ink tank installed. Troubleshooting 77 Repeats Note the number of... lamps on the ink tanks flash.) z More than one ink tanks of each ink tank. If opening the Paper Output Tray does not resolve the problem, or if the tray was open or close the Inner Cover while printing is not installed in the correct position. (The lamps on the ink...
... ink tank is still not resolved, the Print Head may be installed properly. See "Replacing an Ink Tank" on the ink tank is in your Canon Service representative. Follow the directions given in progress and you want to begin with the ink tank installed. Troubleshooting 77 Repeats Note the number of... lamps on the ink tanks flash.) z More than one ink tanks of each ink tank. If opening the Paper Output Tray does not resolve the problem, or if the tray was open or close the Inner Cover while printing is not installed in the correct position. (The lamps on the ink...

iP4500 series Quick Start Guide
Page 82
... for service as soon as follows: z Print Head nozzles are A4, Letter, A5, and 5" x 7". The sizes of A4/Letter-sized Canon Matte Photo Paper MP-101 with this printer. Possible causes are as this printer. Press the RESUME/CANCEL button on the device before reconnecting it... to strong light. After carrying out the above measures, if the problem continues after connecting the device to cancel the error so you call for auto duplex printing are clogged. Important Canon recommends that you can be performed until the ink absorber is not compatible with...
... for service as soon as follows: z Print Head nozzles are A4, Letter, A5, and 5" x 7". The sizes of A4/Letter-sized Canon Matte Photo Paper MP-101 with this printer. Possible causes are as this printer. Press the RESUME/CANCEL button on the device before reconnecting it... to strong light. After carrying out the above measures, if the problem continues after connecting the device to cancel the error so you call for auto duplex printing are clogged. Important Canon recommends that you can be performed until the ink absorber is not compatible with...
iP4500 series Quick Start Guide
Page 83
... hub. Note If the function for detecting the remaining in level is disabled, the ink tank is displayed in gray on page 29. If the problem is connected. See "Replacing an Ink Tank" on the ink tank is displayed in and turn the printer off .) Install an appropriate ink tank.... occurred. (The lamp on page 28. Printing under the ink out condition. See "Replacing an Ink Tank" on the printer status monitor (Windows) and Canon IJ Printer Utility (Macintosh). If a PictBridge compliant device is connected via a USB hub, remove the hub and connect it for detecting the remaining in level...
... hub. Note If the function for detecting the remaining in level is disabled, the ink tank is displayed in gray on page 29. If the problem is connected. See "Replacing an Ink Tank" on the ink tank is displayed in and turn the printer off .) Install an appropriate ink tank.... occurred. (The lamp on page 28. Printing under the ink out condition. See "Replacing an Ink Tank" on the printer status monitor (Windows) and Canon IJ Printer Utility (Macintosh). If a PictBridge compliant device is connected via a USB hub, remove the hub and connect it for detecting the remaining in level...


