iP3500 series Quick Start Guide
Page 5
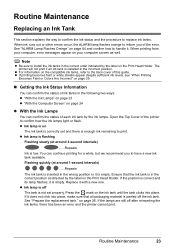
... Routine Maintenance 23 Replacing an Ink Tank 23 Keeping the Best Printing Results 28 When Printing Becomes Faint or Colors Are Incorrect 29 Printing the Nozzle Check Pattern 30 Examining the Nozzle Check Pattern ...........32 Print Head Cleaning 33 Print Head Deep Cleaning 36 Aligning the Print Head 38 Cleaning Your Printer 44 Troubleshooting 52 Cannot Install the Printer...
... Routine Maintenance 23 Replacing an Ink Tank 23 Keeping the Best Printing Results 28 When Printing Becomes Faint or Colors Are Incorrect 29 Printing the Nozzle Check Pattern 30 Examining the Nozzle Check Pattern ...........32 Print Head Cleaning 33 Print Head Deep Cleaning 36 Aligning the Print Head 38 Cleaning Your Printer 44 Troubleshooting 52 Cannot Install the Printer...
iP3500 series Quick Start Guide
Page 6
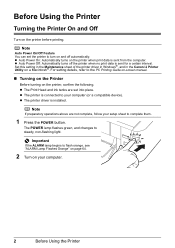
z The Print Head and ink tanks are not complete, follow your computer. 2 Before Using the Printer The POWER lamp flashes green, and changes to steady, non-flashing light. z Auto Power On: Automatically turns on and off the printer when no print data is sent from the computer. Note If ...Set this setting in the Maintenance sheet of the printer driver in Windows®, and in the Canon IJ Printer Utility on the printer, confirm the following. For setting details, refer to the PC Printing Guide on-screen manual. „ Turning on the Printer Before turning on a Macintosh®. ...
z The Print Head and ink tanks are not complete, follow your computer. 2 Before Using the Printer The POWER lamp flashes green, and changes to steady, non-flashing light. z Auto Power On: Automatically turns on and off the printer when no print data is sent from the computer. Note If ...Set this setting in the Maintenance sheet of the printer driver in Windows®, and in the Canon IJ Printer Utility on the printer, confirm the following. For setting details, refer to the PC Printing Guide on-screen manual. „ Turning on the Printer Before turning on a Macintosh®. ...
iP3500 series Quick Start Guide
Page 27
... If the position is inserted in the incorrect position. Routine Maintenance 23 z If printing becomes faint or white streaks appear despite sufficient ink levels, see "When Printing Becomes Faint or Colors Are Incorrect" on the Print Head Holder. Flashing quickly (at around 1-second intervals) ......Repeats The ink tank is ...(at around 3-second intervals) ......Repeats Ink is correctly set properly. on your computer screen as directed by the label on the Print Head Holder. If the lamps are still off after reinserting the ink tanks, there has been an error and the printer cannot...
... If the position is inserted in the incorrect position. Routine Maintenance 23 z If printing becomes faint or white streaks appear despite sufficient ink levels, see "When Printing Becomes Faint or Colors Are Incorrect" on the Print Head Holder. Flashing quickly (at around 1-second intervals) ......Repeats The ink tank is ...(at around 3-second intervals) ......Repeats Ink is correctly set properly. on your computer screen as directed by the label on the Print Head Holder. If the lamps are still off after reinserting the ink tanks, there has been an error and the printer cannot...
iP3500 series Quick Start Guide
Page 29
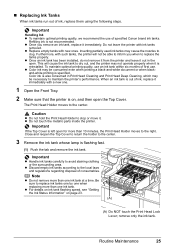
... tank whose lamp is reinstalled. z Discard empty ink tanks according to the center. Color ink is specified. Caution z Do not hold the Print Head Holder to avoid staining clothing or the surrounding area. Close and reopen the Top Cover to return the holder to replace ink tanks one by...„ Replacing Ink Tanks When ink tanks run out of specified Canon brand ink tanks. Important Handling Ink z To maintain optimal printing quality, we recommend the use . This will not be necessary to clog. To maintain optimal printing quality, use an ink tank within six months of first use ...
... tank whose lamp is reinstalled. z Discard empty ink tanks according to the center. Color ink is specified. Caution z Do not hold the Print Head Holder to avoid staining clothing or the surrounding area. Close and reopen the Top Cover to return the holder to replace ink tanks one by...„ Replacing Ink Tanks When ink tanks run out of specified Canon brand ink tanks. Important Handling Ink z To maintain optimal printing quality, we recommend the use . This will not be necessary to clog. To maintain optimal printing quality, use an ink tank within six months of first use ...
iP3500 series Quick Start Guide
Page 31
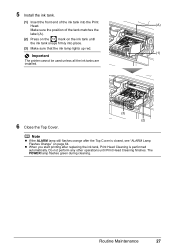
... the Top Cover is performed automatically. 5 Install the ink tank. (1) Insert the front end of the ink tank into the Print Head. (A) Make sure the position of the tank matches the label (A). (2) Press on the mark on page 64. Do not perform any other operations until the ... used unless all the ink tanks are installed. 6 Close the Top Cover. (3) (2) Note z If the ALARM lamp still flashes orange after replacing the ink tank, Print Head Cleaning is closed, see "ALARM Lamp Flashes Orange" on the ink tank until...
... the Top Cover is performed automatically. 5 Install the ink tank. (1) Insert the front end of the ink tank into the Print Head. (A) Make sure the position of the tank matches the label (A). (2) Press on the mark on page 64. Do not perform any other operations until the ... used unless all the ink tanks are installed. 6 Close the Top Cover. (3) (2) Note z If the ALARM lamp still flashes orange after replacing the ink tank, Print Head Cleaning is closed, see "ALARM Lamp Flashes Orange" on the ink tank until...
iP3500 series Quick Start Guide
Page 32
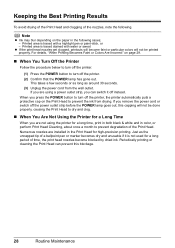
...or - This takes a few seconds or as long as the uncapped tip of time, the print head nozzles become faint or particular colors will not be printed properly. For details, "When Printing Becomes Faint or Colors Are Incorrect" on page 29. „ When You Turn Off the Printer...printer automatically puts a protective cap on the paper in color, or perform Print Head Cleaning, about once a month to turn off instead. Keeping the Best Printing Results To avoid drying of the Print Head and clogging of the Print Head. Numerous nozzles are not using a power outlet strip, you press the ...
...or - This takes a few seconds or as long as the uncapped tip of time, the print head nozzles become faint or particular colors will not be printed properly. For details, "When Printing Becomes Faint or Colors Are Incorrect" on page 29. „ When You Turn Off the Printer...printer automatically puts a protective cap on the paper in color, or perform Print Head Cleaning, about once a month to turn off instead. Keeping the Best Printing Results To avoid drying of the Print Head and clogging of the Print Head. Numerous nozzles are not using a power outlet strip, you press the ...
iP3500 series Quick Start Guide
Page 33
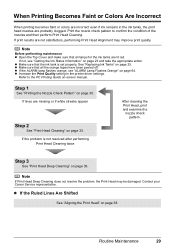
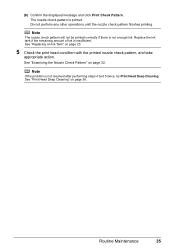
... Cleaning" on page 30. z If the Ruled Lines Are Shifted See "Aligning the Print Head" on page 64. Routine Maintenance 29 If the problem is set properly. Contact your Canon Service representative. Print the nozzle check pattern to the PC Printing Guide on page 33. z If the ALARM lamp flashes orange, see "Getting the Ink...
... Cleaning" on page 30. z If the Ruled Lines Are Shifted See "Aligning the Print Head" on page 64. Routine Maintenance 29 If the problem is set properly. Contact your Canon Service representative. Print the nozzle check pattern to the PC Printing Guide on page 33. z If the ALARM lamp flashes orange, see "Getting the Ink...
iP3500 series Quick Start Guide
Page 34
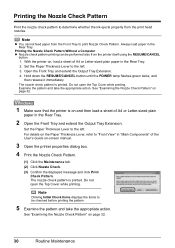
... paper in the Rear Tray. 2. Always load paper in the Rear Tray. Printing the Nozzle Check Pattern Without a Computer z Nozzle check pattern printing can be performed also from the Front Tray to be checked before printing the pattern. 5 Examine the pattern and take the appropriate action. Set the... Lever to the left . For details on the Paper Thickness Lever, refer to determine whether the ink ejects properly from the print head nozzles. Printing the Nozzle Check Pattern Print the nozzle check pattern to "Front View" in "Main Components" of the User's Guide on-screen manual. 3 Open the...
... paper in the Rear Tray. 2. Always load paper in the Rear Tray. Printing the Nozzle Check Pattern Without a Computer z Nozzle check pattern printing can be performed also from the Front Tray to be checked before printing the pattern. 5 Examine the pattern and take the appropriate action. Set the... Lever to the left . For details on the Paper Thickness Lever, refer to determine whether the ink ejects properly from the print head nozzles. Printing the Nozzle Check Pattern Print the nozzle check pattern to "Front View" in "Main Components" of the User's Guide on-screen manual. 3 Open the...
iP3500 series Quick Start Guide
Page 36
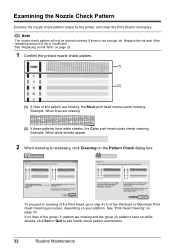
...no white streaks, click Exit or Quit to step 4-(3) of the group (1) pattern are missing, the Black print head nozzle needs cleaning. If no lines of the Windows or Macintosh Print Head Cleaning procedure, depending on the Pattern Check dialog box. See "Replacing an Ink Tank" on page 33....to cleaning of ink is not enough ink. Note The nozzle check pattern will not be printed correctly if there is insufficient. Replace the ink tank if the remaining amount of the Print Head, go to exit nozzle check pattern examination. 32 Routine Maintenance Example: When white streaks appear ...
...no white streaks, click Exit or Quit to step 4-(3) of the group (1) pattern are missing, the Black print head nozzle needs cleaning. If no lines of the Windows or Macintosh Print Head Cleaning procedure, depending on the Pattern Check dialog box. See "Replacing an Ink Tank" on page 33....to cleaning of ink is not enough ink. Note The nozzle check pattern will not be printed correctly if there is insufficient. Replace the ink tank if the remaining amount of the Print Head, go to exit nozzle check pattern examination. 32 Routine Maintenance Example: When white streaks appear ...
iP3500 series Quick Start Guide
Page 37
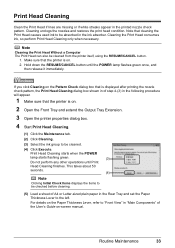
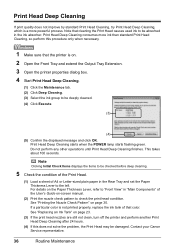
... you click Cleaning on . 2 Open the Front Tray and extend the Output Tray Extension. 3 Open the printer properties dialog box. 4 Start Print Head Cleaning. (1) Click the Maintenance tab. (2) Click Cleaning. (3) Select the ink group to be cleaned from the printer itself, using the RESUME/...(5) Load a sheet of the User's Guide on . 2. Cleaning the Print Head consumes ink, so perform Print Head Cleaning only when necessary. Note that the printer is displayed after printing the nozzle check pattern, the Print Head Cleaning dialog box shown in of step 4-(3) in "Main Components" of A4...
... you click Cleaning on . 2 Open the Front Tray and extend the Output Tray Extension. 3 Open the printer properties dialog box. 4 Start Print Head Cleaning. (1) Click the Maintenance tab. (2) Click Cleaning. (3) Select the ink group to be cleaned from the printer itself, using the RESUME/...(5) Load a sheet of the User's Guide on . 2. Cleaning the Print Head consumes ink, so perform Print Head Cleaning only when necessary. Note that the printer is displayed after printing the nozzle check pattern, the Print Head Cleaning dialog box shown in of step 4-(3) in "Main Components" of A4...
iP3500 series Quick Start Guide
Page 38
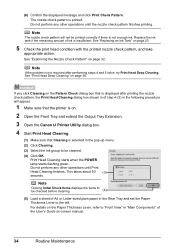
...Make sure that the printer is on. 2 Open the Front Tray and extend the Output Tray Extension. 3 Open the Canon IJ Printer Utility dialog box. 4 Start Print Head Cleaning. (1) Make sure that Cleaning is selected in the Rear Tray and set the Paper Thickness Lever to be checked...the Pattern Check dialog box that is insufficient. Do not perform any other operations until Print Head Cleaning finishes. If you click Cleaning on page 23. 5 Check the print head condition with the printed nozzle check pattern, and take appropriate action. Note Clicking Initial Check Items displays the ...
...Make sure that the printer is on. 2 Open the Front Tray and extend the Output Tray Extension. 3 Open the Canon IJ Printer Utility dialog box. 4 Start Print Head Cleaning. (1) Make sure that Cleaning is selected in the Rear Tray and set the Paper Thickness Lever to be checked...the Pattern Check dialog box that is insufficient. Do not perform any other operations until Print Head Cleaning finishes. If you click Cleaning on page 23. 5 Check the print head condition with the printed nozzle check pattern, and take appropriate action. Note Clicking Initial Check Items displays the ...
iP3500 series Quick Start Guide
Page 39
... tank if the remaining amount of ink is not resolved after performing steps 4 and 5 twice, try Print Head Deep Cleaning. Note If the problem is insufficient. See "Print Head Deep Cleaning" on page 32. Routine Maintenance 35 The nozzle check pattern is not enough ink. Note The...check pattern will not be printed correctly if there is printed. See "Examining the Nozzle Check Pattern" on page 36. (6) Confirm the displayed message and click Print Check Pattern. See "Replacing an Ink Tank" on page 23. 5 Check the print head condition with the printed nozzle check pattern, and ...
... tank if the remaining amount of ink is not resolved after performing steps 4 and 5 twice, try Print Head Deep Cleaning. Note If the problem is insufficient. See "Print Head Deep Cleaning" on page 32. Routine Maintenance 35 The nozzle check pattern is not enough ink. Note The...check pattern will not be printed correctly if there is printed. See "Examining the Nozzle Check Pattern" on page 36. (6) Confirm the displayed message and click Print Check Pattern. See "Replacing an Ink Tank" on page 23. 5 Check the print head condition with the printed nozzle check pattern, and ...
iP3500 series Quick Start Guide
Page 40
... any other operations until Print Head Deep Cleaning finishes. Note Clicking Initial Check Items displays the items to be absorbed in the Rear Tray and set the Paper Thickness Lever to "Front View" in "Main Components" of A4 or Letter-sized plain paper in the ink absorber. Contact your Canon Service representative. 36...
... any other operations until Print Head Deep Cleaning finishes. Note Clicking Initial Check Items displays the items to be absorbed in the Rear Tray and set the Paper Thickness Lever to "Front View" in "Main Components" of A4 or Letter-sized plain paper in the ink absorber. Contact your Canon Service representative. 36...
iP3500 series Quick Start Guide
Page 41
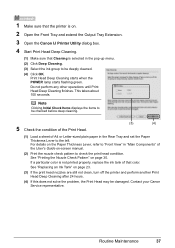
1 Make sure that the printer is on. 2 Open the Front Tray and extend the Output Tray Extension. 3 Open the Canon IJ Printer Utility dialog box. 4 Start Print Head Deep Cleaning. (1) Make sure that color. If a particular color is selected in the pop-up menu. (2) Click Deep Cleaning. (3) Select the ink group to check ... Lever to be damaged. For details on page 30. Routine Maintenance 37 Note Clicking Initial Check Items displays the items to the left. Contact your Canon Service representative. Print Head Deep Cleaning starts when the POWER lamp starts flashing green.
1 Make sure that the printer is on. 2 Open the Front Tray and extend the Output Tray Extension. 3 Open the Canon IJ Printer Utility dialog box. 4 Start Print Head Deep Cleaning. (1) Make sure that color. If a particular color is selected in the pop-up menu. (2) Click Deep Cleaning. (3) Select the ink group to check ... Lever to be damaged. For details on page 30. Routine Maintenance 37 Note Clicking Initial Check Items displays the items to the left. Contact your Canon Service representative. Print Head Deep Cleaning starts when the POWER lamp starts flashing green.
iP3500 series Quick Start Guide
Page 42
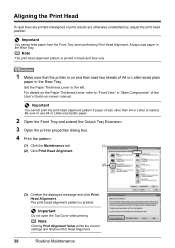
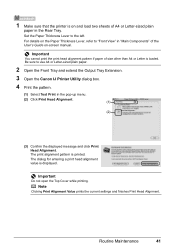
.... (1) Click the Maintenance tab. (1) (2) Click Print Head Alignment. (2) (3) Confirm the displayed message and click Print Head Alignment. Note Clicking Print Alignment Value prints the current settings and finishes Print Head Alignment. 38 Routine Maintenance Aligning the Print Head If ruled lines are printed misaligned or print results are otherwise unsatisfactory, adjust the print head position. Important You cannot print the print head alignment pattern if paper of...
.... (1) Click the Maintenance tab. (1) (2) Click Print Head Alignment. (2) (3) Confirm the displayed message and click Print Head Alignment. Note Clicking Print Alignment Value prints the current settings and finishes Print Head Alignment. 38 Routine Maintenance Aligning the Print Head If ruled lines are printed misaligned or print results are otherwise unsatisfactory, adjust the print head position. Important You cannot print the print head alignment pattern if paper of...
iP3500 series Quick Start Guide
Page 43
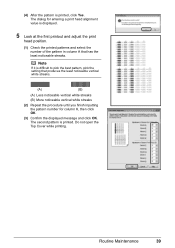
... OK. (3) Confirm the displayed message and click OK. (4) After the pattern is printed. Note If it is displayed. 5 Look at the first printout and adjust the print head position. (1) Check the printed patterns and select the number of the pattern in column A that produces the least ... noticeable vertical white streaks (B) More noticeable vertical white streaks (2) Repeat the procedure until you finish inputting the pattern number for entering a print head alignment value is difficult to pick the best pattern, pick the setting that has the least noticeable streaks. Do not open the Top ...
... OK. (3) Confirm the displayed message and click OK. (4) After the pattern is printed. Note If it is displayed. 5 Look at the first printout and adjust the print head position. (1) Check the printed patterns and select the number of the pattern in column A that produces the least ... noticeable vertical white streaks (B) More noticeable vertical white streaks (2) Repeat the procedure until you finish inputting the pattern number for entering a print head alignment value is difficult to pick the best pattern, pick the setting that has the least noticeable streaks. Do not open the Top ...
iP3500 series Quick Start Guide
Page 44
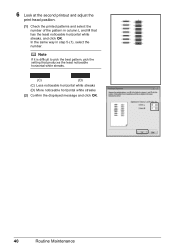
In the same way in column L and M that produces the least noticeable horizontal white streaks. (C) (D) (C) Less noticeable horizontal white streaks (D) More noticeable horizontal white streaks (2) Confirm the displayed message and click OK. 40 Routine Maintenance 6 Look at the second printout and adjust the print head position. (1) Check the printed patterns and select the number of the pattern in step 5-(1), select the number. Note If it is difficult to pick the best pattern, pick the setting that has the least noticeable horizontal white streaks, and click OK.
In the same way in column L and M that produces the least noticeable horizontal white streaks. (C) (D) (C) Less noticeable horizontal white streaks (D) More noticeable horizontal white streaks (2) Confirm the displayed message and click OK. 40 Routine Maintenance 6 Look at the second printout and adjust the print head position. (1) Check the printed patterns and select the number of the pattern in step 5-(1), select the number. Note If it is difficult to pick the best pattern, pick the setting that has the least noticeable horizontal white streaks, and click OK.
iP3500 series Quick Start Guide
Page 45
... the Front Tray and extend the Output Tray Extension. 3 Open the Canon IJ Printer Utility dialog box. 4 Print the pattern. (1) Select Test Print in the Rear Tray. For details on -screen manual. Note Clicking Print Alignment Value prints the current settings and finishes Print Head Alignment. Set the Paper Thickness Lever to "Front View" in "Main Components...
... the Front Tray and extend the Output Tray Extension. 3 Open the Canon IJ Printer Utility dialog box. 4 Print the pattern. (1) Select Test Print in the Rear Tray. For details on -screen manual. Note Clicking Print Alignment Value prints the current settings and finishes Print Head Alignment. Set the Paper Thickness Lever to "Front View" in "Main Components...
iP3500 series Quick Start Guide
Page 46
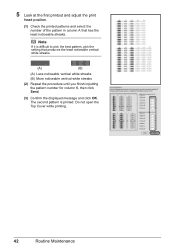
... best pattern, pick the setting that has the least noticeable streaks. Note If it is printed. Do not open the Top Cover while printing. 42 Routine Maintenance 5 Look at the first printout and adjust the print head position. (1) Check the printed patterns and select the number of the pattern in column A that produces the least...
... best pattern, pick the setting that has the least noticeable streaks. Note If it is printed. Do not open the Top Cover while printing. 42 Routine Maintenance 5 Look at the first printout and adjust the print head position. (1) Check the printed patterns and select the number of the pattern in column A that produces the least...
iP3500 series Quick Start Guide
Page 47
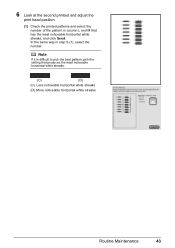
Note If it is difficult to pick the best pattern, pick the setting that has the least noticeable horizontal white streaks, and click Send. In the same way in column L and M that produces the least noticeable horizontal white streaks. (C) (D) (C) Less noticeable horizontal white streaks (D) More noticeable horizontal white streaks Routine Maintenance 43 6 Look at the second printout and adjust the print head position. (1) Check the printed patterns and select the number of the pattern in step 5-(1), select the number.
Note If it is difficult to pick the best pattern, pick the setting that has the least noticeable horizontal white streaks, and click Send. In the same way in column L and M that produces the least noticeable horizontal white streaks. (C) (D) (C) Less noticeable horizontal white streaks (D) More noticeable horizontal white streaks Routine Maintenance 43 6 Look at the second printout and adjust the print head position. (1) Check the printed patterns and select the number of the pattern in step 5-(1), select the number.


