Quick Start Guide
Page 4
... has stopped. z "Macintosh" and "Mac" are not intended to be, nor should they be understood to your Canon PIXMA iP2600 series Photo Printer. © CANON INC.2008 All rights reserved. All statements, technical information and recommendations in any guides or related documents are believed reliable,...information. For details, refer to as "Windows Vista") and Mac® OS X v.10.4.x. As an ENERGY STAR® Partner, Canon Inc. z "Windows" is a registered trademark of Microsoft Corporation. No part of Microsoft Corporation, registered in any form whatsoever without the...
... has stopped. z "Macintosh" and "Mac" are not intended to be, nor should they be understood to your Canon PIXMA iP2600 series Photo Printer. © CANON INC.2008 All rights reserved. All statements, technical information and recommendations in any guides or related documents are believed reliable,...information. For details, refer to as "Windows Vista") and Mac® OS X v.10.4.x. As an ENERGY STAR® Partner, Canon Inc. z "Windows" is a registered trademark of Microsoft Corporation. No part of Microsoft Corporation, registered in any form whatsoever without the...
Quick Start Guide
Page 5
Table of Contents Introduction 2 Safety Precautions 3 Before Using the Printer 6 Included Items 6 Turning the Printer On and Off 6 Loading Printing Paper 8 Printing from Your Computer 16 Printing with Windows 16 Printing with Macintosh 17 Routine Maintenance 18 When ... 27 Replacing a FINE Cartridge 31 Keeping the Best Printing Results 36 Cleaning Your Printer 37 Troubleshooting 43 Cannot Install the Printer Driver 44 The USB Connection Does Not Work Properly 45 Print Results Not Satisfactory 46 Printer Does Not Start 50 Paper Does Not Feed Properly 51 Paper Jams 52 Alarm ...
Table of Contents Introduction 2 Safety Precautions 3 Before Using the Printer 6 Included Items 6 Turning the Printer On and Off 6 Loading Printing Paper 8 Printing from Your Computer 16 Printing with Windows 16 Printing with Macintosh 17 Routine Maintenance 18 When ... 27 Replacing a FINE Cartridge 31 Keeping the Best Printing Results 36 Cleaning Your Printer 37 Troubleshooting 43 Cannot Install the Printer Driver 44 The USB Connection Does Not Work Properly 45 Print Results Not Satisfactory 46 Printer Does Not Start 50 Paper Does Not Feed Properly 51 Paper Jams 52 Alarm ...
Quick Start Guide
Page 7
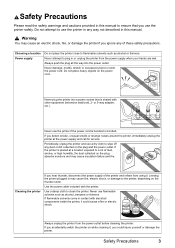
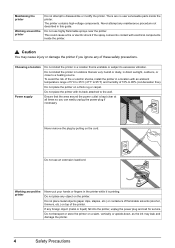
...disconnect the power supply of these safety precautions. Use a damp cloth to the printer, depending on the power cord. Periodically, unplug the printer and use the printer in contact with electrical components inside the printer, it . If flammable solvents come in any dust or dirt collected on the ...damage, modify, stretch or excessively bend or twist the power cord. If you could cause a fire or electric shock. Always unplug the printer from the power supply when your hands are wet. Safety Precautions 3 Do not attempt to use a dry cloth to ensure that is ...
...disconnect the power supply of these safety precautions. Use a damp cloth to the printer, depending on the power cord. Periodically, unplug the printer and use the printer in contact with electrical components inside the printer, it . If flammable solvents come in any dust or dirt collected on the ...damage, modify, stretch or excessively bend or twist the power cord. If you could cause a fire or electric shock. Always unplug the printer from the power supply when your hands are wet. Safety Precautions 3 Do not attempt to use a dry cloth to ensure that is ...
Quick Start Guide
Page 8
...containers of flammable solvents (alcohol, thinners, etc.) on top of 10% to 95°F) and humidity of the printer. To avoid the risk of fire or electric shocks, install the printer in a location with an ambient temperature range of 5°C to 35°C (41°F to 90% (condensation... fall into contact with its back attached to excessive vibration. Caution You may leak and damage the printer. 4 Safety Precautions Do not install the printer in locations that the area around the printer Do not attempt to a heating source. Ensure that are no user serviceable parts inside the...
...containers of flammable solvents (alcohol, thinners, etc.) on top of 10% to 95°F) and humidity of the printer. To avoid the risk of fire or electric shocks, install the printer in a location with an ambient temperature range of 5°C to 35°C (41°F to 90% (condensation... fall into contact with its back attached to excessive vibration. Caution You may leak and damage the printer. 4 Safety Precautions Do not install the printer in locations that the area around the printer Do not attempt to a heating source. Ensure that are no user serviceable parts inside the...
Quick Start Guide
Page 10
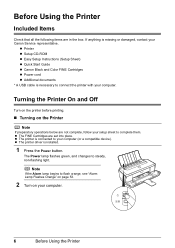
...to steady, non-flashing light. z The printer driver is connected to your Canon Service representative. The Power lamp flashes green, and changes to flash orange, see "Alarm Lamp Flashes Orange" on page 53. 2 Turn on the Printer Note If preparatory operations below are not complete,... the printer with your computer. 6 Before Using the Printer z The FINE Cartridges are in the box. Turning the Printer On and Off Turn on the printer before printing. „ Turning on your computer. z Printer z Setup CD-ROM z Easy Setup Instructions (Setup Sheet) z Quick Start Guide z Canon Black ...
...to steady, non-flashing light. z The printer driver is connected to your Canon Service representative. The Power lamp flashes green, and changes to flash orange, see "Alarm Lamp Flashes Orange" on page 53. 2 Turn on the Printer Note If preparatory operations below are not complete,... the printer with your computer. 6 Before Using the Printer z The FINE Cartridges are in the box. Turning the Printer On and Off Turn on the printer before printing. „ Turning on your computer. z Printer z Setup CD-ROM z Easy Setup Instructions (Setup Sheet) z Quick Start Guide z Canon Black ...
Quick Start Guide
Page 11
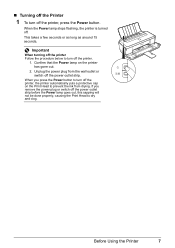
... outlet or switch off the power outlet strip. Confirm that the Power lamp on the Print Head to turn off the printer, the printer automatically puts a protective cap on the printer has gone out. 2. When you remove the power plug or switch off the power outlet strip before the Power lamp ...goes out, this capping will not be done properly, causing the Print Head to turn off the printer, press the Power button. Before Using the Printer 7 Important When turning off the printer Follow the procedure below to dry and clog. Unplug the power plug from drying. When the Power lamp ...
... outlet or switch off the power outlet strip. Confirm that the Power lamp on the Print Head to turn off the printer, the printer automatically puts a protective cap on the printer has gone out. 2. When you remove the power plug or switch off the power outlet strip before the Power lamp ...goes out, this capping will not be done properly, causing the Print Head to turn off the printer, press the Power button. Before Using the Printer 7 Important When turning off the printer Follow the procedure below to dry and clog. Unplug the power plug from drying. When the Power lamp ...
Quick Start Guide
Page 12
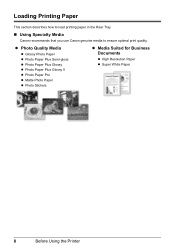
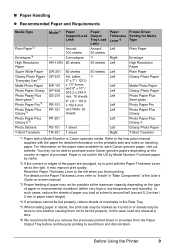
Loading Printing Paper This section describes how to load printing paper in the Rear Tray. „ Using Specialty Media Canon recommends that you use Canon genuine media to ensure optimal print quality. z Photo Quality Media z Glossy Photo Paper z Photo Paper Plus Semi-gloss z Photo Paper Plus Glossy z Photo Paper Plus Glossy II z Photo Paper Pro z Matte Photo Paper z Photo Stickers z Media Suited for Business Documents z High Resolution Paper z Super White Paper 8 Before Using the Printer
Loading Printing Paper This section describes how to load printing paper in the Rear Tray. „ Using Specialty Media Canon recommends that you use Canon genuine media to ensure optimal print quality. z Photo Quality Media z Glossy Photo Paper z Photo Paper Plus Semi-gloss z Photo Paper Plus Glossy z Photo Paper Plus Glossy II z Photo Paper Pro z Matte Photo Paper z Photo Stickers z Media Suited for Business Documents z High Resolution Paper z Super White Paper 8 Before Using the Printer
Quick Start Guide
Page 13
...sheets *6 50 sheets 50 sheets *6 Paper Thickness Lever*2 Left Right Left Left Left Left Left Left Left Left Left Left Right Printer Driver Setting for Media Type Plain Paper Envelope High Resolution Paper Plain Paper Glossy Photo Paper Matte Photo Paper Glossy Photo Paper Photo ...-screen manual. *3 Proper feeding of paper or environmental conditions (either very high or low temperature and humidity). Paper is Canon specialty media. Before Using the Printer 9 For details on the Paper Thickness Lever, refer to one sheet at the maximum capacity depending on the country or region...
...sheets *6 50 sheets 50 sheets *6 Paper Thickness Lever*2 Left Right Left Left Left Left Left Left Left Left Left Left Right Printer Driver Setting for Media Type Plain Paper Envelope High Resolution Paper Plain Paper Glossy Photo Paper Matte Photo Paper Glossy Photo Paper Photo ...-screen manual. *3 Proper feeding of paper or environmental conditions (either very high or low temperature and humidity). Paper is Canon specialty media. Before Using the Printer 9 For details on the Paper Thickness Lever, refer to one sheet at the maximum capacity depending on the country or region...
Quick Start Guide
Page 14
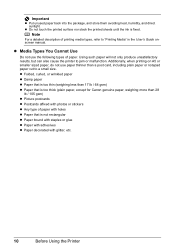
... z Paper bound with staples or glue z Paper with adhesives z Paper decorated with holes z Paper that is too thick (plain paper, except for Canon genuine paper, weighing more than a post card, including plain paper or notepad paper cut to a small size. Using such paper will not only produce...lb / 105 gsm) z Picture postcards z Postcards affixed with photos or stickers z Any type of paper with glitter, etc. 10 Before Using the Printer Additionally, when printing on A5 or smaller sized paper, do not use the following types of printing media types, refer to jam or malfunction. Important...
... z Paper bound with staples or glue z Paper with adhesives z Paper decorated with holes z Paper that is too thick (plain paper, except for Canon genuine paper, weighing more than a post card, including plain paper or notepad paper cut to a small size. Using such paper will not only produce...lb / 105 gsm) z Picture postcards z Postcards affixed with photos or stickers z Any type of paper with glitter, etc. 10 Before Using the Printer Additionally, when printing on A5 or smaller sized paper, do not use the following types of printing media types, refer to jam or malfunction. Important...
Quick Start Guide
Page 15
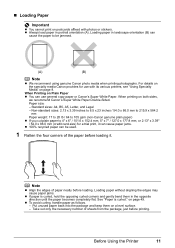
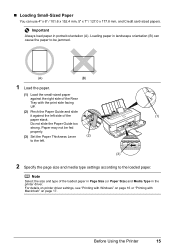
...39 inches to 8.5 x 23 inches / 54.0 x 86.0 mm to 215.9 x 584.2 mm Paper weight: 17 to 28 lb / 64 to 105 gsm (non-Canon genuine plain paper) z If you cut plain paper to be used. 1 Flatten the four corners of sheets from the package, just before loading. See "Paper... or 2.13" x 3.39" / 54.0 x 86.0 mm (credit card-size) for use general copy paper or Canon's Super White Paper. Before Using the Printer 11 „ Loading Paper Important z You cannot print on postcards affixed with its various printers, see "Using Specialty Media" on page 8. z To avoid curling, handle paper as follows. -
...39 inches to 8.5 x 23 inches / 54.0 x 86.0 mm to 215.9 x 584.2 mm Paper weight: 17 to 28 lb / 64 to 105 gsm (non-Canon genuine plain paper) z If you cut plain paper to be used. 1 Flatten the four corners of sheets from the package, just before loading. See "Paper... or 2.13" x 3.39" / 54.0 x 86.0 mm (credit card-size) for use general copy paper or Canon's Super White Paper. Before Using the Printer 11 „ Loading Paper Important z You cannot print on postcards affixed with its various printers, see "Using Specialty Media" on page 8. z To avoid curling, handle paper as follows. -

Quick Start Guide
Page 16
For details on printer driver settings, see "Printing with Windows" on page 16 or "Printing with the Paper Thickness Lever set to the right.... of the Paper Thickness Lever. Reset the Paper Thickness Lever to the left when printing on page 17. 12 Before Using the Printer Paper may improve print quality. Do not slide the Paper Guide too strong. Note Select the size and type of the paper stack... printing on envelopes or T-shirt transfers, and left when you finish printing. 3 Load the paper. (1) Load the paper in the printer driver. 2 Prepare to the loaded paper.
For details on printer driver settings, see "Printing with Windows" on page 16 or "Printing with the Paper Thickness Lever set to the right.... of the Paper Thickness Lever. Reset the Paper Thickness Lever to the left when printing on page 17. 12 Before Using the Printer Paper may improve print quality. Do not slide the Paper Guide too strong. Note Select the size and type of the paper stack... printing on envelopes or T-shirt transfers, and left when you finish printing. 3 Load the paper. (1) Load the paper in the printer driver. 2 Prepare to the loaded paper.
Quick Start Guide
Page 17
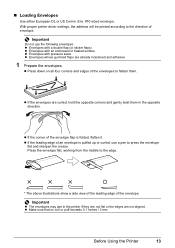
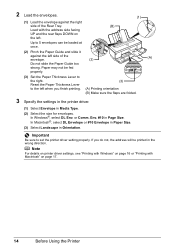
Important Do not use a pen to the direction of the envelope. Before Using the Printer 13 Important z The envelopes may jam in the opposite direction. z Press down on all four corners and edges of the envelopes to the edge. * The ... or puff exceeds 0.1 inches / 3 mm. Press the envelope flat, working from the middle to flatten them in the printer if they are not flat or the edges are not aligned. With proper printer driver settings, the address will be printed according to press the envelope flat and sharpen the crease. z If the...
Important Do not use a pen to the direction of the envelope. Before Using the Printer 13 Important z The envelopes may jam in the opposite direction. z Press down on all four corners and edges of the envelopes to the edge. * The ... or puff exceeds 0.1 inches / 3 mm. Press the envelope flat, working from the middle to flatten them in the printer if they are not flat or the edges are not aligned. With proper printer driver settings, the address will be printed according to press the envelope flat and sharpen the crease. z If the...
Quick Start Guide
Page 18
...side facing UP and the rear flaps DOWN on page 17. 14 Before Using the Printer If you finish printing. (3) (A) Printing orientation (B) Make sure the flaps are folded. 3 Specify the settings in the printer driver. (1) Select Envelope in Media Type. (2) Select the size for envelopes. Paper... slide it against the right side of the envelope. (2) (A) Do not slide the Paper Guide too strong. Important Be sure to set the printer driver setting properly. 2 Load the envelopes. (1) (1) Load the envelope against the left side of the Rear Tray. (B) Load with Macintosh" ...
...side facing UP and the rear flaps DOWN on page 17. 14 Before Using the Printer If you finish printing. (3) (A) Printing orientation (B) Make sure the flaps are folded. 3 Specify the settings in the printer driver. (1) Select Envelope in Media Type. (2) Select the size for envelopes. Paper... slide it against the right side of the envelope. (2) (A) Do not slide the Paper Guide too strong. Important Be sure to set the printer driver setting properly. 2 Load the envelopes. (1) (1) Load the envelope against the left side of the Rear Tray. (B) Load with Macintosh" ...
Quick Start Guide
Page 19
... type of the loaded paper in Page Size (or Paper Size) and Media Type in portrait orientation (A). Important Always load paper in the printer driver. For details on printer driver settings, see "Printing with Windows" on page 16 or "Printing with the print side facing UP. (2) Pinch the Paper Guide and slide... paper to be fed properly. (3) Set the Paper Thickness Lever (2) to the loaded paper. Do not slide the Paper Guide too strong. Before Using the Printer 15
... type of the loaded paper in Page Size (or Paper Size) and Media Type in portrait orientation (A). Important Always load paper in the printer driver. For details on printer driver settings, see "Printing with Windows" on page 16 or "Printing with the print side facing UP. (2) Pinch the Paper Guide and slide... paper to be fed properly. (3) Set the Paper Thickness Lever (2) to the loaded paper. Do not slide the Paper Guide too strong. Before Using the Printer 15
Quick Start Guide
Page 20
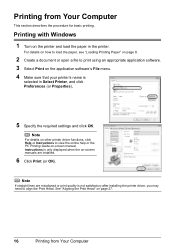
...the on-screen manuals are misaligned or print quality is selected in the printer. See "Aligning the Print Head" on the application software's File menu. 4 Make sure that your printer's name is not satisfactory after installing the printer driver, you may need to align the Print Head. For details on... "Loading Printing Paper" on page 8. 2 Create a document or open a file to view the online help or the PC Printing Guide on the printer and load the paper in Select Printer, and click Preferences (or Properties). 5 Specify the required settings and click OK. Note For details on other...
...the on-screen manuals are misaligned or print quality is selected in the printer. See "Aligning the Print Head" on the application software's File menu. 4 Make sure that your printer's name is not satisfactory after installing the printer driver, you may need to align the Print Head. For details on... "Loading Printing Paper" on page 8. 2 Create a document or open a file to view the online help or the PC Printing Guide on the printer and load the paper in Select Printer, and click Preferences (or Properties). 5 Specify the required settings and click OK. Note For details on other...

Quick Start Guide
Page 21
... document or open a file to print using an appropriate application software. 3 Select Page Setup on the application software's File menu. 4 Make sure that your printer's name is selected in Format for. 5 Select the desired paper size in Paper Size. 6 Click OK. 7 Select Print on the application software's File ...menu. 8 Select Quality & Media in the printer. Note If straight lines are not installed, the PC Printing Guide on-screen manual is not displayed even if is not satisfactory after installing the...
... document or open a file to print using an appropriate application software. 3 Select Page Setup on the application software's File menu. 4 Make sure that your printer's name is selected in Format for. 5 Select the desired paper size in Paper Size. 6 Click OK. 7 Select Print on the application software's File ...menu. 8 Select Quality & Media in the printer. Note If straight lines are not installed, the PC Printing Guide on-screen manual is not displayed even if is not satisfactory after installing the...
Quick Start Guide
Page 22
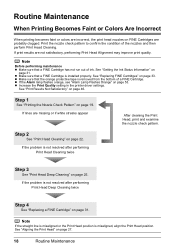
... Before performing maintenance z Make sure that the orange protective tape is removed from the bottom of a FINE Cartridge. z Increase the Print Quality setting in the printer driver settings. If the problem is not resolved after performing Print Head Cleaning twice Step 3 See "Print Head Deep Cleaning" on page 31. If lines...
... Before performing maintenance z Make sure that the orange protective tape is removed from the bottom of a FINE Cartridge. z Increase the Print Quality setting in the printer driver settings. If the problem is not resolved after performing Print Head Cleaning twice Step 3 See "Print Head Deep Cleaning" on page 31. If lines...
Quick Start Guide
Page 23
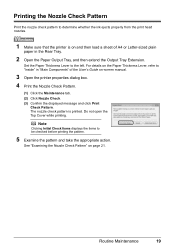
...and take the appropriate action. The nozzle check pattern is on and then load a sheet of the User's Guide on-screen manual. 3 Open the printer properties dialog box. 4 Print the Nozzle Check Pattern. (1) Click the Maintenance tab. (2) Click Nozzle Check. (3) Confirm the displayed message and click Print... Clicking Initial Check Items displays the items to determine whether the ink ejects properly from the print head nozzles. 1 Make sure that the printer is printed. Do not open the Top Cover while printing. Routine Maintenance 19 Set the Paper Thickness Lever to "Inside" in "Main ...
...and take the appropriate action. The nozzle check pattern is on and then load a sheet of the User's Guide on-screen manual. 3 Open the printer properties dialog box. 4 Print the Nozzle Check Pattern. (1) Click the Maintenance tab. (2) Click Nozzle Check. (3) Confirm the displayed message and click Print... Clicking Initial Check Items displays the items to determine whether the ink ejects properly from the print head nozzles. 1 Make sure that the printer is printed. Do not open the Top Cover while printing. Routine Maintenance 19 Set the Paper Thickness Lever to "Inside" in "Main ...
Quick Start Guide
Page 24
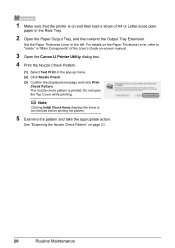
... displays the items to the left. The nozzle check pattern is on and then load a sheet of the User's Guide on-screen manual. 3 Open the Canon IJ Printer Utility dialog box. 4 Print the Nozzle Check Pattern. (1) Select Test Print in the Rear Tray. 2 Open the Paper Output Tray, and then extend the...
... displays the items to the left. The nozzle check pattern is on and then load a sheet of the User's Guide on-screen manual. 3 Open the Canon IJ Printer Utility dialog box. 4 Print the Nozzle Check Pattern. (1) Select Test Print in the Rear Tray. 2 Open the Paper Output Tray, and then extend the...
Quick Start Guide
Page 26
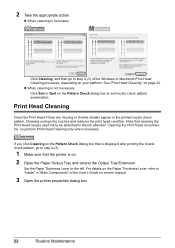
...the nozzles and restores the print head condition. z When cleaning is necessary Click Cleaning, and then go to step 4-(3). 1 Make sure that the printer is on the Pattern Check dialog box to exit nozzle check pattern examination. Note that is not necessary Click Exit or Quit on . 2 Open ...pattern, go to "Inside" in "Main Components" of the Windows or Macintosh Print Head Cleaning procedure, depending on -screen manual. 3 Open the printer properties dialog box. 22 Routine Maintenance If you click Cleaning on the Pattern Check dialog box that cleaning the Print Head causes used ink to...
...the nozzles and restores the print head condition. z When cleaning is necessary Click Cleaning, and then go to step 4-(3). 1 Make sure that the printer is on the Pattern Check dialog box to exit nozzle check pattern examination. Note that is not necessary Click Exit or Quit on . 2 Open ...pattern, go to "Inside" in "Main Components" of the Windows or Macintosh Print Head Cleaning procedure, depending on -screen manual. 3 Open the printer properties dialog box. 22 Routine Maintenance If you click Cleaning on the Pattern Check dialog box that cleaning the Print Head causes used ink to...


