iP2000 Easy Setup Instructions
Page 1
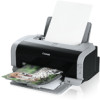
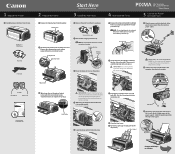
...down the serial number located to the right of a USB cable to the computer, the other end to install the printer driver before proceeding or the print head may not install correctly. 4 Slide the print head into the slot on side two. Shipping Tape 1 Remove the print ...and pull out the output tray. Paper Guide Continue with Step 6 Click on the right. PIXMA iP2000 Photo Printer Print Head Power Cord 2 Prepare the Printer Start Here Easy Setup Instructions 3 Install the Print Head 4 Install the Ink Tanks 1 Remove all items from the print head holder. Print Head Nozzles Electrical...
...down the serial number located to the right of a USB cable to the computer, the other end to install the printer driver before proceeding or the print head may not install correctly. 4 Slide the print head into the slot on side two. Shipping Tape 1 Remove the print ...and pull out the output tray. Paper Guide Continue with Step 6 Click on the right. PIXMA iP2000 Photo Printer Print Head Power Cord 2 Prepare the Printer Start Here Easy Setup Instructions 3 Install the Print Head 4 Install the Ink Tanks 1 Remove all items from the print head holder. Print Head Nozzles Electrical...
iP2000 Easy Setup Instructions
Page 2
...NOTE: If a message prompting you to restart the computer appears, click Restart. 3 Double-click the PIXMA iP2000 280.pkg icon. 11 When the "Installation is not satisfactory after installing the printer, you see the Found New Hardware Wizard, click Cancel. 6 When the "Printer Connection" ...Aligning the Print Head" instructions in order to choose the options you may need to install the remaining software. Refer to continue. Canon is your Quick Start Guide. 7 Click Install. Follow the onscreen instructions. 2 Close any open software applications including anti-virus, computer...
...NOTE: If a message prompting you to restart the computer appears, click Restart. 3 Double-click the PIXMA iP2000 280.pkg icon. 11 When the "Installation is not satisfactory after installing the printer, you see the Found New Hardware Wizard, click Cancel. 6 When the "Printer Connection" ...Aligning the Print Head" instructions in order to choose the options you may need to install the remaining software. Refer to continue. Canon is your Quick Start Guide. 7 Click Install. Follow the onscreen instructions. 2 Close any open software applications including anti-virus, computer...
iP2000 Quick Start Guide
Page 5
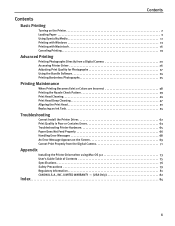
...Check Pattern 39 Print Head Cleaning 44 Print Head Deep Cleaning 47 Aligning the Print Head 50 Replacing an Ink Tank 54 Troubleshooting Cannot Install the Printer Driver 62 Print Quality is Poor or Contains Errors 63 Troubleshooting Printer Hardware 65 Paper Does Not Feed Properly 66 Handling ...Error Messages 68 An Error Message Appears on the Screen 69 Cannot Print Properly from the Digital Camera 71 Appendix Installing the Printer Driver when using Mac OS 9.x 73 User's Guide Table of Contents 75 Specifications 76 Safety Precautions 79 Regulatory Information 81...
...Check Pattern 39 Print Head Cleaning 44 Print Head Deep Cleaning 47 Aligning the Print Head 50 Replacing an Ink Tank 54 Troubleshooting Cannot Install the Printer Driver 62 Print Quality is Poor or Contains Errors 63 Troubleshooting Printer Hardware 65 Paper Does Not Feed Properly 66 Handling ...Error Messages 68 An Error Message Appears on the Screen 69 Cannot Print Properly from the Digital Camera 71 Appendix Installing the Printer Driver when using Mac OS 9.x 73 User's Guide Table of Contents 75 Specifications 76 Safety Precautions 79 Regulatory Information 81...
iP2000 Quick Start Guide
Page 6
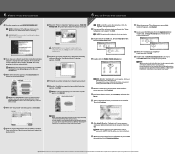
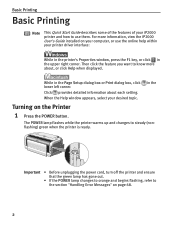
... computer, or use them. For more about each setting. Basic Printing Basic Printing Note This Quick Start Guide describes some of the features of your iP2000 printer and how to use the online help within your printer driver interface: While in the printer's Properties window, press the F1 key, or click... Help window appears, select your desired topic. While in the upper right corner. Then click the feature you want to know more information, view the iP2000 User's Guide installed on the Printer 1 Press the POWER button.
... computer, or use them. For more about each setting. Basic Printing Basic Printing Note This Quick Start Guide describes some of the features of your iP2000 printer and how to use the online help within your printer driver interface: While in the printer's Properties window, press the F1 key, or click... Help window appears, select your desired topic. While in the upper right corner. Then click the feature you want to know more information, view the iP2000 User's Guide installed on the Printer 1 Press the POWER button.

iP2000 Quick Start Guide
Page 38
...more accurately. 34 This enables you to correct red eye caused by the camera's flash or smooth and beautify the facial skin. Canon BJ Printers support Exif Print and use the application(s) suitable for specific camera settings and functions such as photo-lab quality prints....with Exif Print*. „ PhotoRecord (Windows) You can record data tags for your print purposes. Internet Explorer 5.5 or later must be installed. Note • To install applications, refer to the Easy Setup Instructions. • For details about photo applications, refer to the Photo Application Guide. „ ...
...more accurately. 34 This enables you to correct red eye caused by the camera's flash or smooth and beautify the facial skin. Canon BJ Printers support Exif Print and use the application(s) suitable for specific camera settings and functions such as photo-lab quality prints....with Exif Print*. „ PhotoRecord (Windows) You can record data tags for your print purposes. Internet Explorer 5.5 or later must be installed. Note • To install applications, refer to the Easy Setup Instructions. • For details about photo applications, refer to the Photo Application Guide. „ ...
iP2000 Quick Start Guide
Page 44
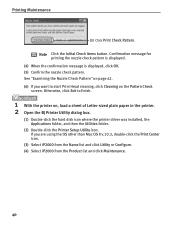
...-sized plain paper in the printer. 2 Open the BJ Printer Utility dialog box. (1) Double-click the hard disk icon where the printer driver was installed, the Applications folder, and then the Utilities folder. (2) Double-click the Printer Setup Utility icon. See "Examining the Nozzle Check Pattern" on page 42...If you are using the OS other than Mac OS X v.10.3, double-click the Print Center icon. (3) Select iP2000 from the Name list and click Utility or Configure. (4) Select iP2000 from the Product list and click Maintenance. 40 If you want to finish. 1 With the printer on the Pattern Check...
...-sized plain paper in the printer. 2 Open the BJ Printer Utility dialog box. (1) Double-click the hard disk icon where the printer driver was installed, the Applications folder, and then the Utilities folder. (2) Double-click the Printer Setup Utility icon. See "Examining the Nozzle Check Pattern" on page 42...If you are using the OS other than Mac OS X v.10.3, double-click the Print Center icon. (3) Select iP2000 from the Name list and click Utility or Configure. (4) Select iP2000 from the Product list and click Maintenance. 40 If you want to finish. 1 With the printer on the Pattern Check...
iP2000 Quick Start Guide
Page 49
... Important Do not perform any other than Mac OS X v.10.3, double-click the Print Center icon. (3) Select iP2000 from the Name list and click Utility or Configure. (4) Select iP2000 from the Product list and click Maintenance. 45 If you want to finish. See "Examining the Nozzle Check Pattern..." on . 2 Open the BJ Printer Utility dialog box. (1) Double-click the hard disk icon where the printer driver was installed, the Applications folder, and...
... Important Do not perform any other than Mac OS X v.10.3, double-click the Print Center icon. (3) Select iP2000 from the Name list and click Utility or Configure. (4) Select iP2000 from the Product list and click Maintenance. 45 If you want to finish. See "Examining the Nozzle Check Pattern..." on . 2 Open the BJ Printer Utility dialog box. (1) Double-click the hard disk icon where the printer driver was installed, the Applications folder, and...
iP2000 Quick Start Guide
Page 52
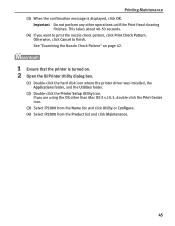
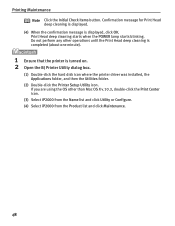
...confirmation message is turned on. 2 Open the BJ Printer Utility dialog box. (1) Double-click the hard disk icon where the printer driver was installed, the Applications folder, and then the Utilities folder. (2) Double-click the Printer Setup Utility icon. Print Head deep cleaning starts when the POWER...click OK. Do not perform any other than Mac OS X v.10.3, double-click the Print Center icon. (3) Select iP2000 from the Name list and click Utility or Configure. (4) Select iP2000 from the Product list and click Maintenance. 48 Printing Maintenance Note Click the Initial Check Items button.
...confirmation message is turned on. 2 Open the BJ Printer Utility dialog box. (1) Double-click the hard disk icon where the printer driver was installed, the Applications folder, and then the Utilities folder. (2) Double-click the Printer Setup Utility icon. Print Head deep cleaning starts when the POWER...click OK. Do not perform any other than Mac OS X v.10.3, double-click the Print Center icon. (3) Select iP2000 from the Name list and click Utility or Configure. (4) Select iP2000 from the Product list and click Maintenance. 48 Printing Maintenance Note Click the Initial Check Items button.
iP2000 Quick Start Guide
Page 56
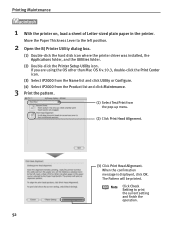
... 52 If you are using the OS other than Mac OS X v.10.3, double-click the Print Center icon. (3) Select iP2000 from the Name list and click Utility or Configure. (4) Select iP2000 from the Product list and click Maintenance. 3 Print the pattern. (1) Select Test Print from the pop-up menu. (2) ...Setting to the left position. 2 Open the BJ Printer Utility dialog box. (1) Double-click the hard disk icon where the printer driver was installed, the Applications folder, and the Utilities folder. (2) Double-click the Printer Setup Utility icon. When the confirmation message is displayed, click OK.
... 52 If you are using the OS other than Mac OS X v.10.3, double-click the Print Center icon. (3) Select iP2000 from the Name list and click Utility or Configure. (4) Select iP2000 from the Product list and click Maintenance. 3 Print the pattern. (1) Select Test Print from the pop-up menu. (2) ...Setting to the left position. 2 Open the BJ Printer Utility dialog box. (1) Double-click the hard disk icon where the printer driver was installed, the Applications folder, and the Utilities folder. (2) Double-click the Printer Setup Utility icon. When the confirmation message is displayed, click OK.

iP2000 Quick Start Guide
Page 58
...; Replacing an Ink Tank When an ink tank runs out of ink, replace it using the following steps. 1 Ensure that the printer is used, or installed in the incorrect position. Color Black Important • Handle ink tanks carefully to avoid staining clothing or the surrounding area. • Discard empty ink tanks...
...; Replacing an Ink Tank When an ink tank runs out of ink, replace it using the following steps. 1 Ensure that the printer is used, or installed in the incorrect position. Color Black Important • Handle ink tanks carefully to avoid staining clothing or the surrounding area. • Discard empty ink tanks...
iP2000 Quick Start Guide
Page 61
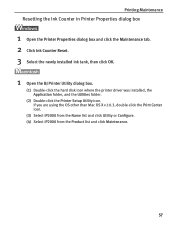
... Ink Counter in Printer Properties dialog box 1 Open the Printer Properties dialog box and click the Maintenance tab. 2 Click Ink Counter Reset. 3 Select the newly installed ink tank, then click OK. 1 Open the BJ Printer Utility dialog box. (1) Double-click the hard disk icon where the printer driver was... installed, the Application folder, and the Utilities folder. (2) Double-click the Printer Setup Utility icon. If you are using the OS other than Mac OS X v.10.3, ...
... Ink Counter in Printer Properties dialog box 1 Open the Printer Properties dialog box and click the Maintenance tab. 2 Click Ink Counter Reset. 3 Select the newly installed ink tank, then click OK. 1 Open the BJ Printer Utility dialog box. (1) Double-click the hard disk icon where the printer driver was... installed, the Application folder, and the Utilities folder. (2) Double-click the Printer Setup Utility icon. If you are using the OS other than Mac OS X v.10.3, ...
iP2000 Quick Start Guide
Page 62
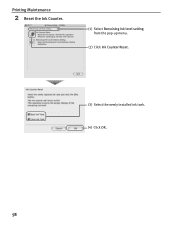
Printing Maintenance 2 Reset the Ink Counter. (1) Select Remaining ink level setting from the pop-up menu. (2) Click Ink Counter Reset. (3) Select the newly installed ink tank. (4) Click OK. 58
Printing Maintenance 2 Reset the Ink Counter. (1) Select Remaining ink level setting from the pop-up menu. (2) Click Ink Counter Reset. (3) Select the newly installed ink tank. (4) Click OK. 58
iP2000 Quick Start Guide
Page 63
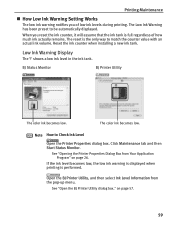
... color ink becomes low. Click Maintenance tab and then Start Status Monitor. See "Open the BJ Printer Utility dialog box." Reset the ink counter when installing a new ink tank. BJ Status Monitor BJ Printer Utility The color ink becomes low. The reset is performed. shows a low ink level in the ink...
... color ink becomes low. Click Maintenance tab and then Start Status Monitor. See "Open the BJ Printer Utility dialog box." Reset the ink counter when installing a new ink tank. BJ Status Monitor BJ Printer Utility The color ink becomes low. The reset is performed. shows a low ink level in the ink...
iP2000 Quick Start Guide
Page 64
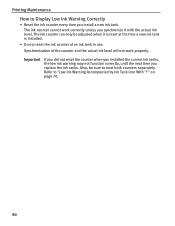
... current ink tanks, the low ink warning may not function correctly, until the next time you install a new ink tank. The ink counter cannot work properly. Refer to treat both counters separately. The ink counter can only be sure to "Low Ink ... of the counter and the actual ink level will not work correctly unless you synchronize it is reset at the time a new ink tank is installed. • Do not reset the ink counter of an ink tank in use. Printing Maintenance How to Display Low Ink Warning Correctly • Reset the...
... current ink tanks, the low ink warning may not function correctly, until the next time you install a new ink tank. The ink counter cannot work properly. Refer to treat both counters separately. The ink counter can only be sure to "Low Ink ... of the counter and the actual ink level will not work correctly unless you synchronize it is reset at the time a new ink tank is installed. • Do not reset the ink counter of an ink tank in use. Printing Maintenance How to Display Low Ink Warning Correctly • Reset the...
iP2000 Quick Start Guide
Page 65
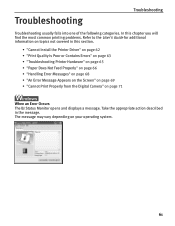
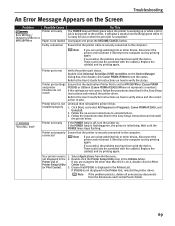
.... Refer to the User's Guide for additional information on topics not covered in the message. Take the appropriate action described in this section. • "Cannot Install the Printer Driver" on page 62 • "Print Quality is Poor or Contains Errors" on page 63 • "Troubleshooting Printer Hardware" on page 65 •...
.... Refer to the User's Guide for additional information on topics not covered in the message. Take the appropriate action described in this section. • "Cannot Install the Printer Driver" on page 62 • "Print Quality is Poor or Contains Errors" on page 63 • "Troubleshooting Printer Hardware" on page 65 •...
iP2000 Quick Start Guide
Page 66
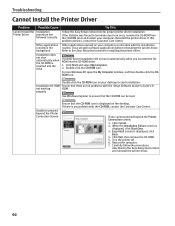
...Start Over. 3. Turn the printer off. 6. Reinstall the printer driver. Refer to ensure that the CD-ROM can interfere with the installation routine. If there is any problem with the Setup Software & User's Guide CD- Restart the computer. 7. Other applications opened on ...Printer Connection screen; 1. For non-Windows XP, open software applications before reinstalling the printer driver. If printer driver installation did not start installation. Double-click the CD-ROM icon. Unable to start automatically when you cannot proceed beyond the Printer Connection Screen Ensure...
...Start Over. 3. Turn the printer off. 6. Reinstall the printer driver. Refer to ensure that the CD-ROM can interfere with the installation routine. If there is any problem with the Setup Software & User's Guide CD- Restart the computer. 7. Other applications opened on ...Printer Connection screen; 1. For non-Windows XP, open software applications before reinstalling the printer driver. If printer driver installation did not start installation. Double-click the CD-ROM icon. Unable to start automatically when you cannot proceed beyond the Printer Connection Screen Ensure...
iP2000 Quick Start Guide
Page 72
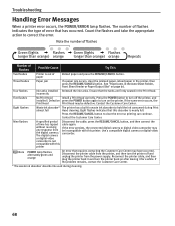
...Contact the Customer Care Center. The digital camera or digital video camcorder is not compatible with this printer. Four flashes Ink tanks installed Reinstall the ink tanks. Eight flashes indicates that the tanks are firmly seated in waste ink absorber to turn the printer off ...Messages When a printer error occurs, the POWER/ERROR lamp flashes. incorrectly Five flashes No Print Head Install a Print Head correctly. Press the POWER button to turn off the printer, and installed / Defective press the POWER button again to hold the ink consumed during cleaning. 68 Nine flashes ...
...Contact the Customer Care Center. The digital camera or digital video camcorder is not compatible with this printer. Four flashes Ink tanks installed Reinstall the ink tanks. Eight flashes indicates that the tanks are firmly seated in waste ink absorber to turn the printer off ...Messages When a printer error occurs, the POWER/ERROR lamp flashes. incorrectly Five flashes No Print Head Install a Print Head correctly. Press the POWER button to turn off the printer, and installed / Defective press the POWER button again to hold the ink consumed during cleaning. 68 Nine flashes ...
iP2000 Quick Start Guide
Page 73
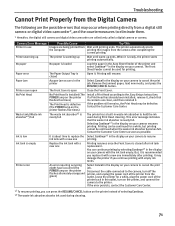
Ensure that the destination Printer Port is set to MPUSBPRNnn (Canon PIXMA and printer iP2000) or USBnnn (Canon PIXMA iP2000) (Where nn represents a number). Note If you are using switching hub or other device, disconnect the printer and reconnect it directly ...job is completed. Follow the on the Device Manager dialog box, then double-click Canon PIXMA iP2000 to see the status. If successful, the problem may have been with the cable(s). Your printer name is not installed properly Uninstall then reinstall the printer driver. 1. Ensure that the printer is securely ...
Ensure that the destination Printer Port is set to MPUSBPRNnn (Canon PIXMA and printer iP2000) or USBnnn (Canon PIXMA iP2000) (Where nn represents a number). Note If you are using switching hub or other device, disconnect the printer and reconnect it directly ...job is completed. Follow the on the Device Manager dialog box, then double-click Canon PIXMA iP2000 to see the status. If successful, the problem may have been with the cable(s). Your printer name is not installed properly Uninstall then reinstall the printer driver. 1. Ensure that the printer is securely ...
iP2000 Quick Start Guide
Page 74
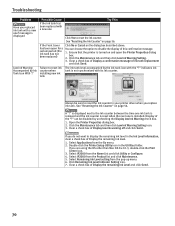
... click Utility or Configure. 4. Clear a check box of this confirmation message. Troubleshooting Problem Have you replaced ink tank with a new one is installed. has been open the Printer Properties dialog box. 2. Clear a check box of Diaplay a confirmation message of the "?" Always be disabled by... With '?' Display of ink tank replacement and click Send. Click the Maintenance tab and then click Low Ink Warning Setting icon. 3. Select iP2000 from the Product list and click Maintenance. 5. certain period (the ink tank has not been replaced) 1. See "Resetting the Ink Counter"...
... click Utility or Configure. 4. Clear a check box of this confirmation message. Troubleshooting Problem Have you replaced ink tank with a new one is installed. has been open the Printer Properties dialog box. 2. Clear a check box of Diaplay a confirmation message of the "?" Always be disabled by... With '?' Display of ink tank replacement and click Send. Click the Maintenance tab and then click Low Ink Warning Setting icon. 3. Select iP2000 from the Product list and click Maintenance. 5. certain period (the ink tank has not been replaced) 1. See "Resetting the Ink Counter"...
iP2000 Quick Start Guide
Page 75
... tank with a new one Replace the ink tank with the ink tank empty. Close the Front Cover. If a Print Head has already been installed, remove it, check that its contacts are collectively called a digital camera or camera. Printing can be continued for printing. You can press the ... the printer back in the display on the printer instead of selecting Continue. *2 The waste ink absorber absorbs ink used during Print Head cleaning. Install a Print Head according to cancel the print job. Selecting Continue*1 in the outlet, turn off the printer, and unplug the power cord of...
... tank with a new one Replace the ink tank with the ink tank empty. Close the Front Cover. If a Print Head has already been installed, remove it, check that its contacts are collectively called a digital camera or camera. Printing can be continued for printing. You can press the ... the printer back in the display on the printer instead of selecting Continue. *2 The waste ink absorber absorbs ink used during Print Head cleaning. Install a Print Head according to cancel the print job. Selecting Continue*1 in the outlet, turn off the printer, and unplug the power cord of...


