iP2000 Easy Setup Instructions
Page 1
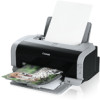
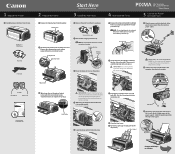
...into the holder until it clicks into the remaining slot. Load a sheet of the printer and connect the other to install the printer driver before proceeding or the print head may not install correctly. 4 Slide the print head into the slot on side two. IMPORTANT: For.... NOTE: Do not touch the electrical contacts or print head nozzles. 1 Unpack the Printer 1 Carefully remove all shipping tape from the printer. PIXMA iP2000 Photo Printer Print Head Power Cord 2 Prepare the Printer Start Here Easy Setup Instructions 3 Install the Print Head 4 Install the Ink Tanks 1 ...
...into the holder until it clicks into the remaining slot. Load a sheet of the printer and connect the other to install the printer driver before proceeding or the print head may not install correctly. 4 Slide the print head into the slot on side two. IMPORTANT: For.... NOTE: Do not touch the electrical contacts or print head nozzles. 1 Unpack the Printer 1 Carefully remove all shipping tape from the printer. PIXMA iP2000 Photo Printer Print Head Power Cord 2 Prepare the Printer Start Here Easy Setup Instructions 3 Install the Print Head 4 Install the Ink Tanks 1 ...
iP2000 Easy Setup Instructions
Page 2
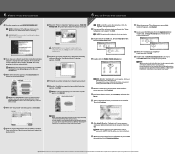
...to the online instructions. 7 Follow the on your Mac and your product. Then, installation of Canon Inc. When the "Authenticate" screen appears, enter your CD-ROM again. Canon is not satisfactory after installing the printer, you do not know your administrator name or password, click... printer, you to restart the computer appears, click Restart. 3 Double-click the PIXMA iP2000 280.pkg icon. 11 When the "Installation is your administrator name and password. NOTE: For Mac OS 9.x printer driver instructions, refer to register your Quick Start Guide. 7 Click Install. NOTE: If...
...to the online instructions. 7 Follow the on your Mac and your product. Then, installation of Canon Inc. When the "Authenticate" screen appears, enter your CD-ROM again. Canon is not satisfactory after installing the printer, you do not know your administrator name or password, click... printer, you to restart the computer appears, click Restart. 3 Double-click the PIXMA iP2000 280.pkg icon. 11 When the "Installation is your administrator name and password. NOTE: For Mac OS 9.x printer driver instructions, refer to register your Quick Start Guide. 7 Click Install. NOTE: If...
iP2000 Quick Start Guide
Page 2
..., please refer to our Web site at a very attractive price. In addition, the latest driver downloads, answers to frequently asked questions, product information, and "where to change without notice. CarePAK offers toll-free Canon technical support and includes Canon's superb InstantExchange product replacement program. Internet - Customer Technical Support Sequence* 1. Toll-Free Live Tech...
..., please refer to our Web site at a very attractive price. In addition, the latest driver downloads, answers to frequently asked questions, product information, and "where to change without notice. CarePAK offers toll-free Canon technical support and includes Canon's superb InstantExchange product replacement program. Internet - Customer Technical Support Sequence* 1. Toll-Free Live Tech...
iP2000 Quick Start Guide
Page 5
... Canceling Printing 19 Advanced Printing Printing Photographs Directly from a Digital Camera 20 Accessing Printer Driver 26 Adjusting Print Quality for Photographs 27 Using the Bundle Software 34 Printing Borderless Photographs ...Aligning the Print Head 50 Replacing an Ink Tank 54 Troubleshooting Cannot Install the Printer Driver 62 Print Quality is Poor or Contains Errors 63 Troubleshooting Printer Hardware 65 Paper Does... from the Digital Camera 71 Appendix Installing the Printer Driver when using Mac OS 9.x 73 User's Guide Table of Contents 75 Specifications 76 Safety...
... Canceling Printing 19 Advanced Printing Printing Photographs Directly from a Digital Camera 20 Accessing Printer Driver 26 Adjusting Print Quality for Photographs 27 Using the Bundle Software 34 Printing Borderless Photographs ...Aligning the Print Head 50 Replacing an Ink Tank 54 Troubleshooting Cannot Install the Printer Driver 62 Print Quality is Poor or Contains Errors 63 Troubleshooting Printer Hardware 65 Paper Does... from the Digital Camera 71 Appendix Installing the Printer Driver when using Mac OS 9.x 73 User's Guide Table of Contents 75 Specifications 76 Safety...
iP2000 Quick Start Guide
Page 6
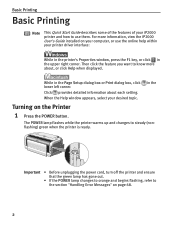
... when displayed. Then click the feature you want to know more information, view the iP2000 User's Guide installed on your computer, or use them. in the Turning on page 68. 2 When the Help window appears, select your printer driver interface: While in the printer's Properties window, press the F1 key, or click... the upper right corner. For more about each setting. Basic Printing Basic Printing Note This Quick Start Guide describes some of the features of your iP2000 printer and how to use the online help within your desired topic.
... when displayed. Then click the feature you want to know more information, view the iP2000 User's Guide installed on your computer, or use them. in the Turning on page 68. 2 When the Help window appears, select your printer driver interface: While in the printer's Properties window, press the F1 key, or click... the upper right corner. For more about each setting. Basic Printing Basic Printing Note This Quick Start Guide describes some of the features of your iP2000 printer and how to use the online help within your desired topic.
iP2000 Quick Start Guide
Page 7
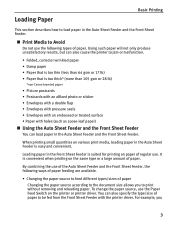
... for printing on various print media, loading paper in the Front Sheet Feeder is too thick* (more than 105 gsm or 28 lb) *non-Canon branded paper • Picture postcards • Postcards with an affixed photo or sticker • Envelopes with a double flap • Envelopes with pressure... seals • Envelopes with an embossed or treated surface • Paper with the printer driver. When printing small quantities on paper of regular use. To change the paper source, use the Paper Feed Switch on the same type or a ...
... for printing on various print media, loading paper in the Front Sheet Feeder is too thick* (more than 105 gsm or 28 lb) *non-Canon branded paper • Picture postcards • Postcards with an affixed photo or sticker • Envelopes with a double flap • Envelopes with pressure... seals • Envelopes with an embossed or treated surface • Paper with the printer driver. When printing small quantities on paper of regular use. To change the paper source, use the Paper Feed Switch on the same type or a ...
iP2000 Quick Start Guide
Page 8
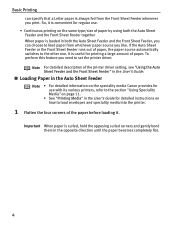
So, it is convenient for regular use with its various printers, refer to the section "Using Speciality Media" on the speciality media Canon provides for printing a large amount of paper, the paper source automatically switches to the other one. It is loaded in the User's Guide for ... the opposing curled corners and gently bend them in the opposite direction until the paper becomes completely flat. 4 Note For detailed description of the printer driver setting, see "Using the Auto Sheet Feeder and the Front Sheet Feeder" in the User's Guide. „ Loading Paper in the Auto Sheet Feeder ...
So, it is convenient for regular use with its various printers, refer to the section "Using Speciality Media" on the speciality media Canon provides for printing a large amount of paper, the paper source automatically switches to the other one. It is loaded in the User's Guide for ... the opposing curled corners and gently bend them in the opposite direction until the paper becomes completely flat. 4 Note For detailed description of the printer driver setting, see "Using the Auto Sheet Feeder and the Front Sheet Feeder" in the User's Guide. „ Loading Paper in the Auto Sheet Feeder ...
iP2000 Quick Start Guide
Page 9
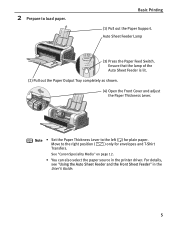
... Lever. For details, see "Using the Auto Sheet Feeder and the Front Sheet Feeder" in the printer driver. Note • Set the Paper Thickness Lever to the left ( ) for envelopes and T-Shirt Transfers. See "Canon Speciality Media" on page 12. • You can also select the paper source in the User's Guide...
... Lever. For details, see "Using the Auto Sheet Feeder and the Front Sheet Feeder" in the printer driver. Note • Set the Paper Thickness Lever to the left ( ) for envelopes and T-Shirt Transfers. See "Canon Speciality Media" on page 12. • You can also select the paper source in the User's Guide...
iP2000 Quick Start Guide
Page 11
... is lit. Use either DL Env. Note Set the Paper Thickness Lever to the right for envelopes. (4) Select Envelope in Page Size. For the printer driver setting, refer to the envelope size you are using. A maximum of 10 envelopes can be loaded at once. (2) Pinch the Paper Guide and slide it...
... is lit. Use either DL Env. Note Set the Paper Thickness Lever to the right for envelopes. (4) Select Envelope in Page Size. For the printer driver setting, refer to the envelope size you are using. A maximum of 10 envelopes can be loaded at once. (2) Pinch the Paper Guide and slide it...
iP2000 Quick Start Guide
Page 12
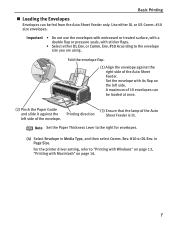
You can print on page 16. 8 Despite the direction of the photograph, load the paper in Page Size. For the printer driver setting, refer to "Printing with Windows" on page 13, "Printing with Macintosh" on the 4" x 6" size papers. (1) Align the paper stack against the left side of ...
You can print on page 16. 8 Despite the direction of the photograph, load the paper in Page Size. For the printer driver setting, refer to "Printing with Windows" on page 13, "Printing with Macintosh" on the 4" x 6" size papers. (1) Align the paper stack against the left side of ...

iP2000 Quick Start Guide
Page 14
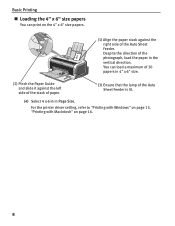
... each side of the Front Sheet Feeder. (3) Pinch the Paper Guide and slide it as shown. Note • You can be fed from the printer driver. Basic Printing 3 Load the paper. (1) Insert the paper into the Front Sheet Feeder with your media. 4 Pull out the Paper Output Tray. Load the paper...
... each side of the Front Sheet Feeder. (3) Pinch the Paper Guide and slide it as shown. Note • You can be fed from the printer driver. Basic Printing 3 Load the paper. (1) Insert the paper into the Front Sheet Feeder with your media. 4 Pull out the Paper Output Tray. Load the paper...
iP2000 Quick Start Guide
Page 16
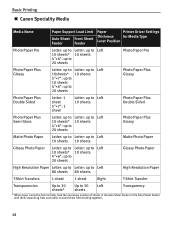
Basic Printing „ Canon Speciality Media Media Name Paper Support Load Limit Paper Printer Driver Settings Auto Sheet Front Sheet Thickness for Media Type Lever Position Feeder Feeder Photo Paper Pro Letter: up to Letter: up to Left 10 sheets* ...
Basic Printing „ Canon Speciality Media Media Name Paper Support Load Limit Paper Printer Driver Settings Auto Sheet Front Sheet Thickness for Media Type Lever Position Feeder Feeder Photo Paper Pro Letter: up to Letter: up to Left 10 sheets* ...
iP2000 Quick Start Guide
Page 17
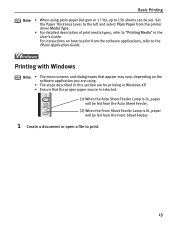
Set the Paper Thickness Lever to the left and select Plain Paper from the printer driver Media Type. • For detailed description of print media types, refer to 150 sheets can be fed from the Front Sheet Feeder. 1 Create a document or ...
Set the Paper Thickness Lever to the left and select Plain Paper from the printer driver Media Type. • For detailed description of print media types, refer to 150 sheets can be fed from the Front Sheet Feeder. 1 Create a document or ...
iP2000 Quick Start Guide
Page 19
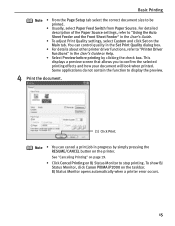
... details about other printer driver functions, refer to be printed. • Usually, select Paper Feed Switch from Paper Source. You can cancel a print job in progress by clicking the check box. This displays a preview screen that allows you to stop printing. To show BJ Status Monitor, click Canon PIXMA iP2000 on BJ Status Monitor...
... details about other printer driver functions, refer to be printed. • Usually, select Paper Feed Switch from Paper Source. You can cancel a print job in progress by clicking the check box. This displays a preview screen that allows you to stop printing. To show BJ Status Monitor, click Canon PIXMA iP2000 on BJ Status Monitor...
iP2000 Quick Start Guide
Page 22
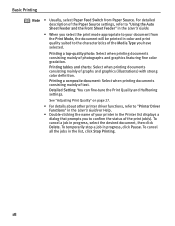
... jobs in progress, select the desired document, then click Delete. See "Adjusting Print Quality" on page 27. • For details about other printer driver functions, refer to "Printer Driver Functions" in the User's Guide or Help. • Double-clicking the name of your document from Paper Source. To cancel a job in the...
... jobs in progress, select the desired document, then click Delete. See "Adjusting Print Quality" on page 27. • For details about other printer driver functions, refer to "Printer Driver Functions" in the User's Guide or Help. • Double-clicking the name of your document from Paper Source. To cancel a job in the...
iP2000 Quick Start Guide
Page 30
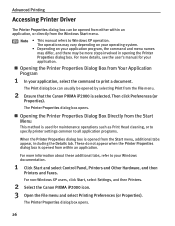
Advanced Printing Accessing Printer Driver The Printer Properties dialog box can usually be more steps involved in opening the Printer Properties dialog box. For non-Windows XP users, click Start, select Settings, and then Printers. 2 Select the Canon PIXMA iP2000 icon. 3 Open the File menu and ...Printing Preferences (or Properties). The Print dialog box can be opened by selecting Print from the File menu. 2 Ensure that the Canon PIXMA iP2000 is opened from within an application, or directly from Your Application Program 1 In your Windows documentation. 1 Click Start and select ...
Advanced Printing Accessing Printer Driver The Printer Properties dialog box can usually be more steps involved in opening the Printer Properties dialog box. For non-Windows XP users, click Start, select Settings, and then Printers. 2 Select the Canon PIXMA iP2000 icon. 3 Open the File menu and ...Printing Preferences (or Properties). The Print dialog box can be opened by selecting Print from the File menu. 2 Ensure that the Canon PIXMA iP2000 is opened from within an application, or directly from Your Application Program 1 In your Windows documentation. 1 Click Start and select ...
iP2000 Quick Start Guide
Page 31
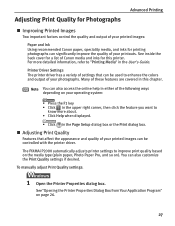
See inside the back cover for a list of Canon media and inks for printing photographs can significantly improve the quality of your printouts. For more about. ... if desired. Many of these features are covered in the User's Guide. You can be controlled with the printer driver. The PIXMA iP2000 automatically adjusts printer settings to improve print quality based on the media type (plain paper, Photo Paper Pro, and ...important factors control the quality and output of your printed images: Paper and Ink Using recommended Canon paper, speciality media, and inks for this chapter.
See inside the back cover for a list of Canon media and inks for printing photographs can significantly improve the quality of your printouts. For more about. ... if desired. Many of these features are covered in the User's Guide. You can be controlled with the printer driver. The PIXMA iP2000 automatically adjusts printer settings to improve print quality based on the media type (plain paper, Photo Paper Pro, and ...important factors control the quality and output of your printed images: Paper and Ink Using recommended Canon paper, speciality media, and inks for this chapter.
iP2000 Quick Start Guide
Page 36
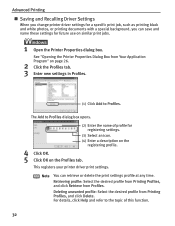
Advanced Printing „ Saving and Recalling Driver Settings When you change printer driver settings for a specific print job, such as printing black and white photos, or printing documents with a special background, you can retrieve or delete ...tab. 3 Enter new settings in Profiles. (1) Click Add to Profiles dialog box opens. (2) Enter the name of this function. 32 This registers your printer driver print settings. Deleting unwanted profile: Select the desired profile from Profiles. Retrieving profile: Select the desired profile from Printing Profiles, and click Retrieve from Printing...
Advanced Printing „ Saving and Recalling Driver Settings When you change printer driver settings for a specific print job, such as printing black and white photos, or printing documents with a special background, you can retrieve or delete ...tab. 3 Enter new settings in Profiles. (1) Click Add to Profiles dialog box opens. (2) Enter the name of this function. 32 This registers your printer driver print settings. Deleting unwanted profile: Select the desired profile from Profiles. Retrieving profile: Select the desired profile from Printing Profiles, and click Retrieve from Printing...
iP2000 Quick Start Guide
Page 37
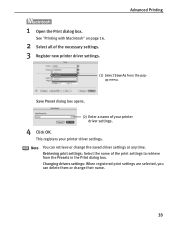
... the name of the necessary settings. 3 Register new printer driver settings. See "Printing with Macintosh" on page 16. 2 Select all of the print settings to retrieve from the popup menu. This registers your printer driver settings. 4 Click OK. Advanced Printing (1) Select Save As... from the Presets in the Print dialog box. 1 Open the Print dialog box. Changing drivers settings: When registered print settings are selected, you can...
... the name of the necessary settings. 3 Register new printer driver settings. See "Printing with Macintosh" on page 16. 2 Select all of the print settings to retrieve from the popup menu. This registers your printer driver settings. 4 Click OK. Advanced Printing (1) Select Save As... from the Presets in the Print dialog box. 1 Open the Print dialog box. Changing drivers settings: When registered print settings are selected, you can...
iP2000 Quick Start Guide
Page 44
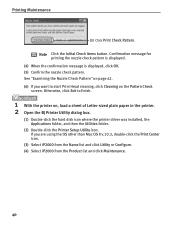
... page 42. (6) If you are using the OS other than Mac OS X v.10.3, double-click the Print Center icon. (3) Select iP2000 from the Name list and click Utility or Configure. (4) Select iP2000 from the Product list and click Maintenance. 40 If you want to finish. 1 With the printer on the Pattern Check... a sheet of Letter-sized plain paper in the printer. 2 Open the BJ Printer Utility dialog box. (1) Double-click the hard disk icon where the printer driver was installed, the Applications folder, and then the Utilities folder. (2) Double-click the Printer Setup Utility icon.
... page 42. (6) If you are using the OS other than Mac OS X v.10.3, double-click the Print Center icon. (3) Select iP2000 from the Name list and click Utility or Configure. (4) Select iP2000 from the Product list and click Maintenance. 40 If you want to finish. 1 With the printer on the Pattern Check... a sheet of Letter-sized plain paper in the printer. 2 Open the BJ Printer Utility dialog box. (1) Double-click the hard disk icon where the printer driver was installed, the Applications folder, and then the Utilities folder. (2) Double-click the Printer Setup Utility icon.


