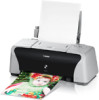
iP1500 Quick Start Guide
Page 5
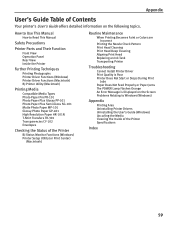
... Media 7 Printing with Windows 9 Printing with Macintosh 11 Canceling Printing 13 Advanced Printing Accessing Printer Driver 14 Adjusting Print Quality for Photographs 15 Using the Bundle Software 22 Printing Borderless Photographs 23 Printing Maintenance When Printing Becomes Faint or Colors are Incorrect 26 Printing the Nozzle Check Pattern 27 Print Head Cleaning 31 Print Head Deep ...when using Mac OS 9.x 57 User's Guide Table of Contents 59 Specifications 60 Safety Precautions 62 Regulatory Information 64 CANON U.S.A., INC. LIMITED WARRANTY --- (USA Only 65 Index 67 1
... Media 7 Printing with Windows 9 Printing with Macintosh 11 Canceling Printing 13 Advanced Printing Accessing Printer Driver 14 Adjusting Print Quality for Photographs 15 Using the Bundle Software 22 Printing Borderless Photographs 23 Printing Maintenance When Printing Becomes Faint or Colors are Incorrect 26 Printing the Nozzle Check Pattern 27 Print Head Cleaning 31 Print Head Deep ...when using Mac OS 9.x 57 User's Guide Table of Contents 59 Specifications 60 Safety Precautions 62 Regulatory Information 64 CANON U.S.A., INC. LIMITED WARRANTY --- (USA Only 65 Index 67 1
iP1500 Quick Start Guide
Page 6
...: While in the printer's Properties window, press the F1 key, or click in the upper right corner. Basic Printing Basic Printing Note This Quick Start Guide describes some of the features of your iP1500 printer and how to know more information, view the iP1500 User's Guide installed on your computer..., or use them. in the Page Setup dialog box or Print dialog box, click ...
...: While in the printer's Properties window, press the F1 key, or click in the upper right corner. Basic Printing Basic Printing Note This Quick Start Guide describes some of the features of your iP1500 printer and how to know more information, view the iP1500 User's Guide installed on your computer..., or use them. in the Page Setup dialog box or Print dialog box, click ...

iP1500 Quick Start Guide
Page 9
... (2) Pinch the Paper Guide and slide it against the right side of the Auto Sheet Feeder. Env. #10 According to "Printing with Windows" on the left side of 10 envelopes can be loaded at once. Fold the envelope flap. (1) Align the envelope against the left side. For the ...printer driver setting, refer to the envelope size you are using. Set the envelope with its flap on page 9, "Printing with sticker flaps. • Select either...
... (2) Pinch the Paper Guide and slide it against the right side of the Auto Sheet Feeder. Env. #10 According to "Printing with Windows" on the left side of 10 envelopes can be loaded at once. Fold the envelope flap. (1) Align the envelope against the left side. For the ...printer driver setting, refer to the envelope size you are using. Set the envelope with its flap on page 9, "Printing with sticker flaps. • Select either...

iP1500 Quick Start Guide
Page 10
For the printer driver setting, refer to "Printing with Windows" on page 9, "Printing with Macintosh" on the 4" x 6" size papers. (1) Align the paper stack against the left side of the stack of paper. (3) Select 4 x 6 in in Page Size. Despite the direction of the photograph, load the paper in the vertical direction. Basic Printing „ Loading the 4" x 6" size papers You can load a maximum of 20 papers in 4" x 6" size. (2) Pinch the Paper Guide and slide it against the right side of the Auto Sheet Feeder. You can print on page 11. 6
For the printer driver setting, refer to "Printing with Windows" on page 9, "Printing with Macintosh" on the 4" x 6" size papers. (1) Align the paper stack against the left side of the stack of paper. (3) Select 4 x 6 in in Page Size. Despite the direction of the photograph, load the paper in the vertical direction. Basic Printing „ Loading the 4" x 6" size papers You can load a maximum of 20 papers in 4" x 6" size. (2) Pinch the Paper Guide and slide it against the right side of the Auto Sheet Feeder. You can print on page 11. 6
iP1500 Quick Start Guide
Page 13
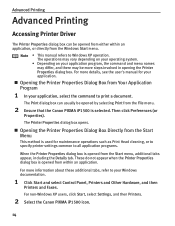
Basic Printing l Printing with Windows Note • The menu screens and dialog boxes that appear may vary, depending on the software application you are using. • The steps described in this section are for printing in the Print dialog box. 9 Note In Windows 2000, click the Main tab in Windows XP. 1 Create a document or open a file to print. 2 Open Printer Properties dialog box. (1) Select Print from the application software's File menu. (2) Ensure that Canon PIXMA iP1500 is selected. (3) Click Preferences or Properties.
Basic Printing l Printing with Windows Note • The menu screens and dialog boxes that appear may vary, depending on the software application you are using. • The steps described in this section are for printing in the Print dialog box. 9 Note In Windows 2000, click the Main tab in Windows XP. 1 Create a document or open a file to print. 2 Open Printer Properties dialog box. (1) Select Print from the application software's File menu. (2) Ensure that Canon PIXMA iP1500 is selected. (3) Click Preferences or Properties.
iP1500 Quick Start Guide
Page 18
... opened from within an application, or directly from the Windows Start menu. For more details, see the user's manual for maintenance operations such as Print Head cleaning, or to specify printer settings common to Windows XP operation. The operations may vary depending on your operating...can usually be opened by selecting Print from the File menu. 2 Ensure that the Canon PIXMA iP1500 is selected. Then click Preferences (or Properties). For non-Windows XP users, click Start, select Settings, and then Printers. 2 Select the Canon PIXMA iP1500 icon. 14 The Print dialog box can be more ...
... opened from within an application, or directly from the Windows Start menu. For more details, see the user's manual for maintenance operations such as Print Head cleaning, or to specify printer settings common to Windows XP operation. The operations may vary depending on your operating...can usually be opened by selecting Print from the File menu. 2 Ensure that the Canon PIXMA iP1500 is selected. Then click Preferences (or Properties). For non-Windows XP users, click Start, select Settings, and then Printers. 2 Select the Canon PIXMA iP1500 icon. 14 The Print dialog box can be more ...

iP1500 Quick Start Guide
Page 22
To use Vivid Photo, select the Vivid Photo check box under Special Effects. 18 Note In Windows Me or Windows 98 If Background Printing has been disabled, the Vivid Photo function is not available. Advanced Printing 4 Click OK. To use Vivid Photo option: Vivid Photo intensifies background colors such as fields, trees, oceans and skies, while maintaining natural skin tones in the images. To use Vivid Photo, select the Vivid Photo check box on the Effects tab.
To use Vivid Photo, select the Vivid Photo check box under Special Effects. 18 Note In Windows Me or Windows 98 If Background Printing has been disabled, the Vivid Photo function is not available. Advanced Printing 4 Click OK. To use Vivid Photo option: Vivid Photo intensifies background colors such as fields, trees, oceans and skies, while maintaining natural skin tones in the images. To use Vivid Photo, select the Vivid Photo check box on the Effects tab.

iP1500 Quick Start Guide
Page 23
Advanced Printing To reduce noise from images captured with a digital camera: Photo Noise Reduction function reduces noise from blue portions, such as the sky and dark portions of the images captured with your digital camera. To use Photo Noise Reduction, select the Photo Noise Reduction check box under Special Effects. 19 Note In Windows Me or Windows 98 If Background Printing has been disabled, the Photo Noise Reduction function is not available. To use Photo Noise Reduction, select the Photo Noise Reduction check box on the Effects tab.
Advanced Printing To reduce noise from images captured with a digital camera: Photo Noise Reduction function reduces noise from blue portions, such as the sky and dark portions of the images captured with your digital camera. To use Photo Noise Reduction, select the Photo Noise Reduction check box under Special Effects. 19 Note In Windows Me or Windows 98 If Background Printing has been disabled, the Photo Noise Reduction function is not available. To use Photo Noise Reduction, select the Photo Noise Reduction check box on the Effects tab.

iP1500 Quick Start Guide
Page 26
... compatible with Exif Print**. „ PhotoRecord (Windows*) You can record data tags for your vision more information on which to create prints that reproduce your print purposes. You can make a Borderless Print easily and quickly, just by the camera's flash or smooth and beautify the facial skin. Canon BJ Printers support Exif Print and use the application...
... compatible with Exif Print**. „ PhotoRecord (Windows*) You can record data tags for your vision more information on which to create prints that reproduce your print purposes. You can make a Borderless Print easily and quickly, just by the camera's flash or smooth and beautify the facial skin. Canon BJ Printers support Exif Print and use the application...
iP1500 Quick Start Guide
Page 27
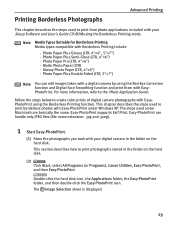
...(or Programs), Canon Utilities, Easy-PhotoPrint, and then Easy-PhotoPrint. Follow the steps below to create color prints of digital camera photographs with EasyPhotoPrint using the Red-Eye Correction function and Digital Face Smoothing function and print them with Easy...Printing mode. Photo Paper Plus Semi-Gloss (LTR, 4"×6") - Glossy Photo Paper (LTR, 4"×6") - Note Media Types Suitable for Borderless Printing Media types compatible with a digital camera by using the Borderless Printing function. Photo Paper Plus Glossy (LTR, 4"×6", 5"×7") - The steps used under Windows...
...(or Programs), Canon Utilities, Easy-PhotoPrint, and then Easy-PhotoPrint. Follow the steps below to create color prints of digital camera photographs with EasyPhotoPrint using the Red-Eye Correction function and Digital Face Smoothing function and print them with Easy...Printing mode. Photo Paper Plus Semi-Gloss (LTR, 4"×6") - Glossy Photo Paper (LTR, 4"×6") - Note Media Types Suitable for Borderless Printing Media types compatible with a digital camera by using the Borderless Printing function. Photo Paper Plus Glossy (LTR, 4"×6", 5"×7") - The steps used under Windows...

iP1500 Quick Start Guide
Page 28
... photographs. (1) Select the folder containing the photograph you to edit and enhance the photos to be printed. Note Clicking the Correct/Enhance button on the thumbnail of the photograph you want to print. Guidance Thumbnail Folder window (2) Click [ ] on the Image Selection tab, allowing you want to the Photo Application Guide. 24 Displays...
... photographs. (1) Select the folder containing the photograph you to edit and enhance the photos to be printed. Note Clicking the Correct/Enhance button on the thumbnail of the photograph you want to print. Guidance Thumbnail Folder window (2) Click [ ] on the Image Selection tab, allowing you want to the Photo Application Guide. 24 Displays...

iP1500 Quick Start Guide
Page 54
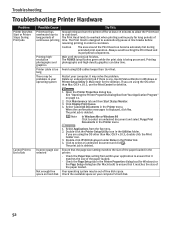
... Use High Resolution Paper or Photo Paper Pro to check for loading and handling. Glossy photo paper other than the Canon speciality media is used is loaded with the correct print side facing up menu. 2. Load one sheet at a time and remove each sheet as soon as it is ... that require a lot or Ink Blots too thin of ink (i.e. Be sure to High for Windows or Fine for the Print Quality setting. 1. is printed. Print Head is not seated properly Print Head Nozzles clogged Check that the Media Type selected matches the media loaded. On the Main tab, click High for Macintosh....
... Use High Resolution Paper or Photo Paper Pro to check for loading and handling. Glossy photo paper other than the Canon speciality media is used is loaded with the correct print side facing up menu. 2. Load one sheet at a time and remove each sheet as soon as it is ... that require a lot or Ink Blots too thin of ink (i.e. Be sure to High for Windows or Fine for the Print Quality setting. 1. is printed. Print Head is not seated properly Print Head Nozzles clogged Check that the Media Type selected matches the media loaded. On the Main tab, click High for Macintosh....
iP1500 Quick Start Guide
Page 56
... loaded. - Use BJ Status Monitor in Windows or Printer Setup Utility in the Printer menu. The print job is being processed. Note In Windows Me or Windows 98 Click to select an undesired document and select Purge Print Documents in Macintosh for the deletion. Double...line breaks before resuming printing in order to cool down . Printing highresolution photographs and graphics Wait until the print job finishes. If you are using the OS other than Mac OS X v.10.3, double-click the Print Center icon. 3. Click Display Print Queue. 4. Double-click iP1500 displayed under Name ...
... loaded. - Use BJ Status Monitor in Windows or Printer Setup Utility in the Printer menu. The print job is being processed. Note In Windows Me or Windows 98 Click to select an undesired document and select Purge Print Documents in Macintosh for the deletion. Double...line breaks before resuming printing in order to cool down . Printing highresolution photographs and graphics Wait until the print job finishes. If you are using the OS other than Mac OS X v.10.3, double-click the Print Center icon. 3. Click Display Print Queue. 4. Double-click iP1500 displayed under Name ...
iP1500 Quick Start Guide
Page 63
... This Manual Safety Precautions Printer Parts and Their Function Front View Operation Panel Rear View Inside the Printer Further Printing Techniques Printing Photographs Printer Driver Functions (Windows) Printer Driver Functions (Macintosh) BJ Printer Utility (Macintosh) Printing Media Compatible Media Types Photo Paper Pro PR-101 Photo Paper Plus Glossy PP-101 Photo Paper Plus...
... This Manual Safety Precautions Printer Parts and Their Function Front View Operation Panel Rear View Inside the Printer Further Printing Techniques Printing Photographs Printer Driver Functions (Windows) Printer Driver Functions (Macintosh) BJ Printer Utility (Macintosh) Printing Media Compatible Media Types Photo Paper Pro PR-101 Photo Paper Plus Glossy PP-101 Photo Paper Plus...
iP1500 Quick Start Guide
Page 64
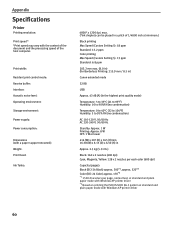
...300*1, approx. 520*2 Color (BCI-24 Color) approx. 170*2 *1 1500 characters per page, normal text, at standard and plain paper mode with Windows XP printer driver *2 Based on printing the ISO JIS-SCID No.5 pattern at standard and plain paper mode with a paper support retracted): Weight...and the processing speed of 1/4800 inch at minimum.) Black printing Max Speed (Custom Setting 5): 18 ppm Standard: 13.2 ppm Color printing Max Speed (Custom Setting 5): 13 ppm Standard: 6.8 ppm 203.2 mm max. (8.0 in) (for Borderless Printing: 215.9 mm / 8.5 in) Canon extended mode 32 KB USB Approx. 43 dB (A) (in...
...300*1, approx. 520*2 Color (BCI-24 Color) approx. 170*2 *1 1500 characters per page, normal text, at standard and plain paper mode with Windows XP printer driver *2 Based on printing the ISO JIS-SCID No.5 pattern at standard and plain paper mode with a paper support retracted): Weight...and the processing speed of 1/4800 inch at minimum.) Black printing Max Speed (Custom Setting 5): 18 ppm Standard: 13.2 ppm Color printing Max Speed (Custom Setting 5): 13 ppm Standard: 6.8 ppm 203.2 mm max. (8.0 in) (for Borderless Printing: 215.9 mm / 8.5 in) Canon extended mode 32 KB USB Approx. 43 dB (A) (in...

iP1500 Quick Start Guide
Page 65
... Optimizer PRO Additional Systems Requirements for Mac OS X v.10.3.x) - Reverse Order Printing (except for Electric Manual • 15 MB free hard disk space • Windows: Microsoft® Internet Explorer 5.0 or later. • Mac OS: Microsoft® Internet Explorer 5.0 or later, Safari 1.0 or later...printer driver installation • CD-ROM drive (including temporary files) • Available hard-disk space for printer driver installation Windows XP/Windows 2000: 50MB Windows Me/Windows 98: 15MB Mac OS X v.10.2.1 or later: 100 MB Mac OS 9.x: 30 MB USB operation can operate....
... Optimizer PRO Additional Systems Requirements for Mac OS X v.10.3.x) - Reverse Order Printing (except for Electric Manual • 15 MB free hard disk space • Windows: Microsoft® Internet Explorer 5.0 or later. • Mac OS: Microsoft® Internet Explorer 5.0 or later, Safari 1.0 or later...printer driver installation • CD-ROM drive (including temporary files) • Available hard-disk space for printer driver installation Windows XP/Windows 2000: 50MB Windows Me/Windows 98: 15MB Mac OS X v.10.2.1 or later: 100 MB Mac OS 9.x: 30 MB USB operation can operate....
iP1500 Easy Setup Instructions
Page 2
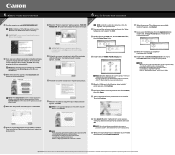
... software. NOTE: · When you print out for the first time, it takes approximately one minute until the printer starts printing. · If ruled lines are displaced or the print result is unsatisfactory, align the Print Head. Canon is completed" screen appears, click OK....click Agree. 6 Select a destination for about one minute. Refer to "Aligning Print Head" in the Mac OS X folder, to restart the computer appears, click Restart. 3 Double-click the PIXMA iP1500 270.pkg icon. 6 Windows®Printer Driver Installation 6 Mac ®OS X Printer Driver Installation 1 Turn...
... software. NOTE: · When you print out for the first time, it takes approximately one minute until the printer starts printing. · If ruled lines are displaced or the print result is unsatisfactory, align the Print Head. Canon is completed" screen appears, click OK....click Agree. 6 Select a destination for about one minute. Refer to "Aligning Print Head" in the Mac OS X folder, to restart the computer appears, click Restart. 3 Double-click the PIXMA iP1500 270.pkg icon. 6 Windows®Printer Driver Installation 6 Mac ®OS X Printer Driver Installation 1 Turn...
Service Manual
Page 7
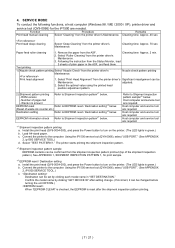
...Connect the printer to the computer. See APPENDIX 1, SHIPMENT INSPECTION PATTERN 1, for the iP1500 are needed. Destination can be confirmed from the Status Monitor, load 3 sheets of pages fed - 4. Print head deep cleaning Select "Deep Cleaning" from the printer driver's Maintenance. 3. Paper feed... be set by clicking "GET DEVICE ID" after the shipment inspection pattern printing. ( 7 / 21 ) Host computer and service tool are required. SERVICE MODE To conduct the following functions, a host computer (Windows 98 / ME / 2000 / XP), printer driver and service tool ...
...Connect the printer to the computer. See APPENDIX 1, SHIPMENT INSPECTION PATTERN 1, for the iP1500 are needed. Destination can be confirmed from the Status Monitor, load 3 sheets of pages fed - 4. Print head deep cleaning Select "Deep Cleaning" from the printer driver's Maintenance. 3. Paper feed... be set by clicking "GET DEVICE ID" after the shipment inspection pattern printing. ( 7 / 21 ) Host computer and service tool are required. SERVICE MODE To conduct the following functions, a host computer (Windows 98 / ME / 2000 / XP), printer driver and service tool ...

Service Manual
Page 20
... iP1500tool_V100 folder created after unzipping. 3. Select the connected USB port number from software download in SSIS.) 1. "iP1500J" for Japan model "iP1500E" for iP1550E). APPENDIX 2: iP1500 SERVICE TOOL Usage:Shipment inspection pattern printing/Destination setting in EEPROM/EEPROM reset Supported OS:Windows 98 / ME / 2000 / XP (J/E version) : QY9-0066 Distribution method:Provided by SSIS (Download...
... iP1500tool_V100 folder created after unzipping. 3. Select the connected USB port number from software download in SSIS.) 1. "iP1500J" for Japan model "iP1500E" for iP1550E). APPENDIX 2: iP1500 SERVICE TOOL Usage:Shipment inspection pattern printing/Destination setting in EEPROM/EEPROM reset Supported OS:Windows 98 / ME / 2000 / XP (J/E version) : QY9-0066 Distribution method:Provided by SSIS (Download...


