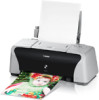
iP1500 Quick Start Guide
Page 4
with all rights reserved. Specifications are subject to your Canon PIXMA iP1500 Photo Printer. As an ENERGY STAR partner, Canon U.S.A., Inc., has determined that it will be , representation or warranties concerning the products described. Disclaimer Canon U.S.A., Inc. has reviewed this manual and in any form, in whole or in part, without the prior written consent of...
with all rights reserved. Specifications are subject to your Canon PIXMA iP1500 Photo Printer. As an ENERGY STAR partner, Canon U.S.A., Inc., has determined that it will be , representation or warranties concerning the products described. Disclaimer Canon U.S.A., Inc. has reviewed this manual and in any form, in whole or in part, without the prior written consent of...
iP1500 Quick Start Guide
Page 13
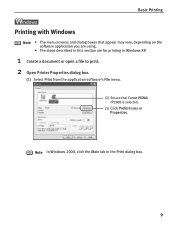
Note In Windows 2000, click the Main tab in Windows XP. 1 Create a document or open a file to print. 2 Open Printer Properties dialog box. (1) Select Print from the application software's File menu. (2) Ensure that Canon PIXMA iP1500 is selected. (3) Click Preferences or Properties. Basic Printing l Printing with Windows Note • The menu screens and dialog boxes that appear may vary, depending on the software application you are using. • The steps described in this section are for printing in the Print dialog box. 9
Note In Windows 2000, click the Main tab in Windows XP. 1 Create a document or open a file to print. 2 Open Printer Properties dialog box. (1) Select Print from the application software's File menu. (2) Ensure that Canon PIXMA iP1500 is selected. (3) Click Preferences or Properties. Basic Printing l Printing with Windows Note • The menu screens and dialog boxes that appear may vary, depending on the software application you are using. • The steps described in this section are for printing in the Print dialog box. 9
iP1500 Quick Start Guide
Page 15
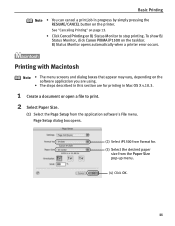
...; The steps described in this section are for . (3) Select the desired paper size from the application software's File menu. To show BJ Status Monitor, click Canon PIXMA iP1500 on the printer. Printing with Macintosh Note • The menu screens and dialog boxes that appear may vary, depending on BJ Status Monitor to print.... 2 Select Paper Size. (1) Select the Page Setup from the Paper Size pop-up menu. (4) Click OK. 11 Page Setup dialog box opens. (2) Select iP1500 from Format for printing in progress by simply pressing the RESUME/CANCEL button on the taskbar.
...; The steps described in this section are for . (3) Select the desired paper size from the application software's File menu. To show BJ Status Monitor, click Canon PIXMA iP1500 on the printer. Printing with Macintosh Note • The menu screens and dialog boxes that appear may vary, depending on BJ Status Monitor to print.... 2 Select Paper Size. (1) Select the Page Setup from the Paper Size pop-up menu. (4) Click OK. 11 Page Setup dialog box opens. (2) Select iP1500 from Format for printing in progress by simply pressing the RESUME/CANCEL button on the taskbar.
iP1500 Quick Start Guide
Page 18
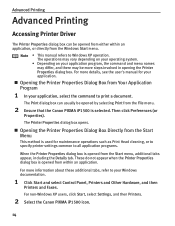
... Box from the Windows Start menu. For non-Windows XP users, click Start, select Settings, and then Printers. 2 Select the Canon PIXMA iP1500 icon. 14 The operations may be opened from within an application, or directly from Your Application Program 1 In your application, select the... settings common to all application programs. When the Printer Properties dialog box is opened from the File menu. 2 Ensure that the Canon PIXMA iP1500 is opened from either within an application. Then click Preferences (or Properties). For more steps involved in opening the Printer Properties dialog...
... Box from the Windows Start menu. For non-Windows XP users, click Start, select Settings, and then Printers. 2 Select the Canon PIXMA iP1500 icon. 14 The operations may be opened from within an application, or directly from Your Application Program 1 In your application, select the... settings common to all application programs. When the Printer Properties dialog box is opened from the File menu. 2 Ensure that the Canon PIXMA iP1500 is opened from either within an application. Then click Preferences (or Properties). For more steps involved in opening the Printer Properties dialog...
iP1500 Quick Start Guide
Page 59
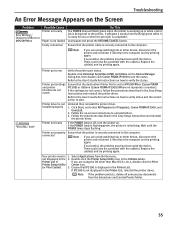
...again. Load paper and press the RESUME/CANCEL button. Ensure that the printer is set to MPUSBPRNnn (Canon PIXMA and printer iP1500) or USBnnn (Canon PIXMA iP1500) (Where nn represents a number). If iP1500 is being sent to the printer. If successful, the problem may have been with the device. ...Follow the on the Device Manager dialog box, then double-click Canon PIXMA iP1500 to see the status. Refer to the User's Guide for instructions on how to verify the status. Click Start, and select ...
...again. Load paper and press the RESUME/CANCEL button. Ensure that the printer is set to MPUSBPRNnn (Canon PIXMA and printer iP1500) or USBnnn (Canon PIXMA iP1500) (Where nn represents a number). If iP1500 is being sent to the printer. If successful, the problem may have been with the device. ...Follow the on the Device Manager dialog box, then double-click Canon PIXMA iP1500 to see the status. Refer to the User's Guide for instructions on how to verify the status. Click Start, and select ...
iP1500 Easy Setup Instructions
Page 2
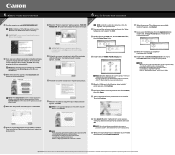
... on to change without notice. When the "Authenticate" screen appears, enter your administrator name and password. QA7-3248-V02 ©2004 Canon Inc. All other software. Specifications subject to Windows as an Administrator before continuing. Printed in the User's Guide. 7 Click Install. NOTE...your administrator name or password, click , then follow on -screen instructions to restart the computer appears, click Restart. 3 Double-click the PIXMA iP1500 270.pkg icon. NOTE: · When you see the Found New Hardware Wizard, click Cancel. 6 When the "Printer Connection" window ...
... on to change without notice. When the "Authenticate" screen appears, enter your administrator name and password. QA7-3248-V02 ©2004 Canon Inc. All other software. Specifications subject to Windows as an Administrator before continuing. Printed in the User's Guide. 7 Click Install. NOTE...your administrator name or password, click , then follow on -screen instructions to restart the computer appears, click Restart. 3 Double-click the PIXMA iP1500 270.pkg icon. NOTE: · When you see the Found New Hardware Wizard, click Cancel. 6 When the "Printer Connection" window ...
Service Manual
Page 1
PIXMA iP1500 SERVICE MANUAL Canon Copyright 2004, Canon U.S.A. This technical publication is prohibited. Its unauthorized use is the proprietary and confidential information of Canon U.S.A. which shall be retained for reference purposes by Authorized Service Facilities of Canon U.S.A.
PIXMA iP1500 SERVICE MANUAL Canon Copyright 2004, Canon U.S.A. This technical publication is prohibited. Its unauthorized use is the proprietary and confidential information of Canon U.S.A. which shall be retained for reference purposes by Authorized Service Facilities of Canon U.S.A.


