iP1500 Quick Start Guide
Page 5
...Using Speciality Media 7 Printing with Windows 9 Printing with Macintosh 11 Canceling Printing 13 Advanced Printing Accessing Printer Driver 14 Adjusting Print Quality for Photographs 15 Using the Bundle Software 22 Printing Borderless Photographs 23 Printing Maintenance When Printing Becomes Faint or Colors are Incorrect 26 Printing the Nozzle Check Pattern 27 Print Head Cleaning 31 Print Head Deep Cleaning 34... the Printer Driver when using Mac OS 9.x 57 User's Guide Table of Contents 59 Specifications 60 Safety Precautions 62 Regulatory Information 64 CANON U.S.A., INC.
...Using Speciality Media 7 Printing with Windows 9 Printing with Macintosh 11 Canceling Printing 13 Advanced Printing Accessing Printer Driver 14 Adjusting Print Quality for Photographs 15 Using the Bundle Software 22 Printing Borderless Photographs 23 Printing Maintenance When Printing Becomes Faint or Colors are Incorrect 26 Printing the Nozzle Check Pattern 27 Print Head Cleaning 31 Print Head Deep Cleaning 34... the Printer Driver when using Mac OS 9.x 57 User's Guide Table of Contents 59 Specifications 60 Safety Precautions 62 Regulatory Information 64 CANON U.S.A., INC.
iP1500 Quick Start Guide
Page 6
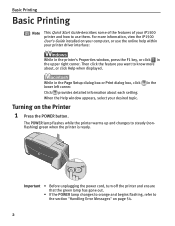
... box, click lower left corner. Click provides detailed information about , or click Help when displayed. Basic Printing Basic Printing Note This Quick Start Guide describes some of the features of your iP1500 printer and how to steady (nonflashing) green when the printer is ready. Then click the feature you want to the section... that the green lamp has gone out. • If the POWER lamp changes to orange and begins flashing, refer to know more information, view the iP1500 User's Guide installed on the Printer 1 Press the POWER button. For more about each setting.
... box, click lower left corner. Click provides detailed information about , or click Help when displayed. Basic Printing Basic Printing Note This Quick Start Guide describes some of the features of your iP1500 printer and how to steady (nonflashing) green when the printer is ready. Then click the feature you want to the section... that the green lamp has gone out. • If the POWER lamp changes to orange and begins flashing, refer to know more information, view the iP1500 User's Guide installed on the Printer 1 Press the POWER button. For more about each setting.
iP1500 Quick Start Guide
Page 7
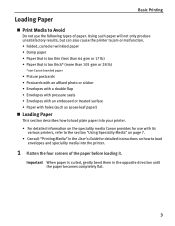
...paper is too thick* (more than 64 gsm or 17 lb) • Paper that is too thin (less than 105 gsm or 28 lb) *non-Canon branded paper • Picture postcards • Postcards with an affixed photo or sticker • Envelopes with a double flap • Envelopes with pressure seals &#...that is curled, gently bend them in the User's Guide for detailed instructions on the speciality media Canon provides for use the following types of the paper before loading it. Loading Paper Basic Printing „ Print Media to Avoid Do not use with holes (such as Loose-leaf paper) „ Loading ...
...paper is too thick* (more than 64 gsm or 17 lb) • Paper that is too thin (less than 105 gsm or 28 lb) *non-Canon branded paper • Picture postcards • Postcards with an affixed photo or sticker • Envelopes with a double flap • Envelopes with pressure seals &#...that is curled, gently bend them in the User's Guide for detailed instructions on the speciality media Canon provides for use the following types of the paper before loading it. Loading Paper Basic Printing „ Print Media to Avoid Do not use with holes (such as Loose-leaf paper) „ Loading ...
iP1500 Quick Start Guide
Page 8
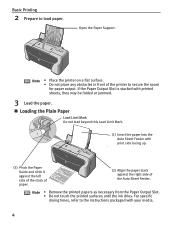
... as necessary from the Paper Output Slot. • Do not touch the printed surfaces until the ink dries. If the Paper Output Slot is stacked with printed sheets, they may be folded or jammed. 3 Load the paper. „ Loading the Plain Paper Load Limit Mark Do not load beyond this Load... Limit Mark. (1) Insert the paper into the Auto Sheet Feeder with your media. 4 Basic Printing 2 Prepare to secure the space for paper output. For specific drying times, refer to the instructions packaged with print side facing up. (3) Pinch the Paper Guide and slide it against the left side of the...
... as necessary from the Paper Output Slot. • Do not touch the printed surfaces until the ink dries. If the Paper Output Slot is stacked with printed sheets, they may be folded or jammed. 3 Load the paper. „ Loading the Plain Paper Load Limit Mark Do not load beyond this Load... Limit Mark. (1) Insert the paper into the Auto Sheet Feeder with your media. 4 Basic Printing 2 Prepare to secure the space for paper output. For specific drying times, refer to the instructions packaged with print side facing up. (3) Pinch the Paper Guide and slide it against the left side of the...

iP1500 Quick Start Guide
Page 9
Printing direction (2) Pinch the Paper Guide and slide it against the right side of the envelope. (3) Select ...side. For the printer driver setting, refer to the envelope size you are using. Env. #10 According to "Printing with Windows" on page 9, "Printing with sticker flaps. • Select either DL or US Comm. #10 size envelopes. Env. #10 or DL Env. ...Basic Printing „ Loading the Envelopes Use either DL Env. Important • Do not use the envelopes with embossed or treated...
Printing direction (2) Pinch the Paper Guide and slide it against the right side of the envelope. (3) Select ...side. For the printer driver setting, refer to the envelope size you are using. Env. #10 According to "Printing with Windows" on page 9, "Printing with sticker flaps. • Select either DL or US Comm. #10 size envelopes. Env. #10 or DL Env. ...Basic Printing „ Loading the Envelopes Use either DL Env. Important • Do not use the envelopes with embossed or treated...

iP1500 Quick Start Guide
Page 10
You can print on page 11. 6 Basic Printing „ Loading the 4" x 6" size papers You can load a maximum of 20 papers in 4" x 6" size. (2) Pinch the Paper Guide and slide it against the right side of the Auto Sheet Feeder. For the printer driver setting, refer to "Printing with Windows" on page 9, "Printing with Macintosh" on the 4" x 6" size papers. (1) Align the paper stack against the left side of the stack of paper. (3) Select 4 x 6 in in Page Size. Despite the direction of the photograph, load the paper in the vertical direction.
You can print on page 11. 6 Basic Printing „ Loading the 4" x 6" size papers You can load a maximum of 20 papers in 4" x 6" size. (2) Pinch the Paper Guide and slide it against the right side of the Auto Sheet Feeder. For the printer driver setting, refer to "Printing with Windows" on page 9, "Printing with Macintosh" on the 4" x 6" size papers. (1) Align the paper stack against the left side of the stack of paper. (3) Select 4 x 6 in in Page Size. Despite the direction of the photograph, load the paper in the vertical direction.

iP1500 Quick Start Guide
Page 12
Select Plain Paper from the printer driver Media Type. • For detailed description of print media types, refer to "Printing Media" in the User's Guide. * When paper cannot be set. Basic Printing „ Canon Speciality Media Media Name Paper Support Load Limit Printer Driver Settings for Media Type Photo Paper...sheet T-Shirt Transfer Transparencies Up to 30 sheets* Transparency Note • When using plain paper (64 gsm or 17 lb), up to print from sticking together. For instructions on how to 100 sheets can be fed normally, load the necessary number of sheets in the Auto Sheet...
Select Plain Paper from the printer driver Media Type. • For detailed description of print media types, refer to "Printing Media" in the User's Guide. * When paper cannot be set. Basic Printing „ Canon Speciality Media Media Name Paper Support Load Limit Printer Driver Settings for Media Type Photo Paper...sheet T-Shirt Transfer Transparencies Up to 30 sheets* Transparency Note • When using plain paper (64 gsm or 17 lb), up to print from sticking together. For instructions on how to 100 sheets can be fed normally, load the necessary number of sheets in the Auto Sheet...
iP1500 Quick Start Guide
Page 13
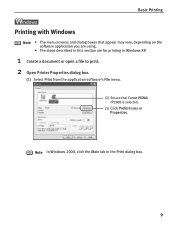
Note In Windows 2000, click the Main tab in Windows XP. 1 Create a document or open a file to print. 2 Open Printer Properties dialog box. (1) Select Print from the application software's File menu. (2) Ensure that Canon PIXMA iP1500 is selected. (3) Click Preferences or Properties. Basic Printing l Printing with Windows Note • The menu screens and dialog boxes that appear may vary, depending on the software application you are using. • The steps described in this section are for printing in the Print dialog box. 9
Note In Windows 2000, click the Main tab in Windows XP. 1 Create a document or open a file to print. 2 Open Printer Properties dialog box. (1) Select Print from the application software's File menu. (2) Ensure that Canon PIXMA iP1500 is selected. (3) Click Preferences or Properties. Basic Printing l Printing with Windows Note • The menu screens and dialog boxes that appear may vary, depending on the software application you are using. • The steps described in this section are for printing in the Print dialog box. 9
iP1500 Quick Start Guide
Page 14
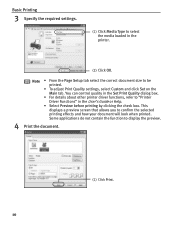
Some applications do not contain the function to confirm the selected printing effects and how your document will look when printed. This displays a preview screen that allows you to display the preview. 4 Print the document. (1) Click Print. 10 Basic Printing 3 Specify the required settings. (1) Click Media Type to select... the media loaded in the User's Guide or Help. • Select Preview before printing by clicking the check box. Note • From the Page Setup tab select the correct document size to "Printer Driver Functions"...
Some applications do not contain the function to confirm the selected printing effects and how your document will look when printed. This displays a preview screen that allows you to display the preview. 4 Print the document. (1) Click Print. 10 Basic Printing 3 Specify the required settings. (1) Click Media Type to select... the media loaded in the User's Guide or Help. • Select Preview before printing by clicking the check box. Note • From the Page Setup tab select the correct document size to "Printer Driver Functions"...
iP1500 Quick Start Guide
Page 15
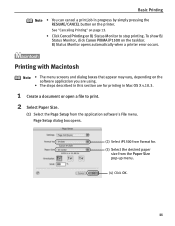
To show BJ Status Monitor, click Canon PIXMA iP1500 on BJ Status Monitor to print. 2 Select Paper Size. (1) Select the Page Setup from the Paper Size pop-up menu. (4) Click OK. 11 Printing with Macintosh Note • The menu screens and dialog boxes that appear may vary, depending... Setup dialog box opens. (2) Select iP1500 from Format for printing in this section are using. • The steps described in Mac OS X v.10.3. 1 Create a document or open a file to stop printing. See "Canceling Printing" on page 13. • Click Cencel Printing on the taskbar. BJ Status Monitor ...
To show BJ Status Monitor, click Canon PIXMA iP1500 on BJ Status Monitor to print. 2 Select Paper Size. (1) Select the Page Setup from the Paper Size pop-up menu. (4) Click OK. 11 Printing with Macintosh Note • The menu screens and dialog boxes that appear may vary, depending... Setup dialog box opens. (2) Select iP1500 from Format for printing in this section are using. • The steps described in Mac OS X v.10.3. 1 Create a document or open a file to stop printing. See "Canceling Printing" on page 13. • Click Cencel Printing on the taskbar. BJ Status Monitor ...

iP1500 Quick Start Guide
Page 16
...click Delete. To cancel all the jobs in the Printer list displays a dialog that prompts you have selected. Basic Printing 3 Specify the required settings. (1) Select Print from the application software's File menu. (2) Select Quality & Media from the pop-up menu. (3) Select the ...Media Type from the pop-up menu. (4) Select the print mode appropriate to your document from the Print Mode. (5) Click Print. Printing a top-quality photo: Select when printing documents consisting mainly of the print job(s). See "Adjusting Print Quality" on page 15. • For details about other printer...
...click Delete. To cancel all the jobs in the Printer list displays a dialog that prompts you have selected. Basic Printing 3 Specify the required settings. (1) Select Print from the application software's File menu. (2) Select Quality & Media from the pop-up menu. (3) Select the ...Media Type from the pop-up menu. (4) Select the print mode appropriate to your document from the Print Mode. (5) Click Print. Printing a top-quality photo: Select when printing documents consisting mainly of the print job(s). See "Adjusting Print Quality" on page 15. • For details about other printer...
iP1500 Quick Start Guide
Page 17
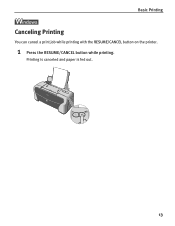
Printing is canceled and paper is fed out. 13 Basic Printing Canceling Printing You can cancel a print job while printing with the RESUME/CANCEL button on the printer. 1 Press the RESUME/CANCEL button while printing.
Printing is canceled and paper is fed out. 13 Basic Printing Canceling Printing You can cancel a print job while printing with the RESUME/CANCEL button on the printer. 1 Press the RESUME/CANCEL button while printing.
iP1500 Quick Start Guide
Page 18
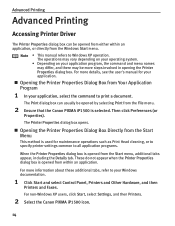
... Settings, and then Printers. 2 Select the Canon PIXMA iP1500 icon. 14 The operations may be opened from the File menu. 2 Ensure that the Canon PIXMA iP1500 is opened from either within an application. Advanced Printing Advanced Printing Accessing Printer Driver The Printer Properties dialog box... can usually be opened by selecting Print from within an application, or directly from the...
... Settings, and then Printers. 2 Select the Canon PIXMA iP1500 icon. 14 The operations may be opened from the File menu. 2 Ensure that the Canon PIXMA iP1500 is opened from either within an application. Advanced Printing Advanced Printing Accessing Printer Driver The Printer Properties dialog box... can usually be opened by selecting Print from within an application, or directly from the...
iP1500 Quick Start Guide
Page 19
...: Paper and Ink Using recommended Canon paper, speciality media, and inks for this chapter. You can significantly improve the quality of your printouts. The Printer Properties dialog box opens. The iP1500 automatically adjusts printer settings to "Printing Media" in this printer. Advanced Printing 3 Open the File menu and select Printing Preferences (or Properties). For more...
...: Paper and Ink Using recommended Canon paper, speciality media, and inks for this chapter. You can significantly improve the quality of your printouts. The Printer Properties dialog box opens. The iP1500 automatically adjusts printer settings to "Printing Media" in this printer. Advanced Printing 3 Open the File menu and select Printing Preferences (or Properties). For more...
iP1500 Quick Start Guide
Page 20
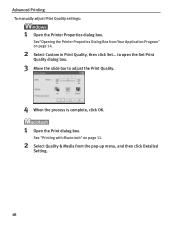
See"Opening the Printer Properties Dialog Box from Your Application Program" on page 11. 2 Select Quality & Media from the pop-up menu, and then click Detailed Setting. 16 to open the Set Print Quality dialog box. 3 Move the slide bar to adjust the Print Quality. 4 When the process is complete, click OK. 1 Open the Print dialog box. See "Printing with Macintosh" on page 14. 2 Select Custom in Print Quality, then click Set... Advanced Printing To manually adjust Print Quality settings: 1 Open the Printer Properties dialog box.
See"Opening the Printer Properties Dialog Box from Your Application Program" on page 11. 2 Select Quality & Media from the pop-up menu, and then click Detailed Setting. 16 to open the Set Print Quality dialog box. 3 Move the slide bar to adjust the Print Quality. 4 When the process is complete, click OK. 1 Open the Print dialog box. See "Printing with Macintosh" on page 14. 2 Select Custom in Print Quality, then click Set... Advanced Printing To manually adjust Print Quality settings: 1 Open the Printer Properties dialog box.

iP1500 Quick Start Guide
Page 21
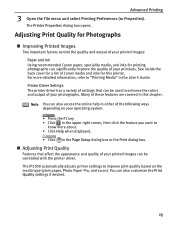
Advanced Printing 4 When the process is complete, click OK. 3 Move the slide bar to compensate for unsatisfactory color balance and over- or under-exposure before printing. 1 Open the Printer Properties dialog box. Use this feature to adjust the Print Quality. See"Opening the Printer Properties Dialog Box from Your Application Program" on page 14. 2 Click the Effects tab. 3 Select the Photo Optimizer PRO check box. 17 To automatically optimize the image: Photo Optimizer PRO automatically adjusts the photographic image created with a digital camera.
Advanced Printing 4 When the process is complete, click OK. 3 Move the slide bar to compensate for unsatisfactory color balance and over- or under-exposure before printing. 1 Open the Printer Properties dialog box. Use this feature to adjust the Print Quality. See"Opening the Printer Properties Dialog Box from Your Application Program" on page 14. 2 Click the Effects tab. 3 Select the Photo Optimizer PRO check box. 17 To automatically optimize the image: Photo Optimizer PRO automatically adjusts the photographic image created with a digital camera.

iP1500 Quick Start Guide
Page 22
To use Vivid Photo, select the Vivid Photo check box on the Effects tab. Note In Windows Me or Windows 98 If Background Printing has been disabled, the Vivid Photo function is not available. To use Vivid Photo option: Vivid Photo intensifies background colors such as fields, trees, oceans and skies, while maintaining natural skin tones in the images. To use Vivid Photo, select the Vivid Photo check box under Special Effects. 18 Advanced Printing 4 Click OK.
To use Vivid Photo, select the Vivid Photo check box on the Effects tab. Note In Windows Me or Windows 98 If Background Printing has been disabled, the Vivid Photo function is not available. To use Vivid Photo option: Vivid Photo intensifies background colors such as fields, trees, oceans and skies, while maintaining natural skin tones in the images. To use Vivid Photo, select the Vivid Photo check box under Special Effects. 18 Advanced Printing 4 Click OK.

iP1500 Quick Start Guide
Page 23
To use Photo Noise Reduction, select the Photo Noise Reduction check box on the Effects tab. To use Photo Noise Reduction, select the Photo Noise Reduction check box under Special Effects. 19 Note In Windows Me or Windows 98 If Background Printing has been disabled, the Photo Noise Reduction function is not available. Advanced Printing To reduce noise from images captured with a digital camera: Photo Noise Reduction function reduces noise from blue portions, such as the sky and dark portions of the images captured with your digital camera.
To use Photo Noise Reduction, select the Photo Noise Reduction check box on the Effects tab. To use Photo Noise Reduction, select the Photo Noise Reduction check box under Special Effects. 19 Note In Windows Me or Windows 98 If Background Printing has been disabled, the Photo Noise Reduction function is not available. Advanced Printing To reduce noise from images captured with a digital camera: Photo Noise Reduction function reduces noise from blue portions, such as the sky and dark portions of the images captured with your digital camera.

iP1500 Quick Start Guide
Page 24
...printer driver settings for a specific print job, such as printing black and white photos, or printing documents with a special background, you can retrieve or delete the print settings profile at any time. This registers your printer driver print settings. Note You can save and... description on the registering profile. 4 Click OK. 5 Click OK on similar print jobs. 1 Open the Printer Properties dialog box. Retrieving profile: Select the desired profile from Printing Profiles, and click Retrieve from Printing Profiles, and click Delete. See "Opening the Printer Properties Dialog Box from Your...
...printer driver settings for a specific print job, such as printing black and white photos, or printing documents with a special background, you can retrieve or delete the print settings profile at any time. This registers your printer driver print settings. Note You can save and... description on the registering profile. 4 Click OK. 5 Click OK on similar print jobs. 1 Open the Printer Properties dialog box. Retrieving profile: Select the desired profile from Printing Profiles, and click Retrieve from Printing Profiles, and click Delete. See "Opening the Printer Properties Dialog Box from Your...
iP1500 Quick Start Guide
Page 25
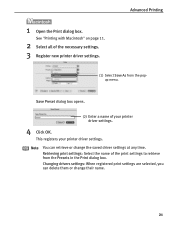
...: Select the name of the necessary settings. 3 Register new printer driver settings. Advanced Printing (1) Select Save As from the Presets in the Print dialog box. See "Printing with Macintosh" on page 11. 2 Select all of the print settings to retrieve from the popup menu. Save Preset dialog box opens. (2) Enter a name of your printer...
...: Select the name of the necessary settings. 3 Register new printer driver settings. Advanced Printing (1) Select Save As from the Presets in the Print dialog box. See "Printing with Macintosh" on page 11. 2 Select all of the print settings to retrieve from the popup menu. Save Preset dialog box opens. (2) Enter a name of your printer...


