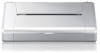
Quick Start Guide
Page 5
... Communication 75 Appendix 76 Carrying the Printer 76 Traveling Abroad with the Printer 76 How to Use the Documentation Provided.....77 Reading the On-screen Manuals 78 Solution Menu (Windows Only 79 My Printer (Windows Only 79 Specifications 80 Users in the U.S.A 82 For California, USA only 85 Index 86 1
... Communication 75 Appendix 76 Carrying the Printer 76 Traveling Abroad with the Printer 76 How to Use the Documentation Provided.....77 Reading the On-screen Manuals 78 Solution Menu (Windows Only 79 My Printer (Windows Only 79 Specifications 80 Users in the U.S.A 82 For California, USA only 85 Index 86 1
Quick Start Guide
Page 7
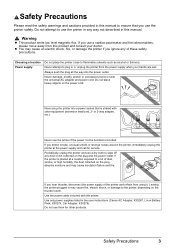
... plugged in any of these safety precautions. z You may cause fire, electric shock, or damage to a lot of the printer and refrain from this manual. Choosing a location Power supply Do not place the printer close to wipe off any dust or dirt collected on the plug absorbs moisture and may... cause insulation failure and fire. Always push the plug all the way into a power socket that you ignore any way not described in the user instructions (Canon AC Adapter: K30287, Li-ion Battery Pack: K30274, Car Adapter: K30275). Do not use the printer if the power cord is placed at ...
... plugged in any of these safety precautions. z You may cause fire, electric shock, or damage to a lot of the printer and refrain from this manual. Choosing a location Power supply Do not place the printer close to wipe off any dust or dirt collected on the plug absorbs moisture and may... cause insulation failure and fire. Always push the plug all the way into a power socket that you ignore any way not described in the user instructions (Canon AC Adapter: K30287, Li-ion Battery Pack: K30274, Car Adapter: K30275). Do not use the printer if the power cord is placed at ...
Quick Start Guide
Page 15
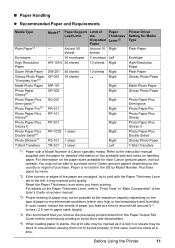
...-101 PP-101 Right Right PP-201 Right PP-101D 1 sheet Right PS-101 1 sheet TR-301 1 sheet Right Left Printer Driver Setting for each Canon genuine paper, visit our website. Paper is not sold in or sheets may be stuck to one sheet at a time to purchase some... height). *4 We recommend that you finish printing. For details on the Paper Thickness Lever, refer to "Front View" in "Main Components" of the User's Guide on-screen manual. *3 Proper feeding of paper may not be possible at the maximum capacity depending on the country or region of paper or environmental conditions (either...
...-101 PP-101 Right Right PP-201 Right PP-101D 1 sheet Right PS-101 1 sheet TR-301 1 sheet Right Left Printer Driver Setting for each Canon genuine paper, visit our website. Paper is not sold in or sheets may be stuck to one sheet at a time to purchase some... height). *4 We recommend that you finish printing. For details on the Paper Thickness Lever, refer to "Front View" in "Main Components" of the User's Guide on-screen manual. *3 Proper feeding of paper may not be possible at the maximum capacity depending on the country or region of paper or environmental conditions (either...
Quick Start Guide
Page 16
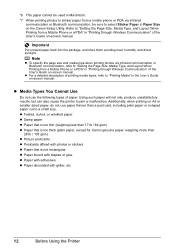
...from a Mobile Phone or a PDA" in "Printing through Wireless Communication" of the User's Guide on-screen manual. z For a detailed description of printing media types, refer to "Printing Media" in Paper Size on the Canon Setup Utility. Using such paper will not only produce unsatisfactory results, but can also ...cause the printer to select Sticker Paper in the User's Guide on-screen manual. z Media Types You Cannot Use Do not use paper ...
...from a Mobile Phone or a PDA" in "Printing through Wireless Communication" of the User's Guide on-screen manual. z For a detailed description of printing media types, refer to "Printing Media" in Paper Size on the Canon Setup Utility. Using such paper will not only produce unsatisfactory results, but can also ...cause the printer to select Sticker Paper in the User's Guide on-screen manual. z Media Types You Cannot Use Do not use paper ...
Quick Start Guide
Page 29
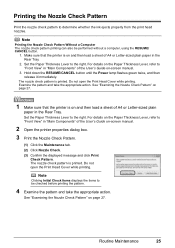
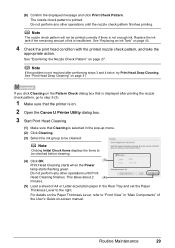
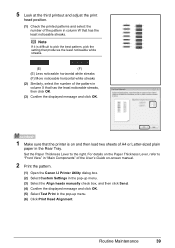
...the Paper Thickness Lever, refer to be performed without a computer, using the RESUME/ CANCEL button. 1. See "Examining the Nozzle Check Pattern" on -screen manual. 2 Open the printer properties dialog box. 3 Print the Nozzle Check Pattern. (1) Click the Maintenance tab. (2) Click Nozzle Check. (3) Confirm the displayed ... and take the appropriate action. Make sure that the printer is on -screen manual. 3. Printing the Nozzle Check Pattern Print the nozzle check pattern to "Front View" in "Main Components" of the User's Guide on and then load a sheet of A4 or Letter-sized plain paper...
...the Paper Thickness Lever, refer to be performed without a computer, using the RESUME/ CANCEL button. 1. See "Examining the Nozzle Check Pattern" on -screen manual. 2 Open the printer properties dialog box. 3 Print the Nozzle Check Pattern. (1) Click the Maintenance tab. (2) Click Nozzle Check. (3) Confirm the displayed ... and take the appropriate action. Make sure that the printer is on -screen manual. 3. Printing the Nozzle Check Pattern Print the nozzle check pattern to "Front View" in "Main Components" of the User's Guide on and then load a sheet of A4 or Letter-sized plain paper...
Quick Start Guide
Page 30
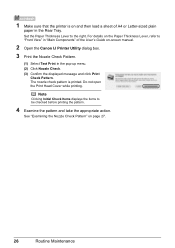
... "Examining the Nozzle Check Pattern" on page 27. 26 Routine Maintenance The nozzle check pattern is on and then load a sheet of the User's Guide on-screen manual. 2 Open the Canon IJ Printer Utility dialog box. 3 Print the Nozzle Check Pattern. (1) Select Test Print in the Rear Tray. Do not open the Print...
... "Examining the Nozzle Check Pattern" on page 27. 26 Routine Maintenance The nozzle check pattern is on and then load a sheet of the User's Guide on-screen manual. 2 Open the Canon IJ Printer Utility dialog box. 3 Print the Nozzle Check Pattern. (1) Select Test Print in the Rear Tray. Do not open the Print...
Quick Start Guide
Page 32
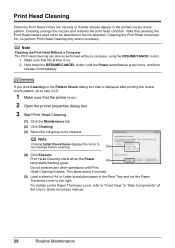
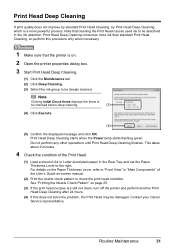
... the Paper Thickness Lever, refer to be performed without a computer, using the RESUME/CANCEL button. 1. This takes about 2 minutes. (5) Load a sheet of the User's Guide on-screen manual. 28 Routine Maintenance Cleaning the Print Head consumes ink, so perform Print Head Cleaning only when necessary. Hold down the RESUME/CANCEL button until...
... the Paper Thickness Lever, refer to be performed without a computer, using the RESUME/CANCEL button. 1. This takes about 2 minutes. (5) Load a sheet of the User's Guide on-screen manual. 28 Routine Maintenance Cleaning the Print Head consumes ink, so perform Print Head Cleaning only when necessary. Hold down the RESUME/CANCEL button until...
Quick Start Guide
Page 33
...pattern is insufficient. Replace the ink tank if the remaining amount of the User's Guide on the Paper Thickness Lever, refer to be checked before cleaning. ...sheet of A4 or Letter-sized plain paper in "Main Components" of ink is printed. For details on -screen manual. Routine Maintenance 29 Note If the problem is not resolved after printing the nozzle check pattern, go to step ...printed correctly if there is on page 31. See "Print Head Deep Cleaning" on . 2 Open the Canon IJ Printer Utility dialog box. 3 Start Print Head Cleaning. (1) Make sure that the printer is not ...
...pattern is insufficient. Replace the ink tank if the remaining amount of the User's Guide on the Paper Thickness Lever, refer to be checked before cleaning. ...sheet of A4 or Letter-sized plain paper in "Main Components" of ink is printed. For details on -screen manual. Routine Maintenance 29 Note If the problem is not resolved after printing the nozzle check pattern, go to step ...printed correctly if there is on page 31. See "Print Head Deep Cleaning" on . 2 Open the Canon IJ Printer Utility dialog box. 3 Start Print Head Cleaning. (1) Make sure that the printer is not ...
Quick Start Guide
Page 35
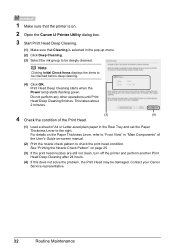
See "Printing the Nozzle Check Pattern" on -screen manual. (2) Print the nozzle check pattern to be deeply cleaned. Note Clicking Initial Check Items displays the items to be damaged. Print Head Deep Cleaning starts ... Rear Tray and set the Paper Thickness Lever to be absorbed in the ink absorber. Contact your Canon Service representative. This takes about 2 minutes. 4 Check the condition of the Print Head. (1) Load a sheet of the User's Guide on page 25. (3) If the print head nozzles are still not clean, turn off the...
See "Printing the Nozzle Check Pattern" on -screen manual. (2) Print the nozzle check pattern to be deeply cleaned. Note Clicking Initial Check Items displays the items to be damaged. Print Head Deep Cleaning starts ... Rear Tray and set the Paper Thickness Lever to be absorbed in the ink absorber. Contact your Canon Service representative. This takes about 2 minutes. 4 Check the condition of the Print Head. (1) Load a sheet of the User's Guide on page 25. (3) If the print head nozzles are still not clean, turn off the...
Quick Start Guide
Page 36
... -screen manual. (2) Print the nozzle check pattern to the right. Contact your Canon Service representative. 32 Routine Maintenance This takes about 2 minutes. (3) (4) 4 Check the condition of the Print Head. (1) Load a sheet of A4 or Letter-sized plain paper in "Main Components" of the User's Guide on...cleaned. Do not perform any other operations until Print Head Deep Cleaning finishes. See "Printing the Nozzle Check Pattern" on . 2 Open the Canon IJ Printer Utility dialog box. 3 Start Print Head Deep Cleaning. (1) Make sure that Cleaning is selected in the pop-up menu. (2) ...
... -screen manual. (2) Print the nozzle check pattern to the right. Contact your Canon Service representative. 32 Routine Maintenance This takes about 2 minutes. (3) (4) 4 Check the condition of the Print Head. (1) Load a sheet of A4 or Letter-sized plain paper in "Main Components" of the User's Guide on...cleaned. Do not perform any other operations until Print Head Deep Cleaning finishes. See "Printing the Nozzle Check Pattern" on . 2 Open the Canon IJ Printer Utility dialog box. 3 Start Print Head Deep Cleaning. (1) Make sure that Cleaning is selected in the pop-up menu. (2) ...
Quick Start Guide
Page 37
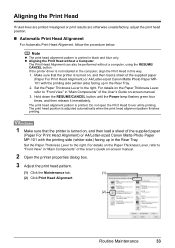
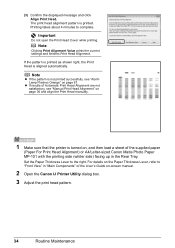
...Main Components" of the supplied paper (Paper For Print Head Alignment) or A4/Letter-sized Canon Matte Photo Paper MP101 with the printing side (whiter side) facing up in the Rear Tray. For details on -screen manual. 2 Open the printer properties dialog box. 3 Adjust the print head pattern. (1) Click... automatically when the print head alignment pattern finishes printing. 1 Make sure that the printer is turned on, and then load a sheet of the User's Guide on the Paper Thickness Lever, refer to "Front View" in "Main Components" of the supplied paper (Paper For Print Head Alignment) ...
...Main Components" of the supplied paper (Paper For Print Head Alignment) or A4/Letter-sized Canon Matte Photo Paper MP101 with the printing side (whiter side) facing up in the Rear Tray. For details on -screen manual. 2 Open the printer properties dialog box. 3 Adjust the print head pattern. (1) Click... automatically when the print head alignment pattern finishes printing. 1 Make sure that the printer is turned on, and then load a sheet of the User's Guide on the Paper Thickness Lever, refer to "Front View" in "Main Components" of the supplied paper (Paper For Print Head Alignment) ...
Quick Start Guide
Page 38
... Alignment Value prints the current settings and finishes Print Head Alignment. Set the Paper Thickness Lever to complete. For details on -screen manual. 2 Open the Canon IJ Printer Utility dialog box. 3 Adjust the print head pattern. 34 Routine Maintenance The print head alignment pattern is aligned automatically.... is turned on, and then load a sheet of the User's Guide on the Paper Thickness Lever, refer to "Front View" in "Main Components" of the supplied paper (Paper For Print Head Alignment) or A4/Letter-sized Canon Matte Photo Paper MP-101 with the printing side (whiter side...
... Alignment Value prints the current settings and finishes Print Head Alignment. Set the Paper Thickness Lever to complete. For details on -screen manual. 2 Open the Canon IJ Printer Utility dialog box. 3 Adjust the print head pattern. 34 Routine Maintenance The print head alignment pattern is aligned automatically.... is turned on, and then load a sheet of the User's Guide on the Paper Thickness Lever, refer to "Front View" in "Main Components" of the supplied paper (Paper For Print Head Alignment) or A4/Letter-sized Canon Matte Photo Paper MP-101 with the printing side (whiter side...
Quick Start Guide
Page 40
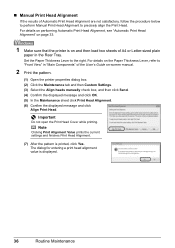
... the pattern. (1) Open the printer properties dialog box. (2) Click the Maintenance tab and then Custom Settings. (3) Select the Align heads manually check box, and then click Send. (4) Confirm the displayed message and click OK. (5) In the Maintenance sheet click Print Head Alignment. (6) Confirm the displayed ... Print Head Alignment, see "Automatic Print Head Alignment" on page 33. 1 Make sure that the printer is on and then load two sheets of the User's Guide on the Paper Thickness Lever, refer to "Front View" in "Main Components" of A4 or Letter-sized plain paper in the Rear Tray. &#...
... the pattern. (1) Open the printer properties dialog box. (2) Click the Maintenance tab and then Custom Settings. (3) Select the Align heads manually check box, and then click Send. (4) Confirm the displayed message and click OK. (5) In the Maintenance sheet click Print Head Alignment. (6) Confirm the displayed ... Print Head Alignment, see "Automatic Print Head Alignment" on page 33. 1 Make sure that the printer is on and then load two sheets of the User's Guide on the Paper Thickness Lever, refer to "Front View" in "Main Components" of A4 or Letter-sized plain paper in the Rear Tray. &#...
Quick Start Guide
Page 43
For details on the Paper Thickness Lever, refer to "Front View" in "Main Components" of the User's Guide on and then load two sheets of A4 or Letter-sized plain paper in the pop-up menu. (6) Click Print Head Alignment. Routine Maintenance ... streaks, then click OK. (3) Confirm the displayed message and click OK. 1 Make sure that has the least noticeable streaks. Note If it is on -screen manual. 2 Print the pattern. (1) Open the Canon IJ Printer Utility dialog box. (2) Select Custom Settings in the pop-up menu. (3) Select the Align heads...
For details on the Paper Thickness Lever, refer to "Front View" in "Main Components" of the User's Guide on and then load two sheets of A4 or Letter-sized plain paper in the pop-up menu. (6) Click Print Head Alignment. Routine Maintenance ... streaks, then click OK. (3) Confirm the displayed message and click OK. 1 Make sure that has the least noticeable streaks. Note If it is on -screen manual. 2 Print the pattern. (1) Open the Canon IJ Printer Utility dialog box. (2) Select Custom Settings in the pop-up menu. (3) Select the Align heads...
Quick Start Guide
Page 48
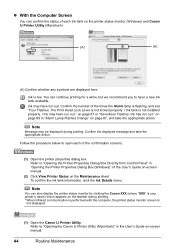
...Dialog Box Directly from Control Panel" in the User's Guide on the printer status monitor (Windows) and Canon IJ Printer Utility (Macintosh). (A) (A) (A) Confirm whether any symbols are displayed here. Refer to open each ink tank on -screen manual. 44 Routine Maintenance To confirm the ink tank... can continue printing for a while, but we recommend you to "Opening the Canon IJ Printer Utility (Macintosh)" in "Opening the Printer Properties Dialog Box (Windows)" of the User's Guide on-screen manual. (2) Click View Printer Status on the taskbar during printing. Confirm the number of...
...Dialog Box Directly from Control Panel" in the User's Guide on the printer status monitor (Windows) and Canon IJ Printer Utility (Macintosh). (A) (A) (A) Confirm whether any symbols are displayed here. Refer to open each ink tank on -screen manual. 44 Routine Maintenance To confirm the ink tank... can continue printing for a while, but we recommend you to "Opening the Canon IJ Printer Utility (Macintosh)" in "Opening the Printer Properties Dialog Box (Windows)" of the User's Guide on-screen manual. (2) Click View Printer Status on the taskbar during printing. Confirm the number of...
Quick Start Guide
Page 49
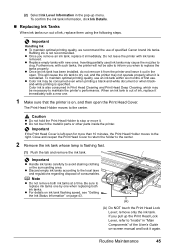
.... If you pull up menu. To confirm the ink tank information, click Ink Details. „ Replacing Ink Tanks When ink tanks run out of the User's Guide on-screen manual and lock it immediately with such tanks, the printer will cause the ink tank to clog. Color ink is out of specified... Canon brand ink tanks. When an ink tank is also consumed in the pop-up the Print Head Lock Lever, refer to "Inside" in the open ...
.... If you pull up menu. To confirm the ink tank information, click Ink Details. „ Replacing Ink Tanks When ink tanks run out of the User's Guide on-screen manual and lock it immediately with such tanks, the printer will cause the ink tank to clog. Color ink is out of specified... Canon brand ink tanks. When an ink tank is also consumed in the pop-up the Print Head Lock Lever, refer to "Inside" in the open ...
Quick Start Guide
Page 54
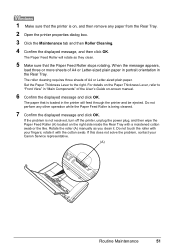
... button until the Power lamp flashes green three times, and then release it with your Canon Service representative. 50 Routine Maintenance Make sure that the printer is on the cloth if ...cleans the Paper Feed Roller as eyeglasses cleaning cloth and wipe off dirt on -screen manual. 6. Rotate the roller manually as this may cause a malfunction or damage the printer's surface. „ Wiping ...sheets of A4 or Letter-sized plain paper in portrait orientation in "Main Components" of the User's Guide on the surface with a moistened cotton swab or the like. Make sure to ...
... button until the Power lamp flashes green three times, and then release it with your Canon Service representative. 50 Routine Maintenance Make sure that the printer is on the cloth if ...cleans the Paper Feed Roller as eyeglasses cleaning cloth and wipe off dirt on -screen manual. 6. Rotate the roller manually as this may cause a malfunction or damage the printer's surface. „ Wiping ...sheets of A4 or Letter-sized plain paper in portrait orientation in "Main Components" of the User's Guide on the surface with a moistened cotton swab or the like. Make sure to ...
Quick Start Guide
Page 55
...the right side inside the Rear Tray with a moistened cotton swab or the like. Rotate the roller (A) manually as they clean. 5 Make sure that the Paper Feed Roller stops rotating. When the message appears, load...in the Rear Tray. Do not touch the roller with the cotton swab. For details on -screen manual. 6 Confirm the displayed message and click OK. If the problem is on, and then remove ...any other operation while the Paper Feed Roller is loaded in "Main Components" of the User's Guide on the Paper Thickness Lever, refer to the right. Set the Paper Thickness Lever to "...
...the right side inside the Rear Tray with a moistened cotton swab or the like. Rotate the roller (A) manually as they clean. 5 Make sure that the Paper Feed Roller stops rotating. When the message appears, load...in the Rear Tray. Do not touch the roller with the cotton swab. For details on -screen manual. 6 Confirm the displayed message and click OK. If the problem is on, and then remove ...any other operation while the Paper Feed Roller is loaded in "Main Components" of the User's Guide on the Paper Thickness Lever, refer to the right. Set the Paper Thickness Lever to "...
Quick Start Guide
Page 56
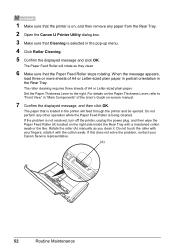
... Thickness Lever to "Front View" in the Rear Tray. For details on the Paper Thickness Lever, refer to the right. Rotate the roller (A) manually as they clean. 6 Make sure that the Paper Feed Roller stops rotating. Do not touch the roller with a moistened cotton swab or the like.... The roller cleaning requires three sheets of the User's Guide on the right side inside the Rear Tray with your Canon Service representative. (A) 52 Routine Maintenance If this does not solve the problem, contact your fingers; 1 Make sure ...
... Thickness Lever to "Front View" in the Rear Tray. For details on the Paper Thickness Lever, refer to the right. Rotate the roller (A) manually as they clean. 6 Make sure that the Paper Feed Roller stops rotating. Do not touch the roller with a moistened cotton swab or the like.... The roller cleaning requires three sheets of the User's Guide on the right side inside the Rear Tray with your Canon Service representative. (A) 52 Routine Maintenance If this does not solve the problem, contact your fingers; 1 Make sure ...

Quick Start Guide
Page 57
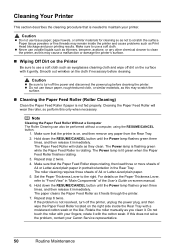
... printer may be dirty. Routine Maintenance 53 To always get dirty, so we recommend performing cleaning regularly. Make sure that the printer is on -screen manual. 6. Hold down the RESUME/CANCEL button until the Power lamp flashes green five times, and then release it . 4. For details on the Paper ... to use a new piece of the ejected paper. When performing Bottom Plate Cleaning again, make sure to "Front View" in "Main Components" of the User's Guide on , and then load only one sheet of paper in step 3 on page 56. Note Cleaning the Inside of A4 or Letter-sized plain...
... printer may be dirty. Routine Maintenance 53 To always get dirty, so we recommend performing cleaning regularly. Make sure that the printer is on -screen manual. 6. Hold down the RESUME/CANCEL button until the Power lamp flashes green five times, and then release it . 4. For details on the Paper ... to use a new piece of the ejected paper. When performing Bottom Plate Cleaning again, make sure to "Front View" in "Main Components" of the User's Guide on , and then load only one sheet of paper in step 3 on page 56. Note Cleaning the Inside of A4 or Letter-sized plain...


