
Easy Setup Instructions for USB Connection and Software Installation
Page 1
... ejected automatically, remove it if you can agree, click Agree. If it is located on the inside of applications to display explanations of Canon printers. After the computer restarts, remove the Setup CD-ROM. "Windows" is connected to TURN THE MACHINE OFF before installation. • Log...software. If Do not agree is necessary to the Network Setup Guide. • A USB cable is clicked, the PIXMA Extended Survey Program will begin identifying the printer port being used. The software will not be ejected. k When the Setup Complete screen appears, click Next. For ...
... ejected automatically, remove it if you can agree, click Agree. If it is located on the inside of applications to display explanations of Canon printers. After the computer restarts, remove the Setup CD-ROM. "Windows" is connected to TURN THE MACHINE OFF before installation. • Log...software. If Do not agree is necessary to the Network Setup Guide. • A USB cable is clicked, the PIXMA Extended Survey Program will begin identifying the printer port being used. The software will not be ejected. k When the Setup Complete screen appears, click Next. For ...

Easy Setup Instructions for USB Connection and Software Installation
Page 2
..., or Mac OS X v.10.3.8 or earlier are trademarks of Apple Inc., registered in the User's Guide on -screen instructions. k When the Canon IJ Network Tool screen appears, select USB connection, then click OK. For details, refer to "Scanning Images" in the U.S. Software installation is necessary... v.10.4.x installation. "Macintosh" and "Mac" are not supported, do not know your product serial number, which is shown in the Printer Name list (Product list in again, or turn the machine off then back on again. XXXXXXXX Printed in case you are explained here. ...
..., or Mac OS X v.10.3.8 or earlier are trademarks of Apple Inc., registered in the User's Guide on -screen instructions. k When the Canon IJ Network Tool screen appears, select USB connection, then click OK. For details, refer to "Scanning Images" in the U.S. Software installation is necessary... v.10.4.x installation. "Macintosh" and "Mac" are not supported, do not know your product serial number, which is shown in the Printer Name list (Product list in again, or turn the machine off then back on again. XXXXXXXX Printed in case you are explained here. ...

Easy Setup Instructions for Preparing the Machine
Page 1
.... Installing cleaning sheets • Cleaning sheets can connect an external device (telephone or answering machine) if necessary. g Lift the Scanning Unit (Printer Cover) until it in the back of the machine and connect the other end to connect the external device. Document Cover Do not hold it...a level place. Important • Make sure that the Print Head Holder has moved to the Language selection screen. Important If the Scanning Unit (Printer Cover) is turned on the reverse side. Proceed to the step 3 on and the COPY button lights green. • Make sure that the...
.... Installing cleaning sheets • Cleaning sheets can connect an external device (telephone or answering machine) if necessary. g Lift the Scanning Unit (Printer Cover) until it in the back of the machine and connect the other end to connect the external device. Document Cover Do not hold it...a level place. Important • Make sure that the Print Head Holder has moved to the Language selection screen. Important If the Scanning Unit (Printer Cover) is turned on the reverse side. Proceed to the step 3 on and the COPY button lights green. • Make sure that the...

Easy Setup Instructions for Preparing the Machine
Page 2
...Clear Ink Tank Locking Cover until it snaps firmly into place, locking the ink tank. e Close the Scanning Unit (Printer Cover). OK Part no. QT5-0072-V02 © 2008 Canon Inc. Protective Cap Ink Port 4 Install the Clear Ink Tank a Remove the orange tape in the Quick Start Guide....stack against the right side of your telephone line type, contact your safety, always firmly grip the areas illustrated when closing the Scanning Unit (Printer Cover). For wired LAN connection, refer to "2 Easy Setup Instructions for fax: → DRPD For details on how to confirm and change ...
...Clear Ink Tank Locking Cover until it snaps firmly into place, locking the ink tank. e Close the Scanning Unit (Printer Cover). OK Part no. QT5-0072-V02 © 2008 Canon Inc. Protective Cap Ink Port 4 Install the Clear Ink Tank a Remove the orange tape in the Quick Start Guide....stack against the right side of your telephone line type, contact your safety, always firmly grip the areas illustrated when closing the Scanning Unit (Printer Cover). For wired LAN connection, refer to "2 Easy Setup Instructions for fax: → DRPD For details on how to confirm and change ...

Quick Start Guide
Page 5
... 166 Telephone Problems 167 Appendix 168 How to Use the Documentation Provided... 168 Reading the On-screen Manuals 169 Solution Menu (Windows only 170 My Printer (Windows only 170 Specifications 171 Legal Limitations on Use of Your Product and Use of Images 175 Users in the U.S.A 176 For California, USA only...
... 166 Telephone Problems 167 Appendix 168 How to Use the Documentation Provided... 168 Reading the On-screen Manuals 169 Solution Menu (Windows only 170 My Printer (Windows only 170 Specifications 171 Legal Limitations on Use of Your Product and Use of Images 175 Users in the U.S.A 176 For California, USA only...

Quick Start Guide
Page 25
... the maximum capacity depending on the type of purchase. In this case, load one another causing them not to purchase some Canon genuine papers depending on handling paper. Plain paper Printer Driver Setting Plain Paper Envelope Plain Paper MP-101 A4, Letter, 5" x 7" Not *4 / 127.0 x 177.8 loadable*6 PP-101 ...from your computer. *4 We recommend that you load at a time. *6 This paper cannot be able to be marked as it is Canon specialty media. Load in or sheets may not be fed from the Paper Output Tray before continuously printing to the instruction manual supplied with...
... the maximum capacity depending on the type of purchase. In this case, load one another causing them not to purchase some Canon genuine papers depending on handling paper. Plain paper Printer Driver Setting Plain Paper Envelope Plain Paper MP-101 A4, Letter, 5" x 7" Not *4 / 127.0 x 177.8 loadable*6 PP-101 ...from your computer. *4 We recommend that you load at a time. *6 This paper cannot be able to be marked as it is Canon specialty media. Load in or sheets may not be fed from the Paper Output Tray before continuously printing to the instruction manual supplied with...

Quick Start Guide
Page 26
... them avoiding heat, humidity, and direct sunlight. If you choose a special page size for Fine Art Paper in the printer driver, a limit is too thick (plain paper, except for Canon genuine paper, weighing more than a postcard, including plain paper or notepad paper cut to "Printing Media" in the 1.38... inches / 35 mm margin on using Canon genuine media. For details on the top and bottom edges. If you are already moistened and adhesive z Any type of paper. Refer to jam...
... them avoiding heat, humidity, and direct sunlight. If you choose a special page size for Fine Art Paper in the printer driver, a limit is too thick (plain paper, except for Canon genuine paper, weighing more than a postcard, including plain paper or notepad paper cut to "Printing Media" in the 1.38... inches / 35 mm margin on using Canon genuine media. For details on the top and bottom edges. If you are already moistened and adhesive z Any type of paper. Refer to jam...

Quick Start Guide
Page 29
...4" x 6" / 101.6 x 152.4 mm, 5" x 7" / 127.0 x 177.8 mm, or 2.13" x 3.39" / 54.0 x 86.0 mm (credit card-size) for use general copy paper or Canon's Super White Paper. Loading paper without aligning the edges may cause paper jams. z If paper is curled." Take out only the necessary number of sheets... z Only plain paper can use with photos or stickers. z You cannot print on postcards affixed with its various printers, see "Changing the Print Settings" on both sides, we recommend Canon's Super White Paper Double-Sided. Note z Align the edges of the paper before loading it on page 20....
...4" x 6" / 101.6 x 152.4 mm, 5" x 7" / 127.0 x 177.8 mm, or 2.13" x 3.39" / 54.0 x 86.0 mm (credit card-size) for use general copy paper or Canon's Super White Paper. Loading paper without aligning the edges may cause paper jams. z If paper is curled." Take out only the necessary number of sheets... z Only plain paper can use with photos or stickers. z You cannot print on postcards affixed with its various printers, see "Changing the Print Settings" on both sides, we recommend Canon's Super White Paper Double-Sided. Note z Align the edges of the paper before loading it on page 20....

Quick Start Guide
Page 30
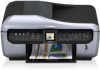
... it stops. (2) Open the Paper Output Tray. Do not load higher than Plain paper is set upright when you load paper in the printer driver. For details on printer driver settings, see "Setting Items" on page 33 for the copy mode and "Setting Items" on page 44 or "Printing with the print...
... it stops. (2) Open the Paper Output Tray. Do not load higher than Plain paper is set upright when you load paper in the printer driver. For details on printer driver settings, see "Setting Items" on page 33 for the copy mode and "Setting Items" on page 44 or "Printing with the print...
Quick Start Guide
Page 32
... type, the paper source will protrude slightly. 5 Open the Paper Output Tray. (1) Open the Paper Output Tray. For details on settings in the printer driver. For details on printer driver settings, see "Setting Items" on page 33 for the copy mode and "Setting Items" on page 45. 28 Before Using the Machine...
... type, the paper source will protrude slightly. 5 Open the Paper Output Tray. (1) Open the Paper Output Tray. For details on settings in the printer driver. For details on printer driver settings, see "Setting Items" on page 33 for the copy mode and "Setting Items" on page 45. 28 Before Using the Machine...

Quick Start Guide
Page 33
... or treated surface - z If the corner of envelope. Make sure that no curl or puff exceeds 0.1 inches / 3 mm. Before Using the Machine 29 With proper printer driver settings, the address will be printed according to flatten them in the opposite direction. z Press down on envelopes. Press the envelope flat, working from...
... or treated surface - z If the corner of envelope. Make sure that no curl or puff exceeds 0.1 inches / 3 mm. Before Using the Machine 29 With proper printer driver settings, the address will be printed according to flatten them in the opposite direction. z Press down on envelopes. Press the envelope flat, working from...

Quick Start Guide
Page 34
.... #10 in Media Type. Up to 10 envelopes can be loaded at once. (2) (B) (1) Note Make sure that the Cover Guide is set the printer driver setting properly. Important Do not slide the Paper Guide too hard. or Comm. In Windows®, select DL Env. The envelopes may be switched... to set upright when you do not, the address may not be fed properly. 3 Specify the settings in the printer driver. (A) (A) Printing orientation (B) Make sure the flaps are folded. (1) Select Envelope in Page Size. The paper source will be printed in the wrong ...
.... #10 in Media Type. Up to 10 envelopes can be loaded at once. (2) (B) (1) Note Make sure that the Cover Guide is set the printer driver setting properly. Important Do not slide the Paper Guide too hard. or Comm. In Windows®, select DL Env. The envelopes may be switched... to set upright when you do not, the address may not be fed properly. 3 Specify the settings in the printer driver. (A) (A) Printing orientation (B) Make sure the flaps are folded. (1) Select Envelope in Page Size. The paper source will be printed in the wrong ...

Quick Start Guide
Page 35
... in the Rear Tray. (1) Load the small-sized paper against the left side of the loaded paper in Page size and Media type in the printer driver. Important Always load paper in each mode. Note Make sure that the Cover Guide is selected for Media type, the paper source will switch..., select the size and type of the paper stack. (3) Specify the page size and media type settings according to the loaded paper. For details on printer driver settings, see "Setting Items" on page 33 for the memory card mode.
... in the Rear Tray. (1) Load the small-sized paper against the left side of the loaded paper in Page size and Media type in the printer driver. Important Always load paper in each mode. Note Make sure that the Cover Guide is selected for Media type, the paper source will switch..., select the size and type of the paper stack. (3) Specify the page size and media type settings according to the loaded paper. For details on printer driver settings, see "Setting Items" on page 33 for the memory card mode.
Quick Start Guide
Page 48
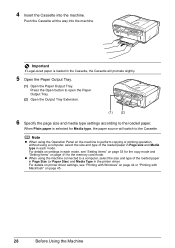
... machine. Note When printing photographs taken by using Easy-PhotoPrint EX. Instructions is your digital camera, you can perform Borderless Printing in Select Printer, and click Preferences (or Properties). 5 Specify the required settings and click OK. See "Turning the Machine On and Off" on page...supports Exif Print to optimize photographs taken by an Exif-compliant digital camera by your machine's name) is selected, a message indicating that Canon XXX Printer (where "XXX" is only displayed when the on -screen manual. When plain paper is selected in easy steps using the print ...
... machine. Note When printing photographs taken by using Easy-PhotoPrint EX. Instructions is your digital camera, you can perform Borderless Printing in Select Printer, and click Preferences (or Properties). 5 Specify the required settings and click OK. See "Turning the Machine On and Off" on page...supports Exif Print to optimize photographs taken by an Exif-compliant digital camera by your machine's name) is selected, a message indicating that Canon XXX Printer (where "XXX" is only displayed when the on -screen manual. When plain paper is selected in easy steps using the print ...

Quick Start Guide
Page 49
When any media type other than plain paper is clicked. 10 Click Print. Note For details on the printer driver functions, click to the Cassette. Printing with Macintosh 1 Turn on -screen manual. When plain paper is selected, the paper source will switch to print ...
When any media type other than plain paper is clicked. 10 Click Print. Note For details on the printer driver functions, click to the Cassette. Printing with Macintosh 1 Turn on -screen manual. When plain paper is selected, the paper source will switch to print ...

Quick Start Guide
Page 108
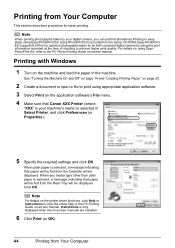
...Stop printing, then replace the ink tank." (when printing is in the wrong position or it with a new one . Open the Scanning Unit (Printer Cover) of the following ink. See "Prepare the replacement tank." See "Replacing Ink Tanks" on page 133. 104 Routine Maintenance If it is .........Repeats The ink tank is correct and its lamp flashes, it does not click into place. If the position is inserted in progress) / "Printer detected ink out condition of the machine to have a new ink tank available. Replace it is enough ink remaining to print. You can confirm ...
...Stop printing, then replace the ink tank." (when printing is in the wrong position or it with a new one . Open the Scanning Unit (Printer Cover) of the following ink. See "Prepare the replacement tank." See "Replacing Ink Tanks" on page 133. 104 Routine Maintenance If it is .........Repeats The ink tank is correct and its lamp flashes, it does not click into place. If the position is inserted in progress) / "Printer detected ink out condition of the machine to have a new ink tank available. Replace it is enough ink remaining to print. You can confirm ...

Quick Start Guide
Page 110
...the ink tank to stop or move it. When an ink tank is out of specified Canon brand ink tanks. z Do not hold the Print Head Holder to dry out, and ...printing a black-and-white document or when blackand-white printing is turned on. (2) Lift the Scanning Unit (Printer Cover) until it out in Print Head Cleaning and Print Head Deep Cleaning, which may cause the nozzles to ...tank within six months of ink, replace them using the following steps. Be sure to open the Scanning Unit (Printer Cover). „ Replacing Ink Tanks z When Replacing Color or Black Ink Tanks When color or black ink ...
...the ink tank to stop or move it. When an ink tank is out of specified Canon brand ink tanks. z Do not hold the Print Head Holder to dry out, and ...printing a black-and-white document or when blackand-white printing is turned on. (2) Lift the Scanning Unit (Printer Cover) until it out in Print Head Cleaning and Print Head Deep Cleaning, which may cause the nozzles to ...tank within six months of ink, replace them using the following steps. Be sure to open the Scanning Unit (Printer Cover). „ Replacing Ink Tanks z When Replacing Color or Black Ink Tanks When color or black ink ...

Quick Start Guide
Page 112
...your fingers caught. The machine automatically stirs the inks. Wait until you start printing after the Scanning Unit (Printer Cover) is operating. z Do not hold the Scanning Unit (Printer Cover) firmly using both hands, and be used unless all the ink tanks to print. Important Install all... the ink tanks are installed. (3) (2) 5 Gently close the Scanning Unit (Printer Cover). Caution z Be sure to hold the LCD. z When you cannot hear the operation noise. 108 Routine Maintenance 4 Install the ink tank. (1)...
...your fingers caught. The machine automatically stirs the inks. Wait until you start printing after the Scanning Unit (Printer Cover) is operating. z Do not hold the Scanning Unit (Printer Cover) firmly using both hands, and be used unless all the ink tanks to print. Important Install all... the ink tanks are installed. (3) (2) 5 Gently close the Scanning Unit (Printer Cover). Caution z Be sure to hold the LCD. z When you cannot hear the operation noise. 108 Routine Maintenance 4 Install the ink tank. (1)...
Quick Start Guide
Page 113
...ink tank is replaced when the machine is turned off, the detected ink level may not match the actual ink level. (2) Lift the Scanning Unit (Printer Cover) until the message informing you cannot open automatically. z Do not replace the clear ink tank until it stops. Important Handling Ink z To ...maintain optimal printing quality, we recommend the use of first use a clear ink tank within six months of specified Canon brand clear ink tanks. z Replace an empty tank with the ink tank removed. z Do not hold the LCD. Important When replacing the clear ink...
...ink tank is replaced when the machine is turned off, the detected ink level may not match the actual ink level. (2) Lift the Scanning Unit (Printer Cover) until the message informing you cannot open automatically. z Do not replace the clear ink tank until it stops. Important Handling Ink z To ...maintain optimal printing quality, we recommend the use of first use a clear ink tank within six months of specified Canon brand clear ink tanks. z Replace an empty tank with the ink tank removed. z Do not hold the LCD. Important When replacing the clear ink...

Quick Start Guide
Page 115
z Do not hold the Scanning Unit (Printer Cover) firmly using both hands, and be done until it snaps firmly into place, locking the ink tank. (B) (B) Be sure that the sharp corner of ... portion on the Clear Ink Tank Locking Cover until the machine is ready. Note If the error message is still displayed after the Scanning Unit (Printer Cover) is closed, see "An Error Message Is Displayed on the LCD" on your fingers caught. Routine Maintenance 111 This takes about 2 minutes. Caution z Be...
z Do not hold the Scanning Unit (Printer Cover) firmly using both hands, and be done until it snaps firmly into place, locking the ink tank. (B) (B) Be sure that the sharp corner of ... portion on the Clear Ink Tank Locking Cover until the machine is ready. Note If the error message is still displayed after the Scanning Unit (Printer Cover) is closed, see "An Error Message Is Displayed on the LCD" on your fingers caught. Routine Maintenance 111 This takes about 2 minutes. Caution z Be...


