Fax Guide
Page 3
...'s Memory 86 Saving a Document in Machine's Memory to USB Flash Drive 88 Summary of Reports and Lists 91 Sending Faxes from a Computer 96 Sending a FAX (Fax Driver 97 Creating an Address Book (Fax Driver 101 Setup when Opening the Address Book for the First Time (Windows XP 105 Edit or Remove a Recipient from an Address...
...'s Memory 86 Saving a Document in Machine's Memory to USB Flash Drive 88 Summary of Reports and Lists 91 Sending Faxes from a Computer 96 Sending a FAX (Fax Driver 97 Creating an Address Book (Fax Driver 101 Setup when Opening the Address Book for the First Time (Windows XP 105 Edit or Remove a Recipient from an Address...
Fax Guide
Page 5
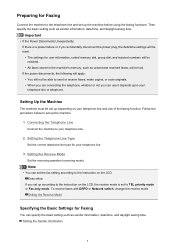
...your telephone line. 3. Preparing for Faxing Connect the machine to the telephone line and set up the machine. 1. To receive faxes with DRPD or Network switch, change the receive mode. Setting the Receive Mode Set the receiving operation (receiving mode). Easy setup If you can use it depends ...upon your telephone line and use of the faxing function. Then specify the basic setting such as sender information, date/time, and daylight saving time....
...your telephone line. 3. Preparing for Faxing Connect the machine to the telephone line and set up the machine. 1. To receive faxes with DRPD or Network switch, change the receive mode. Setting the Receive Mode Set the receiving operation (receiving mode). Easy setup If you can use it depends ...upon your telephone line and use of the faxing function. Then specify the basic setting such as sender information, date/time, and daylight saving time....
Fax Guide
Page 9
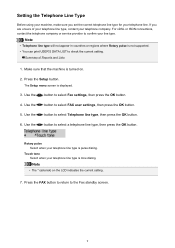
...the current setting. Rotary pulse Select when your telephone line. Press the FAX button to return to select a telephone line type, then press the OK button. Press the Setup button. Use the button to the Fax standby screen. 9 For xDSL or ISDN connections, contact the telephone company... or service provider to confirm your telephone company. The Setup menu screen is turned on the LCD indicates the current ...
...the current setting. Rotary pulse Select when your telephone line. Press the FAX button to return to select a telephone line type, then press the OK button. Press the Setup button. Use the button to the Fax standby screen. 9 For xDSL or ISDN connections, contact the telephone company... or service provider to confirm your telephone company. The Setup menu screen is turned on the LCD indicates the current ...
Fax Guide
Page 15
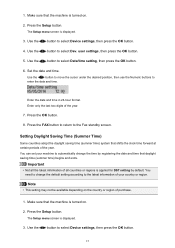
... screen. Enter the date and time in 24-hour format. Press the FAX button to return to select Device settings, then press the OK button. 4. Use the button to select Dev. Press the Setup button. Set the date and time. You need to change the default setting according to... the OK button. 6. Make sure that daylight saving time (summer time) begins and ends. user settings, then press the OK button. 5. 1. The Setup menu screen is displayed. 3. Press the OK button. 8. Important • Not all the latest information of all countries or regions is turned on the country...
... screen. Enter the date and time in 24-hour format. Press the FAX button to return to select Device settings, then press the OK button. 4. Use the button to select Dev. Press the Setup button. Set the date and time. You need to change the default setting according to... the OK button. 6. Make sure that daylight saving time (summer time) begins and ends. user settings, then press the OK button. 5. 1. The Setup menu screen is displayed. 3. Press the OK button. 8. Important • Not all the latest information of all countries or regions is turned on the country...
Fax Guide
Page 17
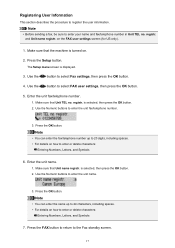
...For details on how to select FAX user settings, then press the OK button. 5. Note • Before sending a fax, be sure to enter or delete characters: Entering Numbers, Letters, and Symbols 7. Enter the unit name. 1. Press the OK button. Press the Setup button. Use the button to... enter or delete characters: Entering Numbers, Letters, and Symbols 6. Enter the unit fax/telephone number. 1. is displayed. 3. is turned on the FAX user settings screen (for US only). 1. on . 2. Press the ...
...For details on how to select FAX user settings, then press the OK button. 5. Note • Before sending a fax, be sure to enter or delete characters: Entering Numbers, Letters, and Symbols 7. Enter the unit name. 1. Press the OK button. Press the Setup button. Use the button to... enter or delete characters: Entering Numbers, Letters, and Symbols 6. Enter the unit fax/telephone number. 1. is displayed. 3. is turned on the FAX user settings screen (for US only). 1. on . 2. Press the ...
Fax Guide
Page 33
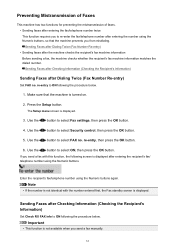
... number after entering the number using the Numeric buttons, so that the machine is turned on. 2. The Setup menu screen is not available when you send a fax manually. 33 Use the button to select ON, then press the OK button. Use the button to select Security...sure that the machine prevents you send a fax with the number entered first, the Fax standby screen is displayed after Checking Information (Checking the Recipient's Information) Set Check RX FAX info to select FAX no . Press the Setup button. Enter the recipient's fax/telephone number using the Numeric buttons. If you...
... number after entering the number using the Numeric buttons, so that the machine is turned on. 2. The Setup menu screen is not available when you send a fax manually. 33 Use the button to select ON, then press the OK button. Use the button to select Security...sure that the machine prevents you send a fax with the number entered first, the Fax standby screen is displayed after Checking Information (Checking the Recipient's Information) Set Check RX FAX info to select FAX no . Press the Setup button. Enter the recipient's fax/telephone number using the Numeric buttons. If you...
Fax Guide
Page 34
Use the button to select Check RX FAX info, then press the OK button. 6. Press the Setup button. Use the button to select Fax settings, then press the OK button. 4. Important • Transmission will be canceled if the machine fails to select ON, then press the OK ...button. Use the button to receive the recipient's fax information or if the received information does not match the fax/telephone number. 34 The Setup menu screen is turned on Telephone 1. Use the button to select Security control, then press the OK...
Use the button to select Check RX FAX info, then press the OK button. 6. Press the Setup button. Use the button to select Fax settings, then press the OK button. 4. Important • Transmission will be canceled if the machine fails to select ON, then press the OK ...button. Use the button to receive the recipient's fax information or if the received information does not match the fax/telephone number. 34 The Setup menu screen is turned on Telephone 1. Use the button to select Security control, then press the OK...
Fax Guide
Page 39
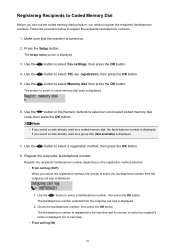
...an unoccupied coded memory dial code, then press the OK button. Use the button to select TEL no. Check the fax/telephone number, then press the OK button. The Setup menu screen is displayed. Use the button to select a registration method, then press the OK button. 8. Press ...the Setup button. If you select a code already used as a coded memory dial, the fax/telephone number is displayed. 3. The fax/telephone number is registered to the machine and the screen to enter the recipient's name is...
...an unoccupied coded memory dial code, then press the OK button. Use the button to select TEL no. Check the fax/telephone number, then press the OK button. The Setup menu screen is displayed. Use the button to select a registration method, then press the OK button. 8. Press ...the Setup button. If you select a code already used as a coded memory dial, the fax/telephone number is displayed. 3. The fax/telephone number is registered to the machine and the screen to enter the recipient's name is...
Fax Guide
Page 42
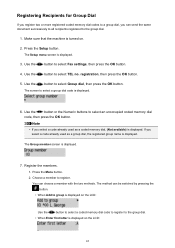
Use the button to select Fax settings, then press the OK button. 4. Register the members. 1. Press the Menu button. 2. You can choose a member with the two methods. The Setup menu screen is displayed. 7. Use the button to select Group dial, then press the OK button. Use the button... can send the same document successively to all recipients registered to select TEL no. Use the button to the group dial. 1. Press the Setup button. Note • If you select a code already used as a coded memory dial, (Not available) is displayed. 6. Make sure that the...
Use the button to select Fax settings, then press the OK button. 4. Register the members. 1. Press the Menu button. 2. You can choose a member with the two methods. The Setup menu screen is displayed. 7. Use the button to select Group dial, then press the OK button. Use the button... can send the same document successively to all recipients registered to select TEL no. Use the button to the group dial. 1. Press the Setup button. Note • If you select a code already used as a coded memory dial, (Not available) is displayed. 6. Make sure that the...
Fax Guide
Page 44
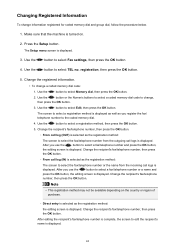
... OK button. 2. Change the registered information. • To change , then press the OK button. 3. After editing the recipient's fax/telephone number is complete, the screen to the coded memory dial. 4. Press the Setup button. After you use the button to select a registration method, then press the OK button. 5. Use the button to...
... OK button. 2. Change the registered information. • To change , then press the OK button. 3. After editing the recipient's fax/telephone number is complete, the screen to the coded memory dial. 4. Press the Setup button. After you use the button to select a registration method, then press the OK button. 5. Use the button to...
Fax Guide
Page 46
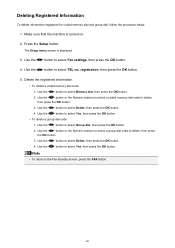
... OK button. 2. Use the button to select TEL no. Use the button to the Fax standby screen, press the FAX button. 46 Note • To return to select Yes, then press the OK button. Press the Setup button. registration, then press the OK button. 5. Use the button or the Numeric buttons... to select a coded memory dial code to select Fax settings, then press the OK button. 4. Use the button to delete, then press...
... OK button. 2. Use the button to select TEL no. Use the button to the Fax standby screen, press the FAX button. 46 Note • To return to select Yes, then press the OK button. Press the Setup button. registration, then press the OK button. 5. Use the button or the Numeric buttons... to select a coded memory dial code to select Fax settings, then press the OK button. 4. Use the button to delete, then press...
Fax Guide
Page 72
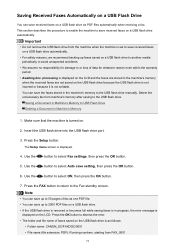
...saving to the USB flash drive. Saving a Document in Machine's Memory to the Fax standby screen. Insert the USB flash drive into the USB flash drive port. 3. The Setup menu screen is not writable. Press the FAX button to return to USB Flash Drive Deleting a Document in Machine's Memory 1. ...is not inserted or because it is displayed. 4. You can save received faxes on a USB flash drive automatically. Make sure that the machine is displayed on the LCD. Press the Setup button. Use the button to select Fax settings, then press the OK button. 5. Note • You can save...
...saving to the USB flash drive. Saving a Document in Machine's Memory to the Fax standby screen. Insert the USB flash drive into the USB flash drive port. 3. The Setup menu screen is not writable. Press the FAX button to return to USB Flash Drive Deleting a Document in Machine's Memory 1. ...is not inserted or because it is displayed. 4. You can save received faxes on a USB flash drive automatically. Make sure that the machine is displayed on the LCD. Press the Setup button. Use the button to select Fax settings, then press the OK button. 5. Note • You can save...

Fax Guide
Page 75
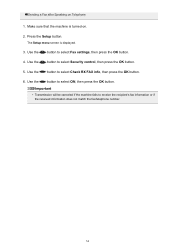
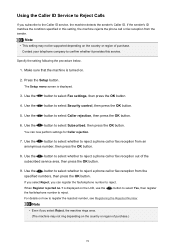
Press the Setup button. Use the button to register the rejected number, see Registering the Rejected Number. Rejects faxes with no caller identification are also rejected when the setting other than No sender info. For details on how to select ON, ...current setting. • When the machine rejects reception, Reception rejected is turned on the LCD. • Faxes with no sender information or those from the senders registered in the machine as rejected numbers. The Setup menu screen is selected. is displayed. 3. No sender info. Use the button to select the...
Press the Setup button. Use the button to register the rejected number, see Registering the Rejected Number. Rejects faxes with no caller identification are also rejected when the setting other than No sender info. For details on how to select ON, ...current setting. • When the machine rejects reception, Reception rejected is turned on the LCD. • Faxes with no sender information or those from the senders registered in the machine as rejected numbers. The Setup menu screen is selected. is displayed. 3. No sender info. Use the button to select the...
Fax Guide
Page 78
... whether it provides this setting, the machine rejects the phone call or fax reception from the specified numbers, then press the OK button. Contact your telephone company to reject. Press the Setup button. The Setup menu screen is displayed on the country or region of purchase. Use ...the button to select Fax settings, then press the OK button. 4. Use the button to select Subscribed, then...
... whether it provides this setting, the machine rejects the phone call or fax reception from the specified numbers, then press the OK button. Contact your telephone company to reject. Press the Setup button. The Setup menu screen is displayed on the country or region of purchase. Use ...the button to select Fax settings, then press the OK button. 4. Use the button to select Subscribed, then...

Fax Guide
Page 105
Click All files and folders. 3. The existing Windows Address Book opens. 6. Setup when Opening the Address Book for the First Time (Windows XP) In Windows XP, when you open the address book for faxing., then click OK. Note • You can import the entries from the list, then click OK...8. In the file name box, enter ".wab". 4. To Create a New Windows Address Book (WAB File) Exclusively for Faxing: Select Create a new Windows Address Book file for the first time, the Setup Windows Address Book dialog box will be selected if there is no Windows Address Book file created. To Use...
Click All files and folders. 3. The existing Windows Address Book opens. 6. Setup when Opening the Address Book for the First Time (Windows XP) In Windows XP, when you open the address book for faxing., then click OK. Note • You can import the entries from the list, then click OK...8. In the file name box, enter ".wab". 4. To Create a New Windows Address Book (WAB File) Exclusively for Faxing: Select Create a new Windows Address Book file for the first time, the Setup Windows Address Book dialog box will be selected if there is no Windows Address Book file created. To Use...

Printing Guide
Page 86
...If you are using Windows XP, select the start menu -> Control Panel -> Printers and Other Hardware -> Printers and Faxes. 2. Important • Opening the printer driver setup window through Printer properties (Windows 8, Windows 7) or Properties (Windows Vista, Windows XP) displays such tabs regarding Windows ... Control Panel -> Hardware and Sound -> Printers. • If you use or from the printer icon. Open the Printer Driver Setup Window through Printing preferences or application software. Right-click your model name icon, and then select Printing preferences from the Desktop charms,...
...If you are using Windows XP, select the start menu -> Control Panel -> Printers and Other Hardware -> Printers and Faxes. 2. Important • Opening the printer driver setup window through Printer properties (Windows 8, Windows 7) or Properties (Windows Vista, Windows XP) displays such tabs regarding Windows ... Control Panel -> Hardware and Sound -> Printers. • If you use or from the printer icon. Open the Printer Driver Setup Window through Printing preferences or application software. Right-click your model name icon, and then select Printing preferences from the Desktop charms,...
Printing Guide
Page 148
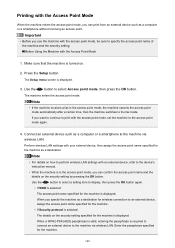
...external device, then assign the access point name specified for the machine is displayed. Enter the passphrase specified for the machine is displayed. The Setup menu screen is turned on. 2. When a WPA2-PSK (AES) passphrase is valid, entering the passphrase is required to connect an external device... to specify the access point name of the machine and the security setting. Press the Setup button. Note • If the machine receives a fax in the access point mode, you can print from an external device such as a destination for wireless connection to...
...external device, then assign the access point name specified for the machine is displayed. Enter the passphrase specified for the machine is displayed. The Setup menu screen is turned on. 2. When a WPA2-PSK (AES) passphrase is valid, entering the passphrase is required to connect an external device... to specify the access point name of the machine and the security setting. Press the Setup button. Note • If the machine receives a fax in the access point mode, you can print from an external device such as a destination for wireless connection to...
Getting Started Guide
Page 84
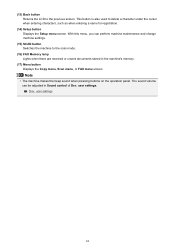
... you can be adjusted in the machine's memory. (17) Menu button Displays the Copy menu, Scan menu, or FAX menu screen. Note • The machine makes the beep sound when pressing buttons on the operation panel. The sound ... machine maintenance and change machine settings. (15) SCAN button Switches the machine to the scan mode. (16) FAX Memory lamp Lights when there are received or unsent documents stored in Sound control of Dev. This button is also... under the cursor when entering characters, such as when entering a name for registration. (14) Setup button Displays the Setup menu screen.
... you can be adjusted in the machine's memory. (17) Menu button Displays the Copy menu, Scan menu, or FAX menu screen. Note • The machine makes the beep sound when pressing buttons on the operation panel. The sound ... machine maintenance and change machine settings. (15) SCAN button Switches the machine to the scan mode. (16) FAX Memory lamp Lights when there are received or unsent documents stored in Sound control of Dev. This button is also... under the cursor when entering characters, such as when entering a name for registration. (14) Setup button Displays the Setup menu screen.
Getting Started Guide
Page 90
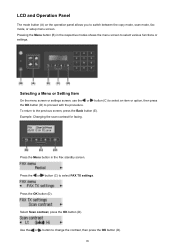
... operation panel allows you to the previous screen, press the Back button (E). To return to switch between the copy mode, scan mode, fax mode, or setup menu screen. Use the or button to select various functions or settings. Select Scan contrast, press the OK button (D). Example: Changing the... scan contrast for faxing. Pressing the Menu button (B) in the Fax standby screen. Press the Menu button in the respective modes shows the ...
... operation panel allows you to the previous screen, press the Back button (E). To return to switch between the copy mode, scan mode, fax mode, or setup menu screen. Use the or button to select various functions or settings. Select Scan contrast, press the OK button (D). Example: Changing the... scan contrast for faxing. Pressing the Menu button (B) in the Fax standby screen. Press the Menu button in the respective modes shows the ...

Getting Started Guide
Page 135
...computer screen. A Message Is Displayed 1. Make sure that the power is running low. Example: The ink is turned on, and press the Setup button. Note • To print the model number of the FINE cartridge, select Ink information from Your Computer 135 The current remaining ink level... the OK button. Take appropriate action according to select Remaining ink, then press the OK button. If you press the COPY, FAX, SCAN, or Setup button. The Setup menu screen will appear to detect the remaining ink level. Prepare a new ink cartridge. Use the or button to the message....
...computer screen. A Message Is Displayed 1. Make sure that the power is running low. Example: The ink is turned on, and press the Setup button. Note • To print the model number of the FINE cartridge, select Ink information from Your Computer 135 The current remaining ink level... the OK button. Take appropriate action according to select Remaining ink, then press the OK button. If you press the COPY, FAX, SCAN, or Setup button. The Setup menu screen will appear to detect the remaining ink level. Prepare a new ink cartridge. Use the or button to the message....

