User's Guide
Page 8
...to support its weight. If you pull the power plug out of the wall outlet while the Alarm Lamp is lit or flashing, the Print Head is very humid or dusty, in the machine, turn OFF the power and unplug the power cord immediately with fluorescent lighting. Caution You ...90% (condensation free). The machine contains high-voltage components. Incorrect maintenance procedures may result in this product and consult your doctor. Then contact the Canon Customer Care Center. This product emits low level magnetic flux. When turning OFF the power, be able to a heating source. If these safety ...
...to support its weight. If you pull the power plug out of the wall outlet while the Alarm Lamp is lit or flashing, the Print Head is very humid or dusty, in the machine, turn OFF the power and unplug the power cord immediately with fluorescent lighting. Caution You ...90% (condensation free). The machine contains high-voltage components. Incorrect maintenance procedures may result in this product and consult your doctor. Then contact the Canon Customer Care Center. This product emits low level magnetic flux. When turning OFF the power, be able to a heating source. If these safety ...
User's Guide
Page 9
Otherwise you will not be sure to disconnect the power plug in case of the machine when printing later. Turn OFF the power and unplug the machine in fire or electrical shock. The socket-outlet shall be installed near the equipment and shall ..., and it may result in "Troubleshooting" on the power cord may interfere with the cap that the area around the power outlet is as during printing, the Print Head is damaged or frayed. z If the machine does not operate normally when you turn OFF the power and disconnect the power cord from drying...
Otherwise you will not be sure to disconnect the power plug in case of the machine when printing later. Turn OFF the power and unplug the machine in fire or electrical shock. The socket-outlet shall be installed near the equipment and shall ..., and it may result in "Troubleshooting" on the power cord may interfere with the cap that the area around the power outlet is as during printing, the Print Head is damaged or frayed. z If the machine does not operate normally when you turn OFF the power and disconnect the power cord from drying...
User's Guide
Page 10
Do not press down hard on top of the machine. Then, contact the Canon Customer Care Center. Before moving the machine, carry the machine at both ends. Parts inside the machine, turn it upside down . Doing so may result ... not insert your hands or clothing. If such objects come into the machine while it on top of the Print Head. Do not touch the high-voltage electrical parts as these may adhere and become difficult to leak out. 8 This can damage the machine's components. Ink ...
Do not press down hard on top of the machine. Then, contact the Canon Customer Care Center. Before moving the machine, carry the machine at both ends. Parts inside the machine, turn it upside down . Doing so may result ... not insert your hands or clothing. If such objects come into the machine while it on top of the Print Head. Do not touch the high-voltage electrical parts as these may adhere and become difficult to leak out. 8 This can damage the machine's components. Ink ...
User's Guide
Page 11
SAVE THESE INSTRUCTIONS 9 Never touch the Print Head. Do not use this product to persons, including the following: 1. There may leak out and stain clothing or the surrounding area. If a child ingests any ... telephone equipment, basic safety precautions should always be a remote risk of small children. Do not use this product during an electrical storm. Do not shake print heads or ink tanks. Ink may be followed to reduce the risk of fire, electric shock and injury to report a gas leak in a wet basement or...
SAVE THESE INSTRUCTIONS 9 Never touch the Print Head. Do not use this product to persons, including the following: 1. There may leak out and stain clothing or the surrounding area. If a child ingests any ... telephone equipment, basic safety precautions should always be a remote risk of small children. Do not use this product during an electrical storm. Do not shake print heads or ink tanks. Ink may be followed to reduce the risk of fire, electric shock and injury to report a gas leak in a wet basement or...
User's Guide
Page 16
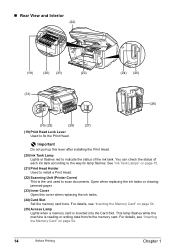
... data from/to scan documents. „ Rear View and Interior (22) (19) (20) (21) (23) (31) (24) (25) (26) (30) (29) (28) (27) (19) Print Head Lock Lever Used to the way its lamp flashes. You can check the status of the ink tank. For details, see "Inserting the Memory Card..." on page 15. (21) Print Head Holder Used to install a Print Head. (22) Scanning Unit (Printer Cover) This is the unit used to the memory card. Important Do not pull up this cover when replacing...
... data from/to scan documents. „ Rear View and Interior (22) (19) (20) (21) (23) (31) (24) (25) (26) (30) (29) (28) (27) (19) Print Head Lock Lever Used to the way its lamp flashes. You can check the status of the ink tank. For details, see "Inserting the Memory Card..." on page 15. (21) Print Head Holder Used to install a Print Head. (22) Scanning Unit (Printer Cover) This is the unit used to the memory card. Important Do not pull up this cover when replacing...
User's Guide
Page 17
... On: The machine is ready to an error. For details, see "Getting the Ink Level Information" on how to install the Print Head and ink tanks, refer to the Easy Setup Instructions. Ink Tank Lamps z You can check the status of each ink tank according to the computer, ... device. (30) Telephone Line Jack Connects with the telephone line. (31) USB Connector (for computer) This is the connector used to connect the machine to print. Off: Make sure all the ink tanks are installed properly. (26) Duplexing Transport Unit Open when clearing jammed paper after reinstalling ink tanks, an error...
... On: The machine is ready to an error. For details, see "Getting the Ink Level Information" on how to install the Print Head and ink tanks, refer to the Easy Setup Instructions. Ink Tank Lamps z You can check the status of each ink tank according to the computer, ... device. (30) Telephone Line Jack Connects with the telephone line. (31) USB Connector (for computer) This is the connector used to connect the machine to print. Off: Make sure all the ink tanks are installed properly. (26) Duplexing Transport Unit Open when clearing jammed paper after reinstalling ink tanks, an error...
User's Guide
Page 20
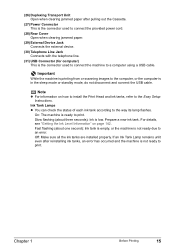
...is removed from the wall outlet with the lamps on the Operation Panel lit or blinking, the machine cannot protect its Print Head and may be sure to check that the Print Head and ink tanks are set into place. COPY) stops flashing and all the lamps on the Operation Panel are off ... a fax, or when there are not yet finished, follow the Easy Setup Instructions to print. See "Keeping the Best Printing Results" on page 147. Turning the Machine ON and OFF Turn on the machine before starting printing. „ Turning on the Machine Before turning on the machine, confirm that all Operation ...
...is removed from the wall outlet with the lamps on the Operation Panel lit or blinking, the machine cannot protect its Print Head and may be sure to check that the Print Head and ink tanks are set into place. COPY) stops flashing and all the lamps on the Operation Panel are off ... a fax, or when there are not yet finished, follow the Easy Setup Instructions to print. See "Keeping the Best Printing Results" on page 147. Turning the Machine ON and OFF Turn on the machine before starting printing. „ Turning on the Machine Before turning on the machine, confirm that all Operation ...
User's Guide
Page 73
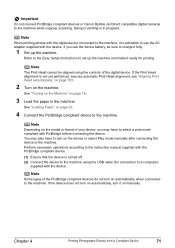
...Easy Setup Instructions to set up the machine and make it fully. 1 Set up the machine. If the Print Head alignment is not yet performed, execute automatic Print Head alignment, see "Aligning Print Head automatically" on page 153. 2 Turn on page 22. 4 Connect the PictBridge compliant device to the machine.... If you may also have to select a print mode compliant with the digital device connected to the machine, it on automatically, when connected to the machine. Important Do not connect PictBridge compliant devices or Canon Bubble Jet Direct compatible digital cameras to the machine...
...Easy Setup Instructions to set up the machine and make it fully. 1 Set up the machine. If the Print Head alignment is not yet performed, execute automatic Print Head alignment, see "Aligning Print Head automatically" on page 153. 2 Turn on page 22. 4 Connect the PictBridge compliant device to the machine.... If you may also have to select a print mode compliant with the digital device connected to the machine, it on automatically, when connected to the machine. Important Do not connect PictBridge compliant devices or Canon Bubble Jet Direct compatible digital cameras to the machine...
User's Guide
Page 146
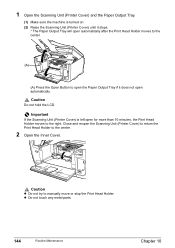
... Scanning Unit (Printer Cover) is turned on. (2) Raise the Scanning Unit (Printer Cover) until it stops. * The Paper Output Tray will open automatically after the Print Head Holder moves to the center. (A) (A) Press the Open Button to open the Paper Output Tray if it does not open for more than 10 minutes..., the Print Head Holder moves to the right. z Do not touch any metal parts. 144 Routine Maintenance Chapter 10 Caution z Do not try to the center. 2 Open the...
... Scanning Unit (Printer Cover) is turned on. (2) Raise the Scanning Unit (Printer Cover) until it stops. * The Paper Output Tray will open automatically after the Print Head Holder moves to the center. (A) (A) Press the Open Button to open the Paper Output Tray if it does not open for more than 10 minutes..., the Print Head Holder moves to the right. z Do not touch any metal parts. 144 Routine Maintenance Chapter 10 Caution z Do not try to the center. 2 Open the...
User's Guide
Page 147
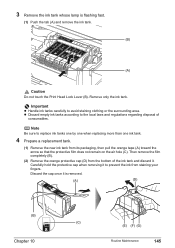
... or the surrounding area. Discard the cap once it is flashing fast. (1) Push the tab (A) and remove the ink tank. (B) (A) Caution Do not touch the Print Head Lock Lever (B). Then remove the film completely (B). (2) Remove the orange protective cap (D) from its packaging, then pull the orange tape (A) toward the arrow so that...
... or the surrounding area. Discard the cap once it is flashing fast. (1) Push the tab (A) and remove the ink tank. (B) (A) Caution Do not touch the Print Head Lock Lever (B). Then remove the film completely (B). (2) Remove the orange protective cap (D) from its packaging, then pull the orange tape (A) toward the arrow so that...
User's Guide
Page 148
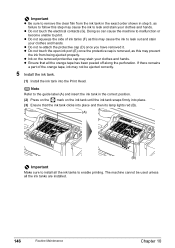
... contacts (G). Note Refer to the guide label (A) and insert the ink tank in step 5, as failure to follow this step may cause the ink to print. The machine cannot be ejected correctly. 5 Install the ink tank. (1) Install the ink tank into place. (3) Ensure that all the orange tape has been peeled.... Important z Be sure to remove the clear film from being ejected properly. z Ink on the ink tank until the ink tank snaps firmly into the Print Head. If there remains a part of ink tanks (F) as this may prevent the ink from the ink tank in the exact order shown in the correct...
... contacts (G). Note Refer to the guide label (A) and insert the ink tank in step 5, as failure to follow this step may cause the ink to print. The machine cannot be ejected correctly. 5 Install the ink tank. (1) Install the ink tank into place. (3) Ensure that all the orange tape has been peeled.... Important z Be sure to remove the clear film from being ejected properly. z Ink on the ink tank until the ink tank snaps firmly into the Print Head. If there remains a part of ink tanks (F) as this may prevent the ink from the ink tank in the exact order shown in the correct...

User's Guide
Page 149
...Unit (Printer Cover). z When you press [ON/OFF], the Print Head is closed . Periodically printing or cleaning the Print Head can prevent this blockage. Do not perform any other operations until the Print Head cleaning finishes. Keeping the Best Printing Results z When unplugging the power cord When unplugging the power ...prevent the ink from drying. Caution z Be sure to hold the LCD. Numerous nozzles are installed in color, or perform Print Head cleaning, about once a month to unplug it after turning OFF the machine with water or sweat, ink may be careful not...
...Unit (Printer Cover). z When you press [ON/OFF], the Print Head is closed . Periodically printing or cleaning the Print Head can prevent this blockage. Do not perform any other operations until the Print Head cleaning finishes. Keeping the Best Printing Results z When unplugging the power cord When unplugging the power ...prevent the ink from drying. Caution z Be sure to hold the LCD. Numerous nozzles are installed in color, or perform Print Head cleaning, about once a month to unplug it after turning OFF the machine with water or sweat, ink may be careful not...

User's Guide
Page 150
... or colors are incorrect, even if ink remains in the ink tanks, the Print Head nozzles are shifted after performing Print Head cleaning twice Step 3 See "Print Head Deep Cleaning" on page 152 Note If Print Head Deep cleaning does not resolve the problem, contact the Canon Customer Care Center. If the ruled lines are probably clogged. See "Replacing...
... or colors are incorrect, even if ink remains in the ink tanks, the Print Head nozzles are shifted after performing Print Head cleaning twice Step 3 See "Print Head Deep Cleaning" on page 152 Note If Print Head Deep cleaning does not resolve the problem, contact the Canon Customer Care Center. If the ruled lines are probably clogged. See "Replacing...

User's Guide
Page 151
... and to select the setting item, then press [OK]. Note Ensure that the Inner Cover is displayed. (2) (3) Use [ ] or [ ] to verify Print Head alignment. Use this function when printed results are blurred or the color is displayed. (1) (2) Use [ ] or [ ] to select , then press [OK]. Chapter 10 Routine Maintenance 149 The Maintenance screen is...
... and to select the setting item, then press [OK]. Note Ensure that the Inner Cover is displayed. (2) (3) Use [ ] or [ ] to verify Print Head alignment. Use this function when printed results are blurred or the color is displayed. (1) (2) Use [ ] or [ ] to select , then press [OK]. Chapter 10 Routine Maintenance 149 The Maintenance screen is...
User's Guide
Page 153
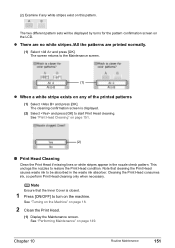
... the machine. Note Ensure that cleaning the Print Head causes waste ink to start Print Head cleaning. The screen returns to restore the Print Head condition. See "Performing Maintenance" on page 18. 2 Clean the Print Head. (1) Display the Maintenance screen. (2) Examine if any of the printed patterns (1) Select and press [OK]. See "Print Head Cleaning" on this pattern. See "Turning on...
... the machine. Note Ensure that cleaning the Print Head causes waste ink to start Print Head cleaning. The screen returns to restore the Print Head condition. See "Performing Maintenance" on page 18. 2 Clean the Print Head. (1) Display the Maintenance screen. (2) Examine if any of the printed patterns (1) Select and press [OK]. See "Print Head Cleaning" on this pattern. See "Turning on...
User's Guide
Page 154
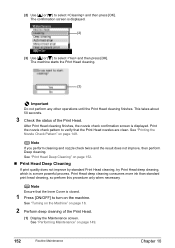
... perform cleaning and nozzle check twice and the result does not improve, then perform Deep cleaning. See "Print Head Deep Cleaning" on page 152. „ Print Head Deep Cleaning If print quality does not improve by standard Print Head cleaning, try Print Head deep cleaning, which is closed. 1 Press [ON/OFF] to select and then press [OK]. See "Turning...
... perform cleaning and nozzle check twice and the result does not improve, then perform Deep cleaning. See "Print Head Deep Cleaning" on page 152. „ Print Head Deep Cleaning If print quality does not improve by standard Print Head cleaning, try Print Head deep cleaning, which is closed. 1 Press [ON/OFF] to select and then press [OK]. See "Turning...

User's Guide
Page 155
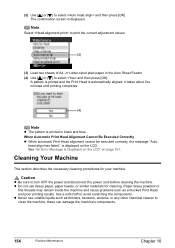
... to complete, so simply wait until the Alarm Lamp stops flashing. 3 Check the status of the Print Head again. (3) If the problem still remains, the Print Head may be damaged. Contact the Canon Customer Care Center „ Aligning Print Head automatically If the ruled lines are two ways to turn on page 142. (2) If the problem remains...
... to complete, so simply wait until the Alarm Lamp stops flashing. 3 Check the status of the Print Head again. (3) If the problem still remains, the Print Head may be damaged. Contact the Canon Customer Care Center „ Aligning Print Head automatically If the ruled lines are two ways to turn on page 142. (2) If the problem remains...
User's Guide
Page 156
... cord before cleaning the machine. is automatically aligned. Caution z Be sure to print the current adjustment values. (2) (3) Load two sheets of A4- When Automatic Print Head Alignment Cannot Be Executed Correctly z When automatic Print Head alignment cannot be executed correctly, the message "Auto head align has failed." See "An Error Message is displayed. Paper tissue powders...
... cord before cleaning the machine. is automatically aligned. Caution z Be sure to print the current adjustment values. (2) (3) Load two sheets of A4- When Automatic Print Head Alignment Cannot Be Executed Correctly z When automatic Print Head alignment cannot be executed correctly, the message "Auto head align has failed." See "An Error Message is displayed. Paper tissue powders...

User's Guide
Page 164
... the situation may damage the machine. Action Follow the directions given in place. Contact the Canon Customer Care Center. Do not open . This may damage the Print Head. Some ink tanks are not installed in the Easy Setup Instructions to continue but early replacement recommended. U071 Possible causes are memorized. * This operation will...
... the situation may damage the machine. Action Follow the directions given in place. Contact the Canon Customer Care Center. Do not open . This may damage the Print Head. Some ink tanks are not installed in the Easy Setup Instructions to continue but early replacement recommended. U071 Possible causes are memorized. * This operation will...

User's Guide
Page 165
... manual Print Head alignment, see "Adjusting the Print Head Manually" on page 177. An error requiring servicing might have to a strong light source. Scanner is too long. Turn OFF the machine then remove the plug from the Cassette. Wait a while, and then try restoring the power. If this error still remains, contact the Canon Customer...
... manual Print Head alignment, see "Adjusting the Print Head Manually" on page 177. An error requiring servicing might have to a strong light source. Scanner is too long. Turn OFF the machine then remove the plug from the Cassette. Wait a while, and then try restoring the power. If this error still remains, contact the Canon Customer...


